Scribus, the popular free open-source desktop publishing software, announced the new stable 1.6.x release series on the first day of 2024!
It’s been more than 4 years since the last stable 1.4.8, while 1.5.x release series is available as development branch.
The new Scribus 1.6 includes many new features! If you have the default 1.5.8 dev package from Ubuntu system repository, then most of them are already in use.
Features include:
Resource Manager for online resources such as dictionaries
canvas rendering improvements on Hi-DPI screens.
New commands added to scripting engine
New PDF-based output preview
Adobe® Illustrator® look like “Symbol” or clone feature.
This simple tutorial shows how to install the most recent xxHash for faster hash checking in Ubuntu Linux.
xxHash is extremely fast non-cryptographic hash algorithm, working at RAM speed limit. It can be useful to check integrity for large amounts of data, index data, and/or used in cryptographic applications like digital signatures.
The library includes the following algorithms:
XXH32 : generates 32-bit hashes.
XXH64 : generates 64-bit hashes.
XXH3/XXH128 (since v0.8.0): generates 64 or 128-bit hashes, using vectorized arithmetic.
I’m new to hash algorithm, but doing hash check regularly when trying out different Linux distributions. And I use sha256, since the most sites provide sha256sum files for the hash code of their disco images.
This is a step by step beginner’s guide shows how to install VS Code IDE and keep it up-to-date in Ubuntu 22.04, Ubuntu 24.04, Ubuntu 25.04 using 3 different ways.
Microsoft provides official code packages for Linux through native .deb (for Debian/Ubuntu), .rpm (for Fedora/SUSE), and universal Snap package run in sandbox.
For choice, there’s also a community maintained Flatpak package which also runs in sandbox.
So, there are 3 common ways to install this IDE in your Ubuntu Desktop!
Gnome Files, aka the default Nautilus file manager in Ubuntu & Fedora workstation, keeps moving with new features!
In the passed few month, there are minor but beginner friendly features merged into this popular file manager. They include “Enter Location” menu option, sidebar toggle button in sidebar, and badge icon to folder icon in ‘properties’ dialog.
NOTE: The new features introduced in this post are merged to master branch but NOT released yet! They may be available in next GNOME versions, backport to current, or even removed!
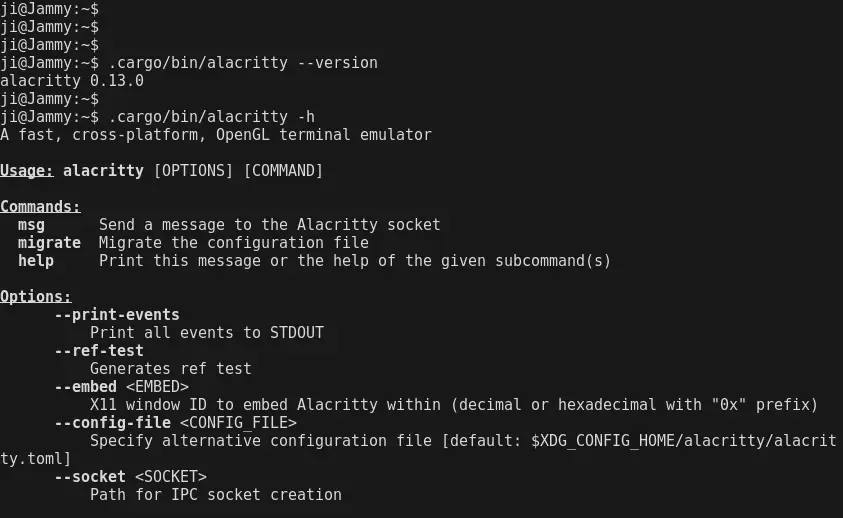
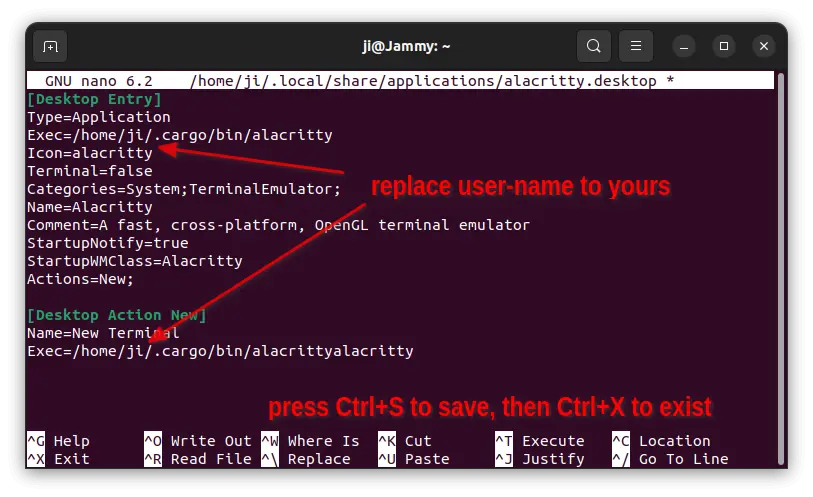
Alacritty, the popular free open-source GPU-accelerated terminal emulator, release new major 0.13.0 version few days ago.
The release introduced new features, including persist config option in hints config section, warnings for unused configuration file options, support for keybindings with dead keys, dynamically loading conpty.dll on Windows, as well as:
Back/Forward mouse buttons support in bindings
Copy global IPC options (-w -1) for new windows
Bindings to create and navigate tabs on macOS
Support startup notify protocol to raise initial window on Wayland/X11
Debug option prefer_egl to prioritize EGL over other display APIs
Inline vi-mode search using f/F/t/T
window.blur config option to request blur for transparent windows
--option argument for alacritty msg create-window
Support for DECRQM/DECRPM escape sequences
Support for kitty’s keyboard protocol
The release now uses TOML instead of YAML for configuration files. Run alacritty migrate command will automatically convert all the configuration files.
Other changes include:
Bundle mode-specific bindings in any mode.
Disable OSC 52 paste ability by default.
Deprecated draw_bold_text_with_bright_colors, key_bindings, and mouse_bindings.
Alacritty, is a free and open-source terminal emulator, written in Rust programming language. It works in Linux, Windows, MacOS, and uses OpenGL API for GPU hardware acceleration for fast response and high performance.
The terminal emulator features vi mode, allows to move around the viewport and scrollback using the keyboard. And, vi search and normal search for anything in the scrollback buffer.
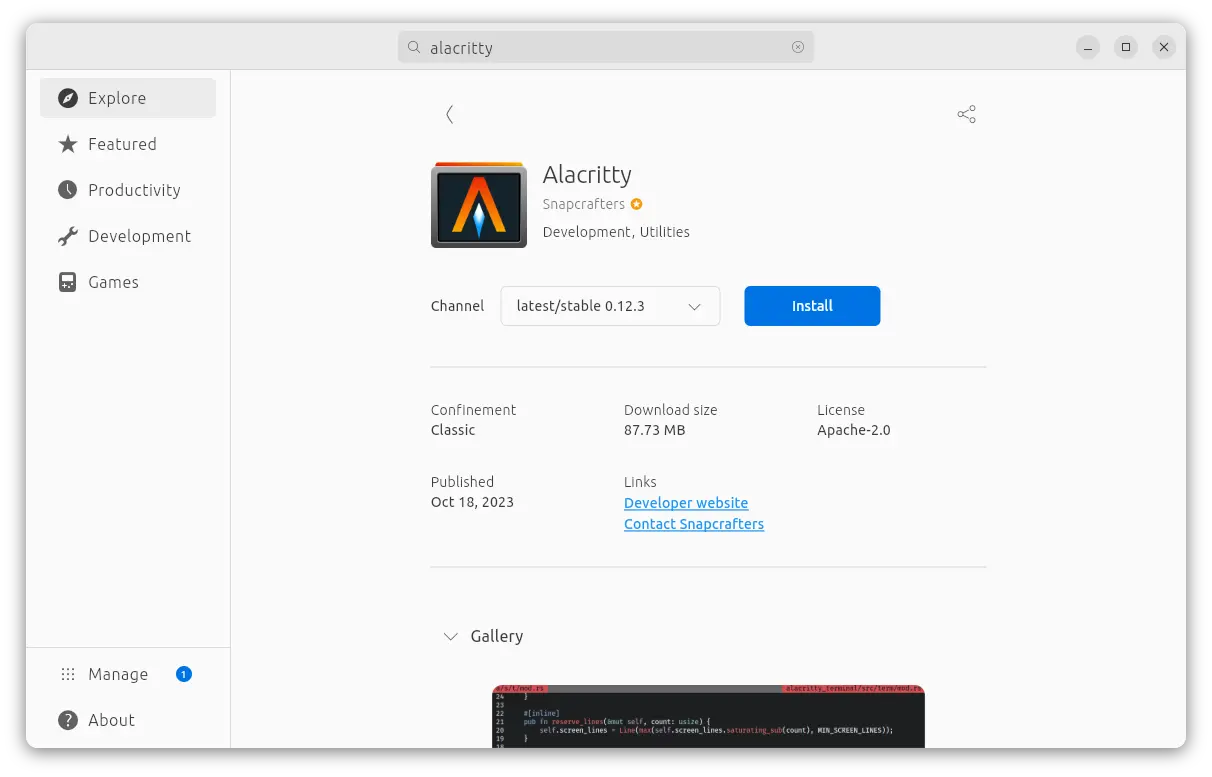
Option 1: Install Alacritty via Snap package
For Ubuntu users, the easily way to install the terminal emulator is using the Snap package. It’s available in Ubuntu Software (App Center for 23.10), though run in sandbox.
Alacritty terminal emulator in App Center
Or, user can install it by running the command below in terminal:
snap install alacritty --classic
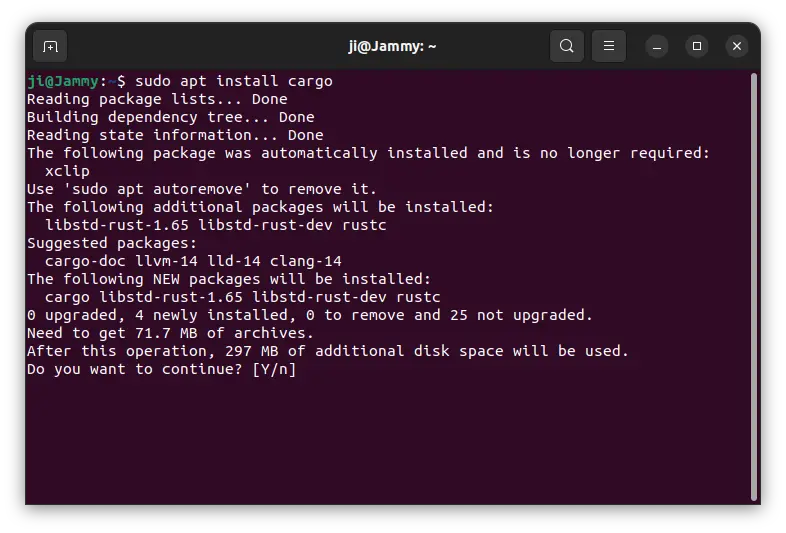
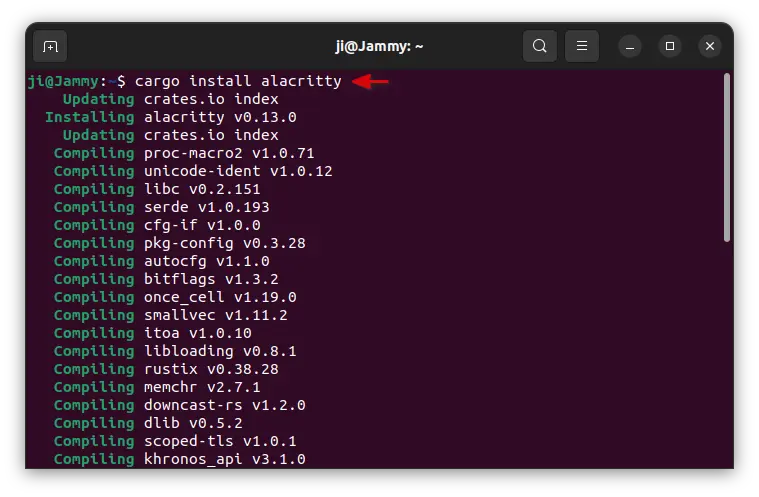
Option 2: Install Alacritty through Cargo (official)
The terminal emulator is also available to install through Cargo, the Rust package manager.
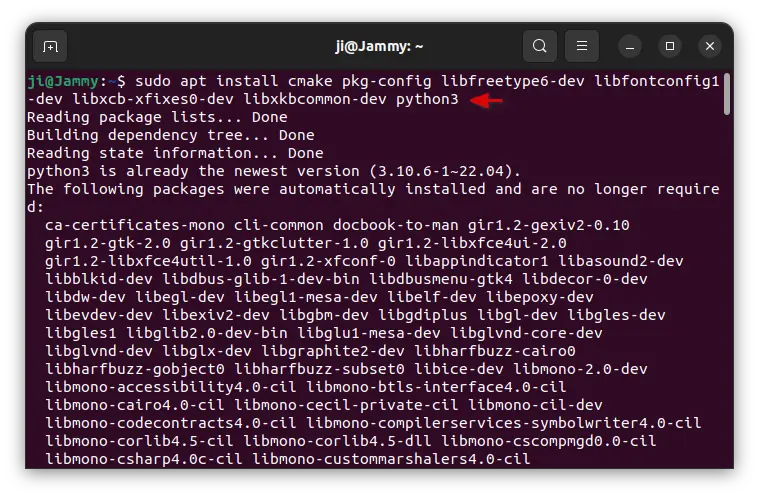
1. Just open terminal (Ctrl+Alt+T) and run command to install Cargo first:
sudo apt install cargo
2. Then, install the required dependency packages:
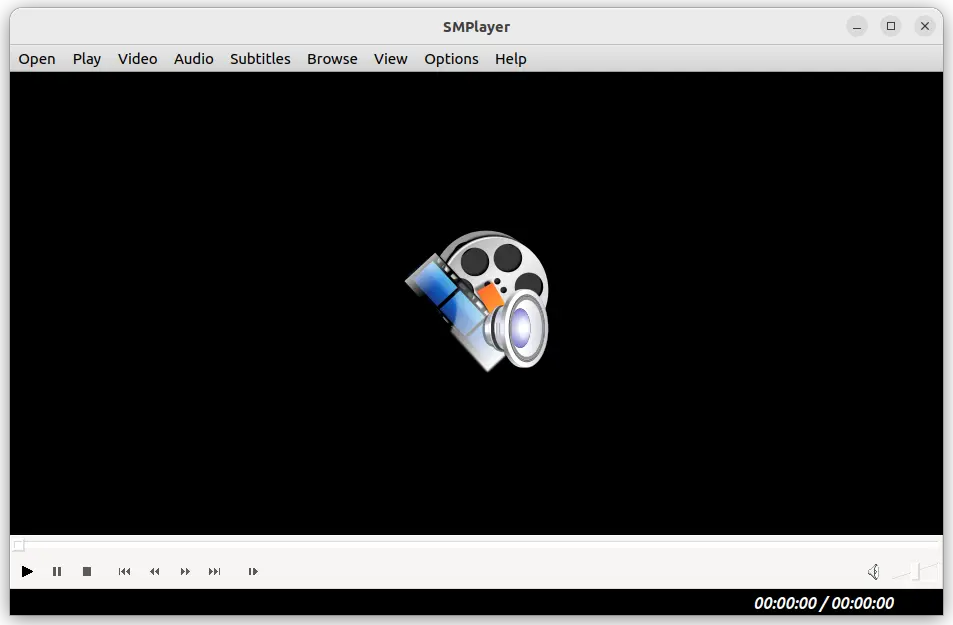
SMPlayer media player released version 23.12 few days ago, with important bug-fixes and new API.
The new released fixed the compatibility issues when using MPV 0.37 as backend. They include video playback can not be resumed from pause, as well as the issue getting the audio and video codec on mpv 0.37.
SMPlayer 23.12 also implemented the new OpenSubtitles API. Since, the old API on OpenSubtitles.org is deprecated, and to be turned off by the end of 2023. If you use the service for getting subtitles, then it’s highly recommended to upgrade as soon as possible.
SMPlayer 23.12
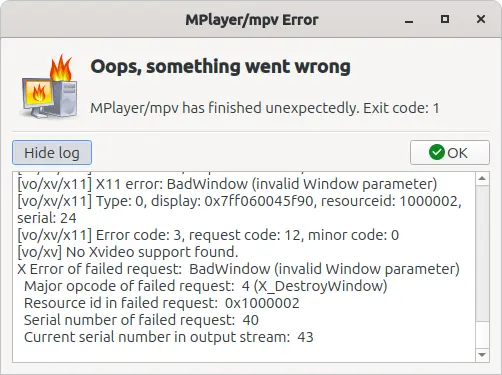
For Ubuntu 23.10, the SMPlayer 22.7.0 installed from system repository, either freezes or pops-up following error on video playback:
“Oops, something went wrong. MPlayer/mpv has finished uxexpectedly. Exit code: 1”
The issue has been fixed in my test by installing the new version 23.12.
Other changes in SMPlayer 23.12 include:
Fix loading playlists with extension m3u8.
Fix video jitter/shudder when clicking on timeline bar.
Other bug fixes.
How to Install SMPlayer 23.12
The player provides official .exe for Windows, .dmg for MacOS, and .rpm/.deb/.snap/.flatpak/.AppImage for Linux, which as available to download at Github releases page:
For Ubuntu, user can choose to install the Snap package (run in sandbox), directly from Ubuntu Software or App Center. Or, use the official PPA (with ARM devices support) by running the commands below one by one:
sudo add-apt-repository ppa:rvm/smplayer
sudo apt update
sudo apt install smplayer
It somehow does not provide package for Ubuntu 23.10. However, download & install the package for 22.04 works good in my case in 23.10 laptop.
For Debian from version 8 to 12 (Bookworm), SMPlayer is also available to install in both amd64 and i386 through the OBS repository.
Uninstall
For Ubuntu user, depends on which package you installed, either remove Snap from Ubuntu Software.
Or, remove the .deb package by running command in terminal (Ctrl+Alt+T):
sudo apt remove --autoremove smplayer
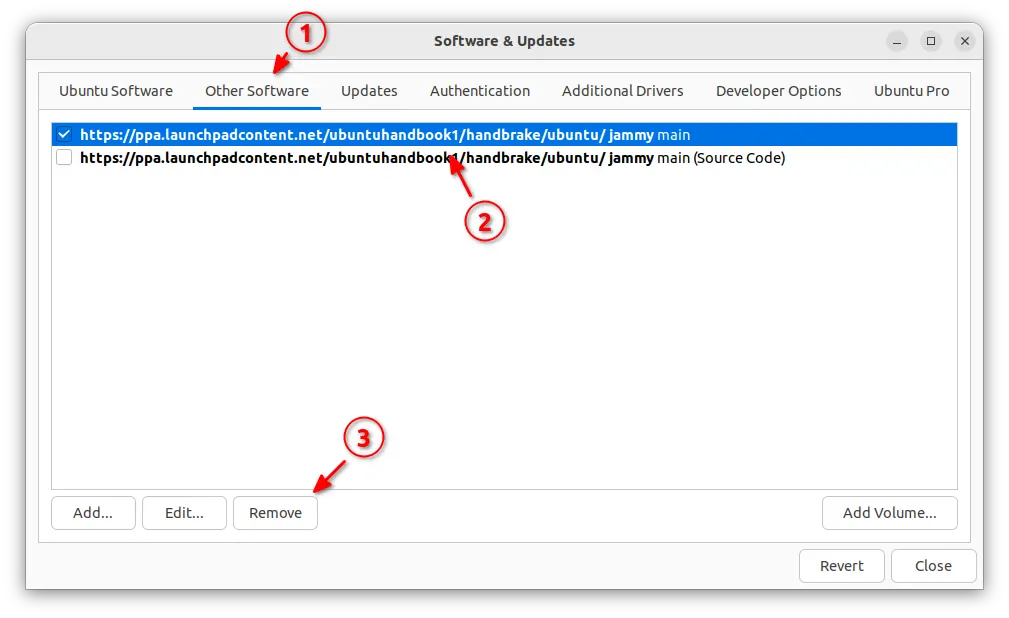
If the PPA was added, either remove it from “Software & Updates” tool under “Other Software” tab, or run command in terminal:
Next, open the Downloads folder, then either double click on the package or use right-click menu “Open With Other Application” and select open the .deb package you just downloaded via Software Install (or App Center). Finally, click install button to install it.
NOTE: The installing process may fail sometimes due to old package in your system, in the case, just uninstall the old one (go to bottom for how) then try to re-install again.
Once installed, search for and launch it either from start menu or ‘Activities’ overview depends on your desktop environment.
Step 2: Add VirtualBox repository to keep it up-to-date
The .deb package you installed via ‘Step 1’ used to automatically add the repository. However, it does NO longer do the trick in recent versions.
So, here’s how to do it step by step via the new Ubuntu PPA policy.
1. Download & install the key
First, press Ctrl+Alt+T on keyboard to open up a terminal window.
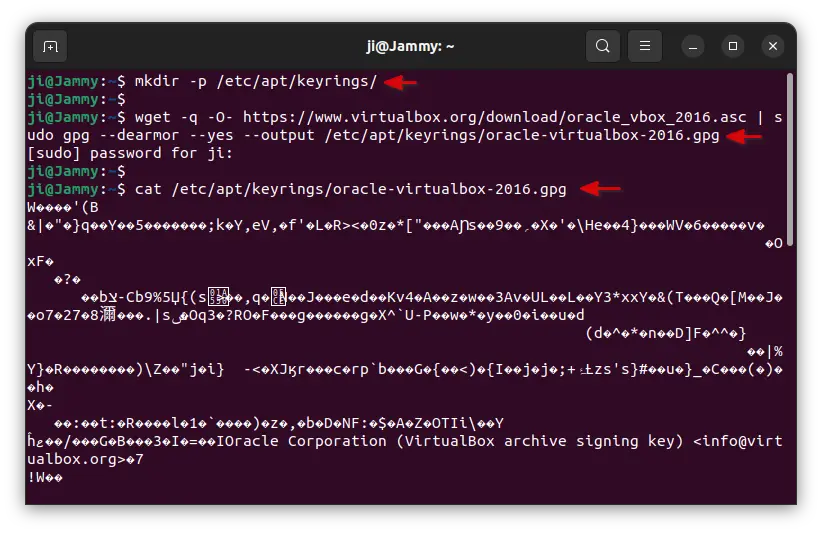
When it opens, run command to make sure “/etc/apt/keyrings” directory exist:
sudo mkdir -p /etc/apt/keyrings
Then, run command to use wget to download key, dearmor it (so unreadable), and finally save it to that directory:
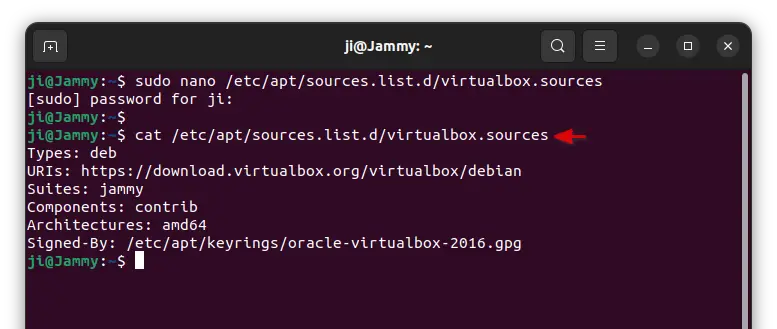
You can finally verify the key file, by running command:
cat /etc/apt/keyrings/oracle-virtualbox-2016.gpg
As the screenshot above shows you, it should outputs unreadable text.
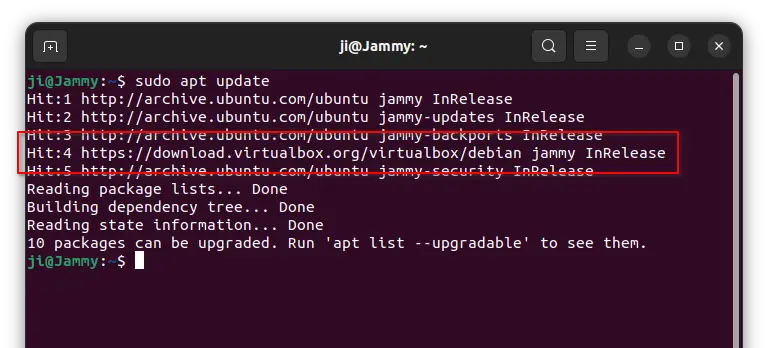
2. Add VirtualBox repository
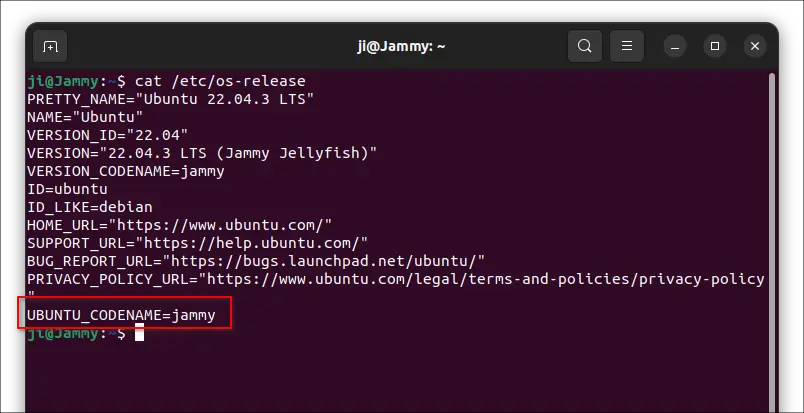
Before adding the source repository, first run command to get system code name:
cat /etc/os-release
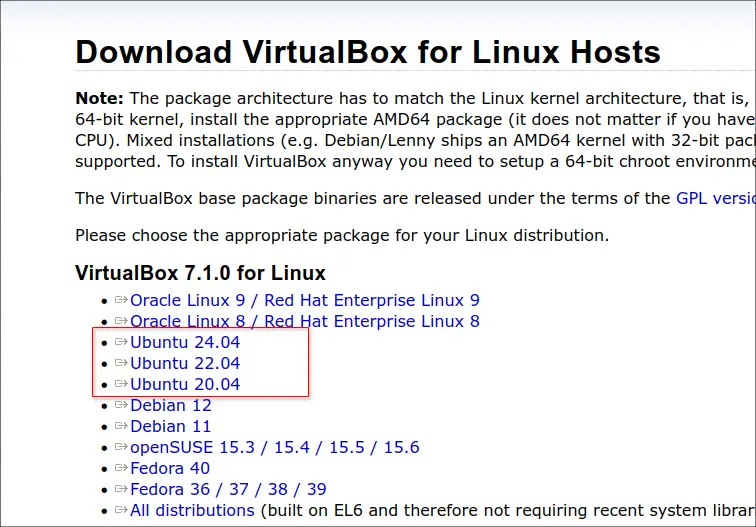
The apt repository so far only support Debian Stable (& old stable), Ubuntu 22.04 & 20.04 LTS (focal, jammy). For all their based systems, use the code-name you got via this command.
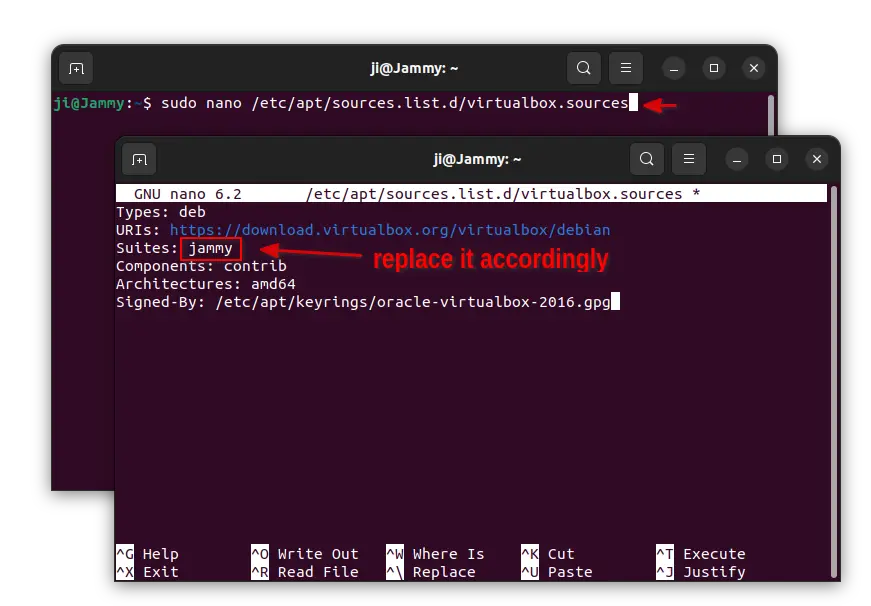
Then, in terminal window, run command to create & edit a sources file:
This simple tutorial shows how to install and setup the rEFInd boot manager in your Ubuntu 22.04, and/or Ubuntu 24.04 computer.
Most Linux uses Grub2 as default boot-loader. Though, there’s a good alternative called rEFInd. It’s a free open-source boot manager for EFI/UEFI enabled computers, such as all Intel-based Macs and recent (most 2011 and later) PCs.
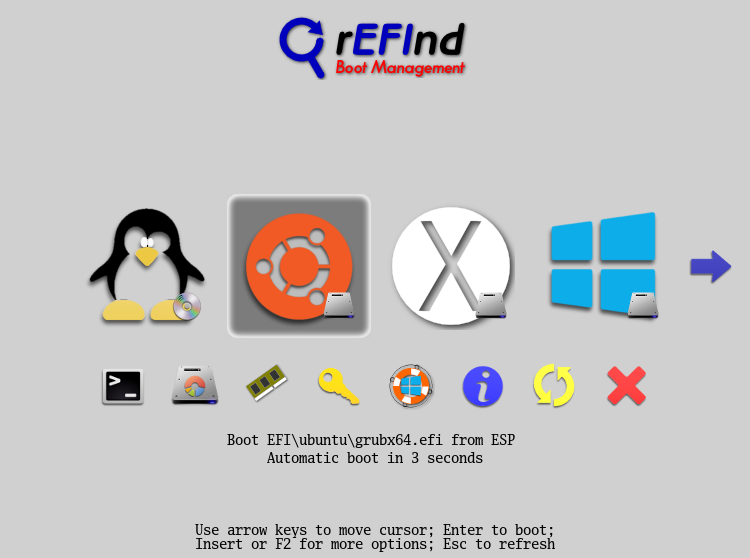
rEFInd with Matrix theme
Why rEFInd:
Compare to Grub2, rEFInd has a more eye candy boot interface, and a simple and easy to tweak config file.
No need to update something, it auto-scans for all boot-able systems on every boot, and displays you the OS menu entries from both local disk and removable device, such as USB drive and CD-R.
It’s more reliable at booting Windows with Secure Boot active. And, it provides handy options to shutdown, restart, and/or go to BIOS settings.
How to Install rEFInd:
The boot manager is quite easy to install in Debian, Ubuntu, and Linux Mint, since it’s available in system repositories.
1. First, launch terminal (press Ctrl+Alt+T on keyboard) and run command to verify if UEFI enabled on your machine:
ls /sys/firmware/efi
The command will list content of ‘/sys/firmware/efi‘. It will show you No such file or directory, if UEFI not enabled.
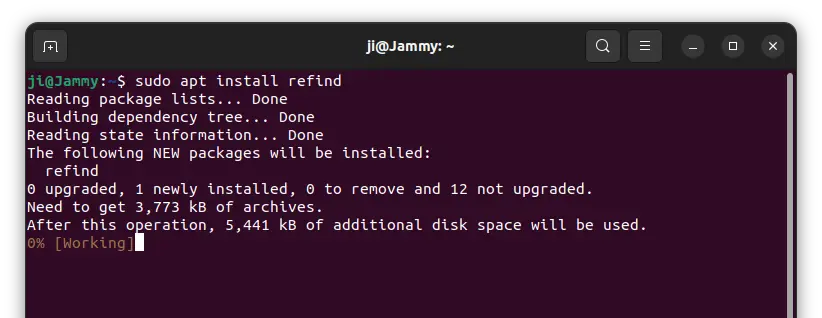
2. To install rEFInd from system repository, simply run command:
sudo apt install refind
The package in system repository may be old. To install the most recent version, use the official PPA maintained by software developer.
Run command to add the PPA:
sudo add-apt-repository ppa:rodsmith/refind
Update system package index:
sudo apt update
Finally, re-run apt install command to install the package:
sudo apt install refind
Remove duplicate icons in boot menu
After installing rEFInd, you can now restart your machine to see the new boot menu.
In menu, use left/right arrow keys to switch menu entries, hit Enter to boot, or press Tab (or F2) for more options.
For duplicate icons issue, simply use left/right arrow to select the icon (menu entry), and hit Delete key on keyboard, finally answer yes to remove that icon (menu entry). Though, deleting icon may NOT work when 3rd party theme is in use.
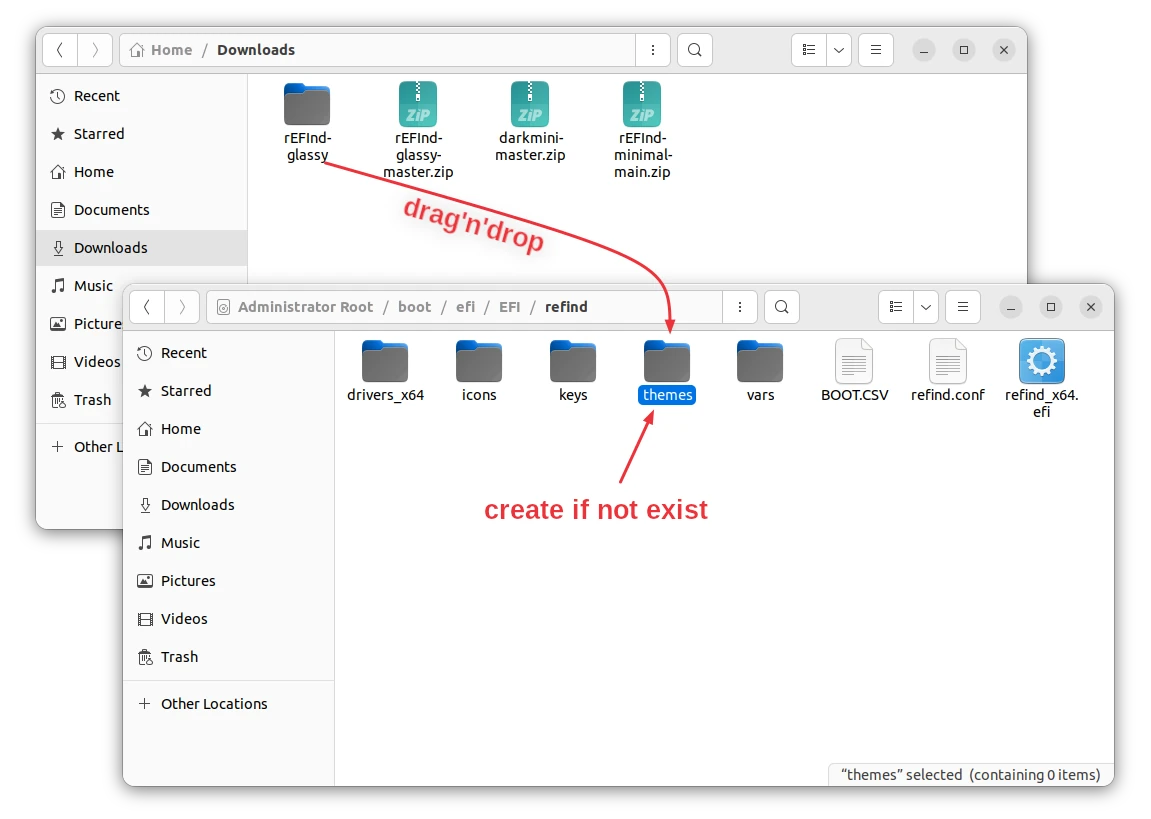
Install Themes
The menu interface is easy to tweak by editing the refind.conf file under “/boot/efi/EFI/refind/” directory. Every option has description text telling what does it do and how it works.
Most themes have how to install steps in Readme file, they are usually:
Open “Files”, and navigate to “Other Location -> Computer (or system, root, etc) -> boot -> efi -> EFI -> refind”. (Some Desktop may need to open File Manager as root first!)
Create “themes” folder in that directory if not exist.
Drag and drop the themes you downloaded (extract & re-name first) into that “themes” folder.
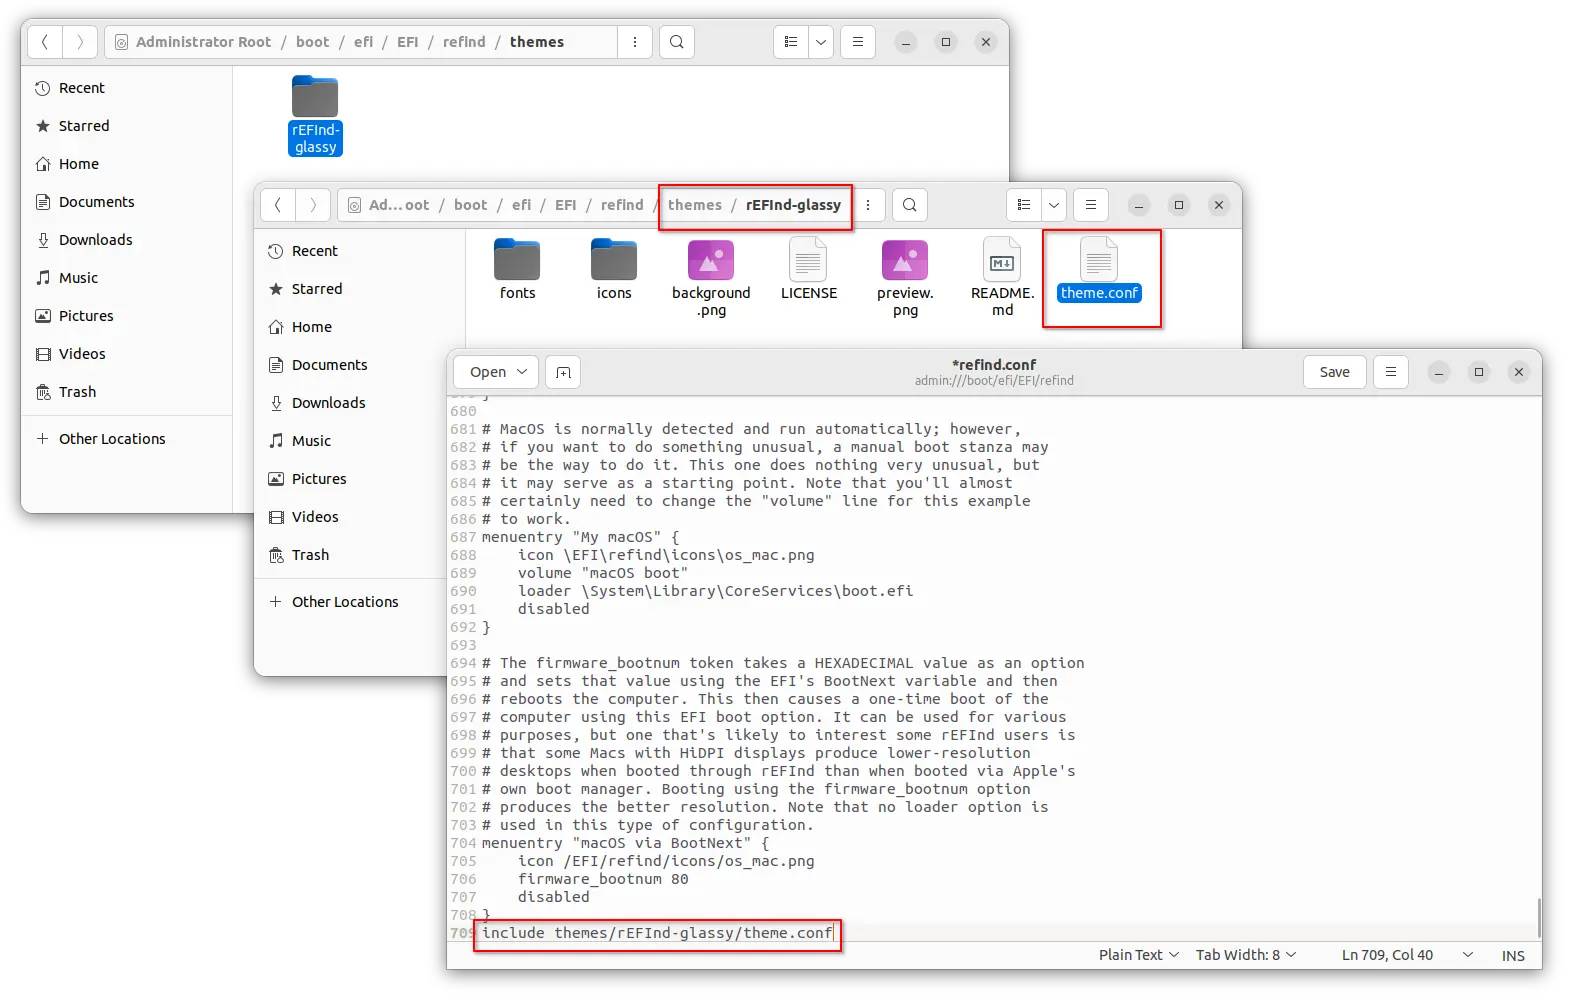
Finally, apply new theme by editing the refind.conf file under “/boot/efi/EFI/refind/“, and adding new line in the end (replace rEFInd-glassy accordingly):
include themes/rEFInd-glassy/theme.conf
NOTE: the theme folder name, rEFInd-glassy in the case, is unique according to the PATH to icons/imgs in ‘theme.conf’ file.
In case the boot menu screen resolution is low, you may also add (or uncomment by removing #) resolution max line to set the maximum available resolution, or use resolution 1024 768 for certain resolution (Note that not all resolutions are supported).
Uninstall:
To uninstall refind in Debian and Ubuntu based systems, open terminal and run command:
sudo apt remove --autoremove refind
Also remove the PPA (if added) by running command:
HandBrake, the popular free open-source video transcoder, released a new update for the new 1.7 series yesterday.
The new release fixed encoding issue for AMD VCN, MPEG-2, MPEG-4, NVIDIA NVENC, and VP9 encoders, which could cause the creation of an excessive number of keyframes.
It fixed unintentional automatic pass through of closed caption side data when using NVIDIA NVENC encoder.
For Linux, the release includes performance improvements by removing duplicate graphic assets and reducing file size, as well as fixes to Flatpak file chooser, file destination path, and memory leaks in the graphical interface.
Other changes include:
Improved automatic selection of Dolby Vision Level
Fixed crash opening an empty folder, and crash using VideoToolbox encoders on Apple Silicon Ultra.
Workaround to prevent issues decoding H.264 video on Mac OS.
Added Automation Properties to some controls on the audio tab to assist screen readers for Windows.
Fixed NVIDIA NVDEC option being ignored in Windows.
Miscellaneous bug fixes and improvements
How to Install HandBrake 1.7.2
HandBrake provides official Windows, MacOS, and Linux packages available to download at Github releases page under Assets
For Linux users, it’s Flatpak package which also available in Flathub repository, though NOT updated at the moment of writing.
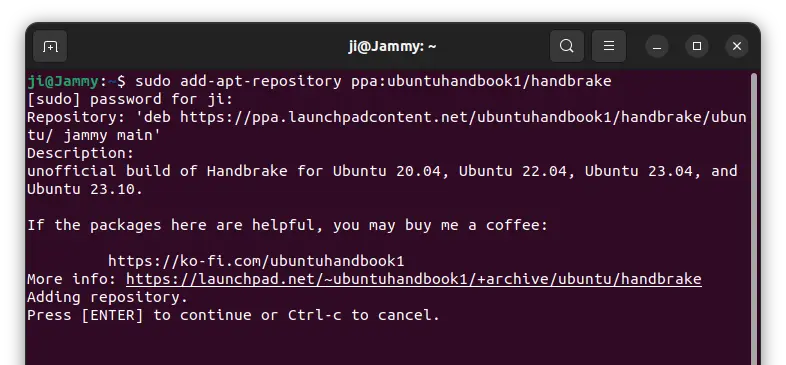
For Ubuntu & Linux Mint users who prefer the classic .deb package, I’ve uploaded the package into this unofficial PPA for Ubuntu 20.04, Ubuntu 22.04, Ubuntu 23.04, and Ubuntu 23.10.
1. First, press Ctrl+Alt+T on keyboard to open terminal. When it opens, run command to add the PPA:
Type user password (no asterisk feedback) when it asks and hit Enter to continue.
2. Linux Mint users need to manually update the system package cache, after adding PPA, by running command:
sudo apt update
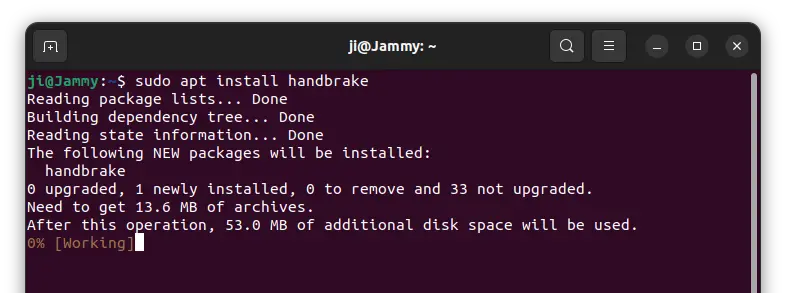
3. Finally, install the new HandBrake package via command:
sudo apt install handbrake
For choice, you may also run sudo apt install handbrake-cli to install the command line tool
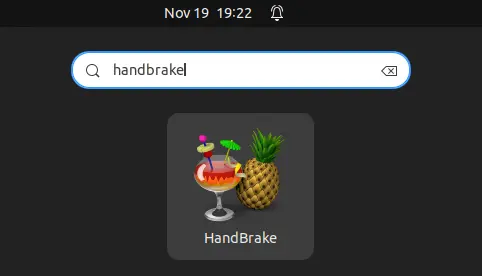
When installation done, search for and launch the video transcoder from either start/application menu or ‘Activities’ overview depends on your desktop environment.
Uninstall:
To uninstall the Ubuntu PPA, either open terminal (Ctrl+Alt+T) and run command: