GNOME Desktop considers adding a new core application for audio playback!
It’s Decibels, a basic free open-source audio player that is supposed to fill the gap of GNOME currently not having a Core app that is designed to open single audio files.
The app has a stupid simple user interface that works in both Linux Desktop and Mobile devices. It features:
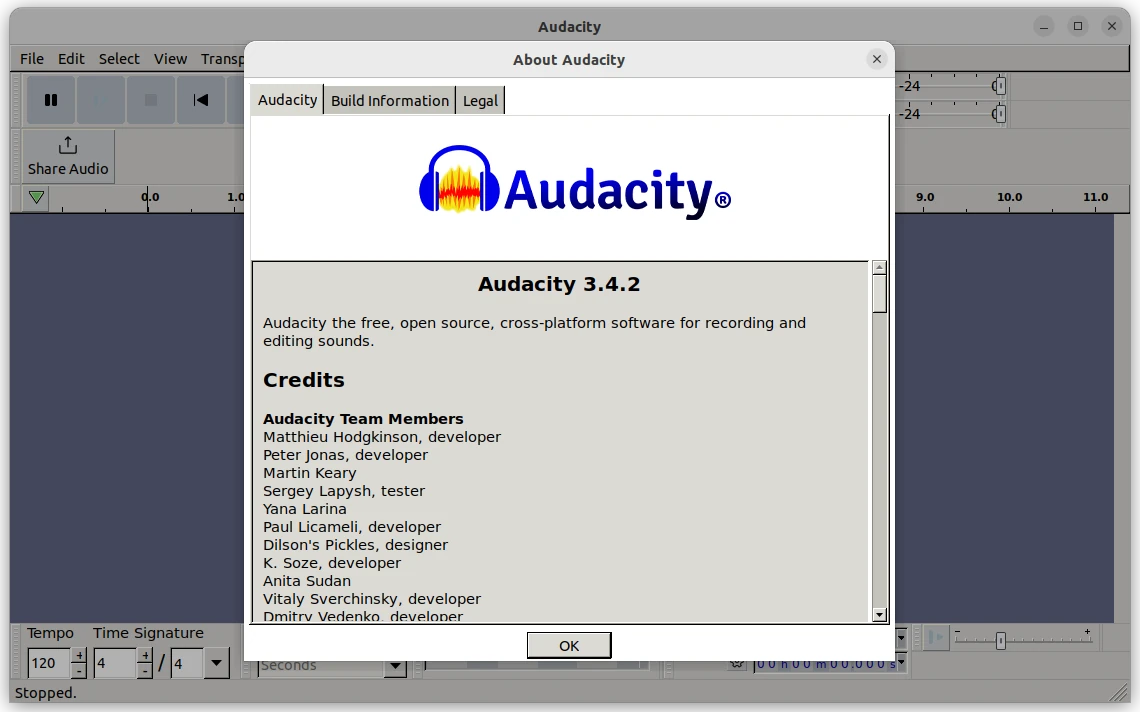
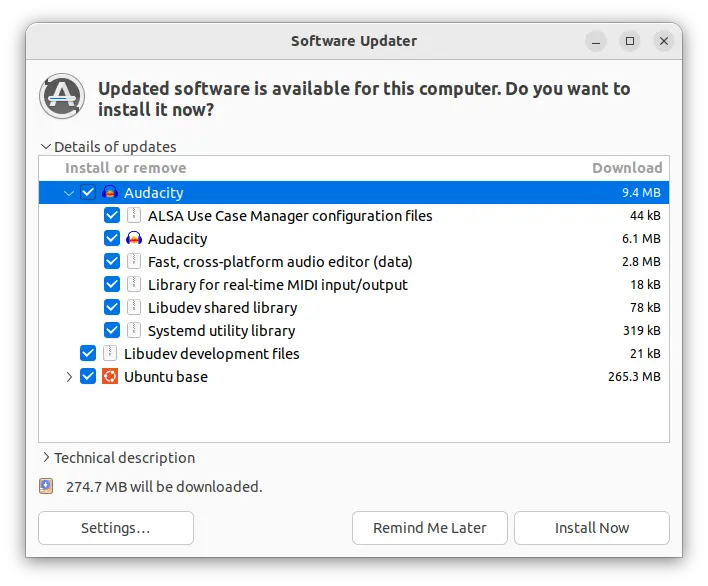
For users of Audacity 3.4.x, the popular audio editor and recorder app just announced the second update for this release series.
It’s Audacity 3.4.2 that includes following bug-fixes:
Fix crash when opening projects with zero-length clips.
Fix a crash when clearing loops.
Fix Nyquist-related crashes.
Fix a crash when closing Audacity.
When exporting a file, the sample rate of the tracks is now considered, and last-used sample rate is remembered.
Copy-pasting now pastes into audio again by default. Though, there’s an option to change in Preferences.
Mix and render now also resets the gain for the resulting track.
Fix clips shifting to the right when effects are applied to them.
Fix clicks occurring when overdubbing a project with muted tracks.
Fix files being exported without a file extension in rare cases.
Show all sample rates possible for MP2 exports.
Fix pasting into labels.
Fix copying when “select all audio if selection required” is enabled.
Fix GTK detection and compilation for wxWidgets 3.2.4.
Fix EQs in macros.
Fix builds on armhf.
How to Install Audacity 3.4.2
Audacity is available to install Ubuntu Linux through a few different ways. They include AppImage, Ubuntu PPA, and Flatpak. Just choose either one that you prefer.
Option 1: AppImage (official)
It provides official macOS .dmg, Windows .exe, and Linux .AppImage packages available to download at the link below:
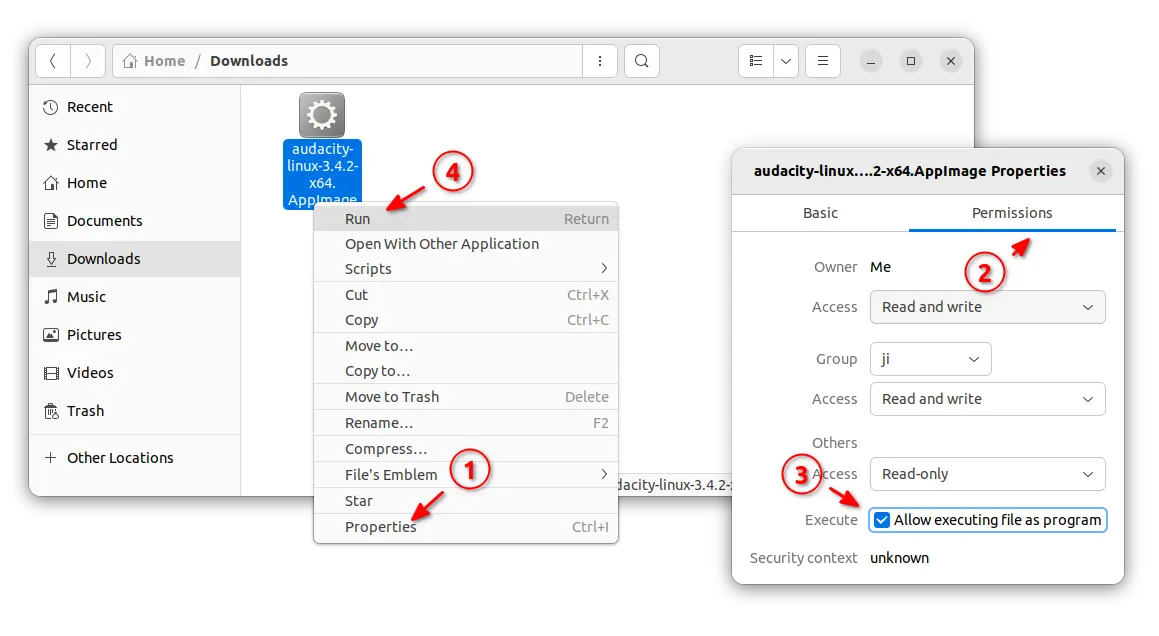
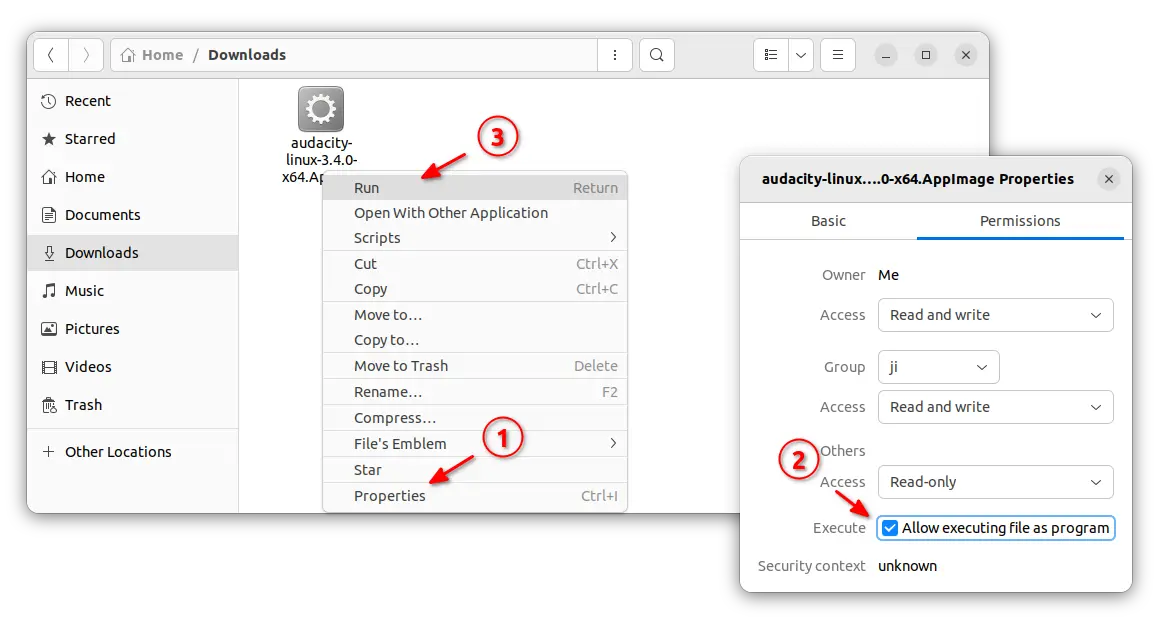
For Linux, click expand the “Assets” section and choose download the .AppImage package.
Then, right-click on the .AppImage file and go to its ‘Properties’ dialog. Add executable permission by enable ‘allow executing file as program‘. Finally, right-click on it and select “Run” to launch Audacity.
Option 2: Ubuntu PPA
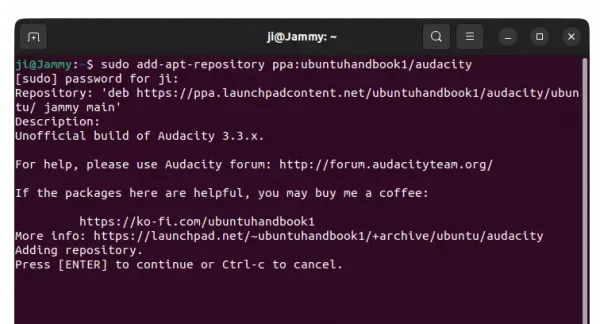
For choice, I’ve uploaded the new release package into unofficial PPA for Ubuntu 22.04, 23.04, and Ubuntu 23.10 with amd64, arm64, and armhf support.
1. First, press Ctrl+Alt+T on keyboard to open terminal. When terminal opens, run command to add the PPA:
Audacity audio editor and recording tool announced the new major 3.4.0 release after almost 2 weeks of beta testing.
The new release features Beats and measures grid, allows to easily align audio clips to the musical tempo and rhythm. It shows you the subdivisions of each measure depending on zoom level, and you can snap clips to the nearest beat.
It also features new time stretching algorithm, allows to change the duration of your audio clips without affecting their pitch non-destructively. Just hold “Alt” (macOS: Option) while hovering over the top third of a clip edge to stretch it.
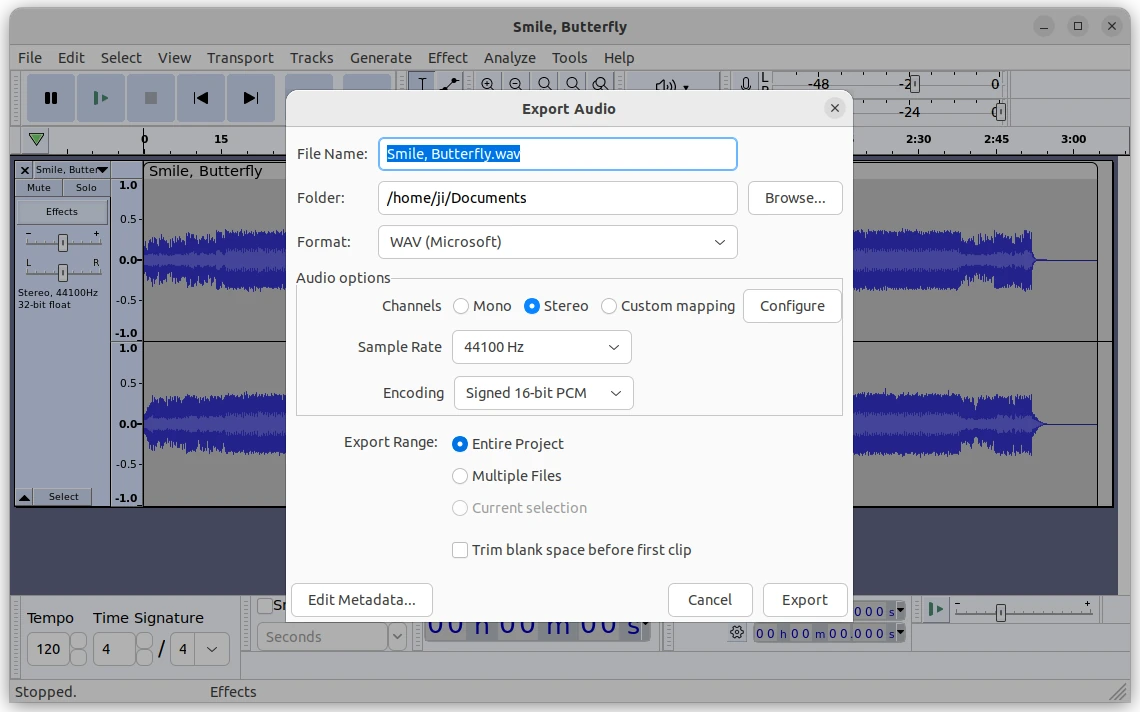
The 3.4.0 also features a new export dialog with easier access to options such as sample rate and custom mapping (for 5.1 or 7.1 audio). Additionally, the “Browse” button uses the native file browser now!
For Linux, click expand the “Assets” section and choose download the .AppImage package.
Then, right-click on the .AppImage file and go to its ‘Properties’ dialog. Add executable permission by enable ‘allow executing file as program‘. Finally, right-click on it and select “Run” to launch Audacity.
Option 2: Ubuntu PPA
For choice, I’ve uploaded the new release package into unofficial PPA for Ubuntu 22.04, 23.04, and Ubuntu 23.10.
NOTE:Due to bug, arm64 and armhf packages are excluded in the PPA until the bug-fix due in next point release.
1. First, press Ctrl+Alt+T on keyboard to open terminal. When terminal opens, run command to add the PPA:
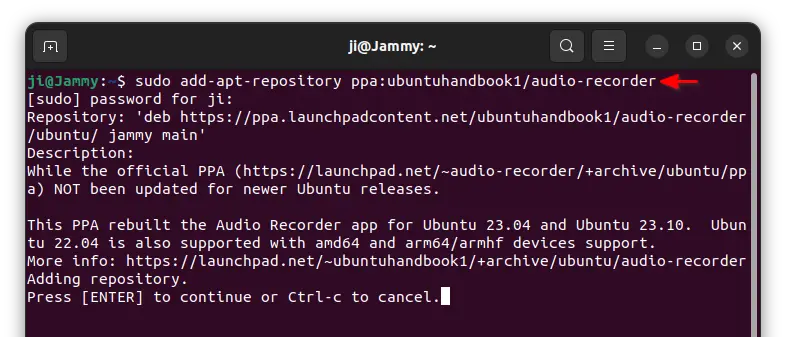
For those who want to install the simple Audio Recorder application in Ubuntu 23.10 and Ubuntu 24.04, here’s new Ubuntu PPA.
UPDATE: The PPA support until Ubuntu 24.04. No longer updates for 24.10 and higher due to lack of upstream source development!!
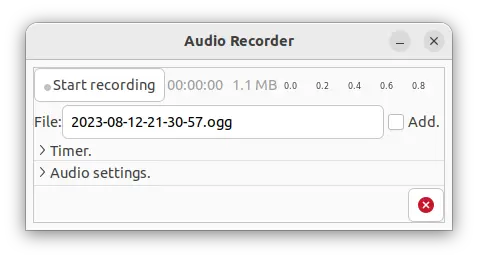
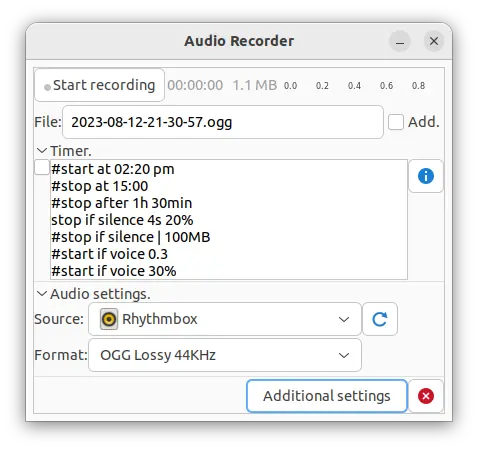
Audio Recorder is a free open-source GTK3 audio recording application for Linux. It has a stupid simple user interface, while can record any sound from your computer.
Audio Recorder simple UI
This app can record sound from your speaker, microphone, music player applications, and mixed source, such as recording speaker and microphone at the same time.
Sound can be recorded into OGG, FLAV, MP3, WAV, OPUS, M4A audio formats. And, it has a timer to start/stop recording automatically on given time and/or voice, silence.
This audio recorder is one of my most favorite Linux applications. But don’t know why, it’s excluded in Debian/Ubuntu repositories. And, the official Ubuntu PPA support so far until Ubuntu 22.04.
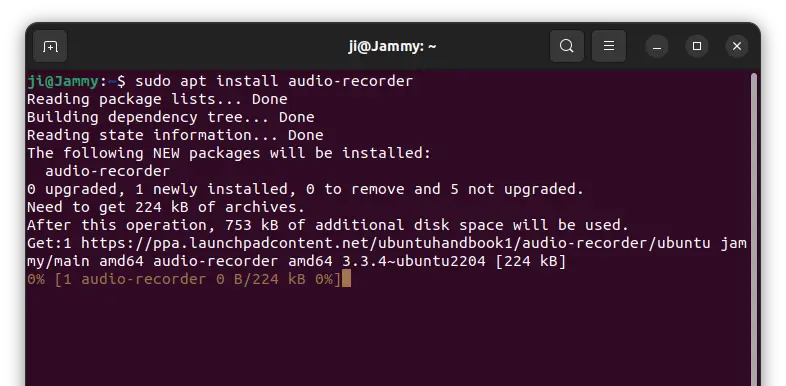
Some users reported it does NOT install in Ubuntu 23.04, so I made a new PPA contains this software packages, with support for Ubuntu 22.04, Ubuntu 24.04, and Ubuntu 23.10 on amd64 (X86_64), arm64/armhf (for Apple M1/M2, Raspberry Pi, etc) CPU architecture types.
And thankfully, the new PPA package seems working good (with only minor testing). Since you may know, Ubuntu 23.04 switched to Pipewire sound server while 22.04 and earlier are using classic PulseAudio.
1. Add the new PPA
To add the PPA, simply press Ctrl+Alt+T on keyboard to open terminal. Then run command:
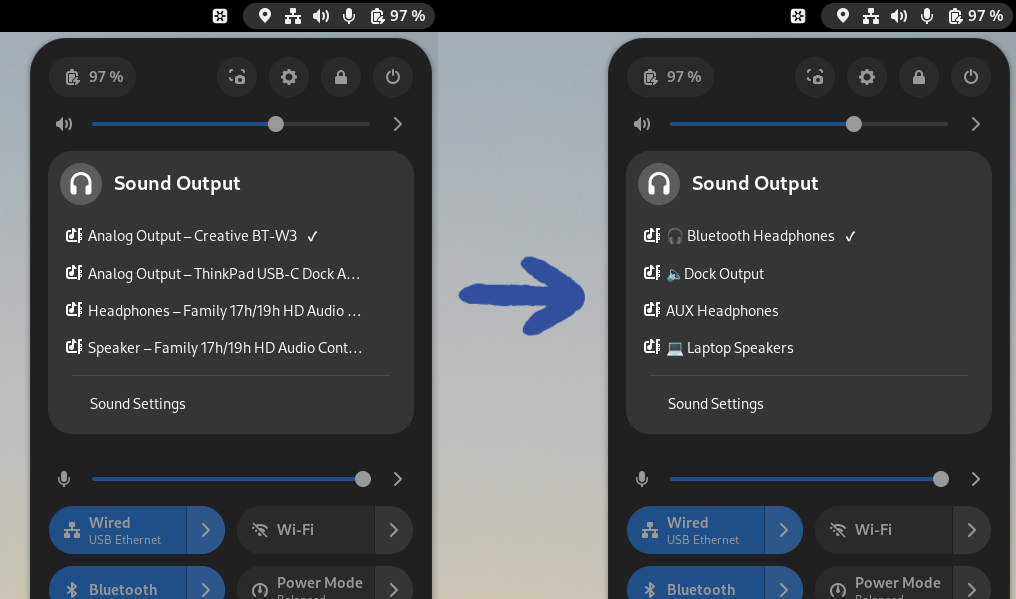
For Ubuntu 24.04, Ubuntu 23.10, Fedora 38 and other Linux with GNOME 44 ~ 46, there’s now an extension allows to change display name of audio output devices from the top-right aggregation menu (aka Quick Settings).
By default, the speakers and headphones in the sound output sub-menu is a bit too explicit, that are not very clear to understand. To make the menu easy to read, you may rename them to just “headphones”, “built-in speaker”, or whatever that you want.
1. To install the extension, first open Ubuntu Software, search and install “Extension Manager”:
Install Extension Manager in Ubuntu 22.04+
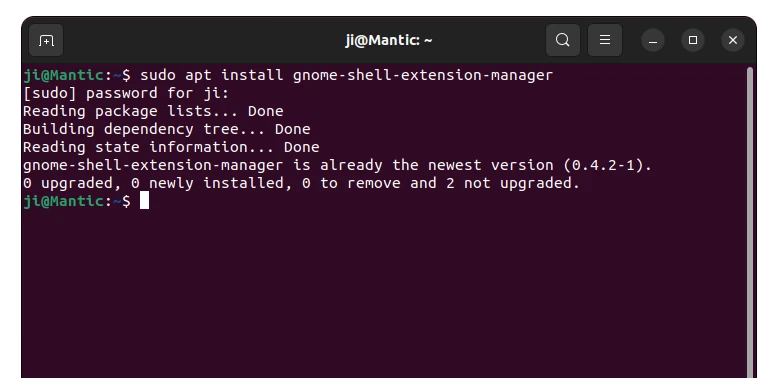
For Ubuntu 23.10/24.04, press Ctrl+Alt+T on keyboard to open terminal and run the command below instead to install it:
sudo apt install gnome-shell-extension-manager
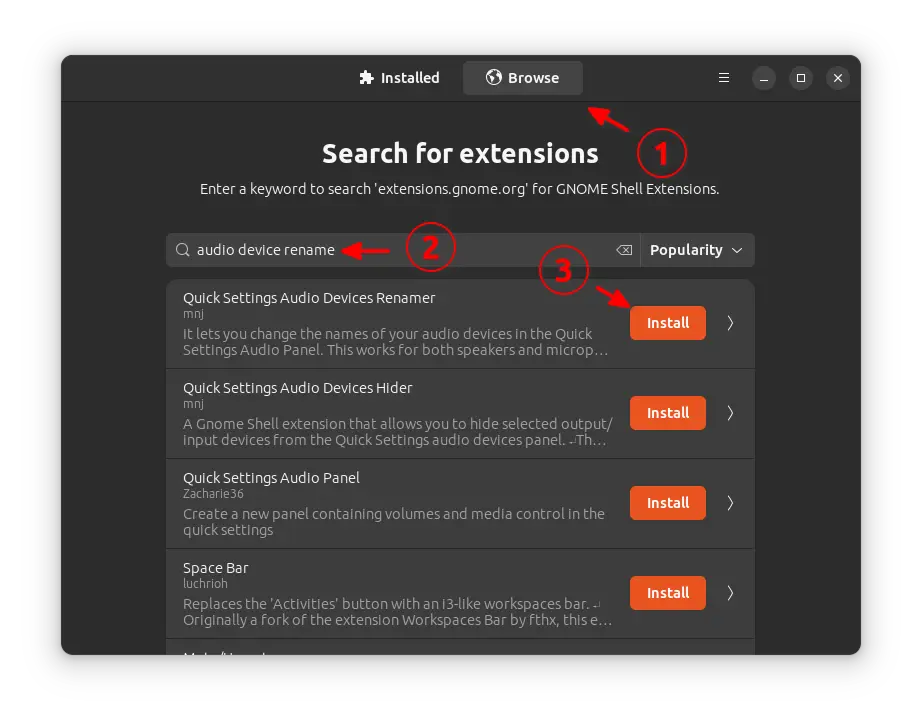
2. Then launch “Extension Manager”, navigate to ‘Browse’ tab, finally search and install the “Quick Settings Audio Devices Renamer” extension.
For Fedora and other Linux, go to this web page and use ON/OFF switch to install the extension.
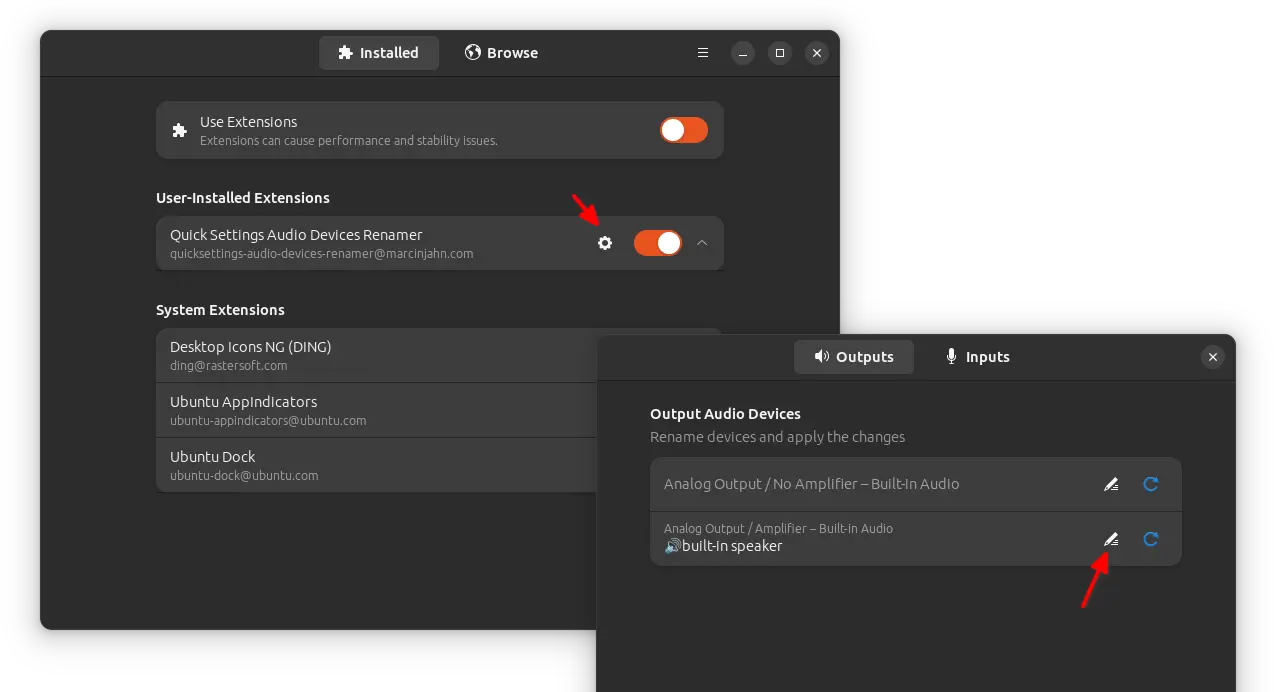
3. Once installed the extension, switch back “Installed” tab in Extension Manager (or open GNOME Extensions app). Then, click open the settings for that extension, finally click on the ‘pencil’ icon to edit the name of corresponding output device.
You can even insert emojis in the name, either by using a emoji picker or copy from “Gnome Characters” app.
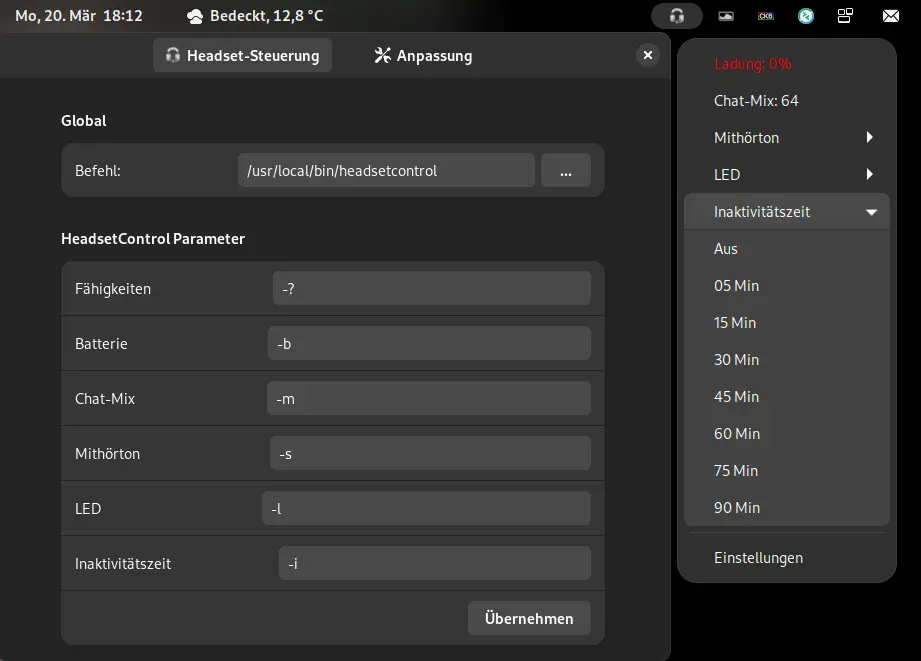
The application is a command line tool, though it has a graphical interface for GNOME 42+ (Ubuntu 22.04 / Fedora 35 and higher).
Image borrowed from extension web page, as I don’t have a headset at hand
How to Install the HeadsetControl app
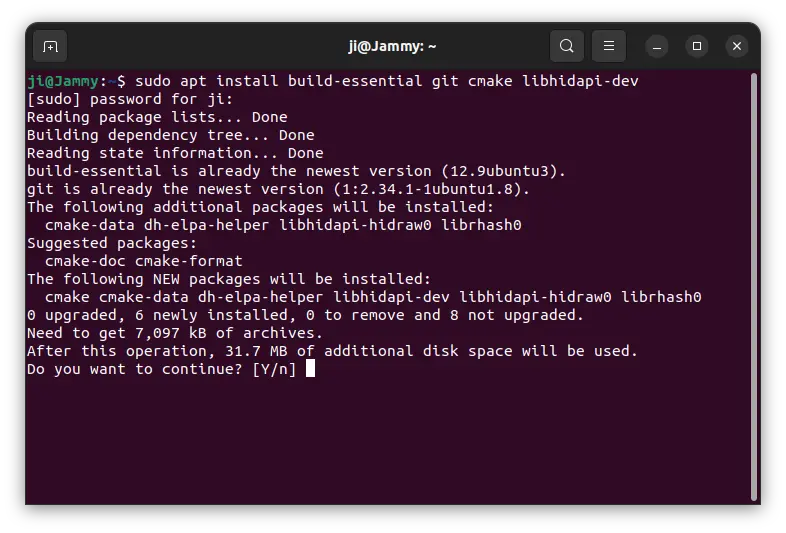
The app so far does not have binary package for Ubuntu Linux, though it’s not hard to build it from source. The following steps is tested and works in my case in Ubuntu 22.04 LTS.
1. First, press Ctrl+Alt+T on keyboard to open a terminal window. When it opens, run command to install build dependencies:
2. Then, clone the source by running the git command in terminal, and then navigate to the source folder:
git clone https://github.com/Sapd/HeadsetControl && cd HeadsetControl
3. Create ‘build’ sub-folder, navigate to that sub-folder and start building it:
mkdir build && cd build && cmake ../
4. Finally, run make and then make install to build and install the tool:
make -j4
sudo make install
Once successfully installed, it will output that ‘/usr/local/bin/headsetcontrol‘ and ‘/usr/local/lib/udev/rules.d/70-headsets.rules‘ installed.
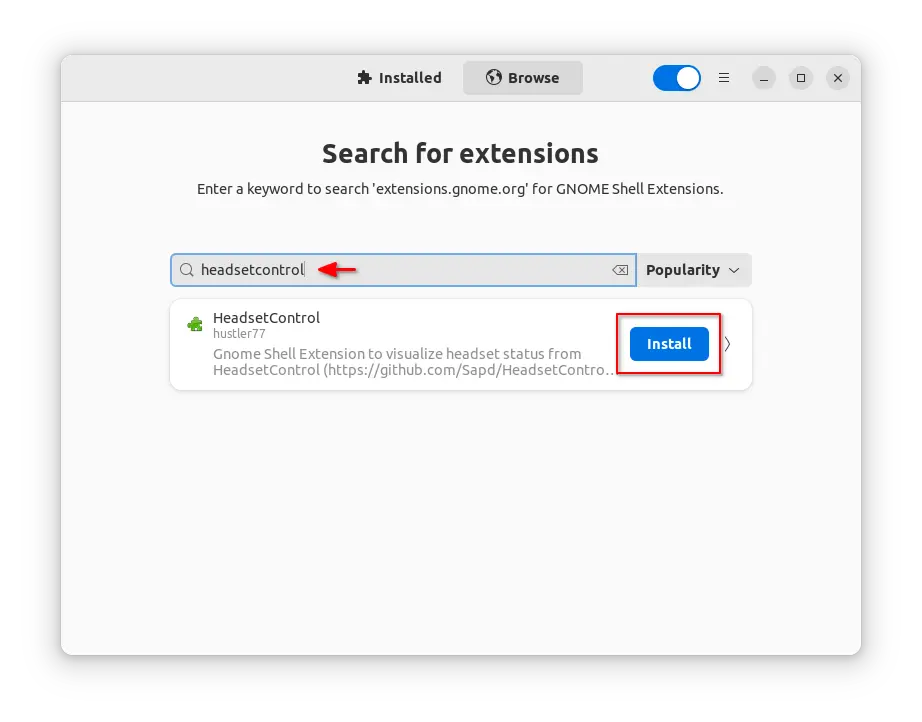
How to Install the Extension for graphical UI
For Ubuntu 22.04 and higher, first search for and install “Extension Manager” from Ubuntu Software.
Install Extension Manager in Ubuntu 22.04+
Then, use “Extension Manager” to search and install the ‘HeadsetControl’ extension under ‘Browse’ tab.
Once installed, it should show the indicator applet in system tray area immediately with menu options to control your headset! Other Linux can go to this page to use ON/OFF switch to install the extension.
Uninstall:
To remove the extension, either go to the link page above and use ON/OFF switch, or use “Extension Manager” or Gnome Extensions tool.
To remove the command line application, open terminal and run command:
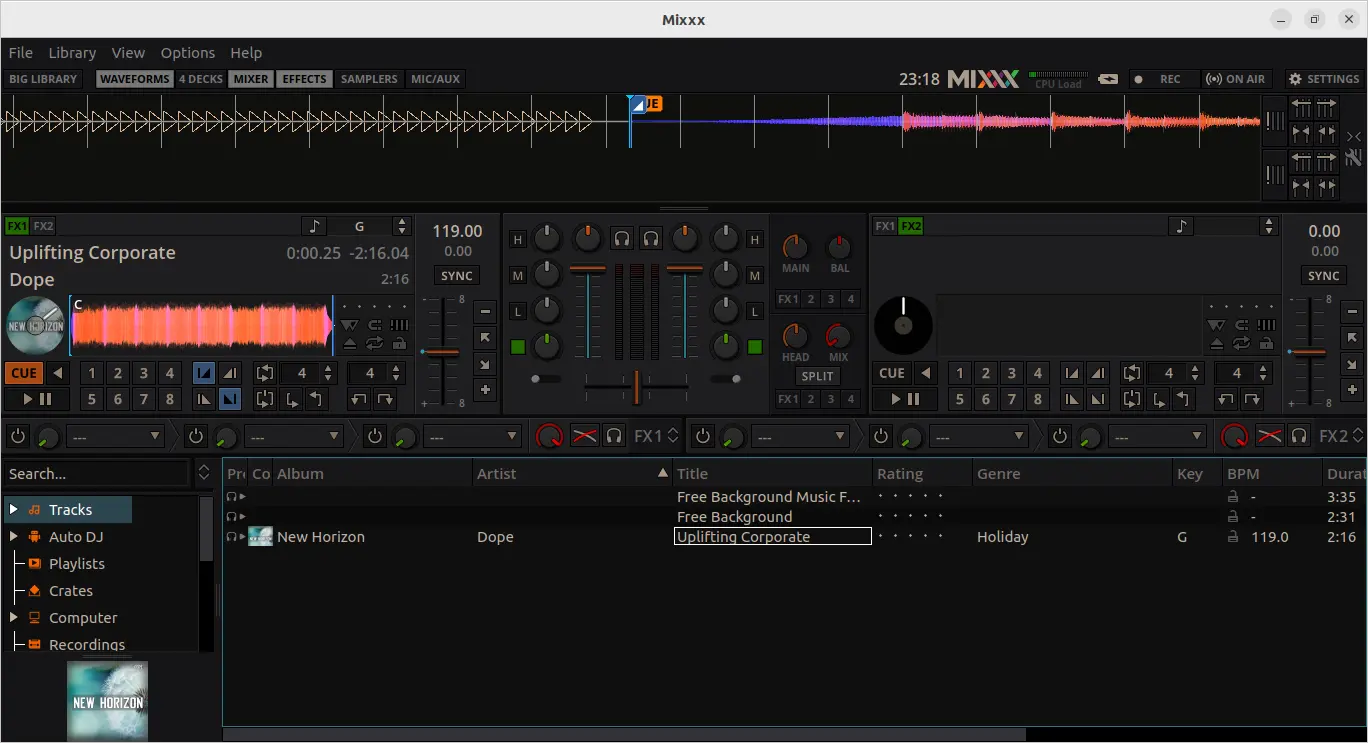
Free DJ mixing software Mixxx announced the 2.3.4 release a few days ago. Here’s how to install it in Ubuntu 22.10, Ubuntu 22.04, Ubuntu 20.04 and Ubuntu 18.04 via PPA.
The new release added controller mapping for the Traktor Kontrol S2 Mk1, and initial mapping for Numark Party Mix.
It now shows ‘date added’ as local time, supports macOS 13.0 Ventura by using portaudio 19.7.0, again allows searching in external libraries. For Ubuntu, it fixed the menu bar issue when working in full-screen mode.
There are as well many other bug-fixes in the release, see the changelog for details.
How to install Mixxx in Ubuntu via PPA
The DJ software has an official PPA for Ubuntu, Linux Mint based systems. So far, it provides the latest 2.3.4 packages for Ubuntu 18.04, Ubuntu 20.04, Ubuntu 22.10, Ubuntu 22.04, and Linux Mint 20/21.
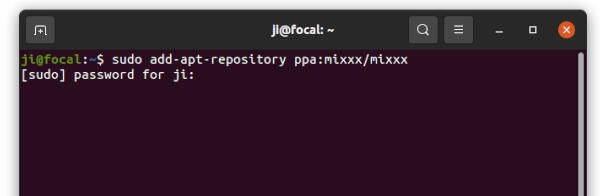
1. Add Mixxx PPA
Open terminal either from app launcher or by pressing Ctrl+Alt+T on keyboard. When it opens, run command to add the PPA:
sudo add-apt-repository ppa:mixxx/mixxx
Type your password (no asterisk feedback) when it prompts and hit Enter to continue.
2. Update package cache:
For Ubuntu 18.04 and Linux Mint, users need to manually refresh the package cache after adding new software sources. To do so, simply run command:
sudo apt update
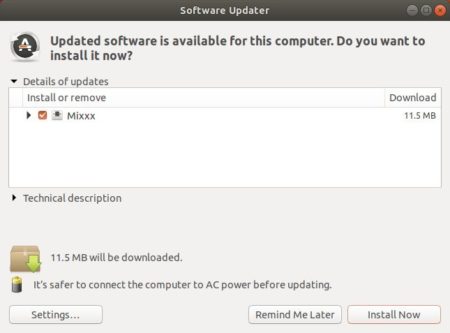
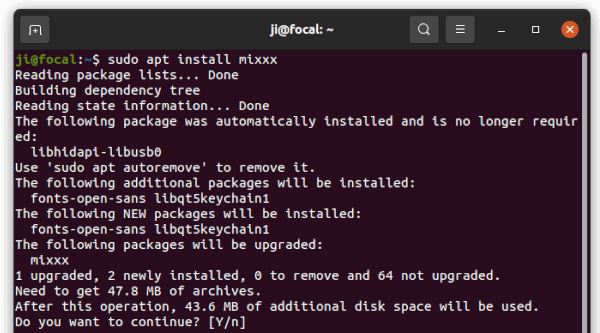
3. Install or Upgrade Mixxx:
If an old Mixxx package was installed on your system, you may try upgrading the DJ software using Software Updater:
Or just run the command below in terminal to either install or upgrade the DJ software:
sudo apt install mixxx
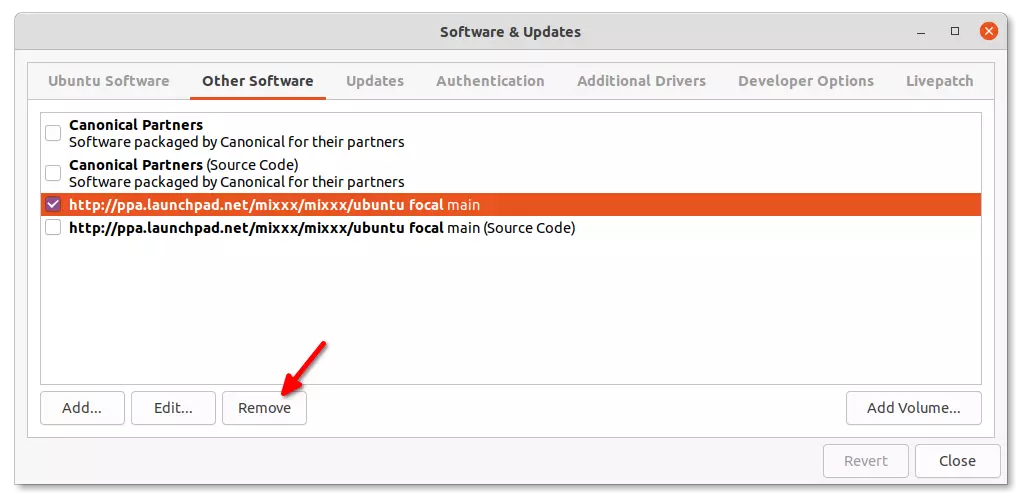
Uninstall Mixxx:
You can easily remove the software by running command in terminal:
sudo apt remove --autoremove mixxx
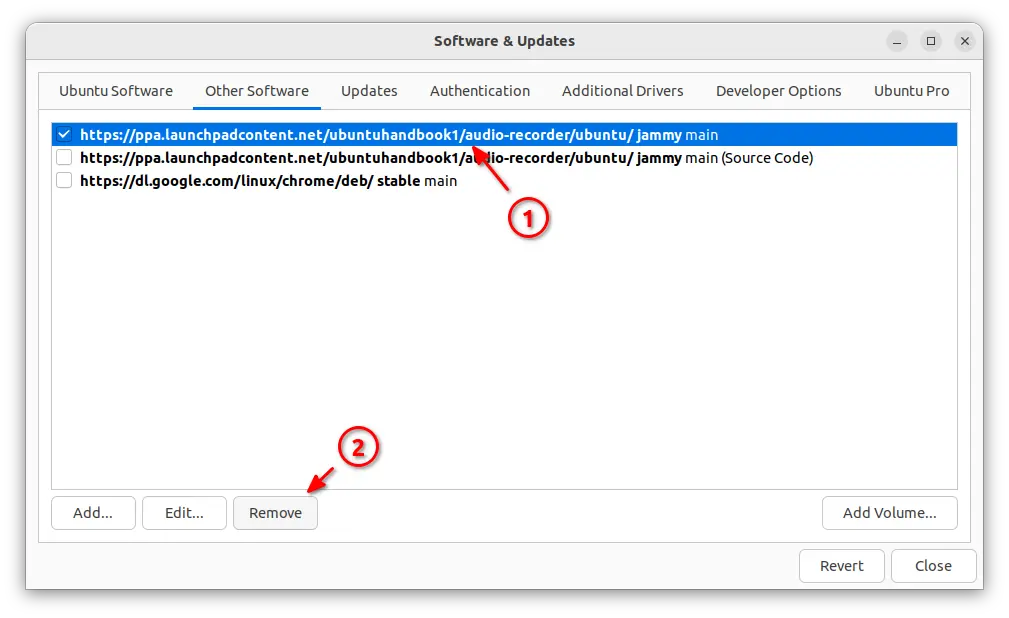
And remove the PPA repository via Software & Updates, by removing relevant line utility under Other Software tab.
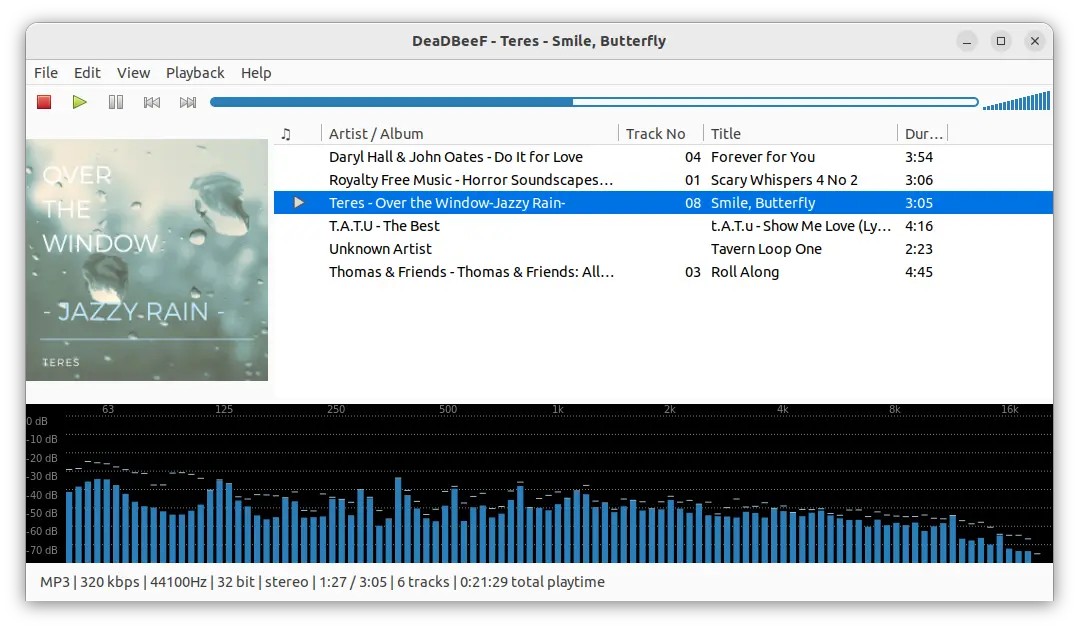
The lightweight DeaDBeef music player got an update recently. Here’s how to install it in Ubuntu 22.04, Ubuntu 20.04, and Ubuntu 18.04.
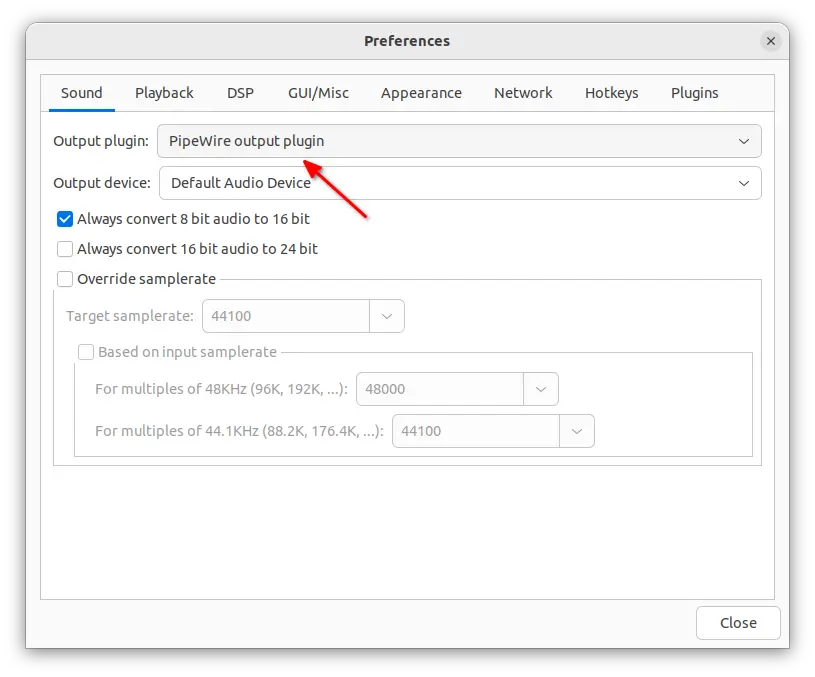
Just like Audacious did in v4.3, DeaDBeef 1.9.5 added the low-latency PipeWire sound server support. Meaning Ubuntu 22.10+, Pop! OS 22.04 and all current Fedora Linux users can select use the new sound output in ‘Preferences’ settings page.
The release also added new LibRetro resampling plugin, updated DUMB plugin with Chiptune voice muting support. Other changes include $itematindex(index,value) function to title formatting, improved drawing of spectrum analyzer, and various bug-fixes. See release note for details.
DeadBeef custom layout
How to Install DeadBeef 1.9.5
The music player website provides official packages for Linux, Windows, and macOS, available to download at the link below:
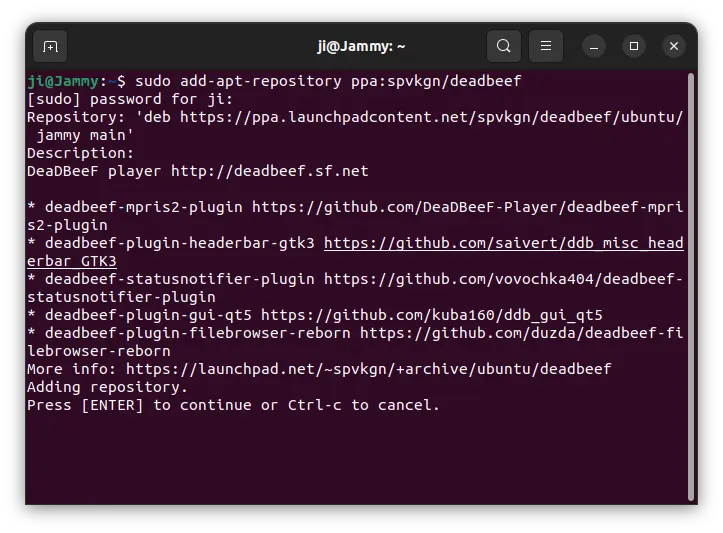
However, I personally prefer using the PPA repository, which provides both GTK3/2 and Qt5 user interface, as well as a few more plugins. Sadly, the PPA so far supports only Ubuntu 22.04, Ubuntu 20.04, and Ubuntu 18.04 LTS and their based systems.
Firstly, press Ctrl+Alt+T on keyboard to open a terminal window. When it opens, run command to add the PPA:
sudo add-apt-repository ppa:spvkgn/deadbeef
Type user password (no asterisk feedback) when it asks and hit Enter to continue.
After adding PPA, update system package index by running command below, though it’s done automatically in Ubuntu 20.04+.
sudo apt update
Finally, install the music player with your favorite UI interface (GTK3 for example):
sudo apt install deadbeef-gtk3
As you see in the screenshot, you may also install the mpris2 plugin, Qt5 UI, file browser plugin, etc.
Audacious music player finally announced the release of version 4.3 after a few weeks of beta testing.
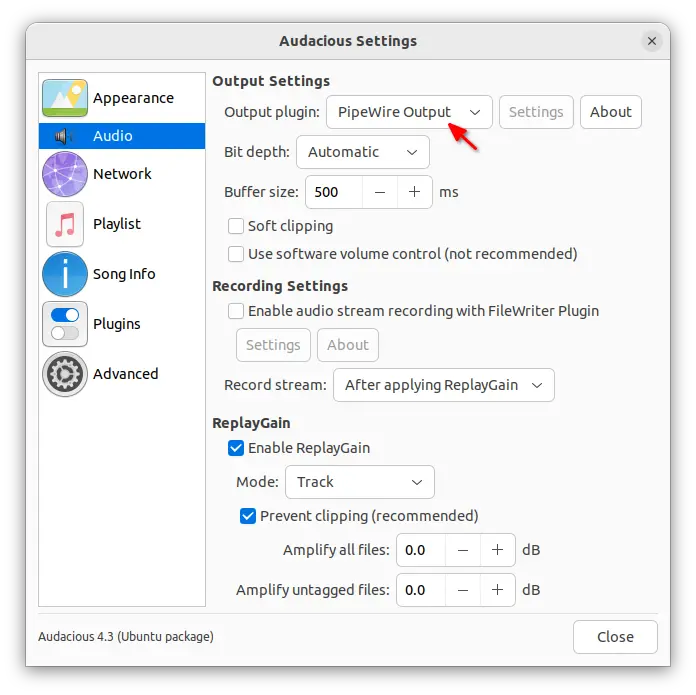
As you may already know, the new release features PipeWire output plugin. Meaning Ubuntu 22.10 + users can switch sound output using the new low-level multimedia framework.
Pop! OS 22.04 (have PipeWire support out-of-the-box) and Ubuntu 20.04 that have switched to Pipewire to replace PulseAudio are also supported.
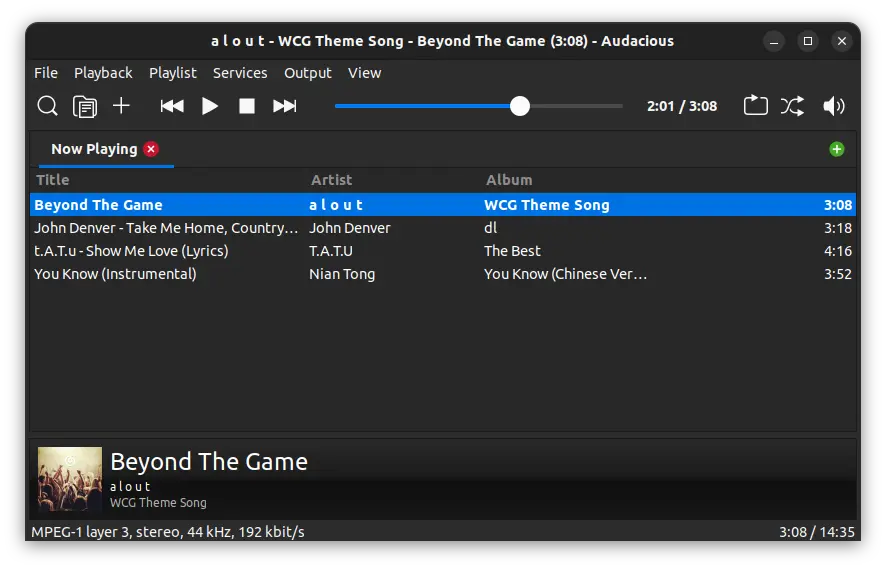
The release also added GTK3 support again, which has much better appearance in my case compare to the old GTK2 interface. It now has a new set of tool-bar icons with both light and dark mode support. Though, the icons in the Settings page are still too big.
Native Opus decoder plugin, previously done via FFmpeg plugin.
Qt6 support goes mature, though still defaults to Qt5.
Meson built system support
Allow copying file path in song info dialog.
Support Ogg FLAC audio streams
Support reading embedded lyrics tags.
Account for album artist in Search Tool.
Support new song length database format in SID plugin.
Support Publisher and Catalog Number tags
Add file filter to Export Playlist file dialog
Remove alarm plugin.
Add Romanian translation.
How to Install Audacious 4.3 in Ubuntu:
Without building from the source, Ubuntu users can install the audio player in 2 ways: Flatpak and Deb.
1. Flatpak
Audacious 4.3 is available to install as Flatpak package, though it runs in sandbox. Linux Mint user can easily search for and install it from Software Manager.
Ubuntu user can press Ctrl+Alt+T on keyboard to open terminal and run the 2 commands below one by one to get it.
For those who prefer the classic .deb package, I’ve upload the new package into this PPA repository.
It now supports the package for Ubuntu 18.04, Ubuntu 20.04, Ubuntu 22.04, Ubuntu 22.10, and Ubuntu 23.04. Besides the modern PC and laptop with x86_64 architecture type, arm64/armhf devices such as Raspberry Pi are also supported!
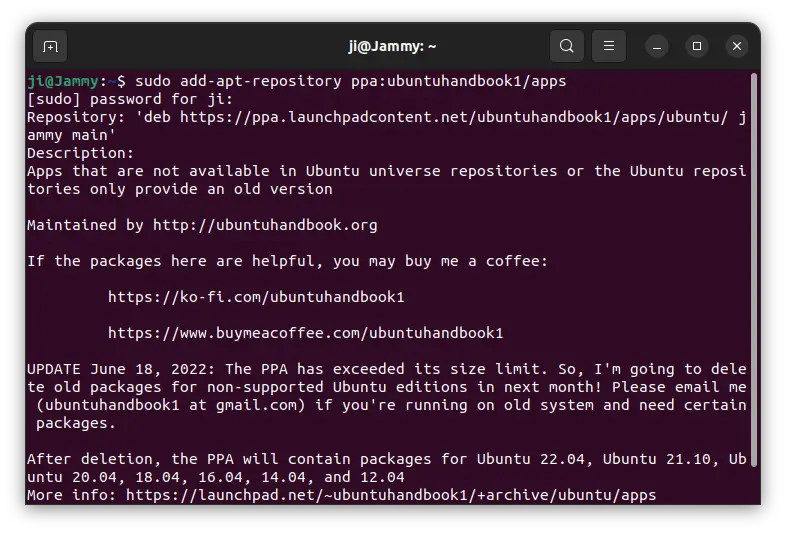
1. First, press Ctrl+Alt+T on keyboard to open terminal. When it opens, run command to add the PPA:
sudo add-apt-repository ppa:ubuntuhandbook1/apps
Type user password (no asterisk feedback) when it asks and hit Enter to continue.
2. Then, update system package index in Ubuntu 18.04 and Linux Mint via the command below. For Ubuntu 20.04+, it’s done automatically while adding PPA.
sudo apt update
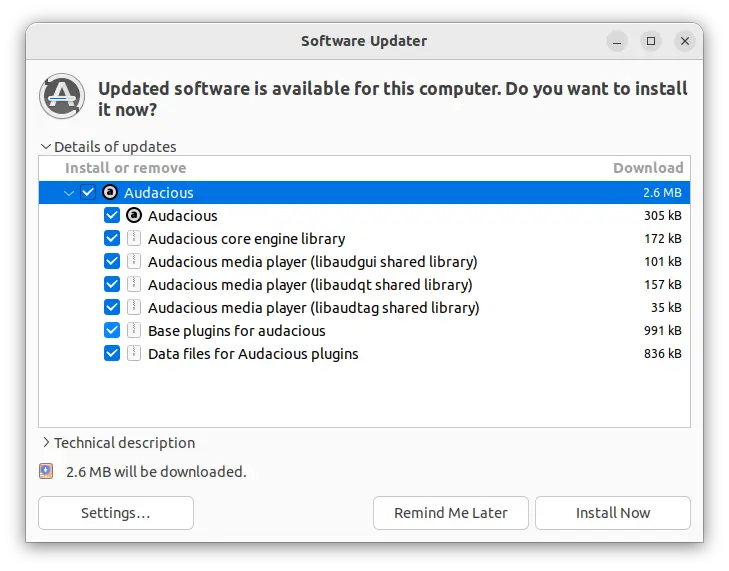
3. If you have an old version of the music player installed, you can now update the package to the latest using “Software Updater” utility.
Or, run the command below in terminal to install or upgrade the package:
sudo apt install audacious audacious-plugins
Uninstall Audacious
Remove the Flatpak package
To remove the audio player installed as Flatpak, open terminal (Ctrl+Alt+T) and use command:
Also clean up runtime library via flatpak uninstall --unused.
Remove Audacious installed from PPA
If you want to restore the music player to the stock version available in system repository. Run command below to purge PPA as well as downgrade installed packages:
The lightweight audacious music player announced the beta release of the next v4.3 a few days ago.
Usually, the final release will be out in next or next few months with mostly no change since beta. So far, this beta release include the following new features.
The new release added plugin support for Pipewire, which is a low latency sound server that is default in Ubuntu since 22.10.
Also, it added a plugin for Opus audio decoding support. Though it previously supports Opus through FFmpeb library compiled with --enable-libopus.
Audacious 4.3 also added again GTK3 as well as Qt6 support. In current v4.2 stable, I prefer to use Qt UI since GTK2 interface looks ugly due to incorrect icon size.
However, Qt UI lacks automatic light and dark mode switch depends on system color scheme in GNOME (default desktop environment in Ubuntu). With the new GTK3 build, it now looks good in my case in Ubuntu 22.04 with better integration.
For all current Ubuntu releases, including Ubuntu 18.04, Ubuntu 20.04, Ubuntu 22.04, Ubuntu 22.10, just open terminal (Ctrl+Alt+T) and run the commands below one by one to install it: