Archives For May 31, 2016

FileZilla FTP Client

The GetDeb repository now is maintaining the latest FileZilla client to make it easy to install and upgrade FileZilla in Ubuntu 16.04.

FileZilla FTP Client is available in Ubuntu universe repositories, but Canonical does not provide updates for the application. You have to manually install / upgrade the client as a new version is released.

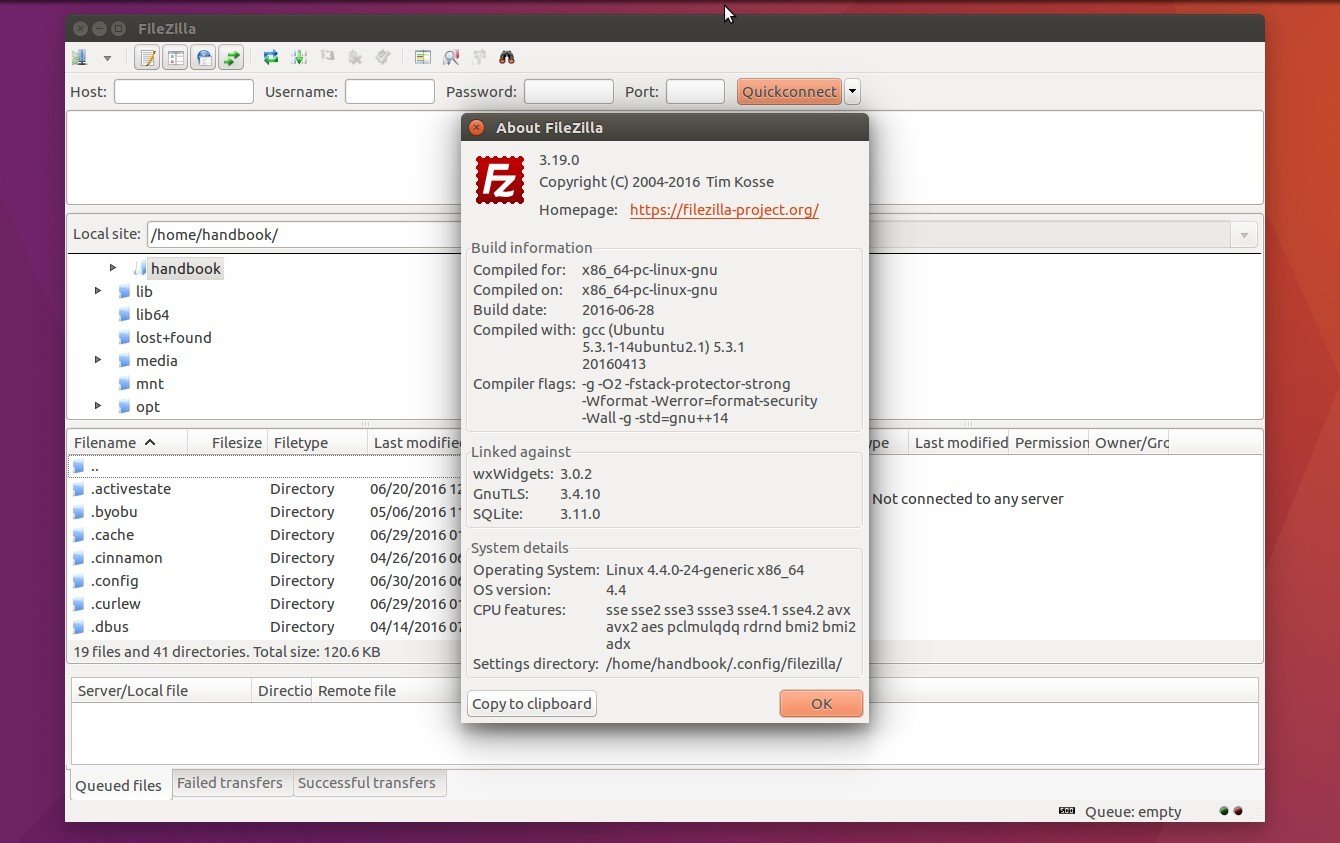
While the official Linux binary is not well integrated with Ubuntu, the GetDeb repository now builds FileZilla for Ubuntu 16.04, so far it’s version 3.19.0.

How to install the latest FileZilla in Ubuntu 16.04:

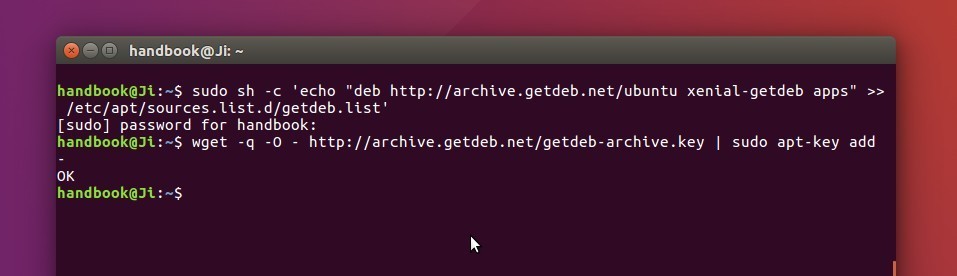
1. Add GetDeb repository.

For Ubuntu 16.04 and derivatives, open terminal and paste (Ctrl+Shift+V) the command below and hit run:

sudo sh -c 'echo "deb http://archive.getdeb.net/ubuntu xenial-getdeb apps" >> /etc/apt/sources.list.d/getdeb.list'

Type in your password when it asks (no visual feedback) and hit enter.

To make Ubuntu trust the packages from that repository, install the key:

wget -q -O - http://archive.getdeb.net/getdeb-archive.key | sudo apt-key add -

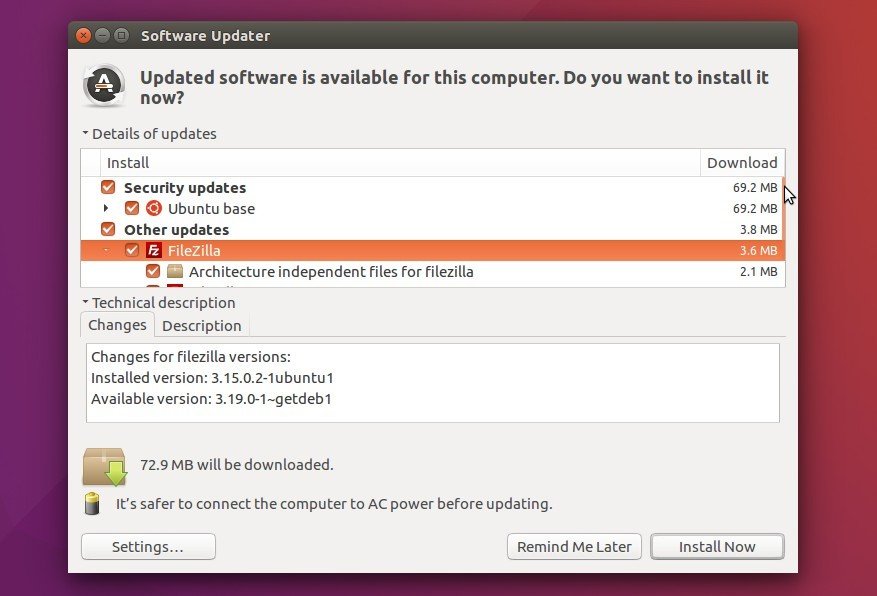
2. Install / Upgrade FileZilla Client.

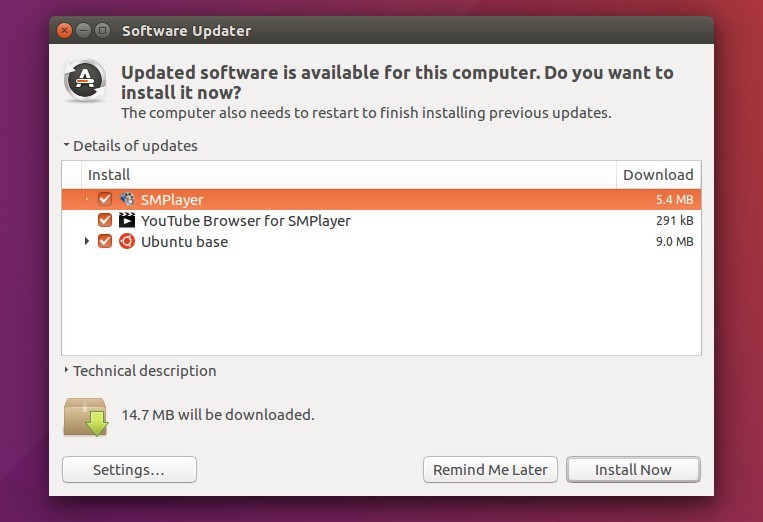
If you have a previous release installed, you can now upgrade it by launching Software Updater:

Or you may run the commands below one by one in terminal to install / upgrade the FTP client:

sudo apt update

sudo apt install filezilla

Curlew is a free multimedia converter for Ubuntu Linux that features small package size, few library dependencies, 100+ output formats, easy to use UI, and more.

Curlew is written in Python and GTK+ 3, and uses FFMPEG (or Libav-tools) to transcode media files. The main features are:

  • Easy to use user interface (New GTK3 Header bar).
  • Hide the advanced options with the ability to show them.
  • More than 100 output formats.
  • Allow to edit formats.
  • Shutdown or suspend PC afer a conversion process.
  • Show file informations, file details using mediainfo.
  • Allow to skip or remove file during conversion process.
  • Preview file before conversion in its context menu.
  • Show video thumbnail.
  • Convert a specified portion of file.
  • Combine subtitle with video.
  • Allow to crop and pad video.
  • Show error details if exist.
  • And more …

Curlew 100+ output formats

Curlew Advanced Settings

Curlew show file info

How to Install Curlew transcoder in Ubuntu:

Pre-compiled Ubuntu .deb is available in the link below:

So far, the latest is “curlew_0.2.2-1_all.deb”, just download and install it via either Ubuntu Software or terminal command (Ctrl+Alt+T):

sudo dpkg -i ~/Downloads/curlew_*.deb; sudo apt -f install

Works for Ubuntu 16.04, Ubuntu 15.10, and their derivatives. Once installed, launch Curlew from Unity Dash, or your desktop app launcher.

Faenza is one of the most popular Gnome icon theme that provides light, dark, Faenza-Ambiance, and Faenza-Radiance themes to fit with light or dark panels / toolbars.

Since Ubuntu 15.04 Vivid, the icon theme was finally made into official Ubuntu repositories to make it easier to install.

For Ubuntu 16.04, while Ubuntu Software (Gnome Software) does not show applications without appdata (information about software description and screenshot etc.), use Synaptic or apt command:

Open terminal (Ctrl+Alt+T) and run command to install Faenza Icons in Ubuntu 16.04:

sudo apt install faenza-icon-theme

Type in password and once it’s properly installed, launch Unity Tweak Tool (available in Ubuntu Software) or other tweak tool for your desktop and apply new icons in Appearance -> Icons.


A repacked version is also available that includes wireless mouse icon and the tiny calendar icon in time & date menu.

Sigil, an open-source and multi-platform ePub ebook editor, has reached the 0.9.6 release with some new features and various bug fixes.

New features added in Sigil 0.9.6:

  • create sgc-nav.css stylesheet for nav and allow templates in Prefs Dir for user to control it
  • add General Setting to allow user to set own temporary directory location
  • add Qt Stylesheet support – Recognize and load “qt_styles.qss” file if stored in Sigil Preferences folder
  • extend the plugin interface to add support for epub3 bindings elements
  • add option + forward delete shortcut to active Metadata Editor remove

It also brings a lot of bug-fixes in the release, see sigil website for details.

How to install Sigil 0.9.6 in Ubuntu:

There’s no official binary releases for Linux. While Ubuntu Software provides an old version, you may either build the latest release from source or use a third-party PPA.

And here are my personal builds of Sigil 0.9.6, available for Ubuntu 16.04 and Ubuntu 15.10:

Download and install the .deb package for sigil-data and then sigil package (i386 for 32bit, amd64 for 64bit).

For those who prefer adding PPA, open terminal (Ctrl+Alt+T) and run the commands below one by one:

sudo add-apt-repository ppa:ubuntuhandbook1/sigil

sudo apt update

sudo apt install sigil sigil-data

To manage PPAs, go to System Settings -> Software & Updates -> Other Software.

Komodo Edit, Active State’s open source text editor, has reached the X (10) release. Here’s how to install it in Ubuntu 16.04, Ubuntu 15.10, Ubuntu 14.04, and Ubuntu 12.04 with Unity integration.

Komodo Edit X (10) Features:

  • new user interface that is skinnable using the color scheme editor
  • a start wizard on first launch
  • new default keybindings and other editors’ keybindings support including Atom, Eclipse, Emacs, IntelliJ, Sublime, Vi.
  • PHP and JavaScript codeintel and other improvements.
  • and much more

Komodo start wizard

How to Install Komodo Edit 10 in Ubuntu:

The official download page provides non-install packages for Linux, but it lacks a shortcut icon for Ubuntu.

To install this editor with Ubuntu integration, use Mystic-Mirage’s PPA repository:

1. Add PPA.

Open terminal (Ctrl+Alt+T) and run command:

sudo add-apt-repository ppa:mystic-mirage/komodo-edit

Type your password when it asks, though there’s no visual feedback, and hit Enter to continue.

2. Now install the editor via your system package manager, or run commands:

sudo apt update

sudo apt install komodo-edit

For those who don’t want to add PPA, grab the .deb package from HERE (i386 for 32bit, amd64 for 64bit), and click install via Ubuntu Software.

A new maintenance release for Virtualbox 5.0 series was announced a few days ago with various fixes and improvements.

Virtualbox 5.0.22 fixes build failure on Linux Kernel 4.7, mouse pointer offset in Linux client fullscreen mode, a potential Linux guest panic on AMD hosts, a potential hang with 32-bit EFI guests on Intel CPUs.

It also adds X.org 1.18 support for Solaris additions, brings fixes for certain Intel Atom hosts and certain 32-bit guest, adds a new I/O-APIC implementation fixing several bugs and improving the performance under certain conditions. For more details, go to the changelog page.

Download & install Virtualbox 5.0.22 in Ubuntu:

1. Download the pre-compiled package for your Ubuntu release from (i386 for 32-bit, amd64 for 64bit):

2. If you installed the stock version of VBOX from official Ubuntu repository, you have to remove it first via Ubuntu Software, or by running the command below in terminal (Ctrl+Alt+T):

sudo apt remove virtualbox virutalbox-*

3. Finally install the new version by opening the package via Ubuntu Software, or run the dpkg command in terminal:

sudo dpkg -i ~/Downloads/virtualbox-5.0_5.0.22-*.deb

4. (Optional) For those who’d like to receive future updates of VBox along with other software updates via Software Updater utility, paste the 2 commands below and run one by one in terminal to add Virtualbox Linux repository:

sudo sh -c 'echo "deb http://download.virtualbox.org/virtualbox/debian $(lsb_release -cs) contrib" >> /etc/apt/sources.list.d/virtualbox.list'

wget -q https://www.virtualbox.org/download/oracle_vbox.asc -O- | sudo apt-key add -

You can manage the PPA later via System Settings -> Software & Updates -> Other Software.

SMPlayer, open-source Qt front-end for MPlayer and MPV, has reached the 16.6 release with some great new features including a tablet mode and high-DPI support.

High DPI screens are supported now in SMPlayer. You can turn on/off this feature and manually adjust the scale factor by navigating to Preferences -> Interface -> High DPI.

There’s a new ‘tablet mode’, available in menu Options, that brings support for 2 in 1 computers with touch screens.

SMPlayer 16.6 also brings:

  • Option to send video to an external screen.
  • Global shortcuts support, enable it in Preferences -> Keyboard and mouse
  • Settings are remembered for online streams.
  • built with Qt 5 by default.

How Install /Upgrade SMPlayer in Ubuntu:

For all current Ubuntu 16.04, Ubuntu 14.04, Ubuntu 12.04, and Ubuntu 16.10, the most recent build can be installed from the PPA by following the steps below one by one:

1. Add PPA.

Open terminal (Ctrl+Alt+T) and paste the command below and hit run:

sudo add-apt-repository ppa:rvm/smplayer

Type in your password (no visual feedback) when it asks and hit Enter to continue.

2. If you have a previous release installed, you can upgrade it by launching Software Updater:

Or run the commands below one by one to do update and install in terminal:

sudo apt update

sudo apt-get install smplayer smtube smplayer-themes

3. (Optional) To revert back to the stock version of SMPlayer in your Ubuntu release, purge the PPA via ppa-purge by running command:

sudo apt install ppa-purge && sudo ppa-purge ppa:rvm/smplayer

Quick tutorial for those who want to change the Hostname (Computer name) in Ubuntu 16.04 Server or Desktop without a restart.

1. To change hostname temporarily so it works until you reboot the machine:

In terminal / command console, run the command:

sudo hostname NEW_NAME_HERE

2. To permanently change your computer name, you may edit the “/etc/hostname” and “/etc/hosts” files.

Open terminal and run command:

gksudo gedit /etc/hostname /etc/hosts

You may need to install gksu first via command sudo apt install gksu.

For Ubuntu Server, use two nano commands instead (Press Ctrl+X, followed by Y, and then Enter to save changes):

sudo nano /etc/hostname
sudo nano /etc/hosts

When the files open, set the new hostname:

  • /etc/hostname is a simple one line file, change the name to whatever your want.
  • /etc/hosts maps IP addresses to host names, change the name in second line and make it SAME to the name in /etc/hostname.

Without restarting your machine, just run the command below to restart hostname service to apply changes:

systemctl restart systemd-logind.service

3. There’s also hostnamectl command with set-hostname flag, which will alter the pretty, the static, and the transient hostname alike:

hostnamectl set-hostname NEW_NAME_HERE

ISSUE: After changing hostname, gedit and other graphical apps use X11/Mir protocol won’t launch from terminal via gksudo, you’ll get something like below:

Failed to connect to Mir: Failed to connect to server socket: No such file or directory
Unable to init server: Could not connect: Connection refused

(gedit:20511): Gtk-WARNING **: cannot open display: :0

To fix it:

run xauth list command to check authentication cookie.
add a matching cookie for the new hostname:

xauth add "NEW_HOSTNAME/unix:0" MIT-MAGIC-COOKIE-1 cookie-id-here

Opera browser 38 was released earlier today with new power-saving mode, which offers up to 50 longer battery life and avoids overheating.

By reducing background tabs activity and frame rate, using hardware accelerated video codecs in video-playback, pausing themes’ animations, auto-pausing unused plugins, including ad blocker, the new power-saving mode increases as much as 50% battery life comparing to other browser, and keeps your laptop over 3 degrees °C cooler.

This feature can be easily enabled from the top-right corner in Opera browser window.

There’s also some other features added in Opera 38:

  • add your own lists in add blocker
  • add your own photo as theme
  • extension button visible in the Speed Dial side panel
  • Speed Dial improvements.

To get the latest Opera for Linux, go to:

This tutorial is going to show you how to install the latest HexChat GTK+ IRC client and receive future software updates along with other system updates.

HexChat is a XChat based IRC client that’s completely free for Windows and Unix-like systems. It features Python and Perl scripting support, a plugin API, multiple server/channel windows, spell checking, multiple authentication methods including SASL, and customizable notifications.

HexChat is available in official Ubuntu repositories, but Canonical does not provide future updates for this software. While Ubuntu 16.04 provides the old 2.10.2 release, the HexChat website refers to Gwendal LE BIHAN’s PPA (unofficial) for the latest release.

1. Add PPA.

Open terminal (Ctrl+Alt+T) and run the command below:

sudo add-apt-repository ppa:gwendal-lebihan-dev/hexchat-stable

Type in password (no visual feedback) when it asks and hit Enter to continue.

2. Update system package index by either launching Software Updater and wait checking for updates, or running command:

sudo apt update

3. If you don’t a previous release installed, you can now install HexChat from Ubuntu Software, or via command:

sudo apt install hexchat

or upgrade the client via Software Updater:

4. (Optional) To remove the PPA, launch System Settings and navigate to Software & Updates -> Other Software.