Archives For November 30, 2017

gnome shell

This quick tutorial shows you how to easily resize or rotate a mass of image files in Ubuntu 18.04.

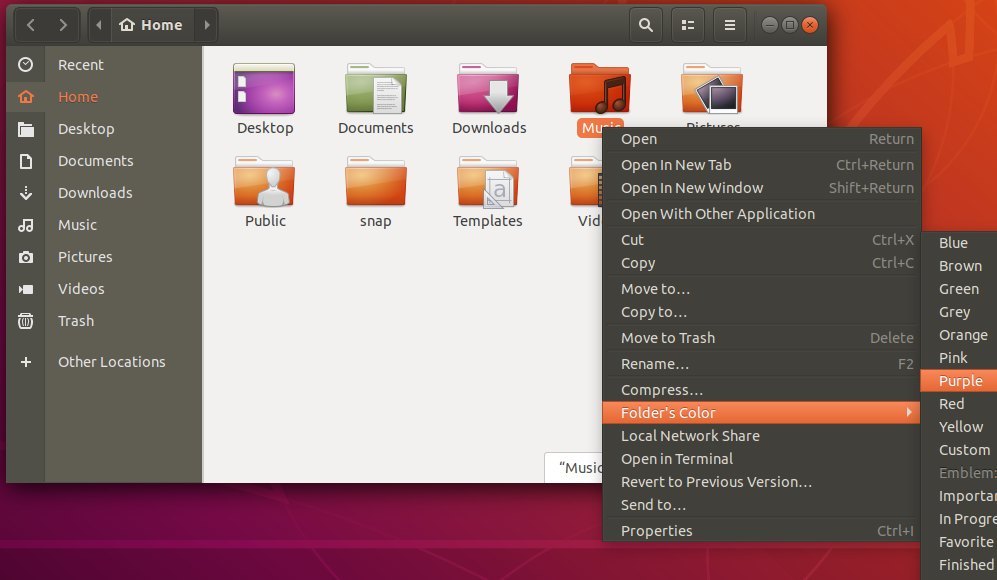
Nautilus, Gnome default file browser, has an extension called nautilus-image-converter. It adds “Resize images” and “Rotate images” options into context menu of image files, that allows to easily resize / rotate a mass of images.

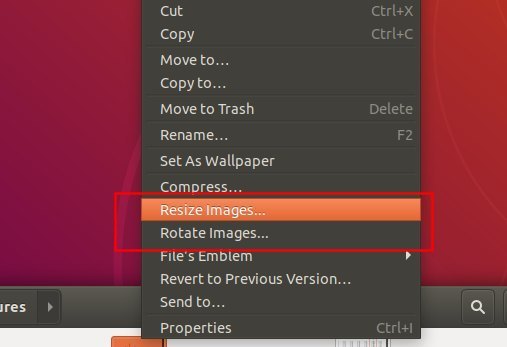
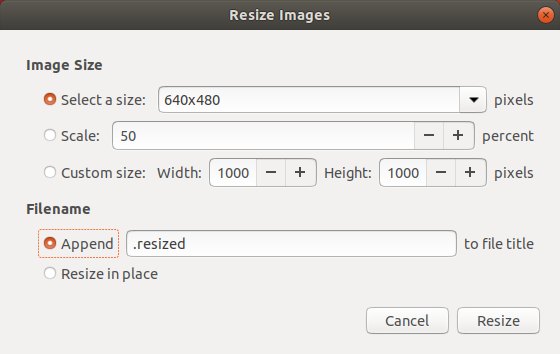
With the two new options, you can resize images to a selected size, custom size, or scale images with given percent.

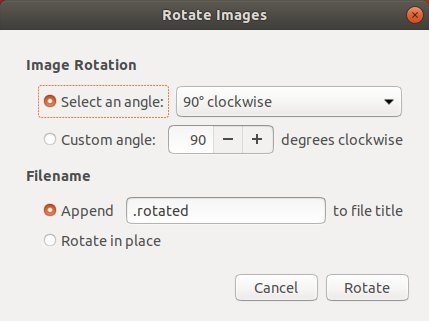
You can also rotate a mass of images with a selected angle or custom angle.

To install the Nautilus extension, open terminal either via Ctrl+Alt+To or by searching for ‘terminal’ from app launcher. When it opens, run command:

sudo apt-get update && sudo apt-get install nautilus-image-converter

Input your password (no visual feedback while typing due to security reason) when it prompts and hit Enter.

Once installed, close all current file browser windows, and open it again. Or run command nautilus -q if you still don’t see the resize and rotate options.

This quick tip shows you how to set custom color or emblem of a folder in Ubuntu 18.04 Nautilus file browser.

For those who want to have a different look and feel on folder icons, folder-color extension allows to change the color or emblem of selected folder in the default Nautilus file browser.

1. Open terminal (Ctrl+Alt+T) and run command to install the folder-color extension.

sudo apt-get update && sudo apt-get install folder-color

Input your password (no visual feedback while typing due to security reason) when it prompts and hit Enter.

2. Then re-open Nautilus (Files) file browser, and right-click on a folder. You’ll be able to choose a color or emblem, or set a custom color of the folder.

Note that if you don’t see the context menu “Folder’s color”, quit Nautilus via command nautilus -q and open the Files again.

The trash can icon is moved from left launcher to desktop icon since Ubuntu switched back to Gnome Desktop.

For those using files context menu or keyboard shortcut to delete file folders, and getting access to trash can via Files (nautilus file browser), the desktop icon is kinda useless and you may want to remove it.

You can easily remove (hide) the trash can desktop icon by doing following steps:

1. Open Ubuntu Software, search for and install Gnome Tweaks, a Gnome 3 desktop configuration tool.

2. Once installed, launch Gnome Tweaks and navigate to Desktop pane. There you can see the toggles to show or hide some desktop icons.

Simply turn off the toggle for Trash and enjoy!

After installed my favorite screenshot tool Shutter in Ubuntu 18.04, I found that the Edit button is greyed out. And this quick tip is going to show you how to re-enable the editing feature in Shutter.

To re-enable the “Edit” option, Shutter requires libgoo-canvas-perl library which is not available in Ubuntu 18.04 main archive. As a workaround, you can grab the package, as well as dependencies, from Ubuntu 17.10’s repository.

And here are the links to the packages you need to install (64-bit only since Ubuntu 18.04 dropped 32-bit support):

1. Download and double-click to install the libgoocanvas-common package:

2. Download and install libgoocanvas3 package:

Either use Gdebi package installer (available in Ubuntu Software) or run command in terminal (press Ctrl+Alt+T) to install the package:

sudo dpkg -i ~/Downloads/libgoocanvas3_1.0.0-1_amd64.deb; sudo apt-get -f install


3. Finally download & install libgoo-canvas-perl package:

Also install the package via Gdebi or terminal command, since Ubuntu Software doesn’t solve dependencies automatically:

sudo dpkg -i ~/Downloads/libgoo-canvas-perl_0.06-2ubuntu3_amd64.deb; sudo apt-get -f install

To apply changes, kill Shutter process or restart your computer!

Touchpad Indicator is system tray applet to configure laptop touchpad settings and actions in Ubuntu desktop.

With Touchpad Indicator, you can easily:

  • Disable / Enable touchpad with indicator menu or keyboard shortcut.
  • Disable touchpad when mouse is plugged.
  • Disable touchpad while typing.
  • Also do basic settings for natural scrolling, tapping, touchpad speed, etc.

How to Install Touchpad Indicator in Ubuntu:

The software is available in the developer’s PPA for all current Ubuntu releases.

Open terminal either via Ctrl+Alt+T or by searching for “terminal” from application launcher. When it opens, do followings steps to install the indicator:

1. Run command to add the PPA.

sudo add-apt-repository ppa:atareao/atareao

Type in your password (no visual feedback while typing due to security reason) when it prompts and hit Enter.

2. Then check updates and install the software by running following commands one by one:

sudo apt-get update

sudo apt-get install touchpad-indicator

Once installed, launch it and you’ll see the applet icon in top-right system tray.

Uninstall:

To remove touchpad indicator, run apt command in terminal with remove flag:

sudo apt-get remove --autoremove touchpad-indicator

To remove PPA repositories, launch Software & Updates and navigate to Other Software tab.

The first bug-fix release of IntelliJ IDEA 2018.1 was released a few days ago with several important and critical bug-fixes.

IntelliJ IDEA 2018.1.1 includes following fixes:

  • An important fix that restores the automatic check for updates.
  • The keystrokes aren’t lost during freezing anymore
  • Clicking the Replace all option from the Replace in path dialog doesn’t cause the IDE to freeze
  • Issue with broken JPS that inhibits all non-gradle Android builds
  • Facet settings stored externally are now loaded by the build process
  • support for annotationProcessorPaths option in the maven-compiler-plugin 3.5 for external dependencies.
  • Performance for scrolling huge text file on 4K monitors was improved
  • The issue with AWT popups, which were above other process windows after alt-tab, was fixed

Install IntelliJ IDEA 2018.1.1 in Ubuntu:

Jetbrains offers official snap packages for Ubuntu Linux users. You can install it in Ubuntu 16.04, Ubuntu 17.10, Ubuntu 18.04 via following steps.

1. (Ubuntu 16.04 only) For those who never installed a snap package, open terminal (Ctrl+Alt+T) and run command to install snapd daemon:

sudo apt-get install snapd snapd-xdg-open

No visual feedback while typing your password due to security reason.

2. Then you can search for and install IDEA via Ubuntu Software:

Or run command in terminal instead to install the IDE:

snap install intellij-idea-community --classic

For the ultimate edition, replace intellij-idea-community with intellij-idea-ultimate in the code.

The lightweight Pragha music player 1.3.91.1 was released a day ago as a new beta of Pragha 1.4.

Changes in the new release include:

  • Save lyrics and artist bio ans similar songs in user cache as files. These are easily editable by the user.
  • Implement increse play count to Koel.
  • Various improvements to the tag editor dialog.
  • Add a header that highlights the main tags.
  • Update the header as you edit the tags.
  • Hides the check buttons and shows them when the tag is modified.
  • When you demarcate the check, restore the original tag.
  • Fix plugins on last tarball due to an internal development patch.

How to Install Pragha 1.3.91.1 in Ubuntu 18.04, 16.04, 17.10:

While the project page provides only source tarball, you can easily install Pragha music player via an unofficial PPA in Ubuntu 16.04, Ubuntu 18.04, and Ubuntu 17.10.

1. Open terminal via Ctrl+Alt+T or from app launcher. When it opens, run command to add the PPA:

sudo add-apt-repository ppa:ubuntuhandbook1/pragha

Input your password (no visual feedback while typing due to security reason) and hit Enter.

2. Then install the music player either via Synaptic Package Manager or by running commands:

sudo apt-get update

sudo apt-get install pragha

Remove Pragha:

To remove the music player, either use Synaptic Package Manager or by running command:

sudo apt-get remove --autoremove pragha

And you can remove the PPA via Software & Updates utility under ‘Other Software’ tab.

Free and open-source scorewriter MuseScore 2.2.1 was released a few days ago. Now it’s available in the PPA repository for Ubuntu 18.04, Ubuntu 17.10, Ubuntu 16.04, Ubuntu 14.04.

MuseScore has an stable PPA repository, which was not updated for almost a year due to outdated dependency libraries in Ubuntu 16.04 since version 2.1.0. Now the PPA is active again with the latest 2.2.1 packages for all current Ubuntu releases.

1. To add the PPA, open terminal either via Ctrl+Alt+T or by searching for ‘terminal’ from app launcher. When it opens, run command:

sudo add-apt-repository ppa:mscore-ubuntu/mscore-stable

Input your password (no visual feedback while typing) when it prompts and hit Enter to continue.

2. Then upgrade MuseScore from an existing release via Software Updater (Update Manager):

or simply run commands one by one in terminal to install or upgrade the scorewriter:

sudo apt-get update

sudo apt-get install musescore

Uninstall MuseScore:

To uninstall the software, open terminal and run command:

sudo apt-get remove --autoremove musescore

And you can remove PPA repositories by launching Software & Updates and navigating to “Other Software” tab.

Flight Simulator FlightGear 2018.1 Released

Last updated: April 7, 2018

The open-source flight simulator FlightGear 2018.1 now is available for download.

Changes in FlightGear 2018.1 “Honolulu” include:

  • Improved “Classic theme” with better fonts and colours
  • Canvas MapStructure support for SlippyMaps, including VFRCharts, STAMEN,
  • Various improvements to the Launcher
  • Atmospheric Light Scattering renderer: extra volumetric vegetation layers for denser undergrowth
  • Active Volcanos, including Kilauea, Stromboli, Etna,
  • CH Products Throttle Quadrant supported out-of-the-box.
  • Improved support for add-ons
  • And many other changes

Download / Install FlightGear 2018.1:

Source tarball, Windows and Mac OS packages are available for download at the link below:

For Ubuntu Linux, there’s a PPA repository (check the link before doing following steps) and the new release packages should be available in few days.

1. To add the PPA repository, open terminal either via Ctrl+Alt+T or by searching for ‘terminal’ from app launcher. When it opens, run command:

sudo add-apt-repository ppa:saiarcot895/flightgear

Input your password (no visual feedback while typing due to security reason) and hit Enter.

2. Then you can upgrade FlightGear via Software Updater (may not work on Ubuntu 16.04 due to version system change) once it’s published in the PPA repository.

Or install it for the first time via commands:

sudo apt-get update

sudo apt-get install flightgear

Uninstall:

To uninstall FlightGear, simply run following command in terminal:

sudo apt-get remove --autoremove flightgear

And remove the PPA by launching “Software & Updates” utility and navigating to Other Software tab.

The final beta of Ubuntu 18.04 Bionic Beaver LTS (Long Term Support) was released a few hours ago.

Ubuntu 18.04 Beta 2 features iso images for Ubuntu Desktop, Server, and Cloud products. Also Kubuntu, Lubuntu, Ubuntu Budgie, Ubuntu Kylin, Ubuntu MATE, Ubuntu Studio, and Xubuntu images are available.

The beta includes updated versions of most of core set of packages, including a current 4.15 kernel, and much more. And the final release of Ubuntu 18.04 will be available on April 26.

Notable hanges in Kubuntu 18.04 since the last LTS:

  • Replace Dragonplayer with VLC as default media player.
  • Muon package manager is shipped by default once again.
  • Replace Amarok with Cantata Qt5 as default music player.
  • Drop Telepathy instant messaging client from the defaults.

Notable changes in Xubuntu 18.04 include:

  • Removed the GTK Theme Configuration tool
  • Replaced the Sound Indicator with the Xfce PulseAudio Plugin.
  • Replaced Application indicator with Status Notifier Plugin
  • Replace some desktop applications: Evince -> Atril, File Roller -> Engrampa, GNOME Calculator -> MATE Calculator.

Changes in Ubuntu MATE 18.04 include:

  • MATE desktop 1.20
  • Uses Indicators by default in all layouts.
  • Brisk Menu switches to a dash-style launcher for Mutiny or Cupertino layout.
  • Minimal installation support and more and more other changes.
  • New and updated desktop layouts
  • The xcursor themes have been replaced with new cursours from MATE upstream

Changes in Ubuntu Budgie 18.04 Beta2 include:

  • Introduce Window Shuffler – a brand-new GUI and keyboard based grid tiling
  • Weather Applet now is working again.
  • Budgie Welcome has had a whole series of changes

Notable changes in Ubuntu Studio 18.04 Beta 2 include:

  • Add an option to Ubuntu Studio Controls to set the CPU governor to performance mode
  • Removed zynjacku as this is no longer maintained software
  • Updated versions of main multimedia packages

The beta images for other flavors: Ubuntu Kylin 18.04, LUbuntu 18.04.