Need to do some work in the black & white command line console? You can press Ctrl+Alt+F3 on keyboard to switch from the current session to tty3 text console, and switch back via Ctrl+Alt+F2.
From the startup grub boot-loader menu entry, you may select the Advanced Options > recovery mode > Drop to root shell prompt to get into text mode. However you need to run command mount -o rw,remount / to get file system write permission.
If you want to make Ubuntu automatically boot into the text mode, configure grub settings by doing following steps one by one:
1. Open terminal and run command to backup the configuration file:
Transmission, Ubuntu’s default BitTorrent Client, released new major 3.00 version a days ago. Here’s how to install it in Ubuntu 20.04, Ubuntu 19.10, Ubuntu 18.04.
1. Open terminal either by pressing Ctrl+Alt+T on keyboard or by searching for ‘terminal’ from your system application menu. When it opens, run command to add the PPA:
sudo add-apt-repository ppa:transmissionbt/ppa
Type user password (no asterisk feedback) and hit Enter to continue.
2. Then launch Software Updater (update manager) and upgrade the torrent client:
How to Restore:
For any reason, you can restore the BitTorrent client to the stock version by running command in terminal:
Presets for more effects can be imported and exported.
New Multi-View mode for tracks.
Export audio to Opus in Windows, Linux.
Easier to convert labels between point labels and range labels.
New Loudness Normalization effect.
New RMS measurement analyzer.
New Noise Gate effect.
New Spectral Delete effect.
Tons of bug-fixes.
How to Install Audacity 2.4.1 in Ubuntu:
The unofficial PPA has built the new release packages for Ubuntu 20.04, Ubuntu 19.10, Ubuntu 18.04, and Ubuntu 16.04.
1. Open terminal either via Ctrl+Alt+T keyboard shortcut or by searching for ‘terminal’ from application menu. When it opens, run command to add the PPA:
HP DeskJet 2300 All-in-One, Ink Advantage 2300 All-in-One
HP ENVY 6000 series, Pro 6400 series.
HP DeskJet Plus 6000, 6400 series
HP DeskJet 2700 and Ink Advantage 2700 All-in-One Printer series
HP DeskJet Plus 4100, Ink Advantage 4100 All-in-One Printer series
HP LaserJet Enterprise M610dn, M611dn, M611x, M612dn, M612x
HP LaserJet Enterprise MFP M634dn, M634z, M635h, M635fht, M636fh
HP LaserJet Enterprise Flow MFP M634h, M635z, M636z
The new release also added support for Debian 10.3, and Manjaro 19.0.
There’s also known issues that USB print and scan will not work on Vasari and Taccola on Ubuntu 20.04, please refer to link: manpages.ubuntu.com.
How to Install HPLIP 3.20.5 in Ubuntu:
1. To install the software, download the package “hplip-3.20.5.run” from the link below:
2. Then open terminal either via Ctrl+Alt+T or by searching for “terminal” from app launcher. When it opens, run command to give executable permission:
chmod +x ~/Downloads/hplip-3.20.5.run
3. Finally run command to start installing the driver:
./Downloads/hplip-3.20.5.run
Follow the terminal output and answer some questions. If everything goes OK, plug or re-plug your HP devices and enjoy!
Want to convert your video files (e.g., mp4, wav, mkv) to mp3 or other audio formats?
Without struggling with FFmpeg command line tool or any other video editor, SoundConverter offers a clean and easy interface that can do the job just with a few clicks.
FlightGear Flight Simulator 2020.1 was released a week ago. Now it’s finally made into PPA for Ubuntu 16.04, Ubuntu 18.04, Ubuntu 19.10, Ubuntu 20.04, and their derivatives.
FlightGear 2020.1 was released as current preview release that contains many exciting new features, enhancements and bugfixes.
Enhancements since 2019.1 include a developer preview of the upcoming Compositor graphical rendering framework as a separate pre-built binary, better aircraft carrier support, improvements to both the JSBSim and YASim flight dynamics models, better view options, more efficient and better looking OpenStreetMap buildings and translation of the UI into Polish. Major aircraft updates include the Boeing 777, Airbus A320, Antonov AN-24, F-16, Piper J3Cub, Saab JA37 Viggen, Piper PA28 Cherokee, Bombardier Q-400, Space Shuttle.
1.) To install the flight simulator, first open terminal either from system application menu or by pressing Ctrl+Alt+T on keyboard.
When terminal opens, run command to add the PPA repository:
This simple tutorial shows how to change the action (e.g., power off, hibernate, do nothing, or lock) when laptop lid is closed in Ubuntu 20.04, Ubuntu 22.04, and Ubuntu 24.04, while it suspends Ubuntu by default.
NOTE: This tutorial is also tested and works in Ubuntu 22.04, and Ubuntu 24.04 with default GNOME desktop environment. It should also works in other Linux uses systemd.
Dconf editor offers options to change the action to take when the laptop lid is closed on AC or power, but it doesn’t work!
Option 1: Edit logind.conf file
So far as I know, you can edit the logind.conf file to change the lid close action. And it should work on all Ubuntu desktop, server, and flavors.
1.) First, press Ctrl+Alt+T on keyboard to open up a terminal window. When it opens, run command to edit the config file:
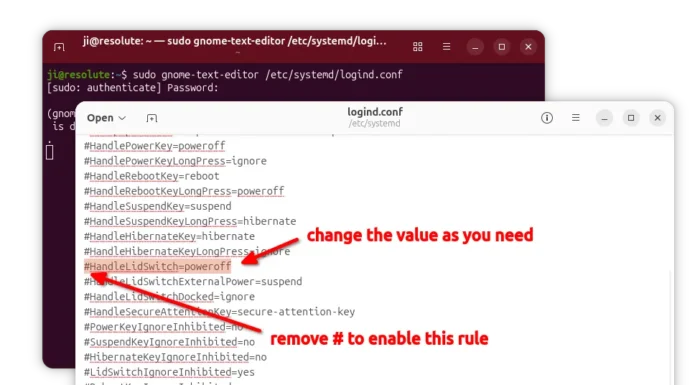
sudo gedit /etc/systemd/logind.conf
Depends on your Ubuntu edition and desktop environment, replace gedit in command with gnome-text-editor for Ubuntu 24.04 and higher. Or, use mousepad for XFCE, pluma for MATE, or nano command line text editor that works in most desktops.
2.) When the file opens, find out the line #HandleLidSwitch=suspend and change it to one of following :
HandleLidSwitch=lock – lock when lid closed.
HandleLidSwitch=ignore – do nothing, some laptops will disconnect Wi-Fi.
HandleLidSwitch=poweroff – shutdown.
HandleLidSwitch=hibernate – hibernate Ubuntu.
NOTE: hibernation feature does NOT work out-of-the-box in Ubuntu, you have to enabled it first if need.
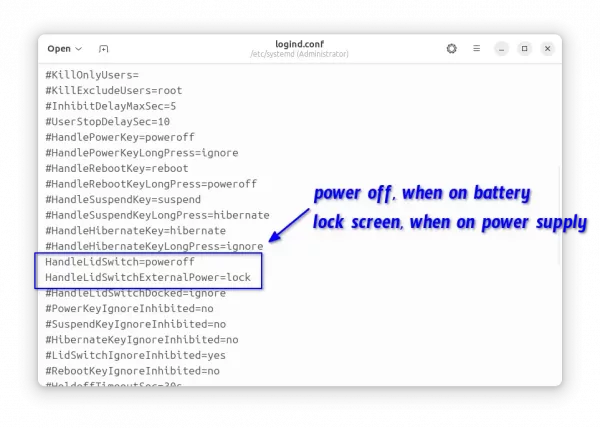
3.) Set lid close action when running on power supply or in docking station.
For choice, you may also uncomment ‘HandleLidSwitchExternalPower‘ and/or HandleLidSwitchDocked lines by removing # at their beginning, and change the value to lock, ignore, poweroff, or hibernate.
So the changes will also apply when your laptop is running with power supply, in a docking station, or with external displays.
4.) After saved the file (for nano, press Ctrl+S then Ctrl+X). Finally apply changes by running command to restart systemd-logind service:
systemctl restart systemd-logind.service
In current Ubuntu releases, the last command will log user out. But for Ubuntu 22.04 and higher, it’s better to restart computer instead.
Note: You have to do previous steps every time you want to change the action. And ‘Suspend when laptop lid is closed‘ option in Gnome Tweaks will no longer work before you comment (add # at the beginning) the line in /etc/systemd/logind.conf.
Option 2: Use A Drop-in under /etc/systemd/logind.conf.d
The first option works good in my case, but it’s recommended to create “drop-ins” in the /etc/systemd/logind.conf.d/ directory. So defaults can be easily restored by deleting main file and all drop-ins.
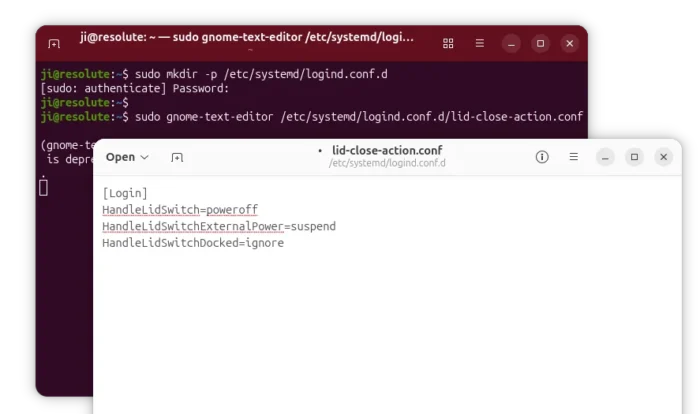
1. First, press Ctrl+Alt+T to open terminal. Then, run command create the directory in case it does not exit:
sudo mkdir -p /etc/systemd/logind.conf.d
2. Next, run command to create a ‘drop-in'(custom config file), for example lid-close-action.conf, under that directory:
UPDATE: For Ubuntu 22.04 and Ubuntu 24.04, there’s now a graphical tool to do the job, see this tutorial for details.
This simple tutorial shows how to easily change the login screen background wallpaper or solid color in Ubuntu 20.04 Gnome desktop.
There’s no setting option to change GDM3 login screen background unless hacking on the the style sheet file, though it was fairly straightforward to edit the content in Ubuntu 18.04 and Ubuntu 19.10.
In Ubuntu 20.04, you have to extract the css file from current theme’s .gresource file, then edit the content and recompile to create the new .gresource file, and finally set it as default.
Change Login screen background via script:
Thankfully, there are a few scripts in Github to make things simple. And here’s the one that works on Ubuntu 20.04, Ubuntu 20.10, and Ubuntu 21.04.
1.) First open terminal via Ctrl+Alt+T key combination and run command to install the required libraries:
sudo apt install wget libglib2.0-dev-bin
2.) Then download the script via wget command line downloader:
3.) After downloaded the script, add executable permission to the file by running command:
chmod +x change-gdm-background
4.) And finally run command to set your photo image as login background:
sudo ./change-gdm-background /PATH/TO/IMAGE
Besides typing the path to image manually, you can type “sudo ./change-gdm-background” in terminal, then hit space bar to input a blank space, and finally drag & drop the image from file manager to terminal window.
Type user password (no visual feedback) when it asks and hit Enter. IMPORTANT: After successfully changed the login screen background, it asks whether to restart GDM to apply changes. Answer yes will log out current session, so it’s important to backup your work before hitting enter!
3.(Optional) To restore changes, run command:
sudo ./change-gdm-background --restore
Save the script for future use:
If you like the script and want to keep it for user later, run command to copy it to /usr/local/bin directory:
sudo cp change-gdm-background /usr/local/bin
After that, you can run the script any time in terminal window via: