![]()

Debian 11, code-name ‘Bullseye’, officially released. Features 5-year support, Kernel 5.10 LTS, out-of-the-box support for exFAT file-system and most modern printers.
Debian is free open-source community-supported Linux distribution started in 1993. It aims to be “The Universal Operating System” that is suitable for Desktop users, servers to cluster systems; and for database, web, and storage servers. And it’s the basis for many other distributions, including Ubuntu.
In my mind, Debian is a quite stable and reliable system for production use. While serving with less system resources, it’s very popular for server users. Though the package base is a little old, there are package teams keep working for the security, stability and performance. And in “Bullseye”, the Debian Med team has been flighting against COVID-19 by packaging software for researching the virus on the sequence level and for the tools used in epidemiology.
What’s New in Debian 11:
For personal computers, Debian 11 is available via different Desktop Environments, including:
- Gnome 3.38,
- KDE Plasma 5.20,
- LXDE 11,
- LXQt 0.16,
- MATE 1.24,
- Xfce 4.16.
The release provides Linux Kernel 5.10 with support for exFAT file system. The exfat-fuse package is no longer required for mounting exFAT file-systems. And the exfatprogs provides the tools to create, check and label exFAT filesystems.
With ipp-usb, it offers out-of-the-box support for most modern printers without vendor specific drivers.
There are also updated packages including Apache 2.4.48, BIND DNS Server 9.16, Calligra 3.2, Cryptsetup 2.3, Emacs 27.1, GIMP 2.10.22, GNU Compiler Collection 10.2, GnuPG 2.2.20, Inkscape 1.0.2, LibreOffice 7.0, MariaDB 10.5, OpenSSH 8.4p1, Perl 5.32, PHP 7.4, PostgreSQL 13, Python 3.9.1, Rustc 1.48, Samba 4.13, and Vim 8.2.
Other changes includes:
- Activate the persistent journal functionality by default.
- New Fcitx 5 input method.
- Defaults to Wayland and better addon support.
- 64-bit/32-bit PC, PowerPC, IBM S/390, ARM, MIPS architectures support.
- Over 11,294 new packages, 9,519 packages marked as obsolete and removed.
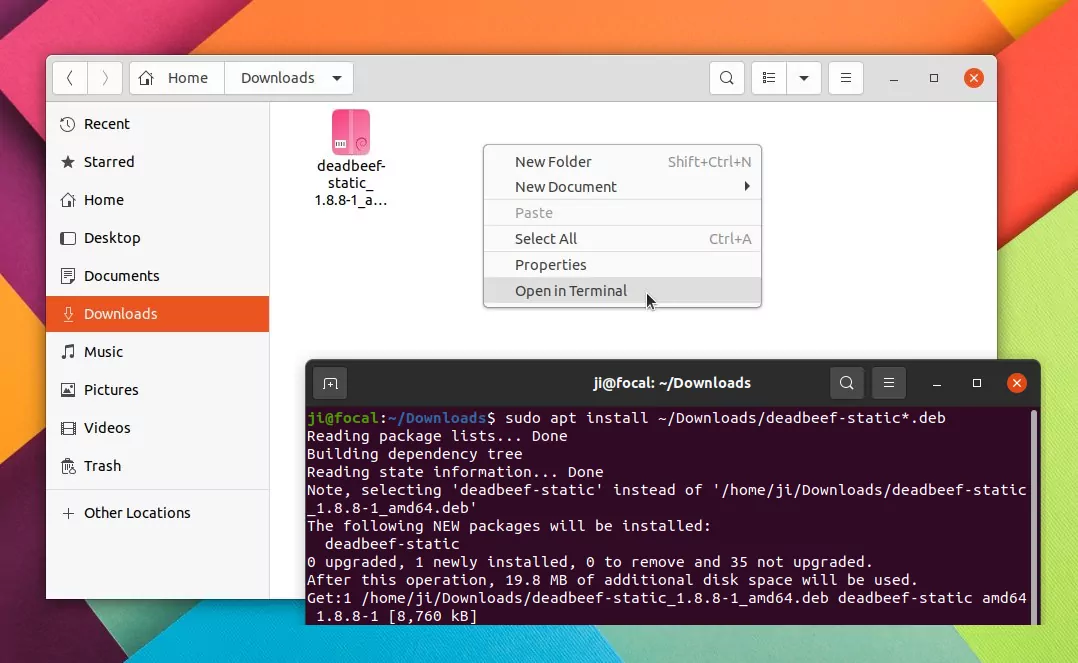
How to Get Debian 11:
Debian website provides small disco image that need internet connection while installing process to download more. There are also complete image, and live iso for trying Debian without installing it on your machine.
To upgrade from the previous Debian 10 buster, the documentation is available with detailed information.