Microsoft Visual Studio Code 1.28 was released a few days ago. Here’s how to install it in Ubuntu 18.04.
VS Code 1.28 release highlights according to the announcement:
- VS Code now ships custom icons reflect file type in your OS explorer.
- Snippets can now be scoped to a project and shared with your team.
- Editor Tab completion can now complete all kind of suggestions.
- New command to go to the location of your last edit.
- New command
Save without Formattingto save a file without triggering any of the save participants - Rename a JS/TS file through it’s import path.
- The new Convert to async function suggestion for JavaScript and TypeScript rewrites functions that use .then Promise chaining to use async and await
- Git improvements: better delete conflict handling, new rebase on sync option.
- Better Markdown folding: collapse code blocks, multi-line lists, and embedded HTML.
How to Install VS Code 1.28 in Ubuntu:
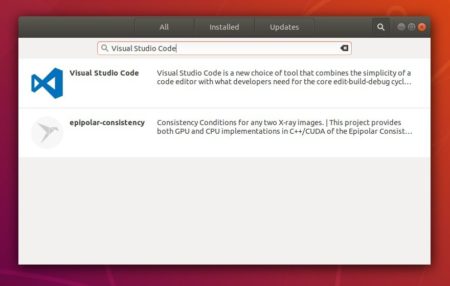
The easiest way is to install the community maintained Snap (run in sandbox) package from Ubuntu Software:
You can also install the official .deb package which is available for download at the link below:
Grab the deb and install it via either Gdebi package manager or command in terminal(Ctrl+Alt+T):
sudo dpkg -i ~/Downloads/code_*.deb; sudo apt -f install
For those who want to receive updates for VS Code via Software Updater utility, add the Microsoft repository via following steps (64bit only):
1. Open terminal (Ctrl+Alt+T) and run command to add the repository:
sudo sh -c 'echo "deb [arch=amd64] https://packages.microsoft.com/repos/vscode stable main" > /etc/apt/sources.list.d/vscode.list'
2. Download and install the repository key via commands:
curl https://packages.microsoft.com/keys/microsoft.asc | gpg --dearmor > microsoft.gpg

sudo mv microsoft.gpg /etc/apt/trusted.gpg.d/microsoft.gpg
3. Finally install the IDE via command:
sudo apt-get install code
Uninstall Visual Studio Code:
To remove the code editor, either use Synaptic Package Manager or run command:
sudo apt-get remove --autoremove code
And remove the Microsoft repository by launching Software & Updates utility and navigating to Other Software tab.