The first release of PyCharm python IDE 2018 was announced earlier today with great new features.
PyCharm 2018.1 release highlights:
- Data scientists can now define code cells in their files, and choose exactly which parts to execute. No more need to re-import your data every time you finetune your analysis!
- Do you run Python code on remote machines? Configuring an SSH remote Python interpreter is now easier than ever.
- Even though Python 3.7 isn’t out yet, PyCharm 2018.1 already fully supports developing Python 3.7 code.
- Those of you who take pride in having precise commits will be pleased to hear that you can now choose which chunks of files to include in your git commits.
- PyCharm is the Python IDE that knows your code, and PyCharm 2018.1 knows Python code better than ever with new code intelligence features.
- Docker Compose file format 3.3 and later are now supported. Also, performance of Docker Compose interpreters has improved significantly.


How to Install PyCharm 2018.1 in Ubuntu:
Jetbrains offers official snap packages for Ubuntu Linux users. You can install it in Ubuntu 16.04, Ubuntu 17.10, Ubuntu 18.04 via following steps.
1. (Ubuntu 16.04 only) For those who never installed a snap package, open terminal (Ctrl+Alt+T) and run command to install snapd daemon:
sudo apt-get install snapd snapd-xdg-open
No visual feedback while typing your password due to security reason.


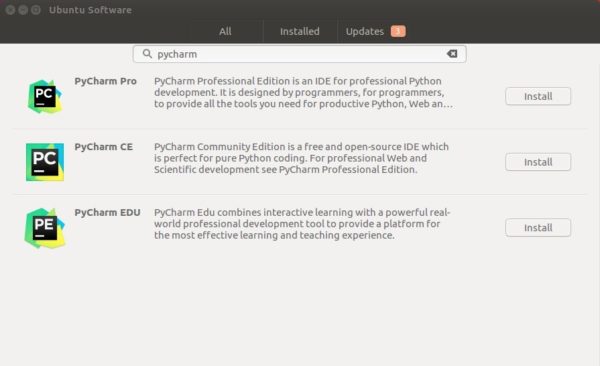
2. Then you can search for and install PyCharm via Ubuntu Software:

Or run command in terminal instead to install the IDE:
snap install pycharm-community --classic
For professional, replace pycharm-community with pycharm-professional in the code.