![]()
Nuvola Player 3, a cloud music integration for your Linux desktop, now is at beta build and is recommended for general usage.
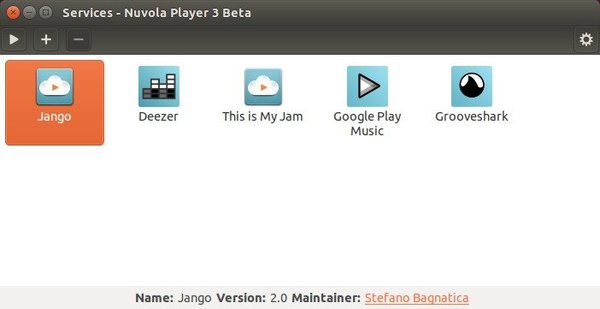
Nuvola Player is an open-source music player that integrates cloud music services like Google Music, Rdio, Spotify, Grooveshark, Jango, etc with your desktop.
Nuvola Player 3 has been rewritten from scratch and contains plenty of improvements over Nuvola Player 2. Now it provides an official Linux repository currently supports Ubuntu 14.04 (Linux Mint 17.1), Ubuntu 14.10, Fedora 20-21 and Debian Jessie and Sid.
Supported Music Services:
Nuvola Player 3 currently ships with five music streamimg services:
- Deezer 2.2 – Jiří Janoušek
- Google Play Music 5.0 – Jiří Janoušek
- Grooveshark 4.0 – Jiří Janoušek
- Jango 2.0 – Stefano Bagnatica
- This is My Jam 2.0 – Jan Vlnas
Five more services are in preparation and will be added to the repository when finished:
- Rdio (Aaron Cripps)
- Bandcamp (Jiří Janoušek)
- Spotify (Michael Nye)
- KEXP Live Stream (Michael Nye)
- Synology Audio Station (Daniel Schep).
- 8tracks (Jiří Janoušek)
How to Install Nuvola 3 in Ubuntu:
NOTE: Nuvola Player 3 won’t replace Nuvola Player 2 in you system. You can keep using Nuvola Player 2 until Nuvola Player 3 is stable enough for you.
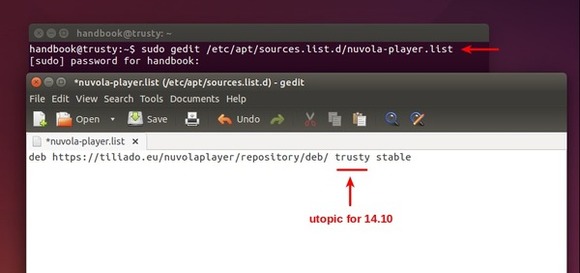
1. Add Nuvola Player stable repository.
Open terminal from the Dash or by pressing Ctrl+Alt+T on keyboard. When it opens, run command to create and edit a repository file:
sudo gedit /etc/apt/sources.list.d/nuvola-player.list
When the file opens, paste below into it (For Ubuntu 14.10, replace trusty with utopic) and save the file:
deb https://tiliado.eu/nuvolaplayer/repository/deb/ trusty stable
2. The official website does not mention the repository gpg key. But sudo apt-get update command outputs below error:
W: GPG error: https://tiliado.eu trusty InRelease: The following signatures couldn't be verified because the public key is not available: NO_PUBKEY 40554B8FA5FE6F6A
This can be easily fixed by running below command to receive the key:
sudo apt-key adv --keyserver keyserver.ubuntu.com --recv-keys 40554B8FA5FE6F6A
3. Finally search and install Nuvola player 3 via Synaptic Package Manager. Or run below two commands one by one in terminal:
sudo apt-get update

sudo apt-get install nuvolaplayer3
Done! For more, go to tiliado.eu/nuvolaplayer/.