The Ubuntu Team has announced the release of Ubuntu 14.04.5 LTS. It’s the fifth and final point release that includes new hardware enablement stack (HWE) from Ubuntu 16.04 LTS.
The Ubuntu team is pleased to announce the release of Ubuntu 14.04.5 LTS (Long-Term Support) for its Desktop, Server, Cloud, and Core products, as well as other flavours of Ubuntu with long-term support.
We have expanded our hardware enablement offering since 12.04, and with 14.04.5, this point release contains an updated kernel and X stack for new installations to support new hardware across all our supported architectures, not just x86.
As usual, this point release includes many updates, and updated installation media has been provided so that fewer updates will need to be downloaded after installation. These include security updates and corrections for other high-impact bugs, with a focus on maintaining stability and compatibility with Ubuntu 14.04 LTS.
Upgrade to Ubuntu 14.04.5:
Ubuntu 14.04 users can easily upgrade to the 14.04.5 point release by running a regular system update via Software Updater.
Or run the commands in terminal:
sudo apt-get update && sudo apt-get upgrade
Note that the updated hardware enablement stack, Kernel 4.4 and X graphics stack from 16.04, will be available through the update only for those who installed Ubuntu 14.04 using the 14.04.2 or newer disc image.
Those who installed Ubuntu 14.04 from the original or 14.04.1 disc image will keep the original Trusty stack. Anyone wishing to opt into the new Kernel and X graphics stack may do so by running the command below in terminal:
This is quick tutorial that shows you how to install and setup a Telnet server in Ubuntu 14.04 LTS.
TELNET (TELetype NETwork) is a network protocol used on the Internet or local area network LAN connections. It allows one computer to access a command-line interface on a remote host.
Telnet is insecure because the communication is not encrypted, your password and all other data will be transmitted as clear text. If possible avoid Telnet, and use Secure Shell (SSH) instead.
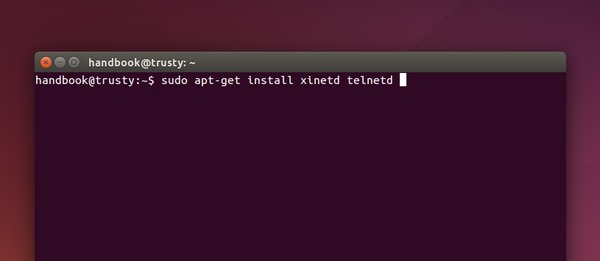
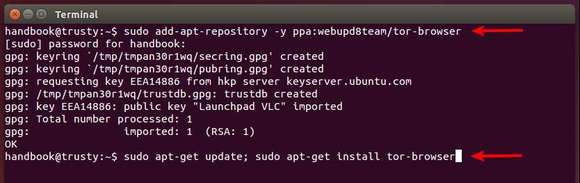
If you really want to enable the Telnet in Ubuntu, just run the command below in text console (terminal) to install Telnet server:
sudo apt-get install xinetd telnetd
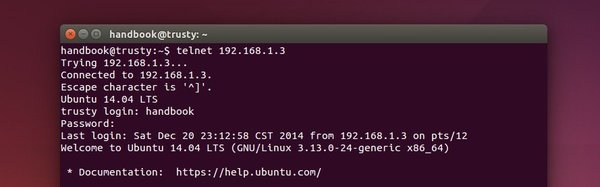
The Telnet service is started automatically once the installation is done. And you can either run telnet serverip or use a Telnet client (PuTTy, SecureCRT, etc.) to access this server.
To change the port (default is 23), edit the /etc/services file with your favorite text editor. Find out and change the number in the line below:
telnet 23/tcp
To apply changes, you have to restart the service by running the command below:
Linux Mint Team finally announced the release of 17.1 “Rebecca” Cinnamon and MATE editions, which is a long term support release based on Ubuntu 14.04 that will be supported until 2019.
According to the release note, the Linux Mint 17.1 “Rebecca” comes with updated software and brings refinements and many new features to make your desktop even more comfortable to use.
Linux Mint 17.1 features:
Cinnamon 2.4 / MATE 1.8
MDM 1.8
Out of the box support for Compiz (MATE edition)
Linux kernel 3.13
Ubuntu 14.04 package base
Update Manager now groups packages together according to their source package.
Redesigned UI of Language Settings.
Redesigned Login Window Preferences.
System, Artwork, and Other Improvements.
Both the Linux Mint 17 and 17.1 RC can upgrade to the new release through Updater Manager. For the 17.1 RC release just install any level 1 update you haven’t installed already.
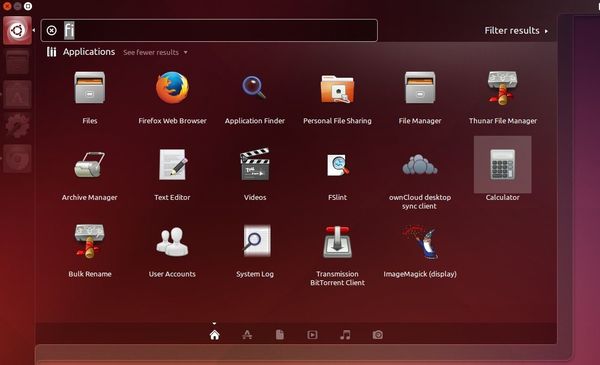
This quick tutorial shows how to improve your Ubuntu experience by speeding up the Unity Dash (search utility) response in Ubuntu 14.10 or Ubuntu 14.04.
1. Remove undesired search results
By default, the Dash displays Unity lens, scopes, Amazon online search results, and records file and application usage. You can disable some of them via below tips:
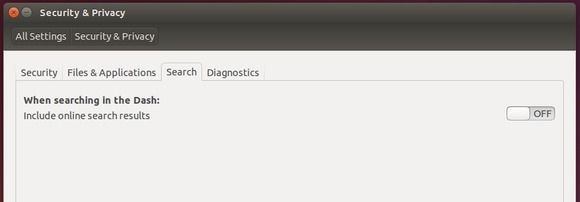
Disable online search results:
Launch System Settings and go to Security & Privacy, under “Search” tab turn off the switch which says “When searching in the Dash: include online search results”
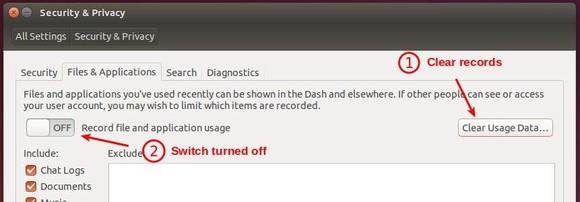
Stop recording file and app usage:
Also launch System Settings and go to Security & Privacy, under “Files & Applications” tab first clear records and then turn off the switch:
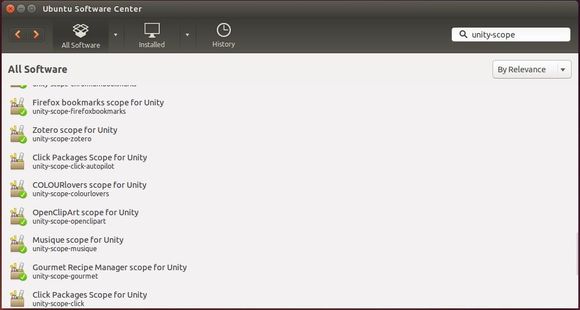
Remove unwanted Unity lens, scopes:
Open Ubuntu Software Center and search for unity-scope. In the results, check the information of installed scopes and remove the scopes you don’t need.
Do same to Unity lens by searching unity-lens.
2. Reduce Graphics Settings.
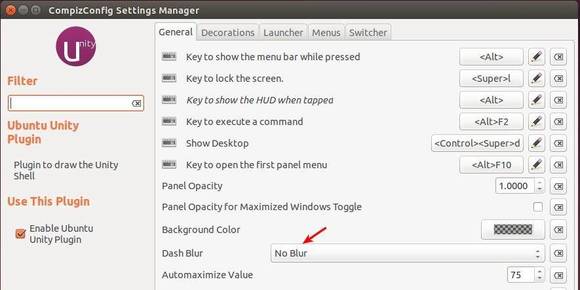
First click the link below to bring up Ubuntu Software Center and click install Compiz Config Settings Manager.
Then launch CCSM from the Unity Dash and do below changes:
Go to Ubuntu Unity Plugin page under the Desktop category. Select No Blur from the drop-down box for Dash Blur.
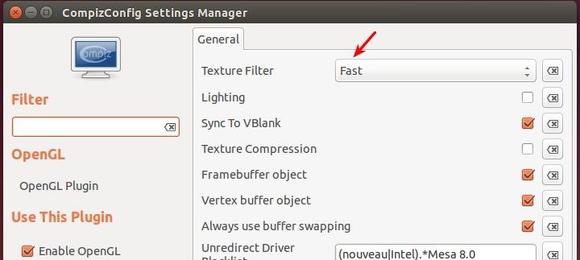
Go back and then go to OpenGL settings page under General category. Select Fast from the drop-down box for Texture Filter.
Note that this change would affect the whole Ubuntu System graphics and not Unity alone.
To apply all the changes, restart your computer. Enjoy!
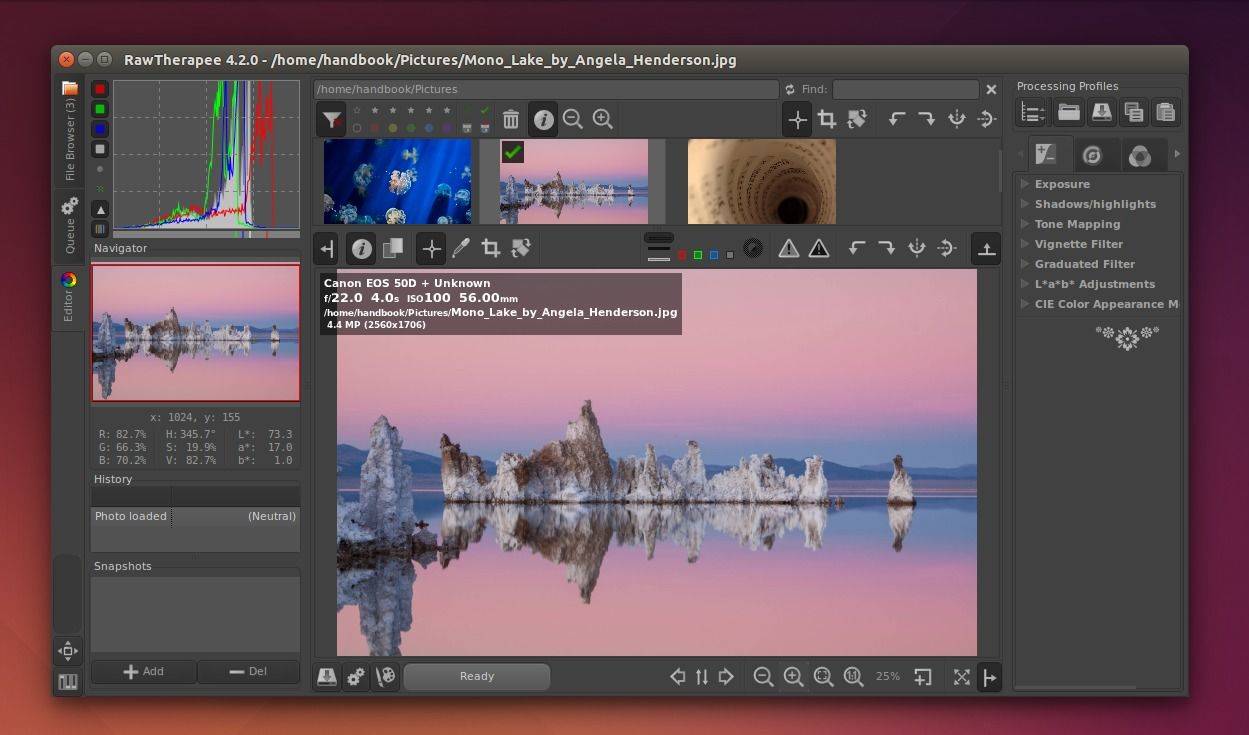
The open source raw image processing program RawTherapee 4.2 has been released recently with new features and speed, stability and memory usage optimizations.
RawTherapee is an advanced program for developing raw photos and for processing non-raw photos. It is non-destructive, makes use of OpenMP, supports all the cameras supported by dcraw and carries out its calculations in a high precision 32bit floating point engine. RawTherapee supports JPEG, PNG, and TIFF as output format for processed photos.
What’s new in RawTherapee 4.2:
RawTherapee-4.2 includes many speed, precision, stability and memory usage optimizations. As such, users of 32-bit operating systems may now find that they can enjoy more stability while using the most memory intensive tools. Of course users of 64-bit systems benefit from this as well. Refer to the full changelog for more information.
Powerful color toning tool.
Curve control of luminance noise reduction.
Median filter in the noise reduction tool.
Film simulation tool using Hald CLUT pattern files.
Command-line option to define bit depth of output TIFF/PNG file.
Multiple improvements to dead/hot pixel handling, see RawPedia.
Filename of currently opened image shown in the titlebar.
Clip control for the flat-field correction tool.
Demosaic method “Mono” for monochrome cameras, and “None” for no demosaicing.
Copy/paste processing profile keyboard shortcuts for right-handed users using Ctrl/Shift-Insert.
Update to dcraw 9.22 1.467
New or improved support for:
Canon EOS 7D
Canon EOS 7D Mark II
Canon PowerShot G7 X
Canon PowerShot SX60 HS
Fujifilm cameras using the X-Trans sensor
Fujifilm X30
Hasselblad H4D-31
Hasselblad H4D-50
Hasselblad H4D-60
Hasselblad H5D-40
Hasselblad H5D-50c
Mamiya Leaf Credo 40
Mamiya Leaf Credo 50
Mamiya Leaf Credo 60
Mamiya Leaf Credo 80
Monochrome cameras such as Leica Monochrome
Nikon D610
Nikon D700
Nikon D750
Nikon D800E
Nikon D810
Panasonic Lumix DMC-FZ1000
Panasonic Lumix DMC-GM5
Panasonic Lumix DMC-LX100
Phase One IQ250
Phase One P40
Phase One P65+
Sony Alpha ILCE-5100
Sony NEX-C3
Install / Upgrade RawTherapee in Ubuntu 14.04:
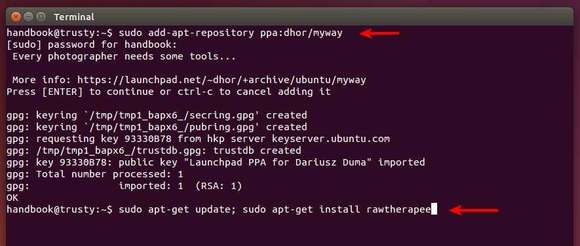
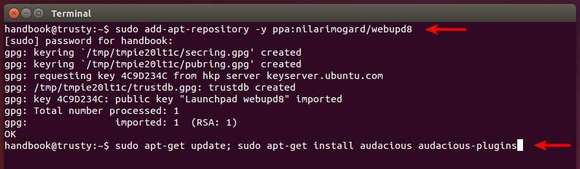
Thanks to Dariusz Duma, the binary package has been made into PPA, available for Ubuntu 14.04 LTS and Linux Mint 17.
To add the PPA and install RawTherapee 4.2, press Ctrl+Alt+T to open terminal, run the commands below one by one:
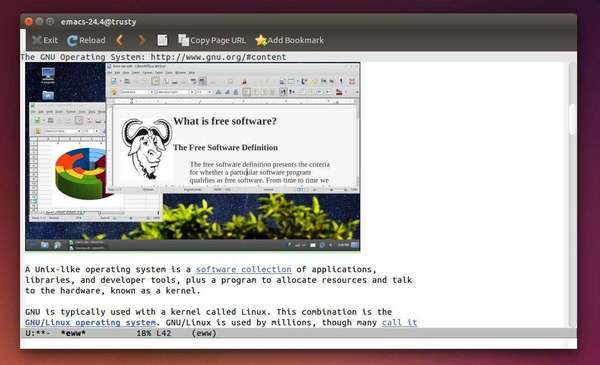
GNU Emacs has finally reached version 24.4 with many new features and improvements. The most notable is that the text editor brings a built-in web browser.
GNU Emacs is the most popular and most ported Emacs text editor, and it was created by Richard Stallman for the GNU Project.
The latest release Emacs 24.4 was released a few hours ago. The new release features:
A built-in web browser (M-x eww)
Improved multi-monitor and fullscreen support
“Electric” indentation is enabled by default
Support for saving and restoring the state of frames and windows
Emacs Lisp packages can now be digitally signed
A new “advice” mechanism for Emacs Lisp
File notification support
Pixel-based resizing for frames and windows
Support for menus in text terminals
A new rectangular mark mode (C-x SPC)
How to Install Emacs 24.4 in Ubuntu:
At the moment of writing this tutorial, there’s no PPA repository that contains Emacs 24.4. Fortunately, it’s not hard to build it from the source tarball. I’ve done it successfully in 64-bit Ubuntu 14.04 LTS. Below steps will show you how:
1. If have the old Emacs 24.3 installed, you may first remove it from Ubuntu Software Center so that you can install the new version over it.
2. Press Ctrl+Alt+T on keyboard to open terminal, or open it from the Unity Dash.
3. Run command below to install the build-essential:
sudo apt-get install build-essential
4. Install the required dependencies:
sudo apt-get build-dep emacs
While the installing process, you’ll be asked to configure the Postfix.
5. Now download Emacs 24.4 from its official FTP download page.
6. Extract the source and go into the result folder in terminal:
cd ~/Downloads && tar -xf emacs-24.4.tar.* && cd emacs-24.4
7. Finally compile the package by running commands below one by one.
./configure

make

sudo make install
Once done, you should be able to launch Emacs by running emacs or emacs-24.4 in terminal and lock the shortcut to the Unity Launcher.
To create a launcher for Emacs 24.4. Thanks to Emad Khoury, run command to create a .desktop file and edit it with Gedit text editor:
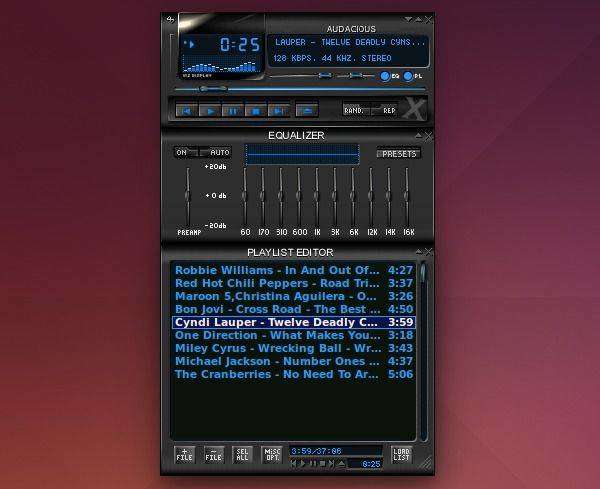
Audacious, the default audio player in Lubuntu, has just reached version 3.5.2 with updated translations and a few bug fixes.
Audacious is a free and open source audio player with a focus on low resource usage, high audio quality, and support for a wide range of audio formats. It contains built-in gapless playback and supports plugins and Winamp 2 skins.
Audacious GTK interface
Audacious Winamp Skin
Audacious 3.5.2 is the final release in 3.5 series. The developers are now working hard on Audacious 3.6. Bug fixes in v3.5.2:
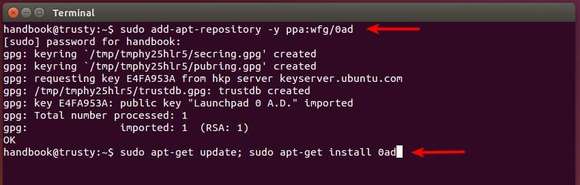
0 A.D. Alpha 17 Quercus, an open-source game of ancient warfare, has been released recently. Here’s how to install it from the official PPA and receive future updates.
0 A.D. is a free, open-source, cross-platform real-time strategy game under development by Wildfire Games. It is a historical war and economy game focusing on the years between 500 B.C. and A.D. 500. The game aims to be entirely free and open-source, using the GPL 2+ license for the game engine and the CC-BY-SA for the game art.
0 A.D. Alpha 17 Quercus features a major gameplay rebalance, units on walls, trigger support, improved mod support and more!
Linus Torvalds finally announced the stable release of Linux Kernel 3.17. He wrote on the Linux Kernel Mailing List (lkml.org):
So the past week was fairly calm, and so I have no qualms about releasing 3.17 on the normal schedule (as opposed to the optimistic “maybe I can release it one week early” schedule that was not to be).
However, I now have travel coming up – something I hoped to avoid when I was hoping for releasing early. Which means that while 3.17 is out, I’m not going to be merging stuff very actively next week, and the
week after that is LinuxCon EU…
What that means is that depending on how you want to see it, the 3.18 merge window will either be three weeks, or alternatively just have a rather slow start. I don’t mind getting pull requests starting now
(in fact, I have a couple already pending in my inbox), but I likely won’t start processing them for a week.
Anyway, back to 3.17. Nothing major happened during the last week, as you can see from the appended shortlog. Mostly drivers (i915, nouveau, ethernet, scsi, sound) and some networking fixes. With some misc
noise all over.
Go out and test,
Linus
What’s New in Linux Kernel 3.17:
Radeon R9 290 “Hawaii” GPUs finally play nicely with the open-source AMD Linux driver.
Microsoft Xbox One controller support.
Improvements to the Sony SIXAXIS support
Toshiba “Active Protection Sensor” Support, a driver to detect if Toshiba laptops are in a free-fall.
New ARM hardware support: Rockchip RK3288 SoC, Allwinner A23 SoC, Allwinner A31 Hummingbird, Tegra30 Apalis board, Gumstix Pepper AM335x, and the AM437x TI evaluation board.
Open-source NVIDIA driver improvements.
DMA-BUF cross-device synchronization support
Broadcom BCM7XXX-based board support
ACPI 5.1 activity and other power management improvements.
Audio support includes Wildcatpoint Audio DSP on Intel Broadwell Ultrabooks.
Install / Upgrade to Linux Kernel 3.17 in Ubuntu:
Ubuntu Kernel Team has made the binary packages, available for download in the link below:
You may first check out your OS type, 32-bit (i386) or 64-bit (amd64), then download and install the packages below in turn:
Tip: If you’re using a proprietary video driver, you may need to re-build (or re-install) the driver to get it work with new kernel.
If for some reason, the new kernel does not work properly for you, reboot with the previous Kernel (Grub boot loader -> Advanced -> select previous kernel) and run below command to remove Linux Kernel 3.17: