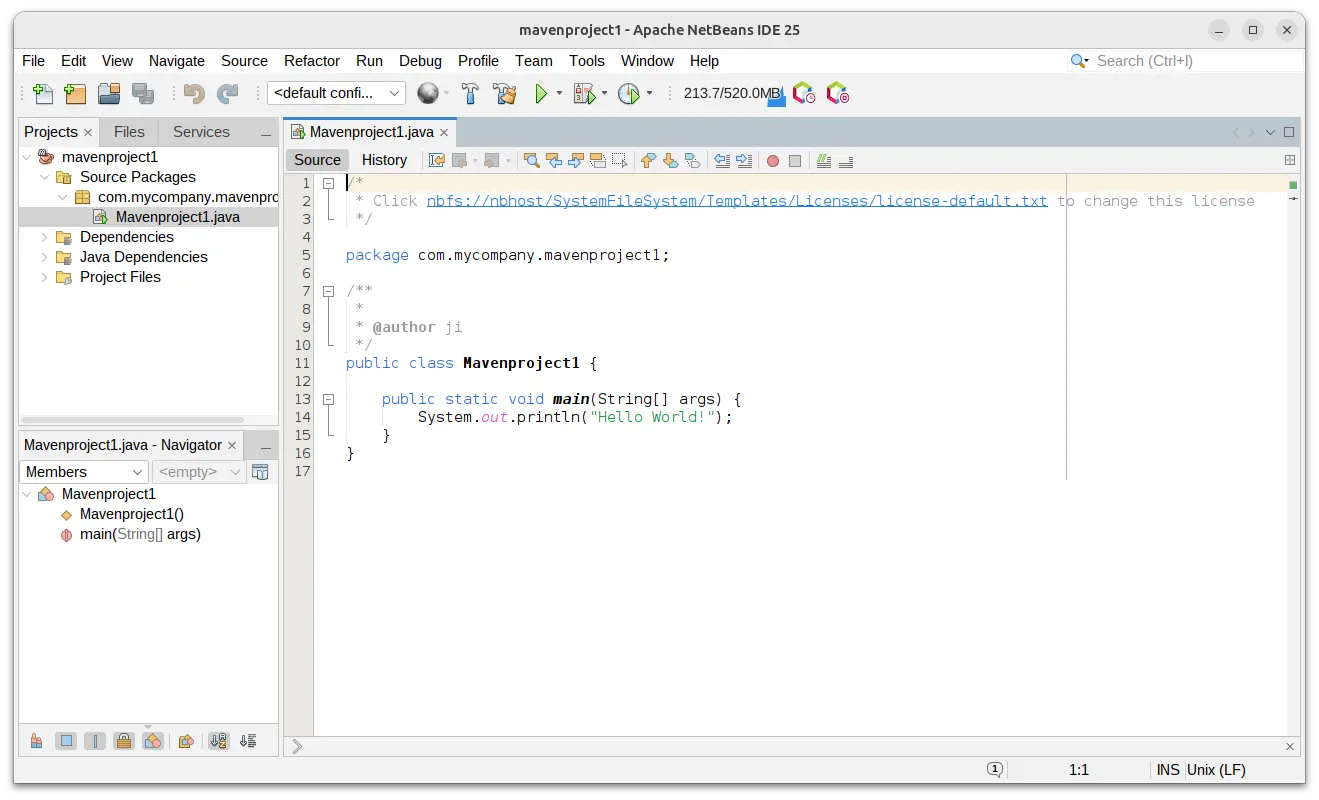
Firefox web browser announced the new monthly 121.0 release this Tuesday!
For Linux, the release finally default to Wayland session when available, meaning for Ubuntu 22.04 and higher (exclude Snap), Fedora Workstation, and other Linux with recent GNOME Desktop.
With Wayland, it has better support for touchscreen & touchpad.
User can use 2-finger swipe left/right to navigate forward and backward, and 2-finger pinch gesture to zoom in/out. It as well has per-monitor DPI settings, better graphics performance, and more.
Besides Wayland for Linux, Firefox 121.0 also adds Voice Control commands support on macOS systems, and prompts Windows users to install the Microsoft AV1 Video Extension to enable hardware decoding support.
Other features in Firefox 121.0 include:
Option to force links to always be underlined
New PDF viewer floating button to simplify deleting drawings, text, and images.
Option to disable the debugger; keyword on the current page.
Support :has() selector, the hanging and each-line keywords, balance keyword, lazy loading iframes.
tail call elimination support in WebAssembly language
Various security fixes.
How to Get Firefox 121.0
Most Linux that pre-installs Firefox, will build the latest package soon and publish into system repositories.
For Ubuntu, the snap package has been updated to v121.0. It should update to the new release automatically.
If NOT, press Ctrl+Alt+T on keyboard to open terminal, and run command to do the update manually.
snap refresh firefox
For the portable Linux tarball, as well as the official release note, go to the link below:
This simple tutorial shows how to install Firefox Beta, Firefox Developer Edition, or Firefox Nightly in Debian, Ubuntu, Linux Mint, using the new official repository.
Mozilla announced new official apt repository for Debian and Ubuntu users few months ago, which contains the .deb package for Firefox Nightly build.
Now, the repository also contains packages for Firefox Beta and Firefox Developer Edition! And, here’s step by step guide shows how to use it to install the latest packages in your system.
NOTE 1: Ubuntu also has an official PPA contains Firefox Beta package. Though, it’s maintained by members from Ubuntu Team.
NOTE 2: This tutorial is tested and works in Debian 12, Ubuntu 20.04, Ubuntu 22.04, and Ubuntu 23.10.
Step 1: Install the Repository Key
To add the new repository, you need to first download & install the key, so your system will trust the packages from it.
First, open terminal either from start menu or by pressing Ctrl+Alt+T on keyboard.
When terminal opens, run command to make sure ‘/etc/apt/keyrings’ exist for storing the keys.
sudo mkdir -p /etc/apt/keyrings
Then, download & install the key by running the single command below in terminal:
wget -q https://packages.mozilla.org/apt/repo-signing-key.gpg -O- | sudo tee /etc/apt/keyrings/packages.mozilla.org.asc > /dev/null
If ‘wget’ command not found, run sudo apt install wget to install it.
After that, you can verify the new key file by listing the content of that directory: ls /etc/apt/keyrings.
Step 2: Add Mozilla’s Official Repository
Also in a terminal window, run the single command below will create a config file and write the source repository.
echo "deb [signed-by=/etc/apt/keyrings/packages.mozilla.org.asc] https://packages.mozilla.org/apt mozilla main" | sudo tee /etc/apt/sources.list.d/mozilla.list > /dev/null
When done, you may verify by running cat /etc/apt/sources.list.d/mozilla.list to print the source file content.
Step 3: Install Firefox Stable, Beta, Dev, or Nightly
After adding the apt repository and key, run the command below to refresh system package cache:
sudo apt update
Finally, install Firefox Beta by running command:
sudo apt install firefox-beta
The repository also contains Firefox Stable, Development, and Nightly versions! Replace firebox-beta in last command with firefox, firefox-devedition, or firefox-nightly according which version you want to install. For STABLE version, you however NEED to set higher PPA priority.
Non-English user may also install the language package by running command:
sudo apt install firefox-beta-l10n-xx
Replace xx with the shortcode for your language. Also, replace beta for dev or nightly version accordingly.
Step 4: (Optional) Change the App Name to Differ from Firefox Stable
The new Firefox Beta uses same logo to Firefox Stable, and it also displayed as “Firefox” in start menu.
If you have more than one edition of Firefox packages in system, then you may have to differ them from each other by changing the name.
To do so, first launch terminal (Ctrl+Alt+T) and run command to copy the .desktop config file from system to local directory:
For people who are hard-of-hearing, and/or for better understanding audio, here’s a live captions app that provides real-time automatic subtitles on Linux desktop.
The app displays a wide flat window on desktop, showing real-time (may have few hundred milliseconds delay) subtitles for voice come from either speaker or microphone.
It’s free and open-source, and captioning locally without network permission with the power of deep learning. And, there’s no API keys, no proprietary services/libraries, no telemetry, no spying, no data collection.
The only thing you need is a somewhat-decent CPU that can perform real-time captioning. It’s tested and working good in my i5-10400, and following CPUs mentioned in project page:
Intel i7-2670QM
Intel i7-7820HQ
Intel i5-8265U
AMD Ryzen 5 1600
Steam Deck
How to Install the Live Captions app
The Live Captions app is available as Flatpak package that works in most Linux desktop!
Linux Mint 21 and Fedora 38+ (with 3rd party repository enabled) can directly search for and install “Live Captions” from either Software Manager or Gnome Software.
1. For Ubuntu, first press Ctrl+Alt+T on keyboard to open terminal. When it opens, run command to enable flatpak support:
sudo apt install flatpak
Other Linux can follow this official setup guide to enable Flatpak.
2. Then, run command to install the app through Flatpak package:
As running in sandbox, it may have hundred MB downloads for run-time libraries.
After installation, launch it from start menu or ‘Activities’ overview depends on your desktop environment.
If you’re first time installing an app through Flatpak, then you may need to log out and back in to make app icon visible. Or, run command below to start it from terminal:
flatpak run net.sapples.LiveCaptions
Start Live Captions
The first launch of the app will guide you to perform a short benchmark for your CPU. You need at least 1.0 score for running this app.
As it noticed, the live captions may not be accurate. It may make mistakes, including when it comes to numbers. Please do not rely on the results for anything critical or important.
When done, it starts into a blank window. There click the gear button to open ‘Preferences dialog’ to configure the window width, background opacity, text font, etc.
The built-in model so far support only English. Though, there are few more models available to download, which makes it work for Polish and French language.
To make the window always on top, just right-click on it and click “Always on Top” option.
When done configuration, just start live chat, or play something with voice, the app window should automatically show you the real-time subtitles in few seconds.
This simple tutorial shows how to edit .desktop files, the config files for your apps shown in start menu (app launcher), in Linux via single command.
In most Linux, the app icons (and their names) you see in dock & launcher are handled by .desktop files. If need, user can edit them by using either text editor or even third-party apps.
For software developing, scripting, or editing multiple .desktop files at the same time, there’s a command line tool that can help!
What you can do by editing .desktop file for your app:
The .desktop files are usually stored in following locations:
/usr/share/applications – for system wide.
$HOME/.local/share/applications – for current user only.
/var/lib/flatpak/exports/share/applications – for Flatpak apps (system wide).
$HOME/.local/share/flatpak/exports/share/applications – for Flatpak apps (current user).
/var/lib/snapd/desktop/applications/ – for Snap apps.
By editing a .desktop file that is associated with your app can do following things:
Change app icon
Change the app name in start menu.
Hide app
Group app icon in different categories.
Associate with different file types.
And more.
Find out the .desktop file for your app
If you don’t know where is the .desktop file, then try following steps to find it out.
First, open terminal (Ctrl+Alt+T) and run command to install plocate (or mlocate for old Ubuntu):
sudo apt install plocate
Then, update the database by running command:
sudo updatedb
Finally, try searching the desktop file for your apps (Firefox for example):
locate "*firefox*desktop"
In last command replace firefox with the keyword for yours (case sensitive). And, copy the path-to-file for the one in the location mentioned above.
Single command to edit the .desktop file
As far as I know, Debian, Ubuntu, Fedora, Manjaro, and their based systems have desktop-file-edit tool out-of-the-box for edit .desktop entries.
For example, hide all the Waydroid Android app icons associated with the .desktop files under .local/share/applications directory.
for file in $Home/.local/share/applications/waydroid.*.desktop; do desktop-file-edit --set-key=NoDisplay --set-value=true $file; done
In addition, the desktop-file-edit command will automatically validate the .desktop file after done editing it. It will output errors if validation not passed. For more, see its man page.
This simple tutorial shows how to install the latest Android Studio 2024.1.1 in Ubuntu 22.04 and/or Ubuntu 24.04.
Android Studio, the official IDE for Android app development, is easy to install in Ubuntu in different ways! They include Snap, Flatpak, and official tarball.
NOTE: All the Android Studio packages below support only amd64 (Intel/AMD) CPU architecture type.
Method 1: Install Android Studio via Snap package
The easiest way to install the IDE is using the Snap package, which however runs in sandbox environment. At the moment of writing, the Snap package is at version 2023.1.1, though the newer 2024.1.1 is in dev channel now. Just install it and wait, it will automatically update to the latest once published.
Simply launch App Center (or Ubuntu Software for 22.04), then search & install Android Studio:
This is beginner’s guide shows how to install and setup Waydroid to run full Android system as well as Android applications in Ubuntu.
I’ve written about this by using Anbox, which is however no longer in active development.
This is a re-write with free and open-source ‘Waydroid’, which is a container-based approach to run a minimal customized Android system image based on LineageOS.
Android OS in my Ubuntu 22.04 desktop
This tutorial is tested and works on Ubuntu 22.04 and Ubuntu 24.04 LTS with default Wayland session (Xorg is NOT supported)! Hardware specs include:
CPU: Intel i5-10400.
GPU: Intel HD 630.
Step 1: Install Waydroid
Waydroid is easy to install in Ubuntu/Debian based systems, through its official apt repository.
1. First, press Ctrl+Alt+T on keyboard to open terminal. When it opens, run command to install required packages:
sudo apt install curl ca-certificates
sudo command needs password authentication, but with no asterisk feedback. Just type in mind and hit Enter.
2. Then, run command to download the official script, and run it to add Waydroid repository into your system.
curl https://repo.waydro.id | sudo bash
In case the script does not work properly, find out your OS code manually via either lsb_release -sc or cat /etc/os-release command. Then, run command below instead:
curl https://repo.waydro.id | sudo bash -s jammy
Replace jammy depends on your system code-name. So far, it supports focal, jammy, noble, bookworm, bullseye, sid
3. Finally, run command to install Waydroid:
sudo apt install waydroid
Try sudo apt update first to refresh cache if the command output package not found
Once successfully installed the app, you should be able to launch it from start menu, applications menu, or any other app launcher depends on your desktop environment.
Step 2: Initialize
The first launch of the app, will launch the “Initialize Waydroid” dialog.
The default options are usually OK. But, you may have to choose Android type before getting start:
VANILLA – as name indicates, it’s vanilla ROM, without Google Services/Apps.
GAPPS – come with Google Services/Gapps.
Next, click Download button will automatically download & install ROM and required packages. In my case, it downloaded & installed Android 11.
When done successfully, it will show you something like the screenshot shows you.
After clicking “Done” button in last step, start Waydroid again will launch an Android screen on your desktop.
However, it by default starts in full-screen (or may-be called maximized) mode.
To change the Android screen size, open terminal (Ctrl+Alt+T) in the Ubuntu host, and run commands:
waydroid prop set persist.waydroid.width 506
waydroid prop set persist.waydroid.height 1000
The 2 commands will set the screen width and height to 506 x 1000. Change the numbers accordingly, and apply by running command to stop current Android session (then re-launch).
waydroid session stop
The Android window is borderless in my case. To move the window, you may either press & hold Super (Windows logo) key then dragging, or press Alt+F7 and then move mouse cursor without mouse clicking.
Step 4: Install & Remove Android Apps
If you selected ‘VANILLA’ while initializing Waydroid, then there’s no app store in the Android to install applications.
In the case, you may download any APK file from the web, or download & install the free open-source F-Droid in the host (Ubuntu in the case) then use it in Android screen to install apps.
To install APK file from host user’s ‘Downloads’ folder, just run command in terminal (Ctrl+Alt+T):
And, verify by listing all installed Android apps:
waydroid app list
Waydroid will create app shortcuts for all installed Android apps, through .desktop files under “.local/share/applications”. Meaning, you can search & launch Android apps directly from host machine (Ubuntu).
Launch ‘F-Droid’ Android app in Ubuntu
And, it supports launching multiple instance of Android apps at the same time out-of-the-box.
To remove an app, either do it in the Android screen, or run command in Ubuntu host:
waydroid app remove packageName
Replace packageName according to waydroid app list output, e.g., org.fdroid.fdroid.
Step 5: Share files between Ubuntu Host and Android
To share files between host and the Android system, simply run single command in Ubuntu host:
sudo mount --bind ~/Documents/vboxshare/ ~/.local/share/waydroid/data/media/0/Documents/share
In the command, you need to replace:
~/Documents/vboxshare/ – ‘vboxshare’ sub-folder in Ubuntu host.
~/.local/share/waydroid/data/media/0/Documents/share – ‘share’ sub-folder of Documents in Android.
You need to first create the share folder if not exist, or it will show mount point does not exist as the screenshot below shows you.
Uninstall Waydroid:
First, stop the session and container, which maybe useful for reloading settings, run commands:
Type user password (no asterisk feedback) when it asks and hit Enter to continue.
2. After adding the PPA, you can then launch Software Updater (Update Manager) and upgrade the system pre-installed transmission package to the new release.
For Ubuntu based system without the BitTorrent client pre-installed, you may run command below to install it:
This is a step by step beginner’s guide shows how to install LibreWolf web browser in Ubuntu and its based systems.
LibreWolf is a free and open-source web browser fork from Firefox. The browser focuses on privacy and security, and has uBlocker ad blocker out-of-the-box.
The browser website has an official guide for installing in on Debian and Ubuntu based systems. This tutorial is just a re-write with screenshots and more explanations.
NOTE: This tutorial only works on x86_64 system for modern Intel/AMD CPU architecture types.
Step 1: Install the Key
Adding 3rd party repository in Debian/Ubuntu system needs to first install the key, so your system will trust the packages from that repository.
First, press Ctrl+Alt+T on keyboard to open terminal. When it opens, run command:
This command will download the key file via wget command line tool, dearmor it so the key will be un-readable, finally save it to /etc/apt/keyrings directory.
You may verify the key by running cat /etc/apt/keyrings/librewolf.gpg. And, it should output unreadable text, like the screenshot below shows you.
Step 2: Add LibreWolf Repository
LibreWolf repository so far supports Debian 11/12, Ubuntu 20.04 & 22.04, Linux Mint 20.3, 21.1, 21.2, and all their based systems. It also works in Ubuntu 23.04/23.10 by using the package for 22.04.
1. Get your system code-name
First, run command in terminal (Ctrl+Alt+T) to get the code-name of your system:
lsb_release -sc
The code-name MUST be one of una, bookworm, vanessa, focal, jammy, bullseye, vera, or uma. If NOT, then run command:
cat /etc/os-release
This command will output which version of Ubuntu (and its code-name) is based on.
2. Add LibreWolf repository
Once you got the code-name, run the command below in terminal to create & edit source file:
Replace gedit in command with gnome-text-editor for Ubuntu 24.04, xed for Cinnamon, pluma for MATE, mousepad for XFCE, or nano command line text editor that works in most desktop environment.
When the file opens, paste the line below and save it:
Types: deb
URIs: https://deb.librewolf.net
Suites: jammy
Components: main
Architectures: amd64
Signed-By: /etc/apt/keyrings/librewolf.gpg
Here you need to replace jammy with the code-name you got in last step. For Ubuntu 24.04 (Noble) and 23.10 (Mantic), just use jammy which is working good in my case.
Finally save the file. For nano text editor, press Ctrl+S to save, then Ctrl+X to exit.
Step 3: Install LibreWolf web browser
After adding the repository and key, run the command below in terminal to refresh your system package cache:
sudo apt update
Finally, install the browser via command:
sudo apt install librewolf
Once successfully installed the package, search for and launch it from start/application menu or ‘Activities’ overview depends on your desktop environment.
And, when a newer version of the browser package is released, just use Software Updater (Update Manager) to update it:
future version of LibreWolf available in Update Manager
Set LibreWolf as default web browser
For the default GNOME Desktop, open Settings (Gnome Control Center), then navigate to Default Applications in left pane. Finally, select “LibreWolf” from the drop-down box for Web.
For GNOME 46 (Ubuntu 24.04), Default Applications has been moved to “Apps” settings page.
Other desktops may have their own option to do the job. If you don’t know where to find the option, try editing the config file that works in most desktop environments. To do so:
First, open file manager and press Ctrl+H to show all hidden files and folders.
Navigate to .config sub-folder and click edit mimeapps.list file.
Finally, set librewolf.desktop for text/html, x-scheme-handler/http, x-scheme-handler/https and save file.
How to Remove LibreWolf Web Browser
To remove the web browser, also open terminal (Ctrl+Alt+T) and run command:
sudo apt remove librewolf --autoremove
Also remove the Key file as well as source repository by running commands in terminal one by one:
sudo rm /etc/apt/sources.list.d/librewolf.sources
sudo rm /etc/apt/keyrings/librewolf.gpg
And, refresh system package cache after making changes to package sources.
Shotwell photo viewer and organizer released new version 0.32.4 a few days ago.
The new release added basic .mpo file support, which is a stereoscopic image consisting of two overlapping 2D images in JPG format.
Besides that, the release also has improved slideshow support. It now supports for shuffled slideshows, allow setting wallpaper slideshows even if videos are selected, though videos are automatically excluded in slideshow in my case. And, fixes left/right navigation and not start issue in slideshow, when video is the first selected item.
Remove app shortcut for “Shotwell Profile Browser”. Add it as an action instead, though also available in ‘Preference’.
Simplified export conflict resolution dialog
New video meta-data handler.
Add dump of available image codecs and meta-data support
Fix showing the original photo with shift if photo was modified externally
Fix crop area jumping on scaled displays
Some crash fixes.
How to Install Shotwell 0.32.4 in Ubuntu:
Shotwell is available to install as Flatpak package, which is however not updated to the latest release at the moment of writing.
For those who prefer the classic .deb package format, I’ve upload the package into this unofficial PPA for Ubuntu 22.04, Ubuntu 23.04, Ubuntu 23.10 on amd64, arm64/armhf CPU architecture types.
1. First, search for and open terminal from your system application menu, or by pressing Ctrl+Alt+T on keyboard. When it opens, run command to add the PPA:
Type user password (no asterisk feedback) when it asks and hit Enter to continue.
2. Next, launch Software Updater (Update Manager), then install the updates for the software package.
Or, run command in terminal to install/upgrade the Shotwell package:
sudo apt install shotwell heif-gdk-pixbuf
NOTE: Linux Mint user may need to run sudo apt update first to refresh package cache.
Finally, either right-click on your photo images to select open with the photo manager, or search for and launch shotwell from ‘Activities’ overview and enjoy!
Uninstall Shotwell 0.32.4
For any issue, it’s recommended to purge the Ubuntu PPA. Which, will remove PPA and downgrade shotwell to the pre-installed version.
To do so, open terminal (Ctrl+Alt+T) and run command: