Transmission is a lightweight Bittorrent Client comes by default with Ubuntu. While Canonical only provides critical updates, here I’ll show you how to install / upgrade the latest Transmission in Ubuntu via its PPA. Supports Ubuntu 13.10 Saucy, Ubuntu 13.04 Raring, Ubuntu 12.04 Precise and Ubuntu 12.10 Quantal.
UPDATE 2024: The tutorial is outdated! If you’re looking for most recent Transmission PPA, see this one instead.
At the moment of writing this tutorial, the latest release is Transmission 2.8.2. It brings a lot of bug fixes and a few improvements.
Fix webseed crash
Fix crash when adding UDP trackers whose host’s canonical name couldn’t be found
Fix crash when sending handshakes to some peers immediately after adding a magnet link
Fix crash when parsing incoming encrypted handshakes when the user is removing the related torrent
Add safeguard to prevent zombie processes after running a script when a torrent finishes downloading
Fix “bad file descriptor” error
Queued torrents no longer show up as paused after exiting & restarting
Fix 2.81 compilation error on OpenBSD
Don’t misidentify Tixati as BitTornado?
Fix bug that had slow download speeds until editing preferences for Mac Client
Fix crash that occurred in some cases after using Torrent > Set Location
Fix crash where on_app_exit() got called twice in a row
Fix 2.81 compilation error on older versions of glib
Can now open folders that have a ‘#’ in their names
Silence gobject warning when updating a blocklist from URL
Add Qt5 support
To get started, press Ctrl+Alt+T to open terminal. When it opens, run below command to add the Bittorrent PPA:
sudo add-apt-repository ppa:transmissionbt/ppa
After that, run blow command to install Bittorrent. Or use Synaptic Package Manager to upgrade the package.
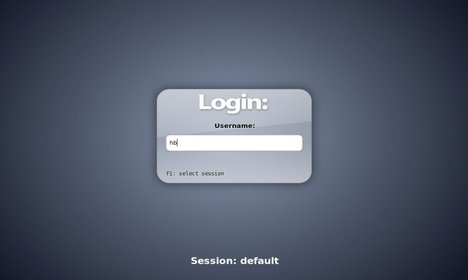
As you may know, Slim is a simple login manager aims to be light and simple, although completely configurable through themes and an option file. It is suitable for machines on which remote login functionalities are not needed.
In this tutorial I’ll show you how to install and use Slim login manager in Ubuntu 13.10, Ubuntu 13.04, Ubuntu 12.04, Ubuntu 12.10, Ubuntu 10.04.
UPDATE: Slim project has discontinued!
To get started, press Ctrl+Alt+T on your keyboard to open terminal. When it opens, run below command to install it:
sudo apt-get install slim
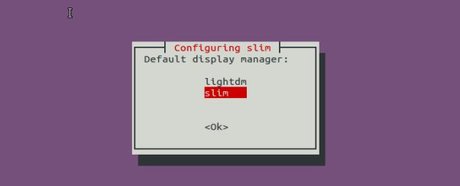
While the installing process, you’ll be prompt to choose slim display manager as the default for your login screen.
After that, restart your computer and you’ll see the Slim login screen.
To switch back to LighDM (replace lightdm with gdm3 for Ubuntu 20.04), run below command in terminal. You’ll see the previous screen again which allows to choose between installed display managers.
sudo dpkg-reconfigure lightdm
Install Themes for Slim:
This Github project provides a list of themes. Download your favorite themes, and put the result folders to /usr/share/slim/themes/. You can finally change the default theme by editing /etc/slim.conf:
This quick tutorial is going to show you how to use Unity Webapps with Google Chromium browser in Ubuntu 13.04, Ubuntu 13.10.
As the default is Mozilla Firefox, you can manage to get unity webapps working in Chromium by installing a plugin.
To install this plugin, go to Ubuntu Software Center. Search for and install the unity-chromium-extension package.
NOTE: The default version in Software Center is 2.4.6 for Ubuntu 13.04. I recommend you install the latest version (2.4.7 so far) which is available for downloading from below link. This version fixes no gmail icon on Unity Launcher for Chromium 27 & 28.
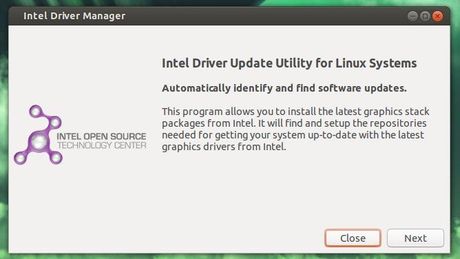
As you may know, Intel has released intel driver update utility for Linux and it’s available for Ubuntu 13.04, Ubuntu 12.04, Ubuntu 12.10 and Linux Mint from Intel Repository.
To add Intel Repository to Ubuntu, press Ctrl+Alt+T to open terminal. When it opens, run below commands:
For Ubuntu 12.04 Precise and Linux Mint 13 Maya:
sudo sh -c 'echo "deb https://download.01.org/gfx/ubuntu/12.04/main Ubuntu 12.04" >> /etc/apt/sources.list.d/intel-graphics.list'
For Ubuntu 12.10 Quantal and Linux Mint 14 Nadia:
sudo sh -c 'echo "deb https://download.01.org/gfx/ubuntu/12.10/main Ubuntu 12.10" >> /etc/apt/sources.list.d/intel-graphics.list'
For Ubuntu 13.04 Raring and Linux Mint 15 Olivia:
sudo sh -c 'echo "deb https://download.01.org/gfx/ubuntu/13.04/main Ubuntu 13.04" >> /etc/apt/sources.list.d/intel-graphics.list'
Then download and install the GPG key via 2 commands:
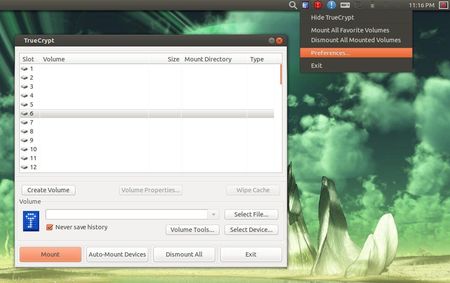
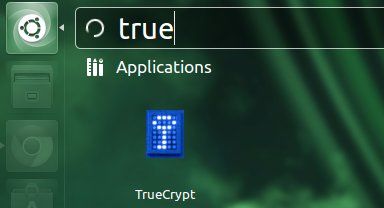
This simple tutorial shows you how to install TrueCrypt as well as its indicator applet in Ubuntu 13.04 Raring Ringtail.
There’s a PPA which contains the TrueCrypt package with the tray icon replaced by a application indicator, so that you can get back the TrueCrypt indicator applet in Ubuntu 13.04 panel since the tray icons is no longer supported. The PPA also supports Ubuntu 12.04 Precise and Ubuntu 12.10 Quantal.
To get started, press Ctrl+Alt+T to open terminal. When it opens, run below command to add the PPA:
The indicator applet exits when the main window is closed if there’s no mounted volumes. To keep the indicator, go to TrueCrypt preferences -> Background Task tab, uncheck the box where it says “Exit when there are no mounted volumes”.
If for some reason this ppa does not work properly for you, run below commands one by one to remove the ppa as well as the installed TrueCrypt.
In this tutorial I’ll show you how to make Ubuntu bootable USB from iso and then install Ubuntu 13.10 Saucy Salamander on your computer from it.
Ubuntu 13.10 is scheduled to be released on October 17th 2013. So far it’s in Alpha stage. The daily build iso can be downloaded at here, and final release will be available at this page.
Requirements:
USB at least 1GB. Format it to FAT32 (uncheck ‘Quick Format’).
Computer running with any operating system.
Download Ubuntu 13.10 iso file from previous links
1. Make Ubuntu 13.10 Bootable USB From ISO
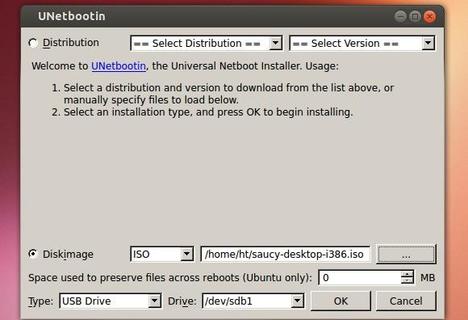
To get started, download Unetbootin, which is a simple tool that allows Windows / Linux / Mac OS users to create bootable Live USB drives for Ubuntu, Fedora, and other Linux distributions without burning a CD. It’s available for downloading at this page.
Insert your USB stick into your computer and then open Unetbootin executable. Check “Diskimage” and choose the Ubuntu 13.10 iso file from your Computer. You USB drive should be selected automatically.
Click on OK to start. When it is done, click Exit.
2. Install Ubuntu 13.10 from the bootable USB
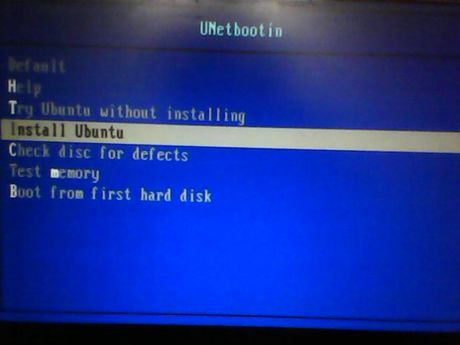
Insert the USB stick into the target computer. Start the machine and choose to boot up via USB in BIOS. You’ll see the below screen:
Choose “Install Ubuntu” and hit Enter, then you’ll get into live Ubuntu Desktop with the installation wizard. To continue, follow a step by step guide to install Ubuntu
Nvidia has released the new display driver 325.15 (certified) for Linux. It’s easy to install or upgrade in Ubuntu 13.04 Raring, Ubuntu 12.04 Precise, Ubuntu 12.10 Quantal and Linux Mint.
Nvidia driver 325.15 supports new GPUs: GRID K340, GRID K350, NVS 315, Quadro K500M (full list of supported GPUs). It brings a lots of bug fixes and some improvements.
Changed the default PCIe interrupt delivery method from virtual-wire to MSI. Note that if the NVIDIA Linux driver fails to initialize with an error indicating that it is not receiving interrupts, MSI can be disabled by setting the module parameter “NVreg_EnableMSI=0” when loading the NVIDIA kernel module.
Removed support for Linux 2.4 kernels. The NVIDIA Linux driver now requires Linux 2.6.9 or later.
Improved the rendering performance of complex gradients.
Added support for configuring SLI Mosaic and Base Mosaic in the “X Server Display Configuration” page of nvidia-settings.
Updated nvidia-installer to look for the following files: /usr/lib/nvidia/alternate-install-available
/usr/lib/nvidia/alternate-install-present
These files may be provided by NVIDIA driver installers other than the official .run package maintained by NVIDIA, to alert nvidia-installer to the presence or availability of an alternative installation method. See the nvidia-installer(1) manual page for more information.
Generate a BadMatch error when applications attempt to create GLX pixmaps using glXCreatePixmap() or glXCreateGLXPixmapWithConfigSGIX() and the pixmap’s depth doesn’t match that of the specified GLXFBConfig.
Updated nvidia-settings to explicitly specify the direction of rotation for configuring per-display rotation configuration
Honor a GPU UUID as the GPU qualifier for X configuration options that allow GPU qualifiers (e.g. “MetaModes”).
Report GPU UUIDs in the X log when verbose logging is enabled in the X server.
Enabled conformant glBlitFrameBuffer() scissor test behavior by default. A driver-provided application profile enables the previous non-conformant behavior for applications that load libcogl, to work around a bug in older versions of libcogl.
Install Nvidia Driver 325.15:
NOTE: Ubuntu by default uses the open source video driver Nouveau for your NVIDIA graphics card, you can enable it from Software & Updates -> Additional Drivers. This may interact better, and you may want to use this rather than NVIDIA’s official package.
To get started, first download the driver from the Nvidia website. Here’s the link:
This tutorial shows you how to reset your Ubuntu 13.10 Saucy Unity and Compiz to the default settings if you messed up your desktop. All you need to do is run two commands in terminal.
Don’t be scared if you’re not comfortable with terminal commands. Just copy the code via Ctrl+C, then paste into terminal via Ctrl+Shift+V and finally hit Enter to run.
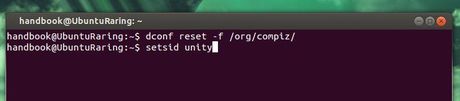
To get started, press Ctrl+Alt+T to open a terminal window. When it opens, run below command to reset Unity and Compiz settings:
dconf reset -f /org/compiz/
After running previous command, you need to run blow command to restart Unity.
setsid unity
To get back the default set of Unity Launcher icons, run below command and then log out and back in.
unity --reset-icons
If you want to restore default icon theme, use Unity Tweak Tool which is available in Ubuntu Software Center.
This tutorial shows how to install BitTorrent server and desktop packages in Ubuntu 13.10 Saucy, 13.04 Raring, 12.10 Quantal, 12.04 Precise, 10.04 Lucid and Linux Mint via PPA repository.
As you may know, BitTorrent Sync is a proprietary peer-to-peer file synchronization tool available for Windows, Mac, Linux, and Android. It can sync files between devices on a local network, or between remote devices over the Internet via secure, distributed P2P technology.
Now there’s PPA repository offers ready to use server and desktop packages of the BitTorrent Sync application for Ubuntu and Linux Mint users.
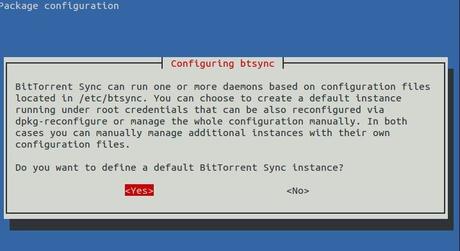
Install BitTorrent Sync Server:
Press Ctrl+Alt+T to open terminal. When it opens, run below command to add the PPA:
sudo add-apt-repository ppa:tuxpoldo/btsync
Then run below commands to update package lists and install the server package:
sudo apt-get update; sudo apt-get install btsync
While the installation, you’ll get the configuration promts to setup download rate, listening ip and port, username and password to access the server.
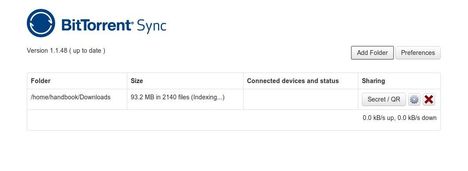
When everything is done, you can access it in your PC or Mobile Phone by going to http://ipaddress:8888/gui/
Want to install or upgrade the latest version of Banshee Music Player? Well, here I’ll show you how to do it in Ubuntu and Linux Mint via its PPA repository.
At the moment of writing this tutorial, the latest release is Banshee 2.6.1 and it’s available for Ubuntu 13.10 Saucy, Ubuntu 13.04 Raring, Ubuntu 12.10 Quantal, Ubuntu 12.04 Precise, Ubuntu 11.10 Oneiric, and Linux Mint 15, 14, 13, 12.
Add Banshee PPA:
Press Ctrl+Alt+T to open terminal window for running commands. When it opens, copy below command and paste in terminal (Ctrl+Shift+V) and hit enter:
sudo add-apt-repository ppa:banshee-team/ppa
It will add the Banshee PPA repository to your system so that you can install and receive updates via package manager or apt-get command.
Install / Upgrade Banshee
For Linux Mint users (and Ubuntu users with Synaptic installed), open Synaptic Package Manager from the start menu. Click Reload to update package lists, search banshee and mark for installation or upgrade by right-clicking on result. Finally click Apply to install / upgrade.
Both Linux Mint and Ubuntu can run below commands instead: