This simple tutorial shows how to easily check your SSD health in Ubuntu and/or Linux Mint desktop.
I’ve been running Ubuntu Linux on my old laptop for about 7 years. Everything works well, but it recently refuses to boot sometimes when pressing on the physical power button. Not sure what’s the problem, but I guess it’s something to do the data reading issue from SSD drive.
In Windows 10, I prefer to use CrystalDiskInfo which is super easy to understand for beginners. For Linux, there’s a tool GSmartControl available for choice.
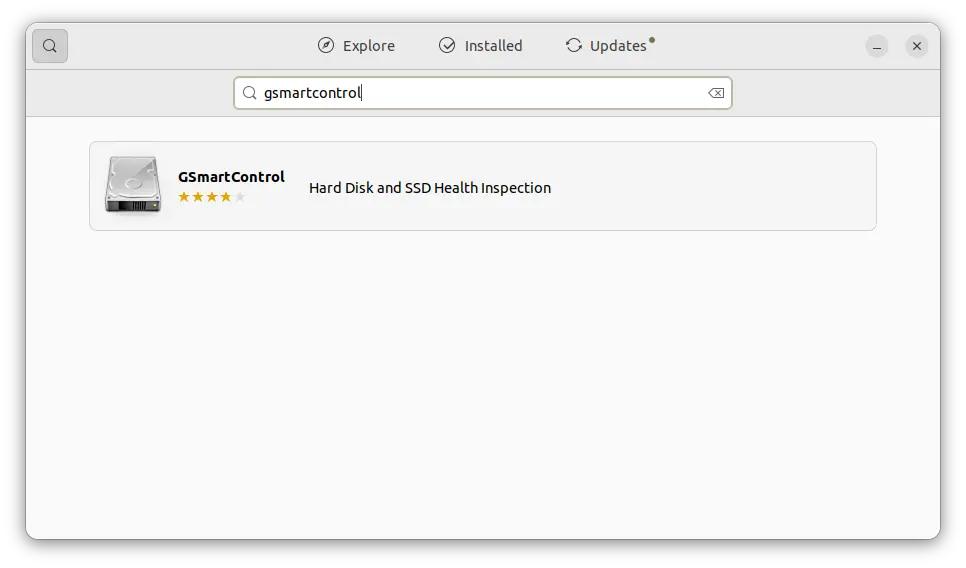
1. First, the tool is available in most Linux’s system repositories. User can just search for and install it from system package manager. For Ubuntu, it’s available to install via Ubuntu Software app:
For those familiar with Linux command can run a single command in terminal (Ctrl+Alt+T) to install it:
sudo apt install gsmartcontrol
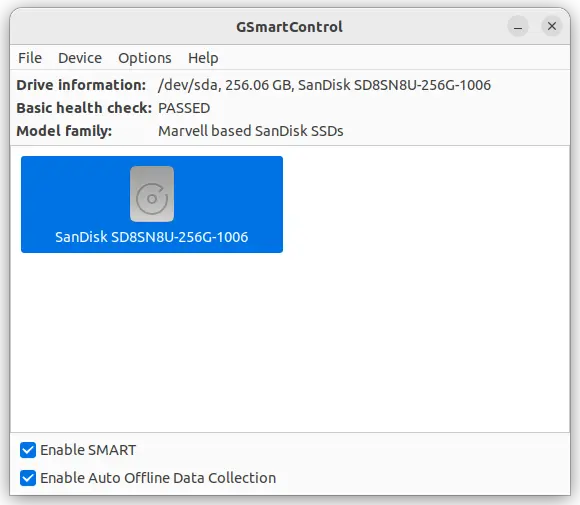
2. After that, search for and launch it from start menu (or Activities overview). It will list your SSD drive in the app window.
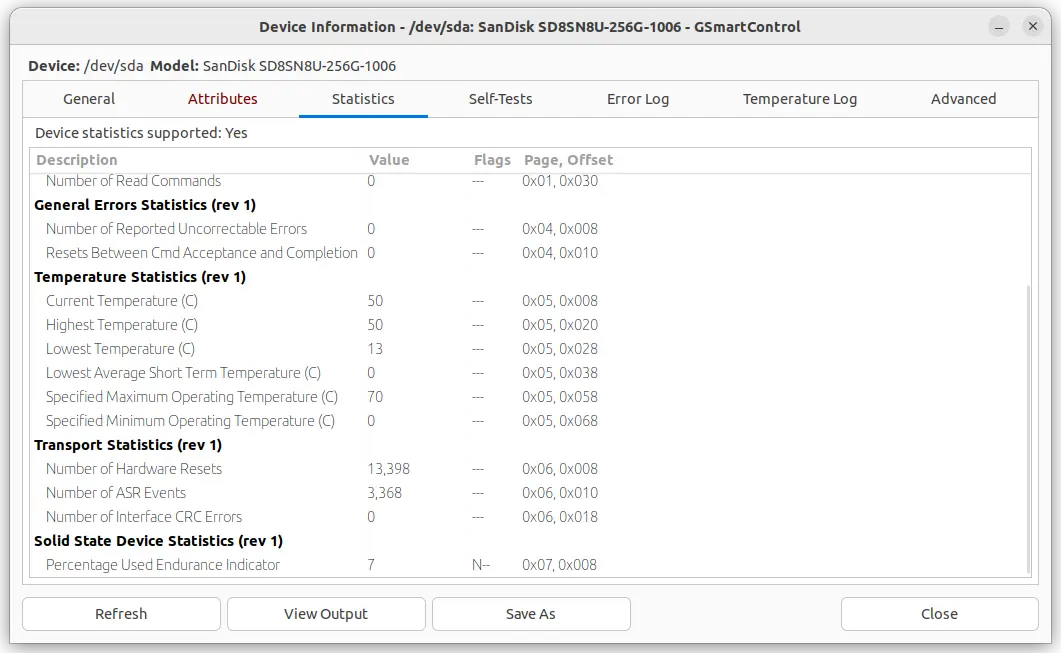
By double-clicking on the disk icon or go menu “Device -> View Details” will open the information dialog that you need.
Things are not so easy to read for beginners. But it will highlight something that is not going well with red text font or background.
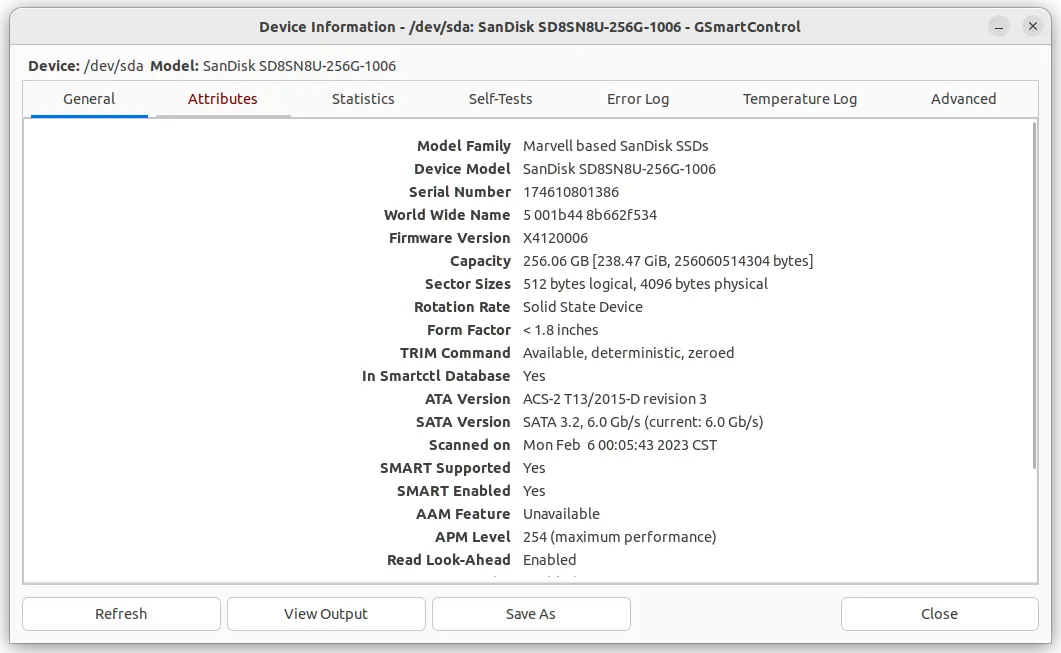
By moving mouse cursor over any item in the app window, there will be a tool-tip pop-over that explain with detailed information. As the screenshot below shows, it shows you:
power-on time.
total disk read and write.
read error rate.
temperature and other information.
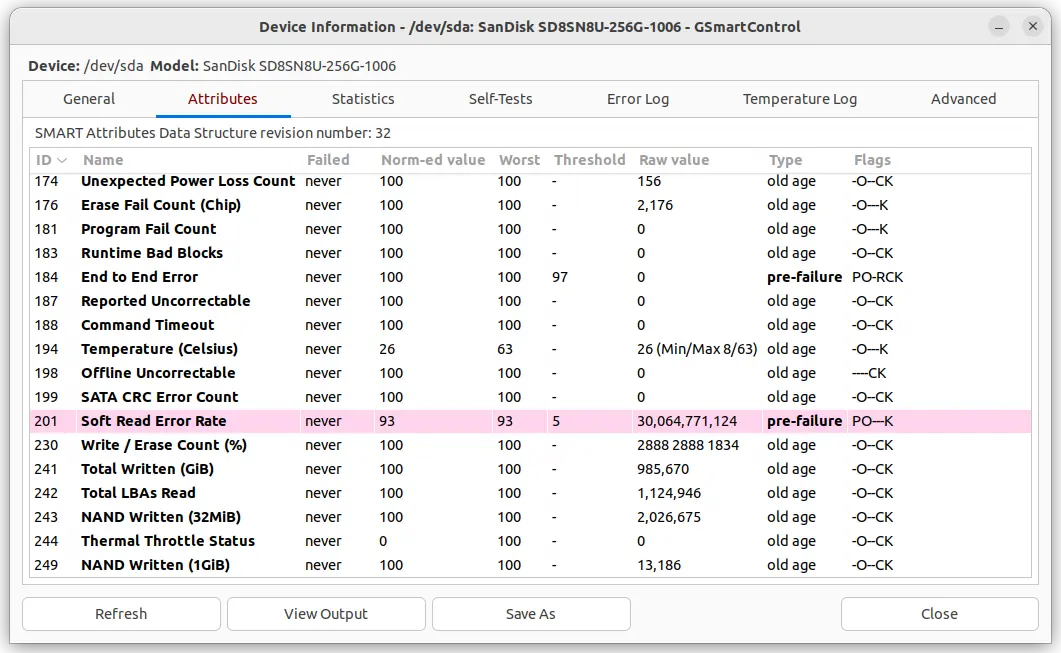
For those prefer a percentage value of the device life, go “Statistics” tab and check the value of Percentage Used Endurance Indicator. In my case as the screenshot shows, there should be still 93% left.
And you can click on “View Output” button to view all the info as text, copy and paste them into online forums to ask for help! Or, run a “Self-Tests” manually to see if there’s any error.
LibreOffice, the default office suite in most Linux, announced the new 7.5 feature release today!
The new release has greatly improved the dark mode support. It now has fully dark appearance, instead of leaving the document background white in dark mode.
LibreOffice 7.5 now has new icons for standard app shortcuts, MIME types, and macOS specific app shortcuts. App start center now includes a filter box for Recent Documents.
A better single-toolbar user interface is available under “View -> User Interface” menu, with context-aware controls and their customization support.
The “Writer” app gains new Plain Text content control and Combo Box content control. And, Content Control now supports titles and tags, as well as exporting to PDF.
For “CALC”, data tables are now supported in charts, the Function Wizard allows to search for descriptions. And, Impress & Draw gets a new set of default table styles.
Initial machine translation based on DeepL translate APIs
Ability to define a custom color for Grammar mistakes in the Application Colors dialog.
“Spell out” number formats in CALC.
Ability to crop inserted videos in the slide and still play them
Run presenter console can run as a normal window.
See short video about new features of LibreOffice 7.5:
How to Install LibreOffice 7.5 in Ubuntu Linux.
LibreOffice is available to install in 4 different package formats: Deb, Flatpak, AppImage, and Snap.
NOTE: User can install all of them side by side in same machine, meaning have duplicated app icons in start menu (‘Activities’ overview search results).
Option 1: Deb package
Libreoffice website offers official .deb packages, which is however built for supporting all Debian based systems.
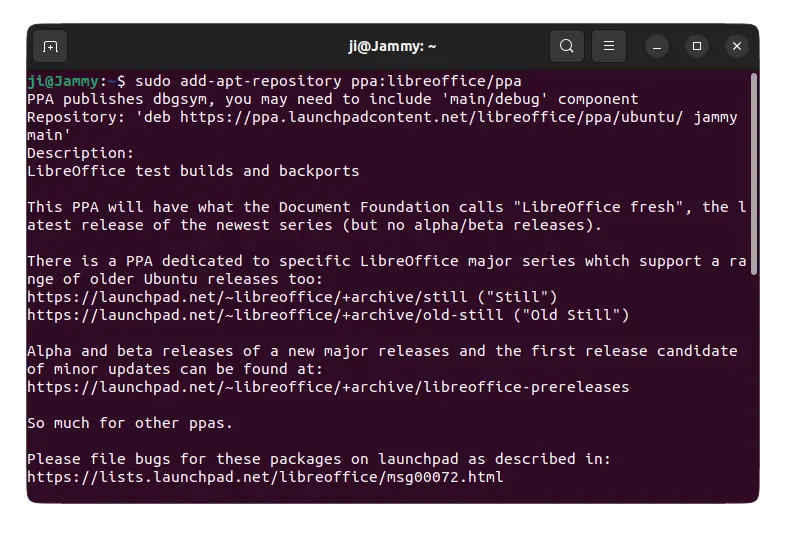
For better integration, the LibreOffice Fresh PPA is HIGHLY recommended for Ubuntu Linux. User can press Ctrl+Alt+T on keyboard to open terminal and run command to add it:
sudo add-apt-repository ppa:libreoffice/ppa
NOTE: The PPA so far contains LibreOffice v7.5 for only Ubuntu 22.04 and Ubuntu 22.10
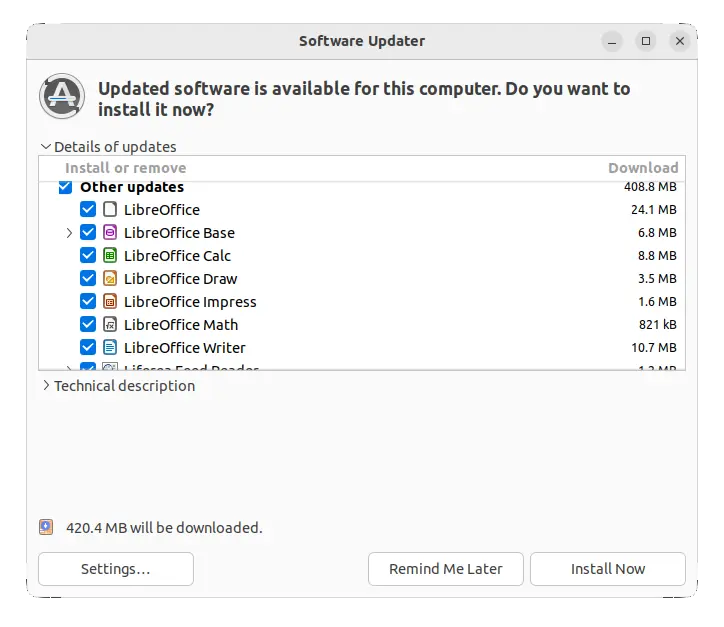
Then, run regular updates via Software Updater (Update Manager) app will update the pre-installed LibreOffice packages to the latest!
Option 2: Snap package
Snap is an universal package runs in sandbox. Ubuntu 20.04 and higher can easily search for and install LibreOffice as Snap from Ubuntu Software.
As mentioned, install LibreOffice Snap will cause duplicated app icons to the pre-installed package.
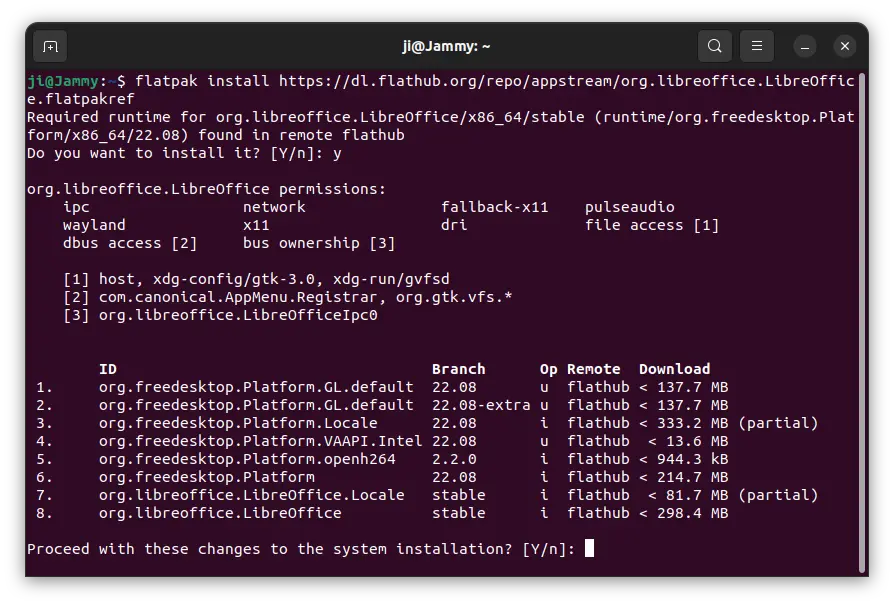
Option 3: Flatpak package
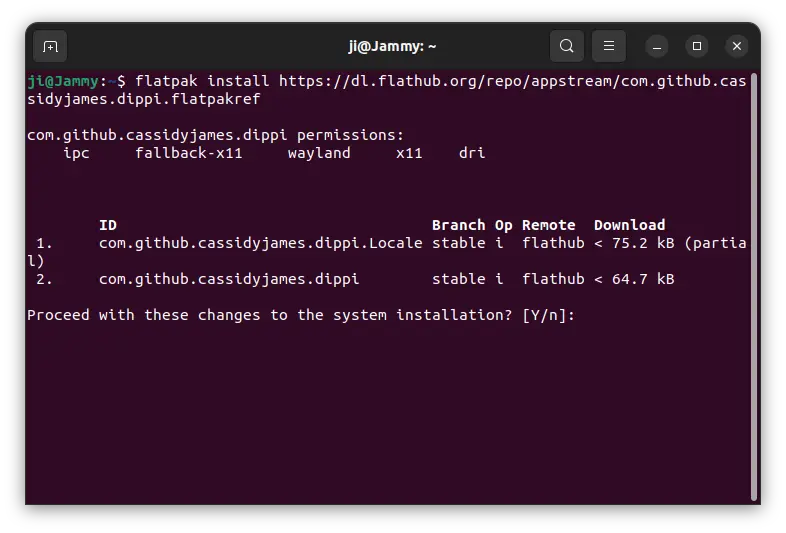
Flatpak is another universal package runs in sandbox. It’s a competitor to Snap. Users can run following commands one by one to install LibreOffice as Flatpak.
First, press Ctrl+Alt+T on keyboard to open terminal. Then run command to install Flatpak daemon:
sudo apt install flatpak
Next, install the office suite as Flatpak via command:
AppImage is an non-install package format runs in most Linux. It’s a good choice to try AppImage until the LibreOffice Fresh PPA updated for the new release packages.
Then, right-click and go file “Properties” dialog, add executable as program permission under Permission tab, and finally click run the AppImage to launch the office suite.
Uninstall:
For the LibreOffice PPA package, open terminal and run command:
Elementary OS 7 is finally released! Here’s how to enable the “Minimize” title-bar button in its app windows.
Elementary OS 7 is based on Ubuntu 22.04 LTS. It was released on Tuesday with many improvements on its core applications as well as desktop experience.
Like Fedora workstation, this Linux Distro does not has a ‘Minimize’ button out-of-the-box. But changing the button-layout key via either dconf-editor or gsettings does not function.
Step 1: Install Pantheon Tweaks
Pantheon Tweaks is simple configuration tool adds more options to configure Elementary OS’ Pantheon desktop appearance.
1. First, search for and open a terminal window from top-left ‘Application’ menu.
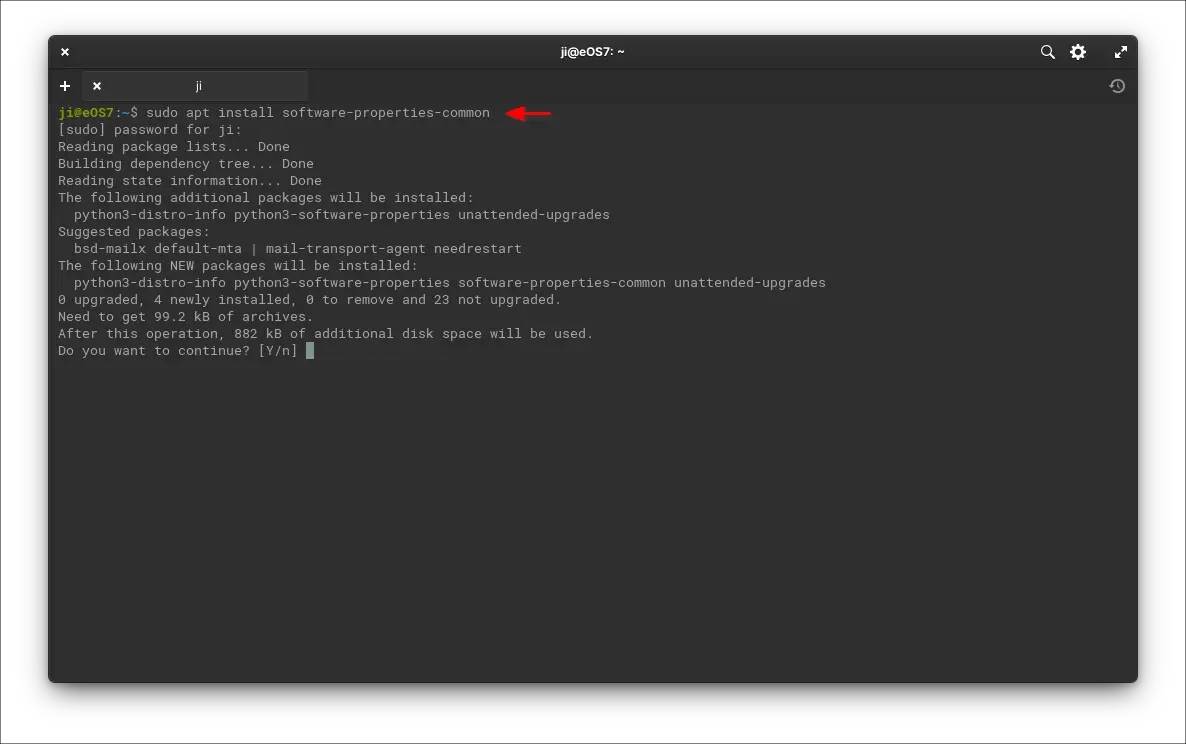
2. When terminal opens, run command to install the package for the ability to add PPA repositories:
sudo apt install software-properties-common
Run sudo apt update first on a fresh OS to update package index.
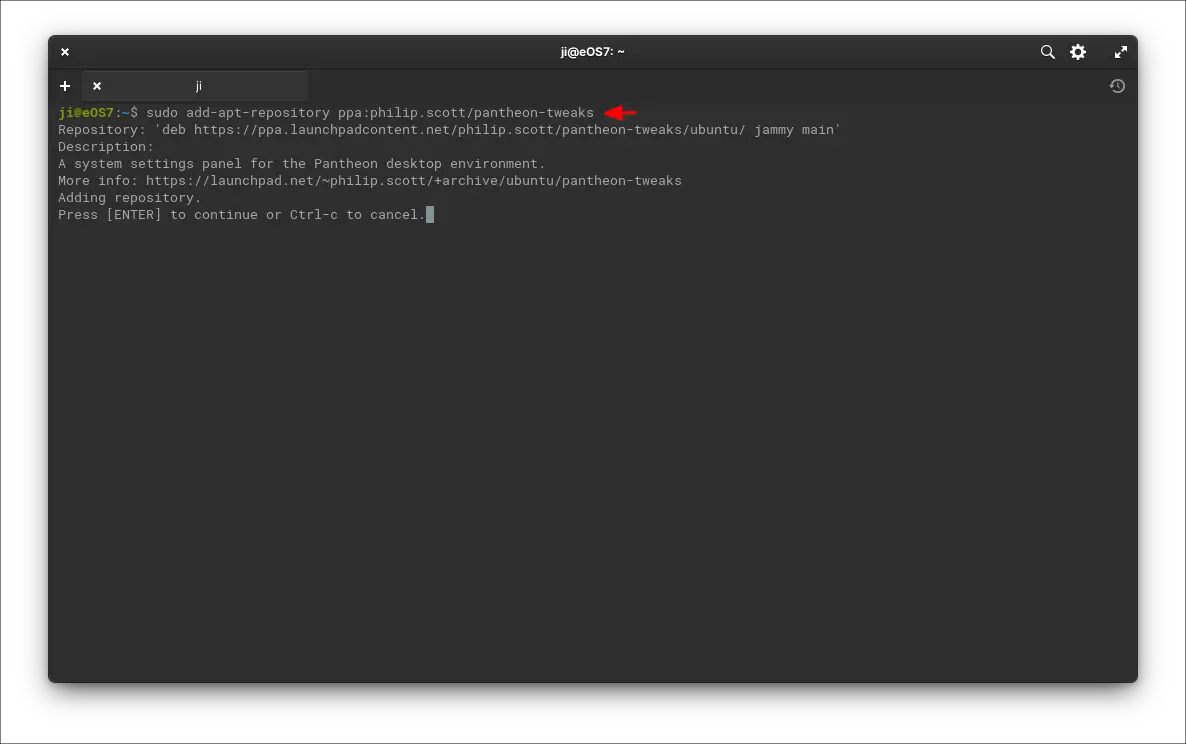
3. Next, run command to add the Ubuntu PPA that contains the Pantheon Tweaks package:
4. After adding PPA, install the tool by running command:
sudo apt install pantheon-tweaks
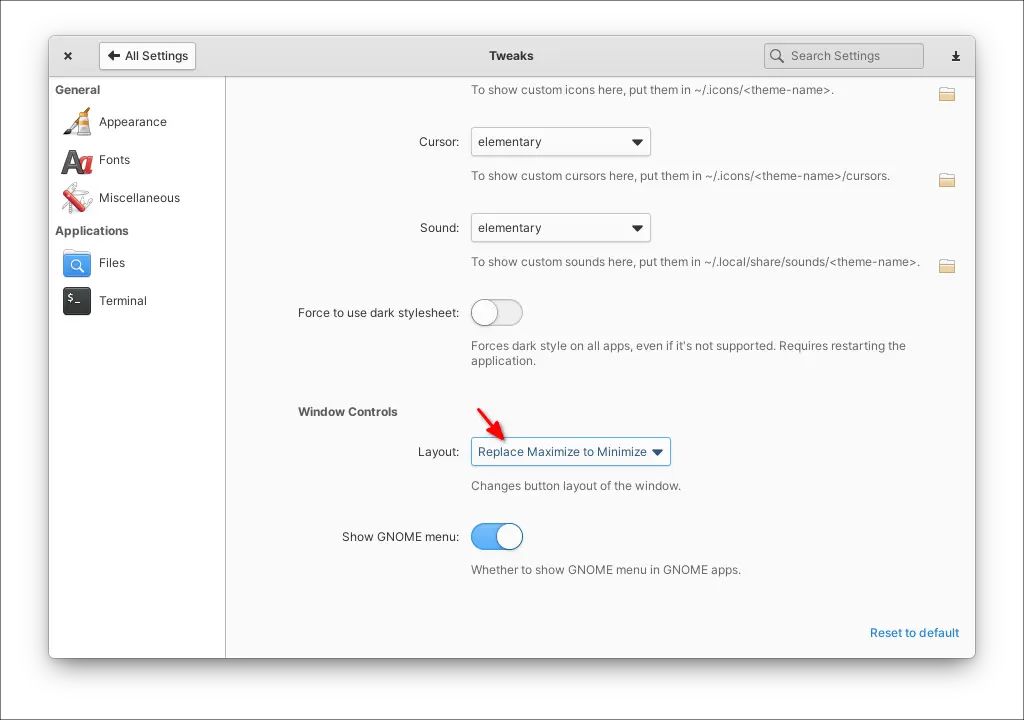
Step 2: Enable Minimize button
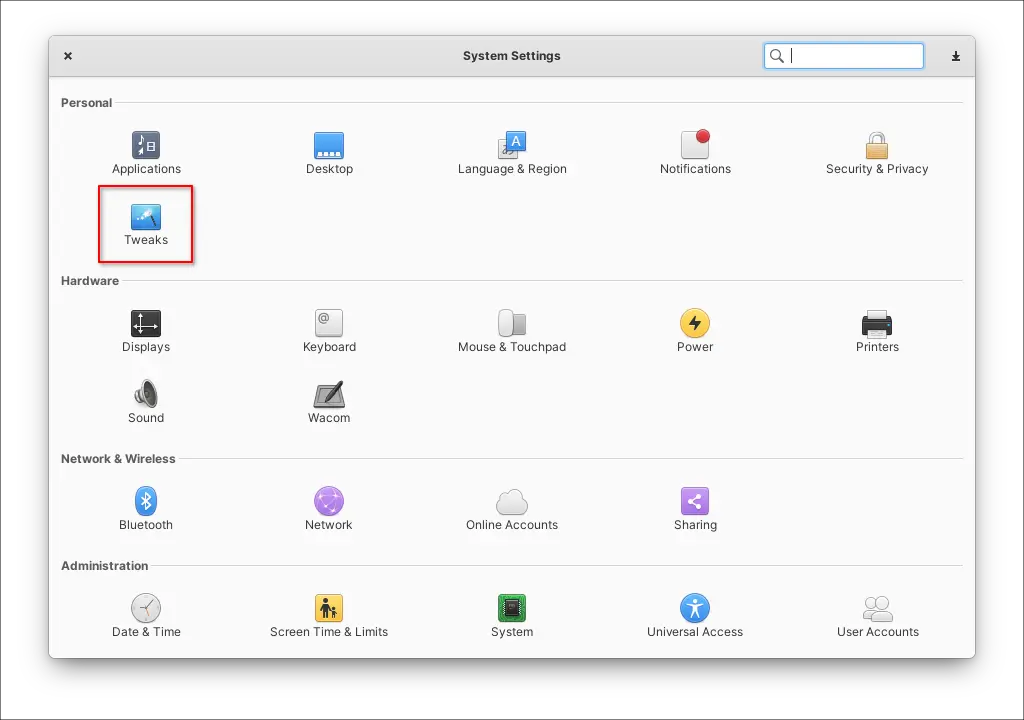
After installing Pantheon Tweaks, open or re-open System Settings from the bottom dock launcher. When it opens, you’ll see a new “Tweaks” option under ‘Personal’.
Click on it to open the settings page. There’s a drop-down box for selecting layout of “Window Controls”. Just choose Windows, Ubuntu, macOS, add minimize, or whatever option that you prefer.
The title-bar button layout will change immediately! Done.
OnlyOffice announced the new 7.3.0 release for its desktop editors office suite one day ago.
For Linux users, the new release now use native dialog windows (e.g., file manager and print). And, it adds support for xdg-desktop-portal in the file dialog window, meaning better desktop integration for application installed as Flatpak and/or Snap packages.
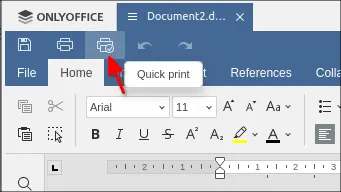
This release also add a Quick Print button right beside the original print button. Instead of bringing to the print configuration page, it will directly send your entire document to the last selected or default printer.
For the Spreadsheet Editor, there’s new Watch Window under Formula tab, as well as new functions include TEXTBEFORE, TEXTAFTER, TEXTSPLIT, VSTACK, HSTACK, TOROW, TOCOL, WRAPROWS, WRAPCOLS, TAKE, DROP, CHOOSEROWS, CHOOSECOLS.
Advanced forms via Forms tab in DOCXF files -> Available fields and Manage Roles menu
SmartArt (e.g., List, Process, Cycle, Hierarchy, Matrix) under Insert tab.
Ability to password protect document while allowing filling forms, commenting, or tracking changes.
Ability to add links between several spreadsheets
New Date and time, Zip Code, Credit Card for creating forms.
Support for creating math equations in both Unicode and LaTeX syntax.
Show/hide left and right panel.
Ability to insert data from the XML Spreadsheet 2003 file
How to Install OnlyOffice Desktop Editors 7.3:
The office suite is available to install in Ubuntu Linux in 3 different package formats: Snap, Deb, and Flatpak. Choose either one that you prefer.
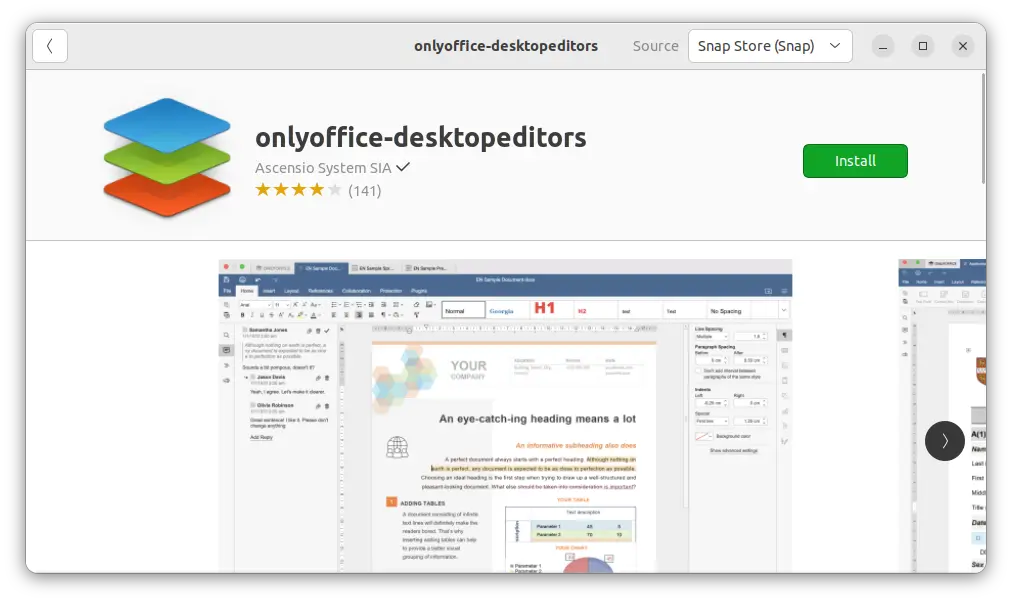
1. Snap
Snap is an universal package format that runs in sandbox. Ubuntu 20.04 and higher users can simply search for and install OnlyOffice as Snap from Ubuntu Software.
The snap automatically receive updates, though the package at the moment of writing is still at version 7.2.1.
ONLYOFFICE Snap in Ubuntu Software
2. Deb
Deb is the native package format for Debian/Ubuntu and their based Linux systems. OnlyOffice provides the .deb package along with RPM, EXE, MSI, and DMG packages for downloading at the github releases page:
Just select download the “onlyoffice-desktopeditors_amd64.deb” package, then click in file manager to open with Software Install and install it.
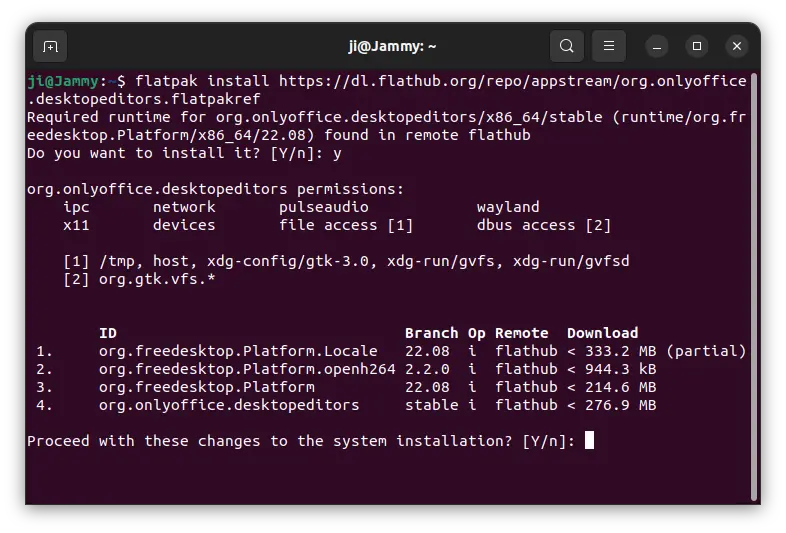
3. Flatpak
Linux Mint user may prefer the Flatpak package a bit more, since it’s available to install directly from the Software Manager.
It’s another universal package format runs in sandbox. Ubuntu user can install ONLYOFFICE Desktop Editors as Flatpak by following the steps below one by one:
First, press Ctrl+Alt+T on keyboard to open a terminal window. When it opens, run command to install the Flatpak daemon:
The Flatpak package is also in v7.2.1 at the moment, use the command flatpak update org.onlyoffice.desktopeditors to update the package once new version published.
Uninstall ONLYOFFICE Desktop Editor
Depends on which package you installed, choose to run either command below in a terminal (Ctrl+Alt+T) window to remove the office suite.
For the Snap package, remove it either via Ubuntu Software or by running the command below:
snap remove --purge onlyoffice-desktopeditors
For the native deb package, run command to remove it:
There are several Gnome Shell extensions to display system resource usage in Ubuntu, but in this tutorial I’m going to introduce an indicator that works in not only GNOME, but also Unity, MATE, and Budgie desktop environments.
It’s Indicator-SysMonitor, a free and open-source applet developed by the leader of Ubuntu Budgie team.
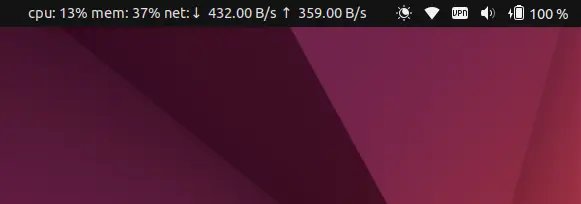
With it, user can display the usage and/or temperature of the following system resource in top-panel:
average CPU usage.
NVIDIA GPU utilization.
Memory usage.
network upload/download speed.
CPU, NVIDIA GPU temperature.
Swap usage.
Public IP address.
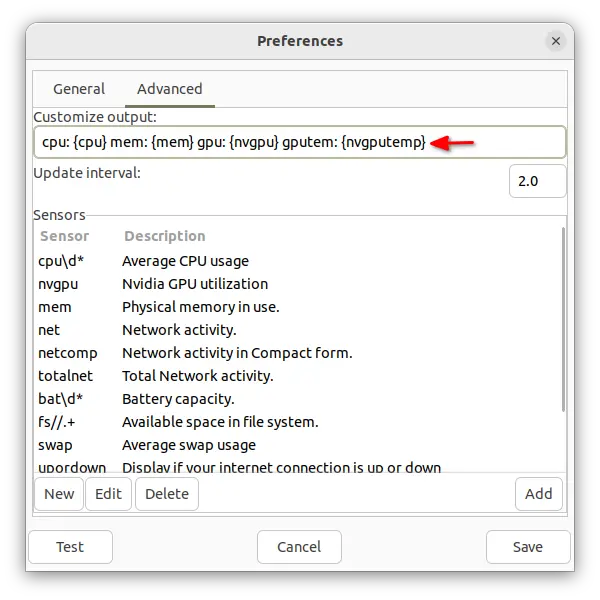
Most important is that user can customize the output, by setting which one or ones to display, in which order with which text. User just need to click the indicator on panel to open ‘Preferences’ dialog from pop-down menu, and format the output code in ‘Advanced’ tab.
How to Install Indicator-Sysmonitor
UPDATE: This app is NOT updated for almost one year! It does NOT work anymore in my case in Ubuntu 24.04!
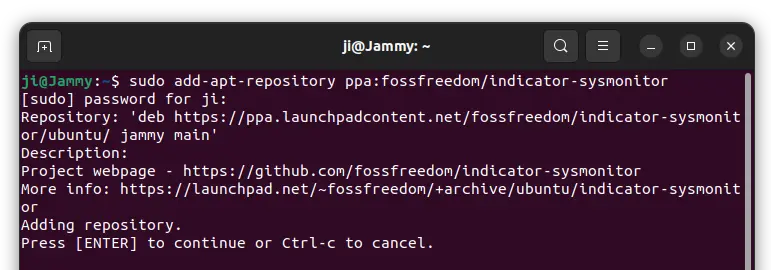
The developer has an Ubuntu PPA contains the packages for Ubuntu 18.04, Ubuntu 20.04, Ubuntu 22.04, Ubuntu 22.10, and even the next Ubuntu 23.04.
1. First, press Ctrl+Alt+T on keyboard to open a terminal window. When it opens, run command to add the PPA:
Type user password when it asks and hit Enter to continue.
2. For the old Ubuntu 18.04, you need to manually refresh package index after adding PPA:
sudo apt update
3. And, install the indicator applet via command:
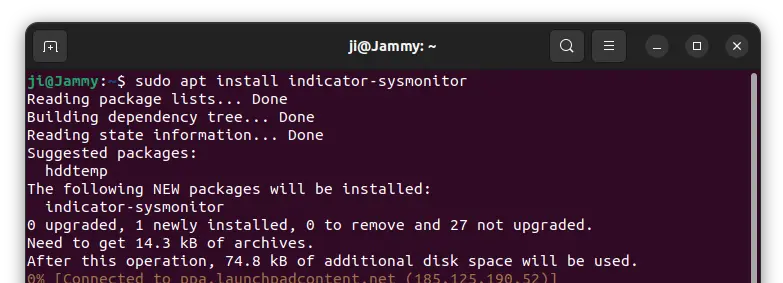
sudo apt install indicator-sysmonitor
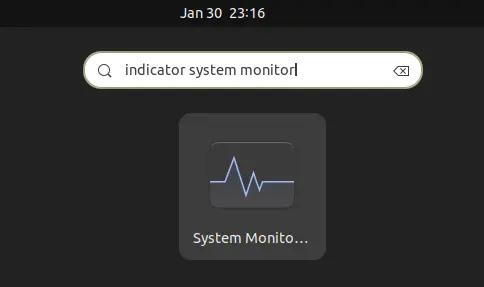
Finally, search for and open the applet like a normal application (it has same icon to System Monitor).
And click on the applet to open Preferences, and turn on start at login, configure output layout, refresh interval, etc.
Uninstall Indicator-Sysmonitor
You can close the applet by clicking on it in panel and select “Quit”. And remove the package at any time by running a single command in terminal window:
sudo apt remove indicator-sysmonitor
Also remove the PPA repository, either by running the command below or open “Software & Updates”and remove source line under “Other Software” tab.
There are several Lightroom alternative applications for editing your photos. LightZone is one of them works in Linux.
It’s a free and open-source professional-level digital darkroom and photo editor written in Java. It has less features than the popular Darktable and RawTherapee, but it’s good at processing black and white photos.
Type user password (no asterisk feedback) when it asks and hit enter to continue.
2. For Linux Mint and old Ubuntu 18.04, user need to manually refresh the system package index by running command:
sudo apt update
3. Finally, install this photo editing tool via command:
sudo apt install lightzone
With the PPA, you don’t have to run the apt command again and again, the future release page will be available to install in Software Updater (Update Manager) utility.
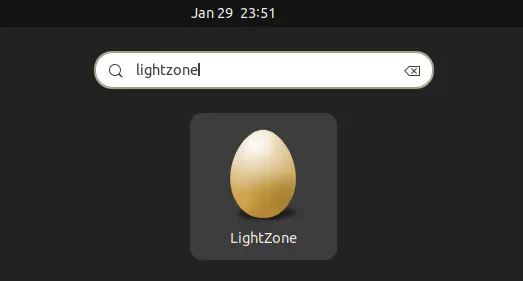
After installation, search for and launch the editor either from start menu or ‘Activities’ overview depends on your system.
Uninstall LightZone
To remove the photo editor, open a terminal window and run command:
sudo apt remove --autoremove lightzone
And remove the PPA repository either via “Software & Updates” utility under Other Software tab, or by running command:
Wine, the compatibility layer for running MS Windows apps in Linux and macOS, announced new stable 8.0 release after 1 year of development.
Wine 8.0 has finally completed PE conversion. All modules can be built in PE format. Meaning various features to be supported, such as copy protection, 32-bit applications on 64-bit hosts, Windows debuggers, x86 applications on ARM, etc.
Wow64 (Microsoft’s subsystem for running 32 bit applications on 64-bit Windows) is implemented for essentially all Unix libraries. Once the legacy calls removed, it will be possible to run 32-bit Windows applications on Linux without any 32-bit Wine libraries.
Convert the graphics drivers to run on the Unix side of the syscall boundary.
Effects are supported in Direct2D.
Direct3D improved with more graphics cards support.
Greatly improved the controller hotplug support.
Support Sony DualShock and DualSense controllers when the hidraw backend is used.
Introduce Windows.Gaming.Input API with hotplug notifications, force feedback effects and haptics, as well as trigger rumble support.
Mono engine updated to 7.4.0
How to Install Wine 8.0 in Ubuntu and Linux Mint
Winehq website now has a good tutorial teaching about how to install Wine packages in Ubuntu based systems. And, here is a re-write with more descriptions.
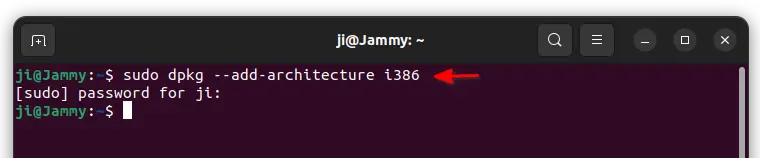
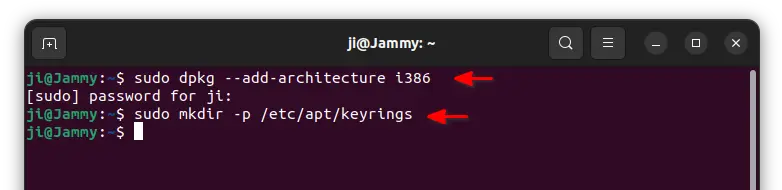
1. First, press Ctrl+Alt+T on keyboard to open a terminal window. When it opens, run command:
sudo dpkg --add-architecture i386
This command makes it possible to install 32-bit packages in 64-bit Ubuntu, since Wine at the moment still requires a lot of 32-bit libraries.
2. Then, run command in terminal to create “keyrings” folder under ‘/etc/apt’ directory for storing the keys. With -p flag, it ignores error if that folder already exist.
sudo mkdir -p /etc/apt/keyrings
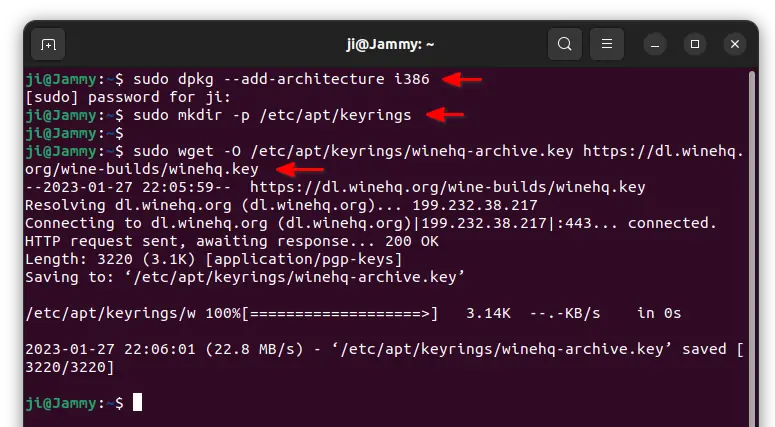
3. Next, use wget command line downloader to download the GPG key for winehq repository, and store in the folder you created in last step.
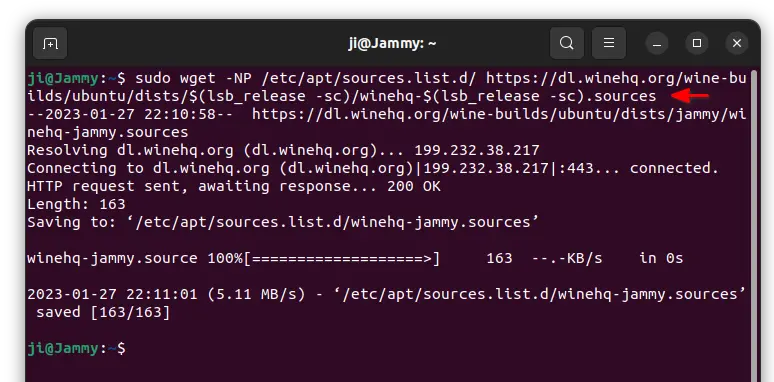
IMPORTANT: This command is for Ubuntu 23.04, 22.04, 20.04, 18.04 only! For Linux Mint, Zorin OS, etc, you have to replace the “$(lsb_release -sc)” in command with the codename of Ubuntu version your system is based on:
For Ubuntu 23.04 based system, use lunar.
For Ubuntu 22.04 based system (e.g., Linux Mint 21), use jammy instead.
For Ubuntu 20.04 based (e.g., Zorin OS 16.x), use focal.
For Ubuntu 18.04 based system, use bionic
5. After setting up the Wine’s official apt repository, run the command below to fetch package index:
sudo apt update
In the output, there should be a output line indicates Get x https://dl.winehq.org/wine-builds/ubuntu xxxxx InRelease.
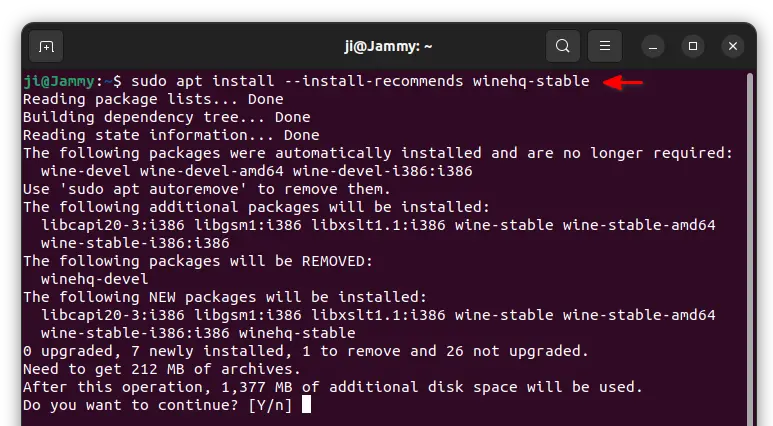
6. Finally, install Wine stable 8.0, as well as dependency libraries via command:
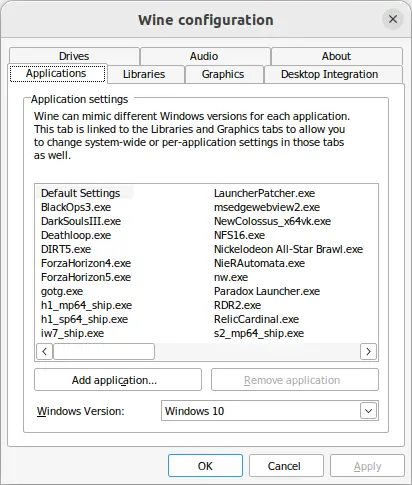
7. After successfully installed Wine packages, run command to generate the config files and open the configuration dialog.
winecfg
There you can verify Wine version and change the settings of this layer.
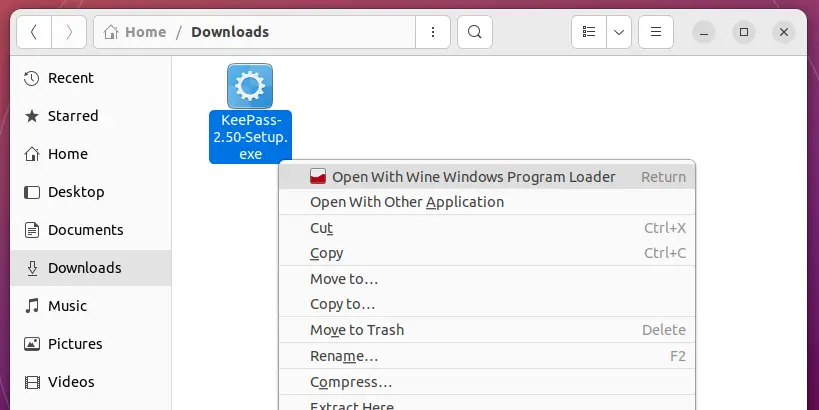
8 Finally, right-click on your EXE file in file manager and select “Open With Wine Windows Program Loader” (or select it from open with other applications dialog). See if Wine supports your Windows app.
How to Remove Wine 8.0
To remove the software package as well as dependency libraries, simply open terminal and run command:
sudo apt remove --autoremove winehq-stable
Also, remove the Wine apt repository by removing the source file:
sudo rm /etc/apt/sources.list.d/winehq-*.sources
And remove the key file via:
sudo rm /etc/apt/keyrings/winehq-archive.key
Finally, remember to refresh package index via sudo apt update command.
Going to buy a new monitor or laptop, or want to calculate whether it’s a HiDPI display? Here’s a handy app can help!
I previously thought that 4K and 8K displays are HiDPI, but 720p that I’m being using is LoDPI. It’s 100% wrong! HiDPI, stands for High Dots Per Inch, also known by Apple’s “Retina Display”. Meaning screens with a high resolution in a relatively small format.
A HiDPI monitor may be good for displaying photo images or playing FPS games, but not all software behaves well in high-resolution mode yet. If you’re going to buy a monitor or calculate existing display DPI, then here’s a good app for choice.
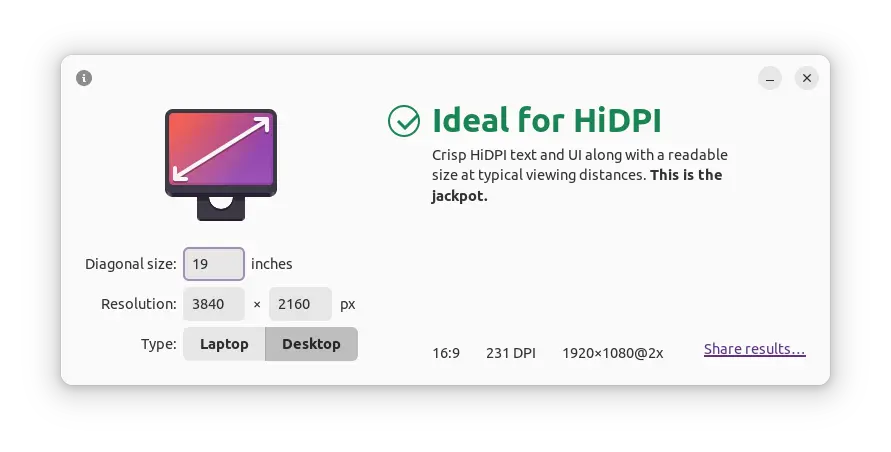
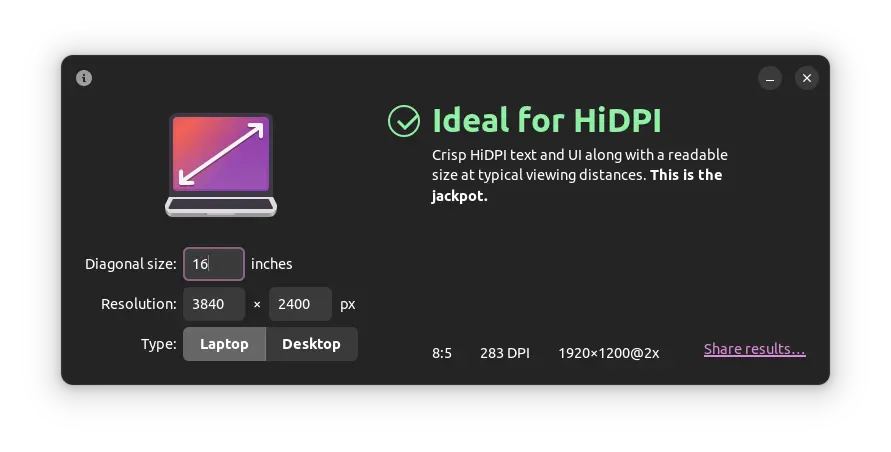
It’s ‘Dippi’, a free and open-source GTK4 application developed by a GNOME Foundation member.
With it, you just need to tell: laptop or desktop, monitor size (inches), and screen resolution. Then, it shows you aspect ratio and DPI value, as well as display’s density.
They include:
Very Low DPI,
Fairly Low DPI,
Ideal for LoDPI,
Potentially Problematic,
Ideal for HiDPI,
Fairly High for HiDPI, or
Too High DPI
Each value has some texts below to tell the text and UI feeling (too small or too large) at typical viewing distances. As a GTK4 app, it looks good in Ubuntu, Fedora and other Linux with GNOME desktop. And, it automatically changes the UI color between light and dark mode, to follow system color scheme.
How to Install Dippi
Dippi is also available as an online service, you can visit this page to analyze your display.
For most Linux users, it’s available to install as universal flatpak package in Flathub.org.
Ubuntu user can do following steps one by one to install the package:
Firstly, press Ctrl+Alt+T on keyboard to open terminal. When it opens, run command to make sure Flatpak is enabled:
sudo apt install flatpak
For the old Ubuntu 18.04, add this PPA repository before running apt install command.
There are quite a few ways to transfer files between different machines. For Ubuntu and most other Linux, here’s an easy way for choice.
Usually, I use a USB cable or a messenger app for transferring photo images between my personal PC and mobile devices.
However, my USB cable is always NOT near at hand and I hate to scan QR code again and again on PC for logging 3rd app. In this case, creating a temporary http file server with Python is an easy and good choice.
Upside and downside
Python is pre-installed in most Linux Distros. So this is an universal method for Linux. It also works in Windows and macOS with Python programming language installed.
As a simply http server, any devices with a web browser can download (or upload) files from/to the server side either over local network or internet.
However, http is NOT designed for transferring files. It’s OK to handle small files (e.g., photo images and short videos less than a few hundred MB). But for large files with a few GB or more file size, it may not work! As well, it’s NOT secure for accessing important files outside from local network.
Single command to create a Python http server:
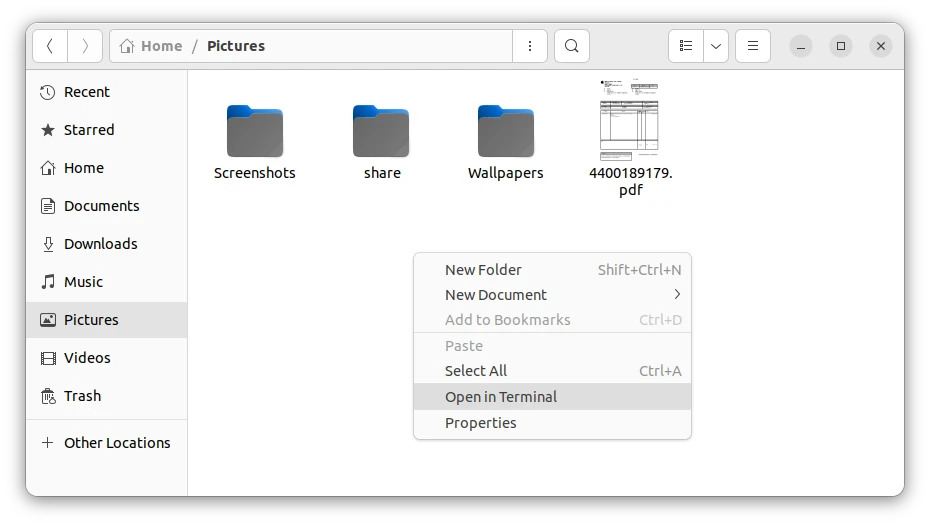
For those who are new to Linux, user may first open file manager, navigate to the folder that contains the files to share with other device, right-click on blank area and select “Open in Terminal”.
It will open a terminal window and automatically navigate to that folder as working directory.
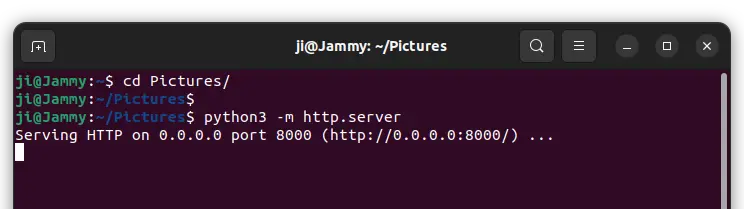
Or, you can also open terminal from start menu and run cd command to navigate directory. For example, run the command below to navigate to user’s Pictures folder:
cd ~/Pictures
Then, run the single command to start a http file server (For some Linux, replace python3 with python in command):
python3 -m http.server
By default, it listens to port 8000. If the port is already in use, use python3 -m http.server 9090 to set another port number (change number 9090 as you want).
After that, visit http://ip-address:8000 (change number 8000 if you set another port) in any device via a web browser. You can then open and/or right-click save as to download any file from that folder.
Create python http server with upload support
1. If you want to send files from any device to Ubuntu Linux, open terminal and run command:
python3 -m pip install --user uploadserver
Install pip first via sudo apt install python3-pip if the command above does not work. This command will install a Python module uploadserver.
NOTE: For Ubuntu 24.04, this pip install command does NOT work due to policy change. You may either follow this tutorial for workaround, or use the command below instead:
2. Then open or navigate to your desired folder in terminal window, and run command to create simple http file server with both download and upload support:
python3 -m uploadserver
Also specify port number if you want, for example, python3 -m uploadserver 9990
3. Finally, visit http://ip-address:8000 in any device via web browser can access and download files. Or, go to http://ip-address:8000/upload for uploading files.
For security reason, you may add a token authentication so client machines need to verify before being able to upload a file. To do so, run the command below instead in Ubuntu Linux:
I don’t remember when’s the last time auto-save session feature works correctly in my Ubuntu machine. While, enabling hibernation could be the best choice now to save and restore all open app windows in Ubuntu.
But for those who really like the auto-save session feature, here’s an Gnome Shell extension can do the job partially.
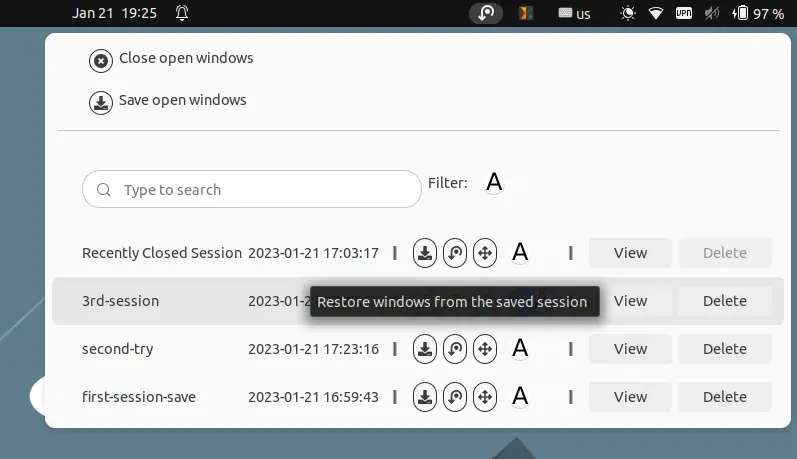
It’s ‘Another Window Session Manager’, an extension which adds an indicator icon on top panel system tray area. It provides an option to manually save all open windows, then allows to restore either manually via menu button or automatically at login.
Save open windows
Not only for classic Xorg, but it also supports Wayland session. Also, it remembers window size, position, and workspace. The downsides are that it does not restore the window workspace correctly sometimes, and restores some apps in empty window rather than last open files or URLs.
The extension is not perfect so far, but anyhow it’s better than nothing!
How to Install this session restore extension:
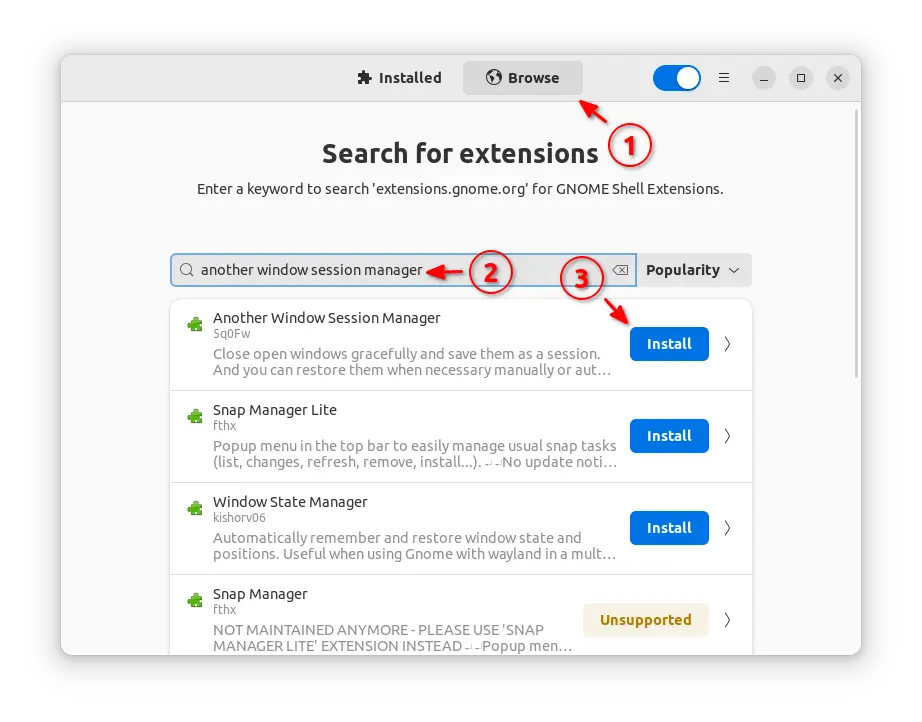
The extension so far support for Gnome 40, 41, 42 and 43. Meaning not only for Ubuntu 22.04, Ubuntu 22.10, it also works in Fedora 35/36/37 workstation, Rocky Linux 9, Arch, and other Linux with recent GNOME desktop.
For Ubuntu 22.04+, first search for and install “Extension Manager” app from Ubuntu Software.
Install Extension Manager in Ubuntu 22.04+
Then, use the tool to search and install “Another Window Session Manager” under Browse tab.
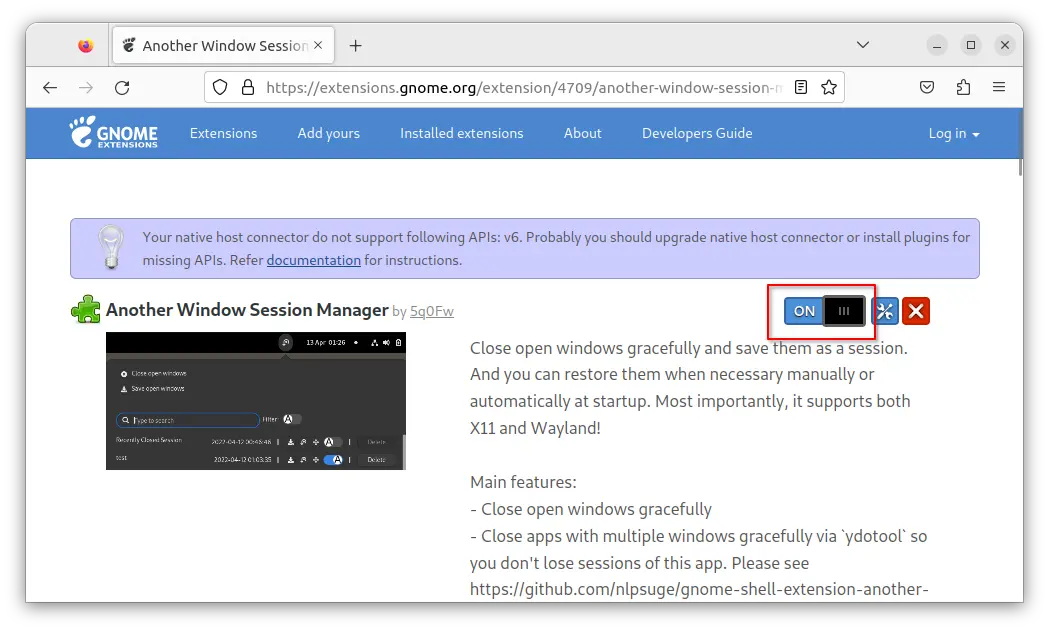
For Fedora 35/36/37 and other Linux with GNOME, visit the extension web page and use ON/OFF switch to install it.
Enable Restore open windows at login
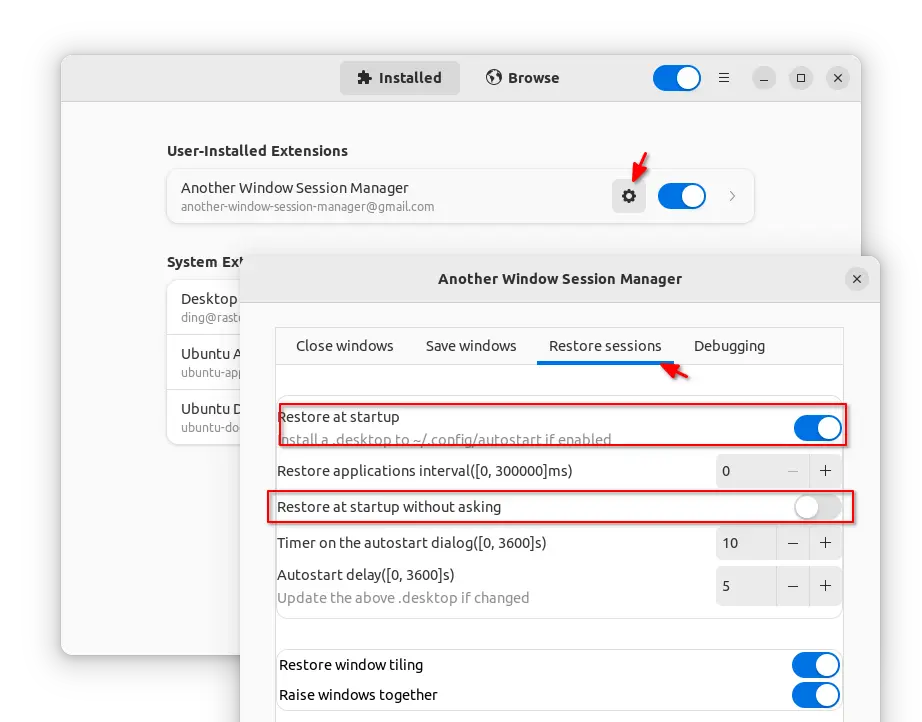
The feature to restore all open app windows on startup after user login is not enabled by default.
You can need to do following steps one by one to enable the function:
First, go to ‘Installed’ tab in Extension Manager. Then open the configuration dialog for the extension, by clicking on the gear button. (or install Gnome Extensions app and use the tool to open the settings).
Next, navigate to “Restore Sessions” tab and:
enable ‘Restore at startup’ toggle option.
enable ‘Restore at startup without asking’ to skip the confirm dialog on each login (optional)
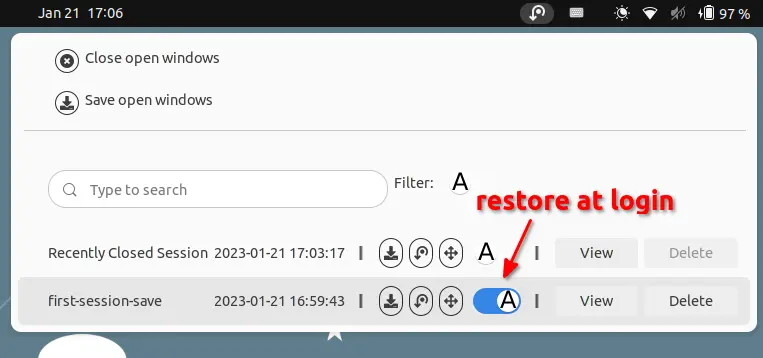
Finally, open the indicator menu, and turn on the ON/OFF switch for your saved session, so it will restore automatically at next login.