Disk Indicator is a simple system tray indicator applet for managing devices in Ubuntu.
The simple tool allows you to quickly access disk partitions and mount points. It also allows mount / unmount devices, view disk usage, and mount ISO images.
The software is developed by Tony George, the man behind Timeshift (system restore app). You can easily get this applet by adding the developer’s PPA:
1. Open terminal (Ctrl+Alt+T) and run command to add the PPA:
sudo add-apt-repository ppa:teejee2008/ppa
So far the PPA contains the packages for Ubuntu 17.04, Ubuntu 16.10, Ubuntu 16.04, Ubuntu 14.04, and their derivatives.
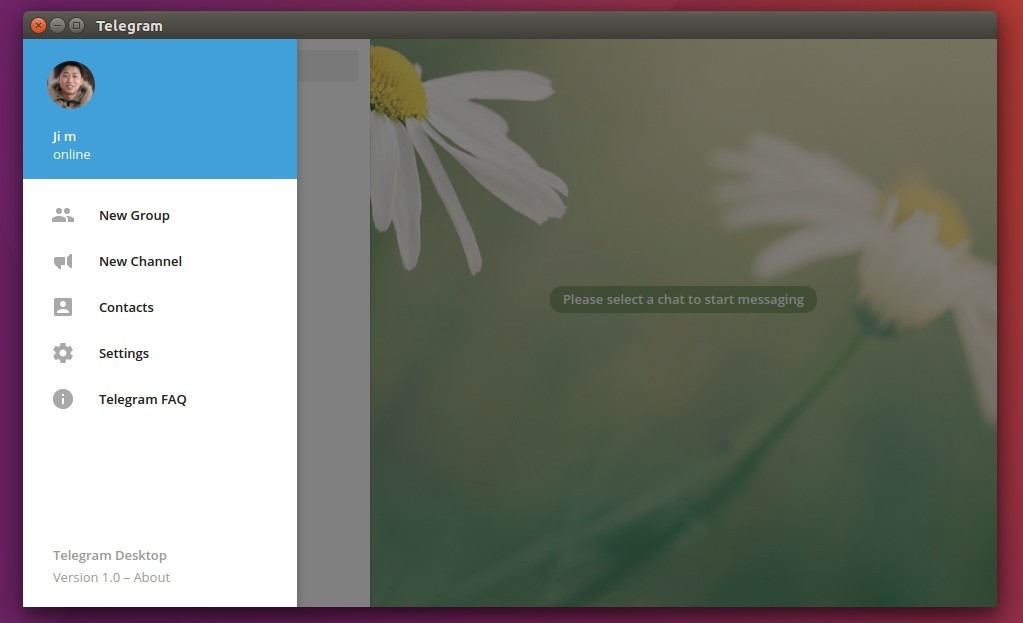
The Telegram Desktop App finally reached the 1.0 release! Here’s how to install it via PPA or Snap in Ubuntu 16.10, Ubuntu 16.04, Ubuntu 14.04, Linux Mint 17/18 and derivatives.
The popular instant messaging app, Telegram 1.0 for desktop, was released a few days ago with a fabulous new design. It features:
Consistent material design
Smooth animations
Support for custom themes
Auto sync messages from phone with computer using Telegram’s encrypted cloud.
Ability to start typing on phone, then continue on computer.
Install Telegram Desktop App via Snap in Ubuntu:
To install the Telegram snap package in Ubuntu 16.04 and higher, simply open terminal (Ctrl+Alt+T) and run command:
sudo snap install telegram-sergiusens
Type in password (no visual feedback) and hit Enter. It will automatically download the snap package and install it in your system.
Uninstall Telegram (Snap):
To uninstall it, simply run the snap command with remove option:
sudo snap remove telegram-sergiusens
Install Telegram Desktop via PPA in Ubuntu:
For all current Ubuntu releases, including Ubuntu 12.04, Ubuntu 14.04, Ubuntu 16.04, Ubuntu 16.10, and derivatives, e.g., Linux Mint and Elementary OS, Telegram is also available as .deb package in an unofficial PPA.
1. Open terminal (Ctrl+Alt+T) and run command to add the PPA:
sudo add-apt-repository ppa:atareao/telegram
Type in password (no visual feedback) and hit Enter.
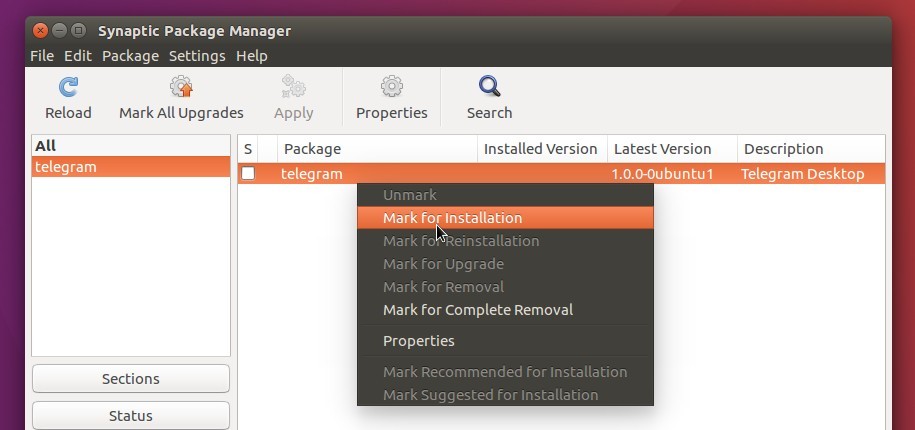
2. Then search for and install the app via Synaptic Package Manager:
or just run the commands below one by one:
sudo apt update

sudo apt install telegram
Uninstall:
To uninstall it, simply run apt command with remove option:
sudo apt remove telegram && sudo apt autoremove
And the PPA can be removed by launching Software & Updates and navigating the Other Software tab.
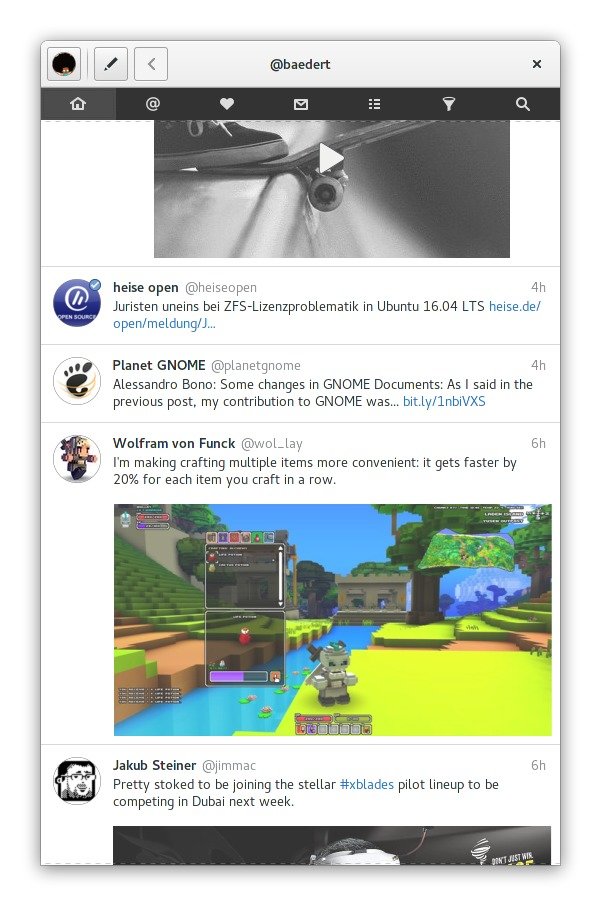
Corebird, an open-source and native GTK+ twitter client, has reached the 1.4 release a few hours ago with some enhancements and bug-fixes.
The changes in Corebird 1.4 according to the release page:
Images in quoted tweets now look more like they actually belong to the quoted tweet instead of the quoting tweet.
Allow deleting tweets from the tweet info page and not just from timelines.
Fix the user completion not showing all possible results
Focus the already opened window for an account if the account gets selected in the accounts popover
Avoid window resizing when typing in the Direct Message text box
Add ‘q’ accelerator to tweet rows for quoting
Add spellchecking. This add a dependency to gspell
Increase gtk+ dependency to 3.18 to get rid of some workarounds.
Increase avatar size in profiles and slightly overlap them over the banner. Also, always show the full banner.
Fix completion popup positioning under Wayland
Add experimental meson build files
Fix some videos not playing correctly
Add a minimal video progress indicator to the video dialog
Fix the retweet/favorite count updating in the tweet info page
How to Install Corebird 1.4 in Ubuntu / Linux Mint:
The new release has been made into unofficial PPA, available for Ubuntu 16.04, Ubuntu 16.10, Linux Min 18 and derivatives. Spellcheck feature disabled due to build error.
Tip: The GetDeb repository also maintains the Corebird packages, see here.
1. Open terminal (Ctrl+Alt+T) and run command to add the PPA:
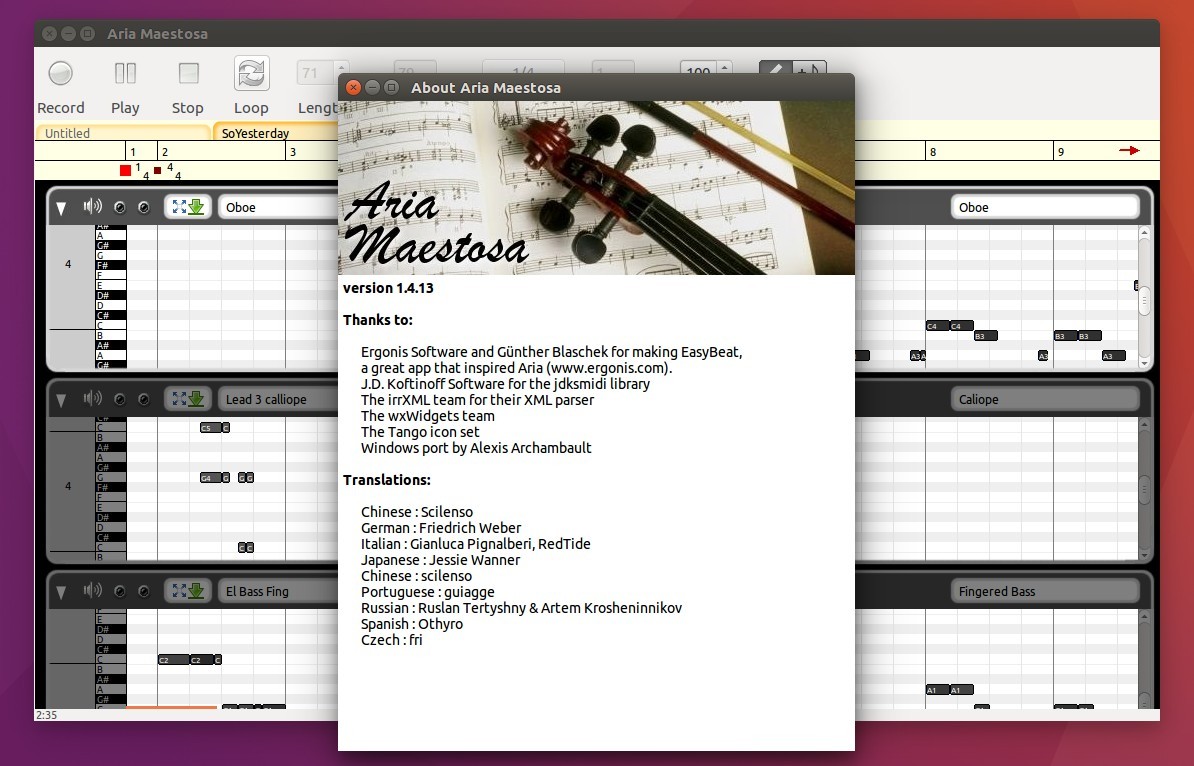
The open source Aria Maestosa midi tracker/editor has reached the 1.4.13 release a few days ago with some bug-fixes. Here’s how to install it in Ubuntu 16.04, Ubuntu 16.10, and Linux Mint 18.
Aria Maestosa lets you compose, edit and play midi files with a few clicks in a user-friendly interface offering score, keyboard, guitar, drum and controller views. It features:
Import and play MIDI files
Easily compose and edit music
See and use musical score notation, as well as piano roll, tablature and/or drum views
Print musical notation
Record from a MIDI instrument
How to Install Aria Maestosa in Ubuntu:
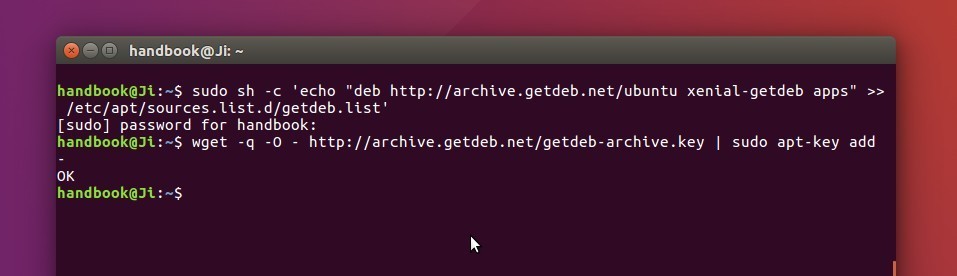
The GetDeb repository contains the latest packages of Aria Maestosa, available for Ubuntu 16.04, Ubuntu 16.10, and derivatives.
1. To add the repository, open terminal (Ctrl+Alt+T) and run command:
sudo sh -c 'echo "deb http://archive.getdeb.net/ubuntu xenial-getdeb apps" >> /etc/apt/sources.list.d/getdeb.list'
You may replace xenial (for 16.04 and derivatives) in the code with yakkety for Ubuntu 16.10.
2. After adding the repository, either search for and install the software using Synaptic Package Manager, or run the commands below one by one in terminal:
sudo apt update

sudo apt install ariamaestosa
Uninstall:
To remove the software, either use Synaptic Package Manager or simply run the command below in terminal:
fixed displaying first video frame in frame button
changed transcoding caching to allow put multiple equal video files on DVD (e.g. with different cut points)
added support of EXIF metadata in slideshow
added CBR option for menu and slideshow enoding settings (disabled by default)
added Bulgarian translation (thanks to Ivan Dobrev)
win32/win64: updated Manolito’s VBR plug-in
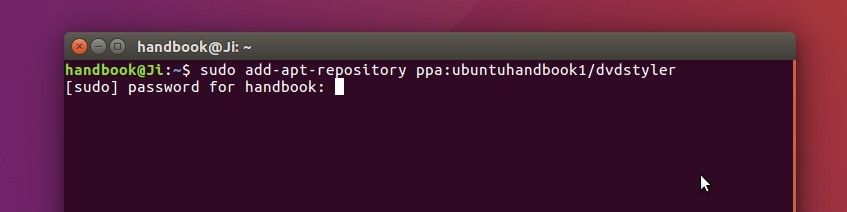
How to Install DVDStyler 3.0.3 via PPA:
DVDStyler does not offer official binary packages for Linux. An unofficial PPA is available with the latest packages for Ubuntu 16.10, Ubuntu 16.04, Ubuntu 14.04, and Linux Mint 17 / 18.
1. To add the PPA, open terminal (Ctrl+Alt+T) and run command:
Type in your password (no visual feedback) when it asks and hit Enter to continue.
2. After that, search for and install dvdstyler via Synaptic (or other) Package Manager. Or run the commands below in terminal to update and install the tool:
sudo apt update

sudo apt install dvdstyler
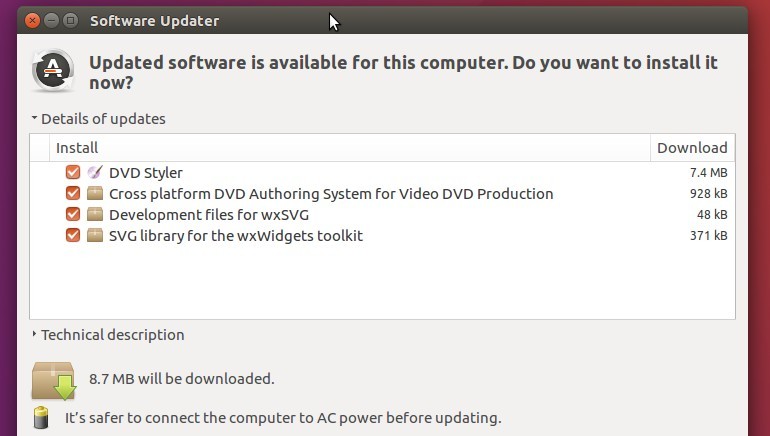
With the PPA repository added, you can receive future updates via Software Updater once a new release is out and made into PPA.
How to Uninstall:
To remove DVDStyler, either use Synaptic Package Manager or run the command below in terminal:
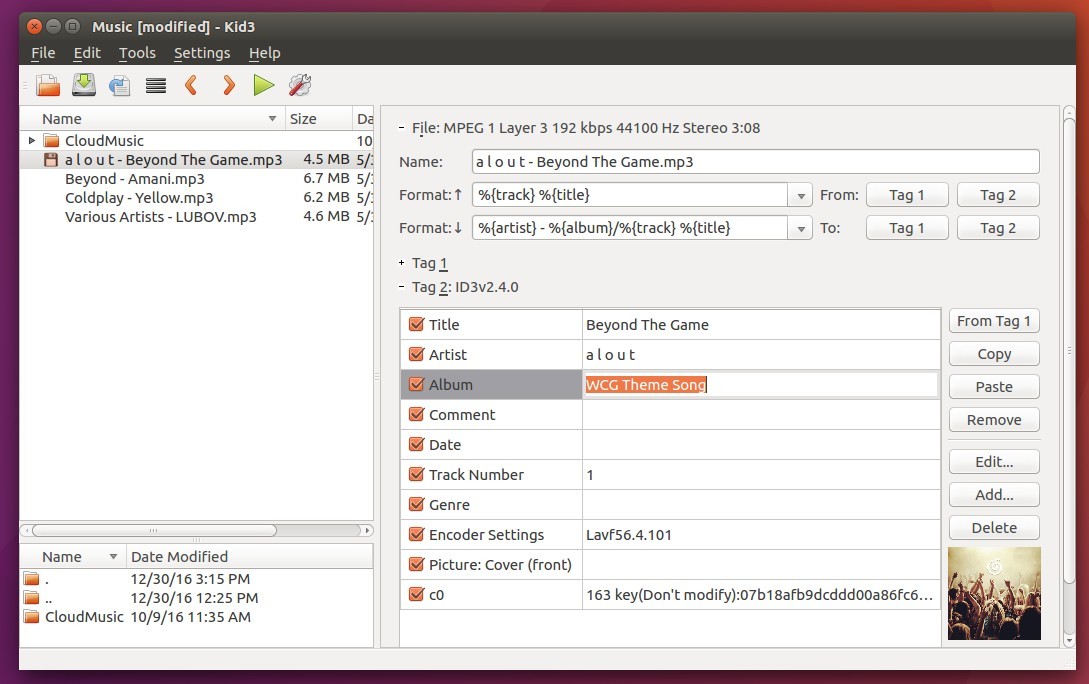
For those sticking to the latest Kid3 audio tag editor, here’s how to install / upgrade it (version 3.4.4 so far) via PPA in Ubuntu 16.04, Ubuntu 16.10, Ubuntu 14.04, Ubuntu 12.04, and Linux Mint 17 / 18.
Kid3 is an open-source cross-platform audio tag editor for many audio file formats. It supports DSF, MP3, Ogg, FLAC, MPC, MPEG-4 (mp4/m4a/m4b), AAC, Opus, SPX, TrueAudio, APE, WavPack, WMA, WAV, AIFF, tracker modules.
The latest version so far is Kid3 3.4.4 that brings new features include a portable mode storing the configuration file in the application folder, copying of images to the clipboard and an MPRIS D-Bus interface for the audio player on Linux. Also it fixes the import of durations when importing from file or clipboard, and building with Chromaprint 1.4.
How to Install / Upgrade Kid3 in Ubuntu / Linux Mint:
The editor has an official PPA repository that so far offers the latest packages for Ubuntu 12.04, Ubuntu 14.04, Ubuntu 16.04, Ubuntu 16.10, and their derivatives.
1. Open terminal (Ctrl+Alt+T) and run command to add the PPA:
sudo add-apt-repository ppa:ufleisch/kid3
Type in your password (no visual feedback) when it asks and hit Enter to continue.
2. After that, search for and install kid3 via your package manager, or run the commands below in terminal to install it for the first time:
sudo apt update

sudo apt install kid3
For Qt version (without KDE libraries), use sudo apt install kid3-qt instead. There’s also command line version kid3-cli available.
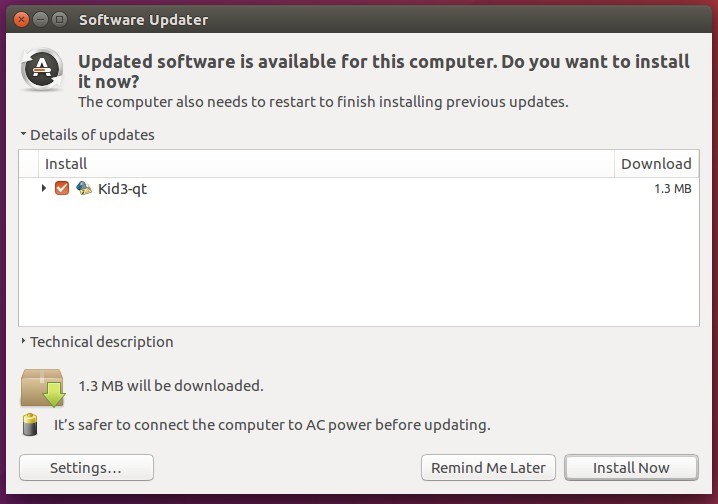
For those who have a previous release installed, launch Software Updater (or Update Manager) to upgrade Kid3 after checking for updates:
How to Uninstall:
To uninstall Kid3 audio tagger, either use your package manager or run the command below in terminal:
Don’t have a built-in webcam in your Ubuntu PC? You can use your Android or iPhone as wireless or USB webcam.
By installing a free open-source ‘DroidCam‘ app in both your phone and Linux Desktop, then you can use the Android/iOS phone just like built-in webcam, through either wireless network or USB cable.
It also works with OBS/XSplit/etc for streaming to Twitch or YouTube. You can also use DroidCam as an IP webcam (or Surveillance Camera) via a Internet browser virtually on all networks. Use it as a simple pet cam, spy cam, or a security camera.
Features:
Chat using “DroidCam Webcam” on your computer, including Sound and Picture.
Connect over WiFi or USB cable.
Use other apps with DroidCam in background (Android).
Surveillance/IP webcam MJPEG access
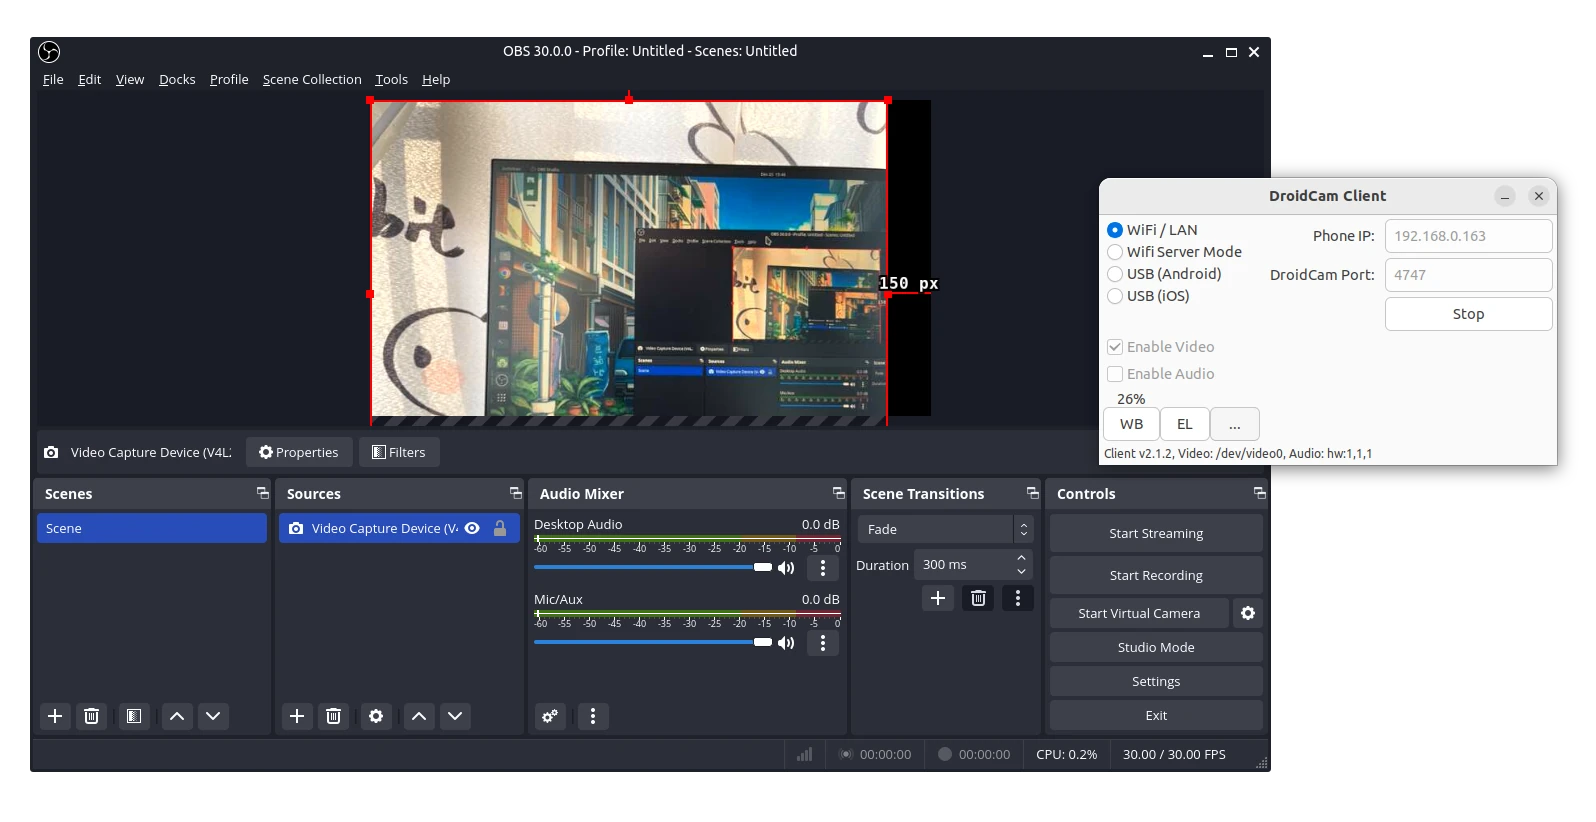
my iPhone camera screen in OBS Studio
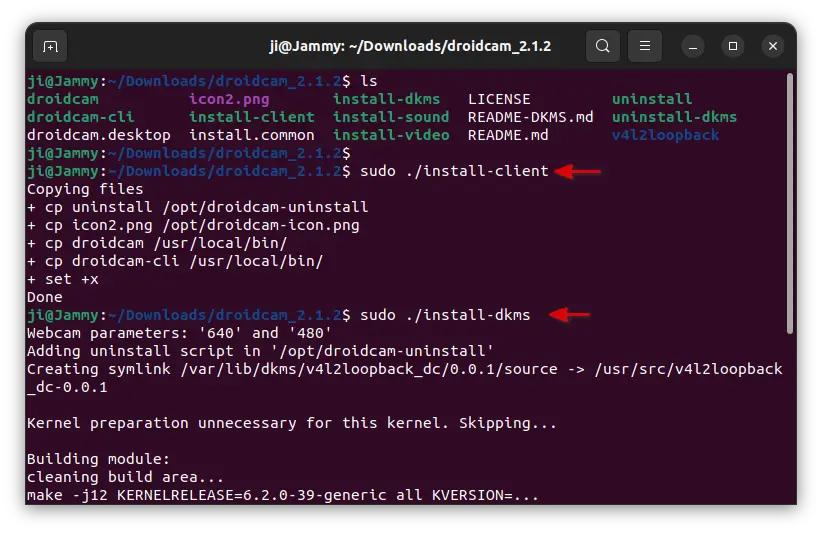
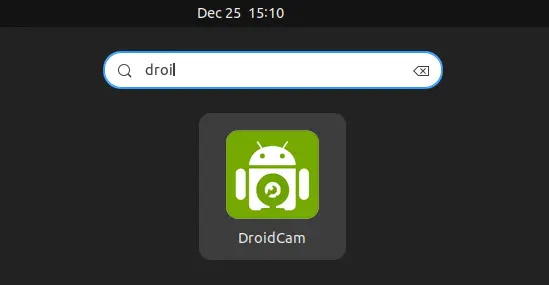
Step 1: Install DroidCam in Ubuntu:
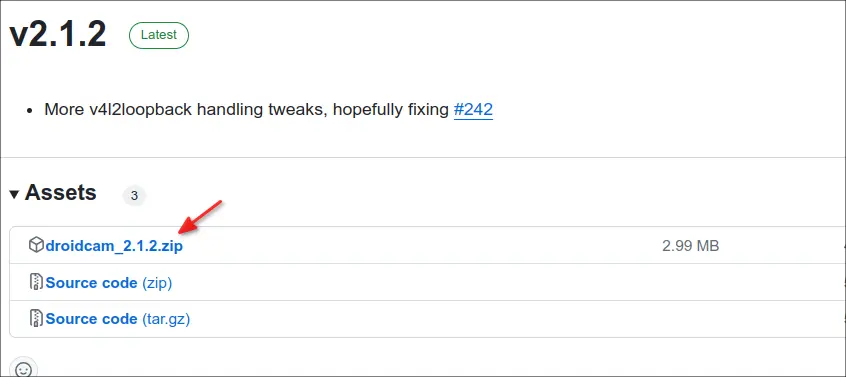
To install the app in Ubuntu & other Linux, first go to the Github release page to download the latest package:
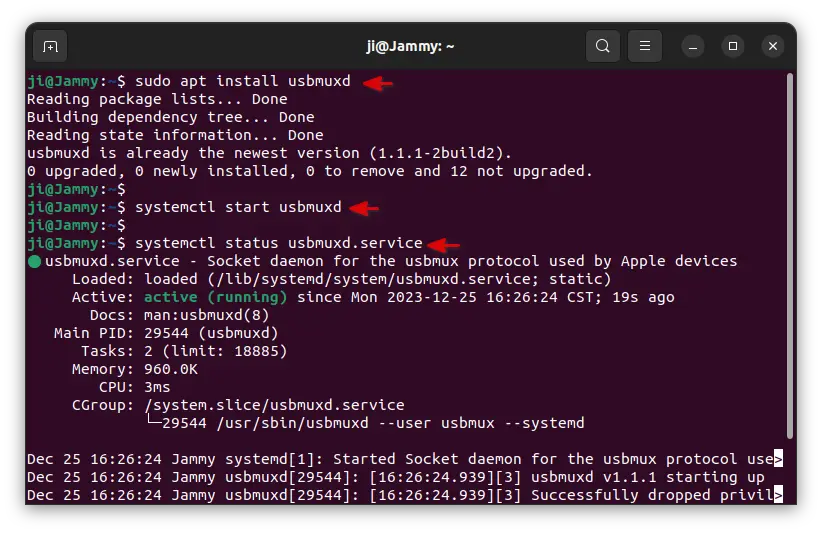
Finally, either connect both phone and Ubuntu PC into same local network, or connect through USB.
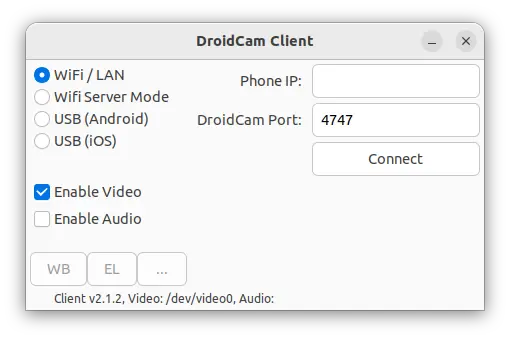
Open the app in both devices, and select either WiFi or USB in Ubuntu client app, try phone IP address if required and click “Connect”.
Once successfully connected, open up a V4L2 compatible program (e.g., VLC player, Skype, OBS Studio) and you should see DroidCam listed as a video device.
In addition, as you see in last screen, the app has a few buttons to configure white-balance, exposure-locked, zoom in/out, flip/mirror, and toggle LED flash, etc.
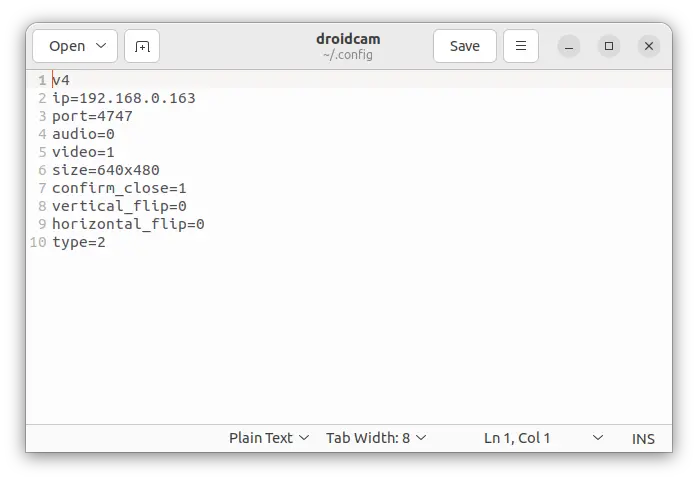
As well as screen resolution, user can edit the .config/droidcam (press Ctrl+H to view in Files) file for the configurations.
Uninstall:
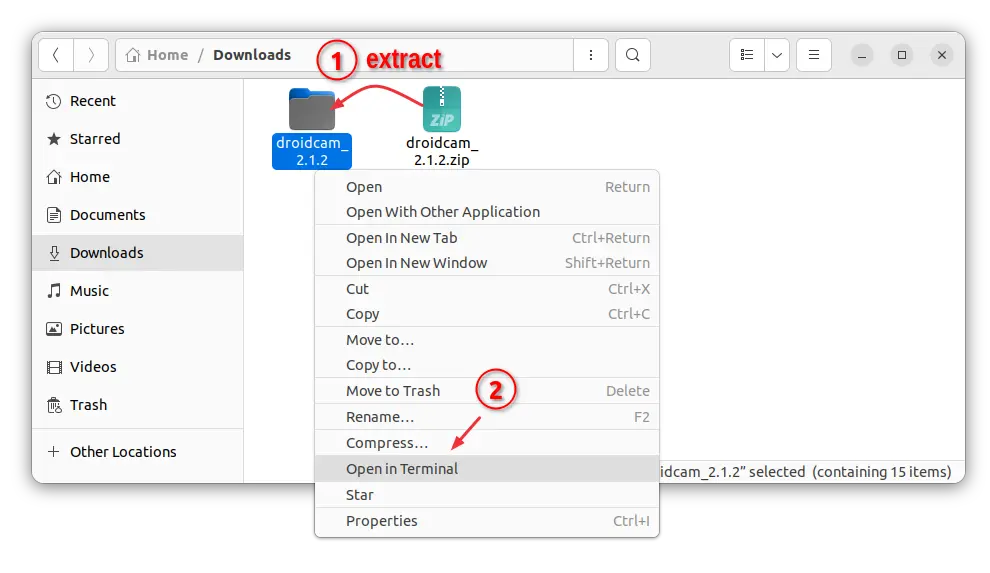
To remove DroidCam client in Ubuntu, simply open terminal (Ctrl+Alt+T) and run command to run uninstall script:
For Ubuntu 14.04, Ubuntu 16.04, Ubuntu 16.10, and their derivatives, e.g, Linux Mint 17, 18, follow the steps below to add OpenShot Stable PPA and install / upgrade the latest release:
1. Open terminal (Ctrl+Alt+T) and run command to add the PPA:
A new maintenance release for Oracle Virtualbox 5.1 has been released one day ago with Linux hosts and guests fixes and kernel 4.9, 4.10, 2.2.68 compile fixes.
Changes in Virtualbox 5.1.12:
VMM: fixed VERR_IEM_ASPECT_NOT_IMPLEMENTED Guru Meditations with certain Linux guests if KVM paravirtualization is enabled
VMM: fixed VERR_VMX_UNABLE_TO_START_VM Guru Meditations under rare conditions
GUI: prevent a crash under certain conditions if the VM is terminated very early
GUI: fixed certain keyboard capture issues for OS X hosts.
GUI: fixed dragging guest windows in seamless mode with the keyboard captured (X11 hosts only)
GUI: fixed a problem where the new version detected dialog was covered by the appliance import dialog (Mac OS X hosts only
Storage: fixed NVMe reset processing when doing rmmod nvme; modprobe nvme in a Linux guest
Storage: fixed creating a snapshot when the VM is running and an NVMe controller is present
Storage: fixed a problem with the LsiLogic SCSI controller where requests could be lost with SMP guests
E1000: fixed “cable disconnected” issue for Mac OS X guests
E1000: fixed “TX unit hang” issue for Linux guests only
Parallel ports: fixed port enumeration on Windows host
API: don’t crash when sanitizing certain VM names
Linux hosts: automatically disable asynchronous I/O on Linux 2.6.18 kernels
Linux hosts / guests: Linux 2.6.28 compile fix
Linux hosts: compile Linux 4.9 compile fix
Linux Additions: warn the user about a known bug with older Linux guests (e.g. Debian 7) requiring manual work to get 3D working
Linux Additions: fix the graphics driver build with Linux 4.10 and later
Windows Additions: fixed a crash in the WDDM driver under certain conditions
Download / Install Virtualbox 5.1.12 in Ubuntu:
The official Linux binary packages are available for download at the link below:
Grab the package (i386 for 32-bit, or amd64 for 64-bit) for you system and click install via Ubuntu Software.
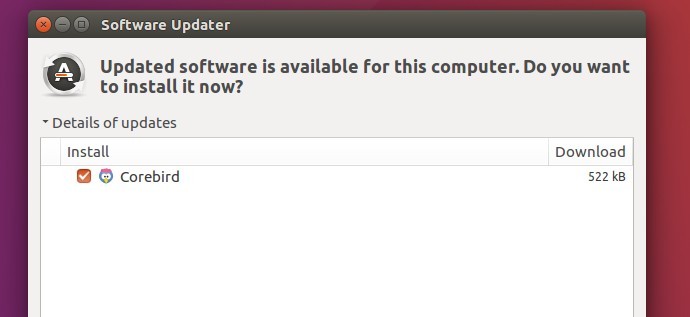
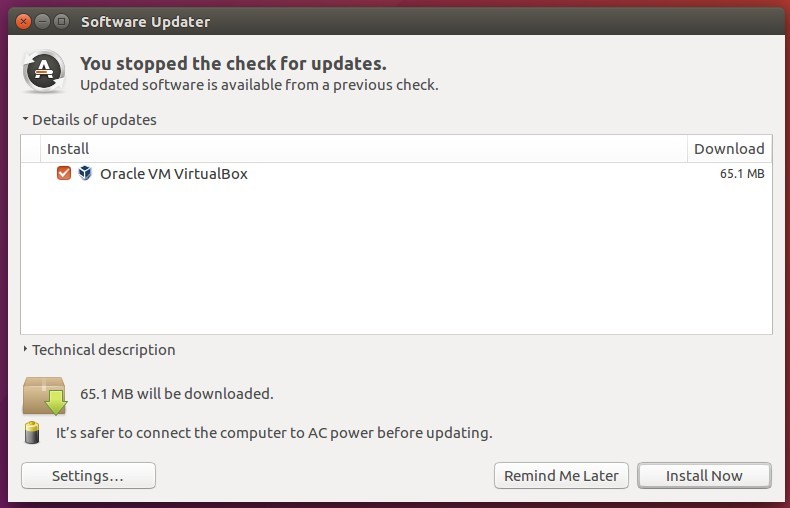
For those who have a previous VBox 5.1 release installed, launch Software Updater to upgrade the software if you have Virtualbox Linux repository added in your system:
To manually add Virtualbox Linux repository:
1. Open terminal (Ctrl+Alt+T) and run command:
sudo sh -c 'echo "deb http://download.virtualbox.org/virtualbox/debian xenial contrib" >> /etc/apt/sources.list.d/virtualbox.list'
Replace xenial in the code with yakkety (for 16.10), or trusty for 14.04 and Linux Mint 17.x.
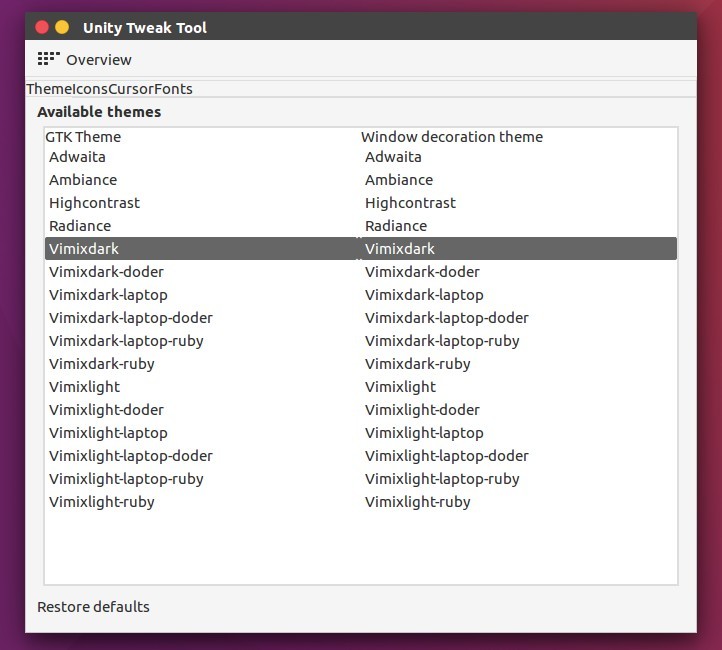
Vimix is a flat Material Design theme for GTK 3, GTK 2 and Gnome-Shell which supports GTK 3 and GTK 2 based desktop environments like Gnome, Unity, Budgie, Pantheon, XFCE, Mate, etc.
This theme is based on Flat-Plat gtk theme of nana-4. The theme offers:
dark theme, dark doder, dark ruby.
light theme, light doder, light ruby.
Following pictures are Vimix theme with Numix icons in Unity Desktop (with plank):
Vimix Light with Numix icons (Unity with Plank)
Vimix Dark with Numix icons in Unity
Install Vimix GTK Theme in Ubuntu 16.10:
The theme project page offers .deb and .rpm packages for Gtk 3.20 and Gtk 3.22. So you need at least Ubuntu 16.10.
For other Gtk3.22 or other packages, go to github.com.
After installed the .deb packages via Ubuntu Software or dpkg command, launch Unity Tweak Tool, Gnome Tweak Tool, or other configuration tool and apply new GTK themes and enjoy!