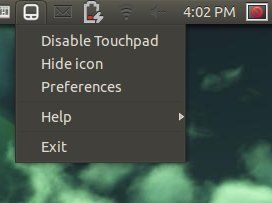
The touchpad indicator applet, which shows the status of the touchpad, and to enable and disable the touchpad, now is available in Ubuntu 13.10 Saucy. Here I’ll show you how to install it in Ubuntu, Linux Mint, and Elementary OS using the developer’s PPA repository.
So far, the PPA provides the latest packages for Ubuntu 13.10, Ubuntu 13.04, Ubuntu 12.04, Ubuntu 12.10 and the derivatives. Also there are old versions for Ubuntu 10.04, Ubuntu 11.04, Ubuntu 11.10 and derivatives.
Tutotiral Objectives
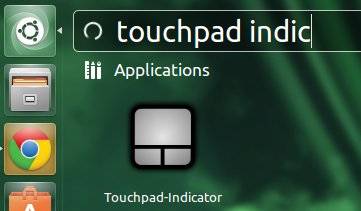
Install Touchpad Indicator in Ubuntu 13.10 Saucy
Enjoy!
To get started, press Ctrl+Alt+T to open terminal. When it opens, run below commands to add the Touchpad Indicator PPA:
sudo add-apt-repository ppa:atareao/atareao
Then you can install the indicator via below commands:
After properly installed Nvidia drives in Ubuntu, you may get the Nvidia Logo while booting up your machine. If you find it’s annoying to have this screen, this tutorial will show you how to easily disable it by two ways.
One command to disable Nvidia logo
The easiest way to do this is running below command in terminal (press Ctrl+Alt+T):
sudo nvidia-xconfig --no-logo
After that, you won’t see the logo in bootup any longer.
The other way is to manually edit the Nvidia config file. Edit the /etc/X11/xorg.conf by running below command:
sudo gedit /etc/X11/xorg.conf
add Option “NoLogo” to Section “Device”, make it look like this:
SMPlayer 0.8.6 has been released with Youtube Playback fixed. With this tutorial, you can always install the latest SMPlayer in Ubuntu & Linux Mint via SMPlayere PPA.
Changes in latest SMPlayer 0.8.6:
SMPlayer can now update its internal Youtube code so it’s not necessary to update smplayer everytime Youtube makes a change.
A section “Updates” has been added to the preferences dialog, where it’s possible to configure or disable the update checker.
SMPlayer could still fail to find some subtitles from opensubtitles.org. Hopefully this is fixed.
(Windows) The autoload of subtitles with non latin1 filenames has been fixed.
The Windows installer gives the possibility to delete most of the configuration files of smplayer. This can be useful if the configuration files have been corrupted or smplayer has been misconfigured. Linux users can use the command “smplayer -delete-config”.
Several other bugfixes. See the Changelog for details.
Install SMPlayer via PPA:
So far, the PPA supports Ubuntu 13.10, Ubuntu 13.04, Ubuntu 12.10, Ubuntu 12.04, and Linux Mint 13, 14, 15, 16.
Press Ctrl+Alt+T to open terminal. When it opens, run commands to add SMPlayer PPA.
XnView MP has reached version 0.61. Since the default is version 0.51 in Ubuntu Software Center, the latest XnView brings a lot of bug fixes and improvements. With this tutorial, you can always get the latest version of XnView in Ubuntu and Linux Mint.
Changes since XnView MP 0.51:
Batch convert: Watermark, stretch image
remember item selection in information panel
8bf 64bits plugin can be used with XnViewMP 64bits version
XMP-photoshop:Location not more written
JPEG arithmetic decoding support
Change timestamp can create EXIF date
Show always selection information
JPEG2000 Export
Print in view mode
Clean DB can remove files with categories
Database has been improved, PLEASE make an backup of it before to install this version
Linux, better way to delete files/folders
Fix XMP/IPTC import problem
Download & Install XnView MP:
First you may check OS type 32-bit or 64-bit by System Settings -> Details.
Then press Ctrl+Alt+T to open terminal:
For 32-bit system, download and install XnView via below 2 commands:
WebcamStudio is a virtual webcam software that can be used with Skype or a flash website like UStream, to create a professional looking broadcast, including banners, animations, transit animations and icons, etc.
This tool is not meant as a video editor but as a live video mixer giving you the possibilities to change the look of the broadcast on the fly.
Some of the features include:
Switch webcams on a single click
Show an IRC channel in your video broadcast
Broadcast your desktop for creation of nice HOWTO’s
Be creative and put animations and banners
Display what song is currently played by Rhythmbox
Co-host a remote friend, show his webcam inside your output (PicInPic)
Connect to WeatherBug and display your current weather
Apply some fancy effects on each source
Have a green wall, then why not use the ChromaKey effect to do the same as the weather man on the news network
Use all kinds of devices as webcamera like a MiniDV, your iPhone, etc.
Install WebcamStudio from GetDeb:
The getdeb repository provides the latest version for Ubuntu 13.04, Ubuntu 12.04 and a little old version of Ubuntu 10.04, Ubuntu 11.10, Ubuntu 12.10, and Linux Mint.
For Ubuntu users, download and double-click the below package to add the GetDeb repository:
download getdeb package
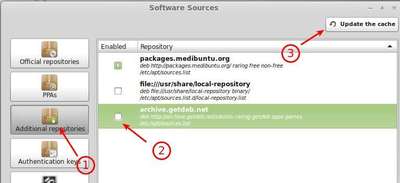
For Linux Mint users, enable the repository from Start menu -> Software Sources -> Additional Repositories
After that, install the WebcamStudio via your package manager. Or run below command in terminal (press Ctrl+Alt+T to open it):
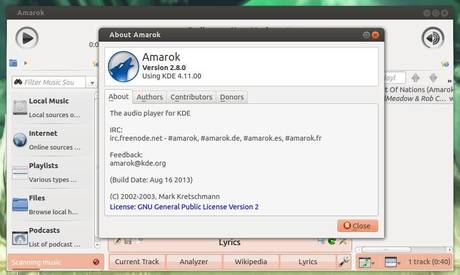
Amarok music player has reached version 2.8.0. This simple tutorial will show you how to install it in Ubuntu 13.04 Raring, Ubuntu 12.04 Precise and Linux Mint 13, 15.
According to the developers of Amarok, users can now add the Tracks from the Recently Played List widget directly to the application, the Jamendo service now uses a higher quality MP3 format instead of Ogg Vorbis, the player now depends on Qt 4.8.3, and much more. Read full changelog
Install Amarok 2.8.0 via PPA:
The Kubuntu Backports PPA has updated for Ubuntu 13.04 and Ubuntu 12.04 users. Press Ctrl+Alt+T to open terminal. When it opens, run command to add the PPA:
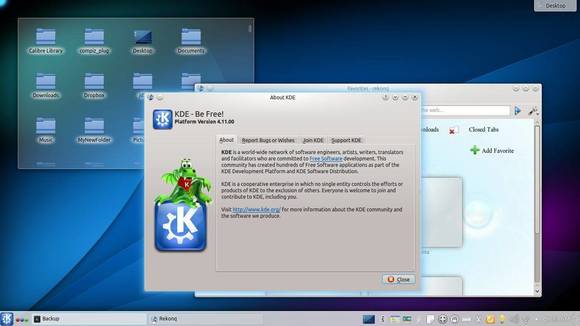
The KDE Community announced Plasma Workspaces 4.11 a few days ago. Now it’s available in Kubuntu Backports PPA, here you can install / Upgrade to KDE 4.11 in (K)Ubuntu 13.04, (K)Ubuntu 12.04, (K)Ubuntu 12.10.
New in KDE 4.11:
Plasma Workspaces 4.11 Continues to Refine User Experience
Gearing up for long term maintenance, Plasma Workspaces delivers further improvements to basic functionality with a smoother taskbar, smarter battery widget and improved sound mixer. The introduction of KScreen brings intelligent multi-monitor handling to the Workspaces, and large scale performance improvements combined with small usability tweaks make for an overall nicer experience.
KDE Applications 4.11 Bring Huge Step Forward in Personal Information Management and Improvements All Over
This release marks massive improvements in the KDE PIM stack, giving much better performance and many new features. Kate improves the productivity of Python and Javascript developers with new plugins, Dolphin became faster and the educational applications bring various new features.
KDE Platform 4.11 Delivers Better Performance
This release of KDE Platform 4.11 continues to focus on stability. New features are being implemented for our future KDE Frameworks 5.0 release, but for the stable release we managed to squeeze in optimizations for our Nepomuk framework.
Press Ctrl+Alt+T to open terminal. When it opens, copy (Ctrl+C) the code and paste (Ctrl+Shift+V) in terminal and hit enter to add the Kubuntu Backports PPA:
sudo add-apt-repository ppa:kubuntu-ppa/backports
Then update package lists and upgrade your system:
sudo apt-get update; sudo apt-get upgrade
If you’re going to install the Kubuntu desktop, run below commands instead:
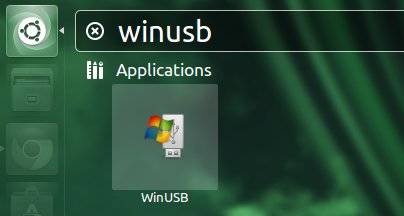
As you may know, WinUSB is simple tool allows to create bootable Windows USB install stick from Ubuntu Linux. This tool supports Windows 7, 8, Vista, XP and can use either an ISO or a DVD as a source.
WinUSB Ubuntu
In the screen above, choose your ISO or DVD drive and plug in the USB stick and click Refresh to make it available. Click ‘Install’, WinUSB Maker will format your USB device before converting your ISO or Directory into a bootable image on your USB device. The whole process will take several minutes up to an hour. And you’ll get a pop-up to let your know when finished.
Install WinUSB in Ubuntu, Linux Mint via PPA:
There’s a PPA contains WinUSB package for Ubuntu 13.04, Ubuntu 12.10, Ubuntu 12.04, Ubuntu 11.10, Ubuntu 11.04, Ubuntu 10.04 and Linux Mint 15, 14, 13, 12, 11, 10.
Press Ctrl+Alt+T to open terminal. When it opens, copy below code via Ctrl+C and paste in terminal via Ctrl+Shift+V. Hit enter to run, it’ll add the PPA repository to your system:
sudo add-apt-repository ppa:colingille/freshlight
After that, update package lists and install WinUSB:
The Vuze Bittorrent Client 5.1 has been released. Here I’ll show you how to install it in Ubuntu 13.04, Ubuntu 12.04, Ubuntu 12.10 and create a launcher for Unity.
Vuze 5.1 includes a number of updates to the client, providing an improved user interface (UI) with enhanced usability and efficiency, improved performance and some critical bug fixes (for example elimination of some deadlock conditions). Read the official release note.
Install Vuze in Ubuntu Linux
1.) Vuze depends on Java, so first install OpenJDK from Ubuntu Software Center, or install Oracle Java via PPA
2.) Download Vuze 5.1 from the official website. Below is the link:
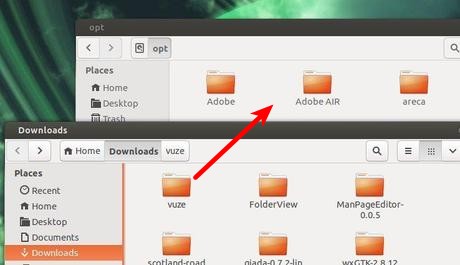
3.) Open file browser, extract the downloaded package. Then move the result folder to /opt/. You’ll need to press Alt+F2 and type in gksudo nautilus to open file browser with root privilege.
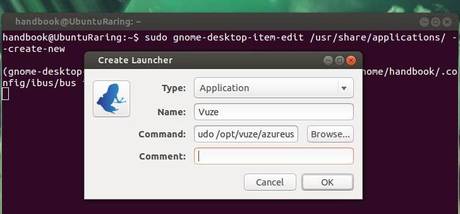
4.) Now you can launch Vuze via below command (Press Ctrl+Alt+T to open terminal):
sudo /opt/vuze/azureus
Create Launcher for Vuze
Install the required package by running below command in terminal:
Linux Kernel 3.10.7 has been released. All users of the 3.10 kernel series must upgrade. Here’s how to install / upgrade in Ubuntu 13.04 Raring, Ubuntu 12.04 Precise, Ubuntu 12.10 Quantal, and Linux Mint.
Linux kernel 3.10.7 is a pretty big release that brings PowerPC enhancements, updated drivers (including DRM ones), as well as improvements to the EXT4, CIFS, ReiserFS and Btrfs filesystems. See official release announcement.
Install / Upgrade Kernel 3.10.7
Press Ctrl+Alt+T on your keyboard to open terminal. When it opens, run below commands to download the DEBs: