Linus Torvalds announced the release of Kernel 6.5 this Sunday. He wrote:
So nothing particularly odd or scary happened this last week, so thereis no excuse to delay the 6.5 release.
I still have this nagging feeling that a lot of people are on vacation and that things have been quiet partly due to that. But this release has been going smoothly, so that’s probably just me being paranoid. The biggest patches this last week were literally just to our selftests.
Linux Kernel 6.5 features enhanced load balancing for Intel hybrid CPUs, Intel SoundWire ACE2.x support, and new meteor Lake-S driver.
For AMD, it now uses AMD P-State driver by default rather than CPUFreq for Zen 2 and newer systems, and support Error Detection And Correction (EDAC) subsystem for AMD Ryzen 7000 series.
The AMDGPU driver enabled FreeSync video mode by default, got performance improvements and power saving optimizations.
The release also improved LoongArch support with Simultaneous Multi-Threading, SIMD/Vector Extensions. Added support for the Alibaba T-Head TH1520 RISC-V 64-bit processor, and IBM POWER10 received DEXCR support.
Other changes in Kernel 6.5 include:
Mainline support for the Acer Aspire 1 Arm laptop, Sony Xperia M4 Aqua phone.
Enable new Permission Indirection Extensions for Armv8.9
Open-source driver support for Adreno 690 that found in Lenovo ThinkPad X13s laptop.
Mediatek Vcodec driver has added support for AV1 and HEVC/H.265 stateless video codecs.
Much faster parallel direct I/O overwrite on EXT4.
Microsoft Xbox controller rumble support
Initial support for USB4 v2.
MIDI 2.0 support
How to Install Linux Kernel 6.5 in Ubuntu
As usual, the mainline Kernel PPA build the packages available to download at the link below:
Sadly, this build only installs in Ubuntu 23.10 due to dependency updates. For modern 64-bit (x86_64) PC/laptop, select download the amd64 build packages:
For those who want to install the latest Linux Kernel (6.19.x updated), there’s a new apt repository made for Ubuntu 20.04, Ubuntu 22.04, Ubuntu 24.04 and Debian 12 Bookworm, Debian 13 Trixie.
As you may know, Ubuntu has a mainline Kernel PPA that keeps building the latest Linux Kernel packages for testing purpose. The most recent packages however do NOT support current Ubuntu 22.04 & 20.04 LTS (though fixed now).
For those who need the latest Kernel for new hardware support or compatibility fixes, there’s now a new repository with all current Ubuntu LTS (24.04 & 22.04) and Debian Stable (Bookworm and Trixie) support.
It’s maintained by Stéphane Graber, Ubuntu core developer and project leader of Linux containers(@lxc), who quit from Canonical last month, after working for the company for 12 years.
And, he made this repository because Ubuntu’s generic kernel that he thought has sadly decreased in quality over time.
The Ubuntu kernel includes a lot of backported fixes and occasionally, those backports go bad, resulting in missing commits, introducing bugs and regressions. Unfortunately the way the Ubuntu kernel is built, tested and published comes with a lot of delays, making fixing such regressions often take weeks if not months
Install Latest Kernel in Ubuntu via new Repository
NOTE 1: This is a trustworthy, but unofficial repository!
NOTE 2: Like Ubuntu Mainline Kernel PPA, the kernels are un-signed, you may need to turn off Secure Boot to boot the new kernel.
First, open terminal either from start menu or ‘Activities’ overview.
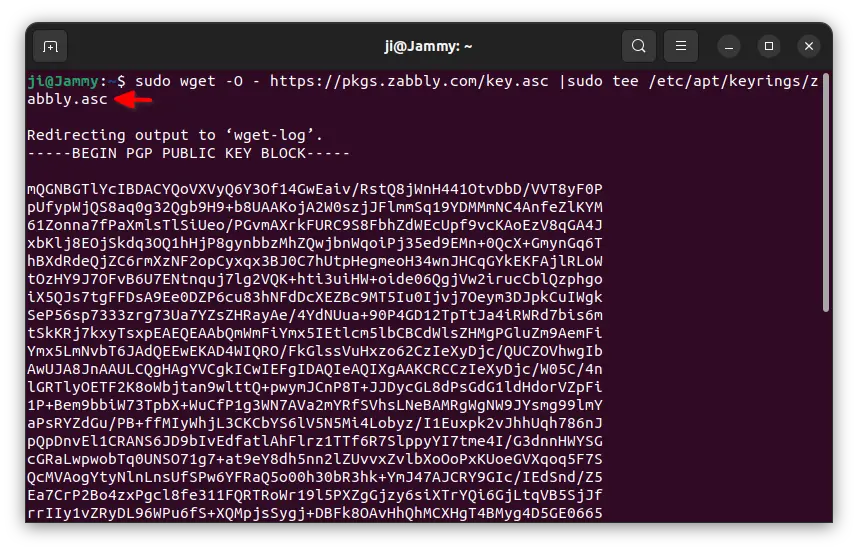
1. Install the GPG Key
When terminal opens, first run command to create ‘/etc/apt/keyrings’ directory, in case it does not exist:
sudo mkdir -p /etc/apt/keyrings
Then, run command to download the key and install to that directory you just created:
sudo wget -O - https://pkgs.zabbly.com/key.asc |sudo tee /etc/apt/keyrings/zabbly.asc
Re-run the command to update the key if expired.
2. Set up the source repository
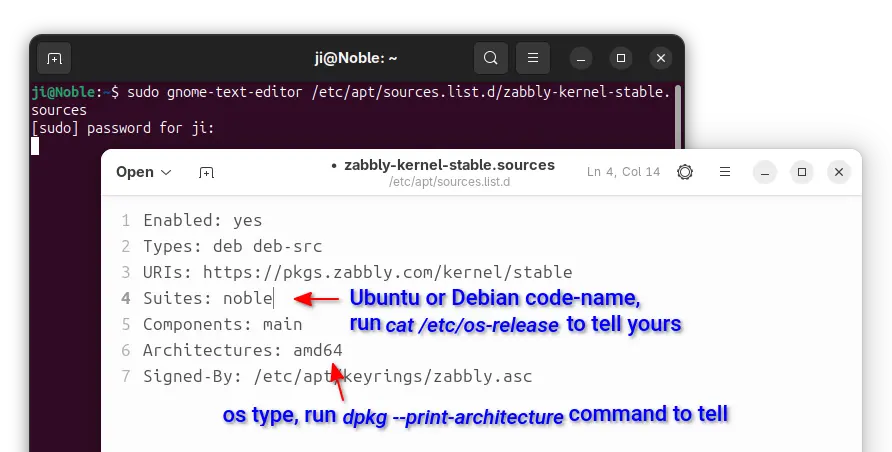
Then, run command below to create & edit the source file:
Depends on your desktop environment, replace gnome-text-editor with gedit for Ubuntu 22.04 and earlier, mousepad for XFCE, or use nano that works in most desktops.
When terminal opens, add following lines and save it:
Enabled: yes
Types: deb deb-src
URIs: https://pkgs.zabbly.com/kernel/stable
Suites: noble
Components: main
Architectures: amd64
Signed-By: /etc/apt/keyrings/zabbly.asc
NOTE: You have to replace noble (for 24.04, Linux Mint 22) in the code with
jammy for Ubuntu 22.04, Linux Mint 21.
trixie for Debian 13
or bookworm for Debian 12.
Also, replace amd64 with arm64 for ARM devices, such as Raspberry Pi. For nano text editor, press Ctrl+S to save, then Ctrl+X to exit.
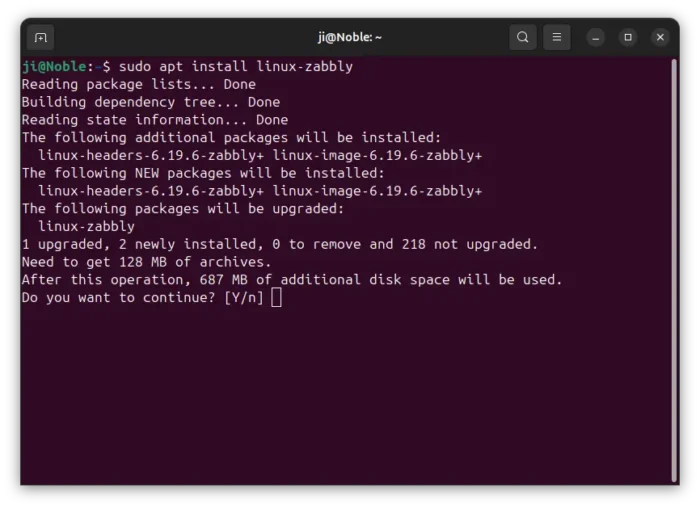
3. Update package cache & Install Newest Kernel
When done setting up the new source repository and GPG key, run the command below to re-index system package cache:
sudo apt update
Finally, install the latest kernel, 6.19.x so far, by running command:
sudo apt install linux-zabbly
Tips: If the last command does not work, then try the command below to specify Kernel version, which also works for Kernel 6.18, 6.17, 6.16, etc releases.
The minor version number varies as time goes on. Type the first half of the last command (sudo apt install linux-headers-6.19) and hit Tab to list all available choices.
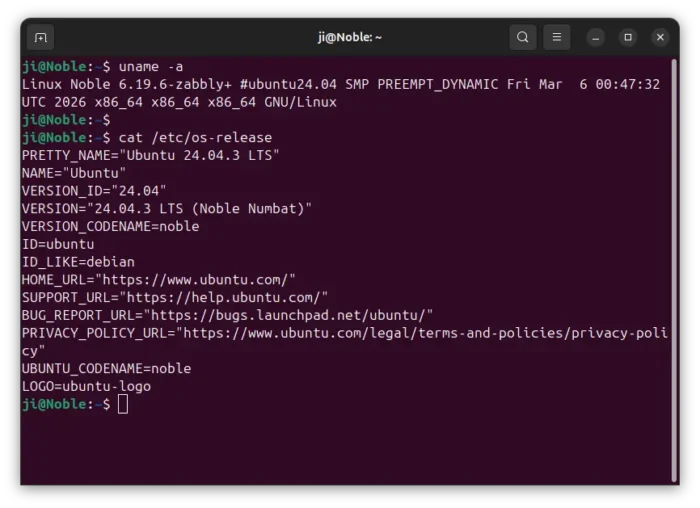
4. Verify
Finally, restart your machine and run the command below to verify your Kernel version in terminal:
uname -a
Uninstall:
If you have any issue with the new Kernel, just restart and select boot an old Kernel from Grub menu under ‘Advanced Options’.
Then, run the command below to remove the Kernel from Zabbly repository:
sudo apt remove --autoremove linux*zabbly*
Depends on when you tried this tutorial, the package version varies. So, I use asterisk wildcard in command to auto-select any package start with ‘linux‘ and have ‘zabbly‘ in between of package name. Just in case, it’s better to keep an eye on terminal output before hitting ‘y’ to confirm.
Also, remove the source repository by running commands below to delete the key and source file:
Got a Ubuntu PC or Server and want to use it as remote download server? This is the step by step guide shows you how to do the job using Transmission Daemon.
Ubuntu’s default Transmission torrent client has a daemon package, that can run silently as a background service, allowing you to manage downloads anywhere around the world with internet connection and a web browser.
To use the service, you just need to install the package, enable the service, do some changes on the config file, and grant user permission. And here’s how to do it step by step.
Step 1: Install Transmission Daemon & Enable the service
Firstly, press Ctrl+Alt+T on your Ubuntu PC to open terminal. Or connect to your remote Ubuntu server via SSH.
1. To install the Daemon package, run command:
sudo apt install transmission-daemon
In Ubuntu Desktop, you might have dependency issue if you’ve tried 3rd-party Transmission package. In the case, try sudo apt remove transmission* to remove the torrent packages first, then re-run the command above.
2. Run the daemon service. The daemon should run automatically after installation. Just in case, you may run it manually by running the 2 commands below one by one:
systemctl enable transmission-daemon
systemctl start transmission-daemon
For Ubuntu server, you may need to add sudo in the beginning for each command.
Step 2: Set up Downloads folder & Grant Permission
You can skip this step, if you’d like to use default location to save downloads. It’s “/var/lib/transmission-daemon/downloads/“, which however is NOT a good choice.
1. To create a folder for saving download files, for example ‘transmission‘ sub-folder under Downloads,run command:
mkdir -p ~/Downloads/transmission
For Ubuntu Desktop, you can just open ‘Files’ (Nautilus file browser) to create a folder anywhere that you want!
For Ubuntu Server, you may even don’t have “Downloads” folder, so change the command accordingly! If you want, just run mkdir -p ~/transmission to create the folder under your user home directory.
2. Add read and write permission to that folder, for anyone in your user group.
chmod g+rw ~/Downloads/transmission
In the command, replace ~/Downloads/transmission if you selected another location for saving downloads. In Ubuntu 22.04 Desktop edition, you can skip this command since group by default have read & write to user created folders.
3. Finally, add ‘debian-transmission’ to your user group. So, Transmission daemon has read & write permission to the folder you just created.
sudo gpasswd --add debian-transmission $USER
NOTE: This change seems needing system restart to take effect in Ubuntu Desktop, but not sure if required in Server.
Step 3: Edit the Daemon config file
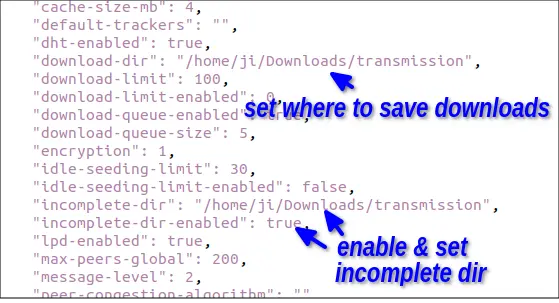
The daemon by default has only one config file. It’s /etc/transmission-daemon/settings.json.
1. To edit the file, run command:
sudo gedit /etc/transmission-daemon/settings.json
Here you may replace gedit with gnome-text-editor for Ubuntu 24.04, or use nano for Ubuntu Server and other Desktop Environment that you don’t know which text editor to use.
2. When file opens, edit it with following changes:
The file includes many configure lines, that I only write some important ones here. You can leave all others default, or edit it according to you need.
First, change the value of "download-dir" and "incomplete-dir" to the folder you created in Step 2.In my case, it’s /home/ji/Downloads/transmission. (replace ‘ji’ to your username!) Also, set “incomplete-dir-enabled” to true, or unfinished download files are not visible.
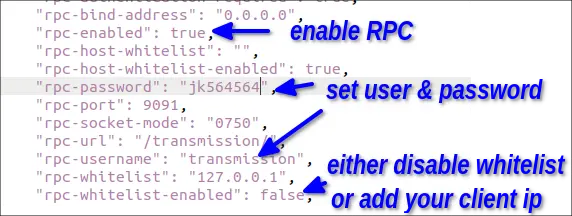
Then, change the values of “rpc-username” and “rpc-password” to your desired username & password for remote authentication. Set “rpc-whitelist-enabled” to false, so anyone with the username & password can access. Or, set it to true, and add you client IP address to “rpc-whitelist”.
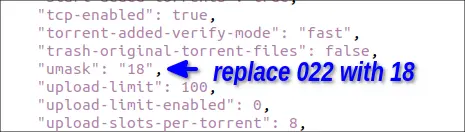
Finally, change value of “umask” to 18.
Value 022 means 0 (read, write, execute for ‘debian-transmission’, the owner), 2 (read for group & others). It’s OK but .json file does not allow octal notation. So, use 18 instead (octal 22 = decimal 18).
3. Finally, save file. For nano text editor, press Ctrl+X, type y and hit Enter to save changes.
Step 4: Reload daemon to apply changes
After editing the config file, you need to reload the daemon to apply the changes.
To reload the daemon, run command:
systemctl reload transmission-daemon.service
It must be reload! Because restart or start the service somehow will reset the password to default.
You may also run command to check the service status by running command:
systemctl status transmission-daemon.service
Step 5: Set up Firewall
Ubuntu Desktop does not active firewall by default, but Servers are mostly have firewall activated.
To check firewall status, run command:
sudo ufw status
If firewall is activated, run command to allow port 9091:
sudo ufw allow 9091,51413/tcp
Step 6: Access Transmission Remotely
Finally, you can access the transmission service on remote Ubuntu Desktop or Server, in anywhere with a web browser. By visiting ip-address:9091/transmission/web/.
Or, use any client app with Transmission RPC support!
For Ubuntu 23.04, Debian 12, Fedora 38 and other Linux with GNOME 43/44, there’s now an extension allows to monitor and control your remote Transmission downloads via system tray indicator.
It uses Transmission RPC protocol for interacting with remote PC/server that is running Transmission GTK, daemon, or Fragments.
With the indicator, user can easily add new download via torrent link, monitor all the downloading process, and one click to open the web UI with more options.
How to Install the Indicator Applet
For Ubuntu 23.04 user, firstly search for and install “Extension Manager” from Ubuntu Software.
Install Extension Manager in Ubuntu 22.04+
Then launch “Extension Manager” and use the tool to search and install “Transmission Daemon Indicator NG” extension.
For other Linux with GNOME 43/44, just go to the link below:
Then, turn ON the toggle switch to install the extension. If you don’t see the ON/OFF switch, install browser extension and refresh the page.
Configure the Indicator Applet
Once installed, the applet should appear immediately on your panel. You can open the settings page either from applet’s drop-down menu, or via “Extension Manager”.
Of course, in the server (either local or remote) that’s running Transmission, you have to enable the Remote Control first from preferences.
Transmission GTK, enable Remote Control
For Transmission daemon running in the background, edit the ‘/etc/transmission-daemon/settings.json‘ file to enable RPC remote control, setup user & password, whitelist, etc, before being able to connect.
Remember to use systemctl reload transmission-daemon.service to apply changes, since start or restart may reset your password in the config file.
KeePassXC, the popular free open-source password manager, released version 2.7.6 today!
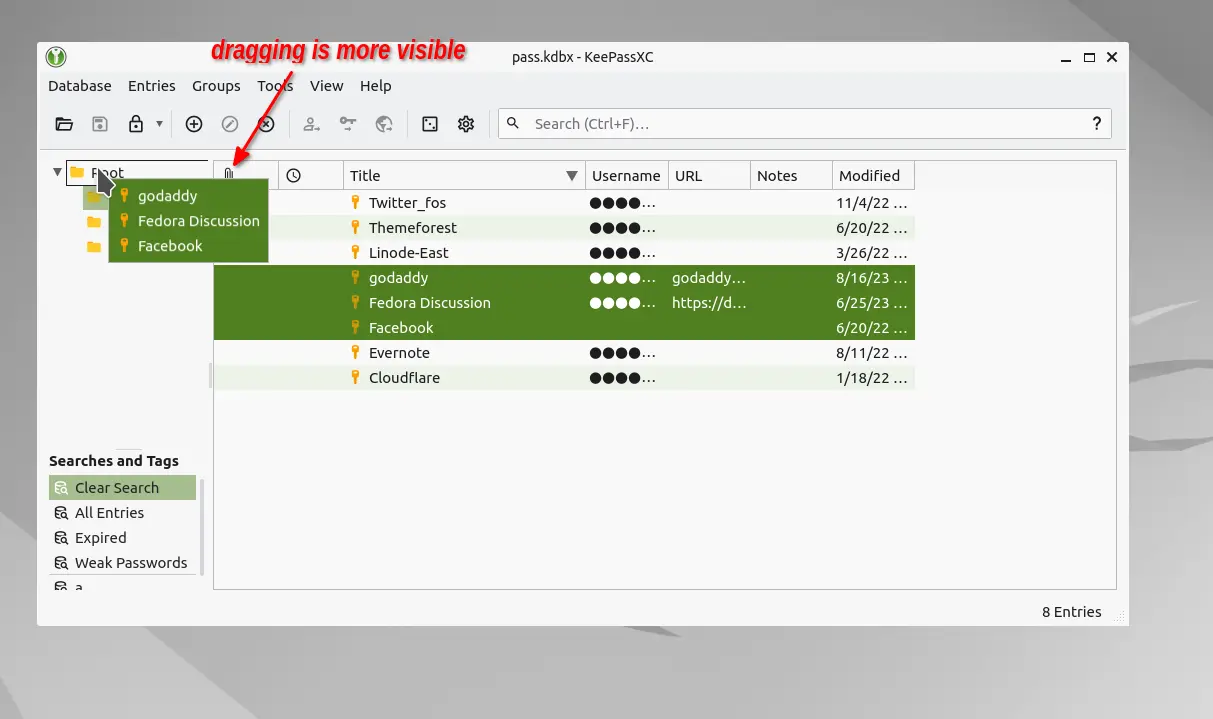
This is a new maintenance release with bug-fixes and minor improvements. According to the release note, the release improve the drag’n’drop behavior. Just like drag’n’drop files in your OS, dragging entries in KeePassXC now shows the thumbnail that following mouse cursor until you drop it/them.
KeePassXC 2.7.6 also improved the Quick Unlock function. It’s now automatically activated when unlocking for Auto-Type or Browser access, and the Auto-Type button and shortcut key will be disabled when Auto-Type is turned off for the entry or group.
Other change in the release include:
Add challenge-response support for Nitrokey 3
Search by entry UUID
Warn duplicate URLs in Additional URLs list.
Fix warning message about allow screencapture
Fix system tray icon color.
Several UI and stability fixes.
How to Install KeePassXC 2.7.6 via PPA in Ubuntu/Linux Mint
For all current Ubuntu releases, including Ubuntu 18.04, Ubuntu 20.04, Ubuntu 22.04, Ubuntu 23.04, and Linux Mint 20/21, and their based systems, KeePassXC 2.7.6 is available to install via its Official PPA repository.
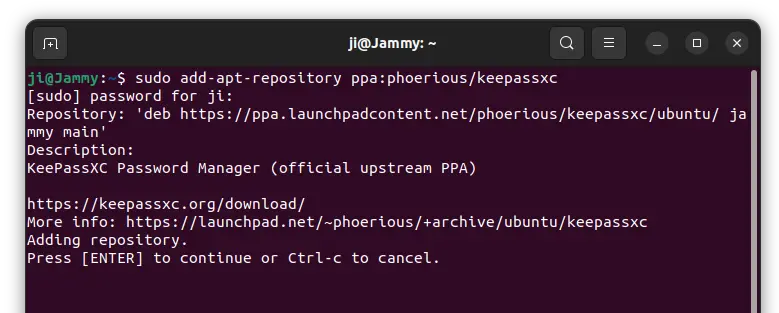
1. First, press Ctrl+Alt+T on keyboard to open terminal and run command to add the PPA:
sudo add-apt-repository ppa:phoerious/keepassxc
Type user password when it asks (no asterisk feedback) and hit Enter to continue.
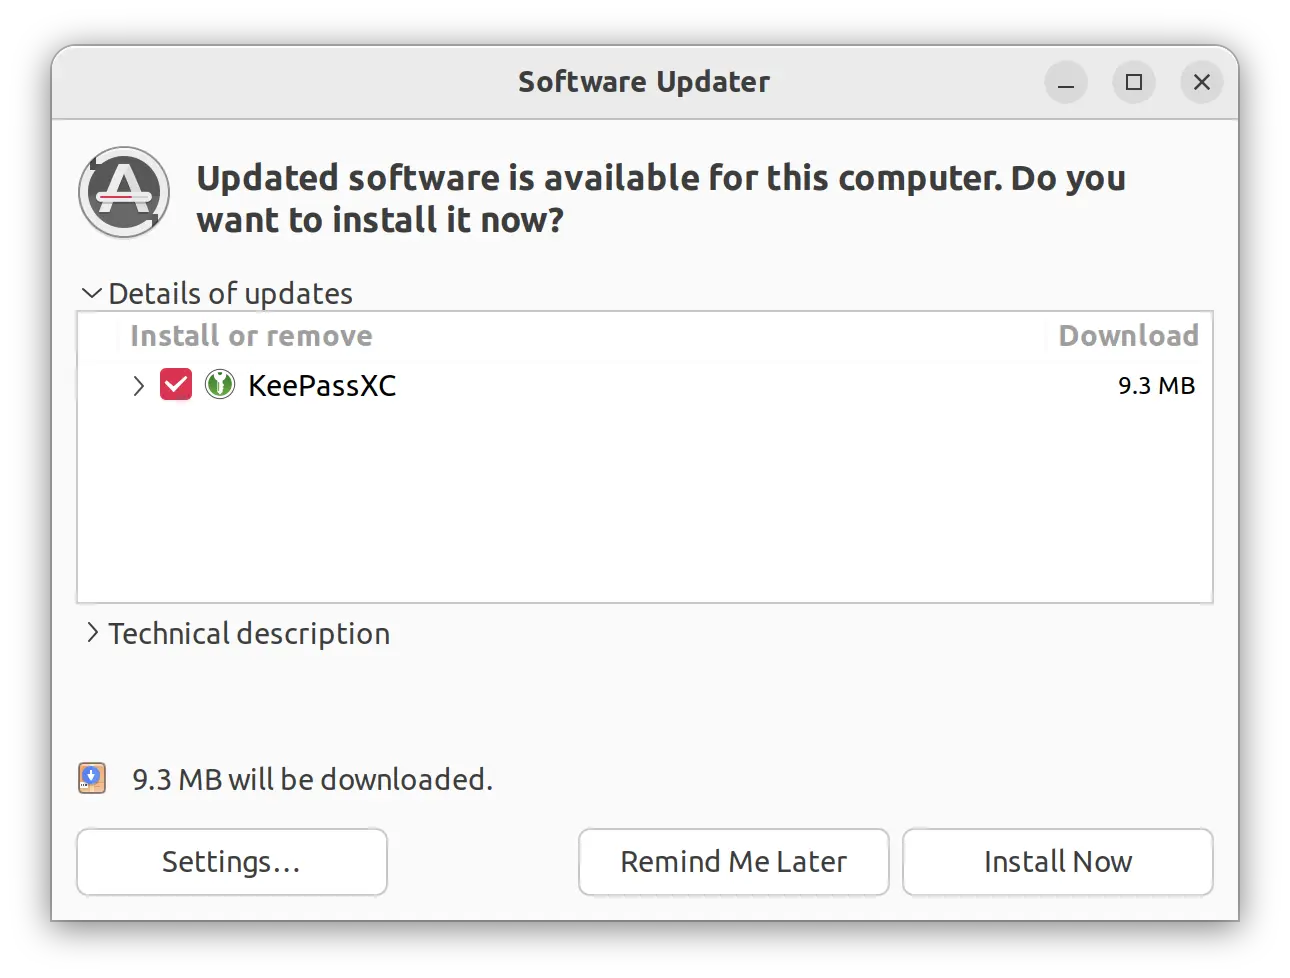
2. If you have an old version of KeePassXC installed as .deb package, simply launch “Software Updater” or Update Manager to update it to the latest.
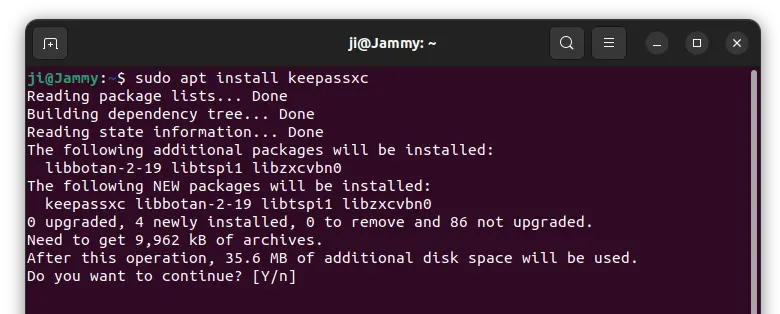
Or, run the apt command below in terminal to install the password manager:
sudo apt install keepassxc
NOTE: Linux Mint has to run sudo apt update first to update cache.
After installation, search for and open the tool either from ‘Activities’ overview or system start menu depends on your desktop environment.
Uninstall KeePassXC
To uninstall the password manager installed as native .deb package, either use Ubuntu Software app or open terminal and run command:
sudo apt remove --autoremove keepassxc
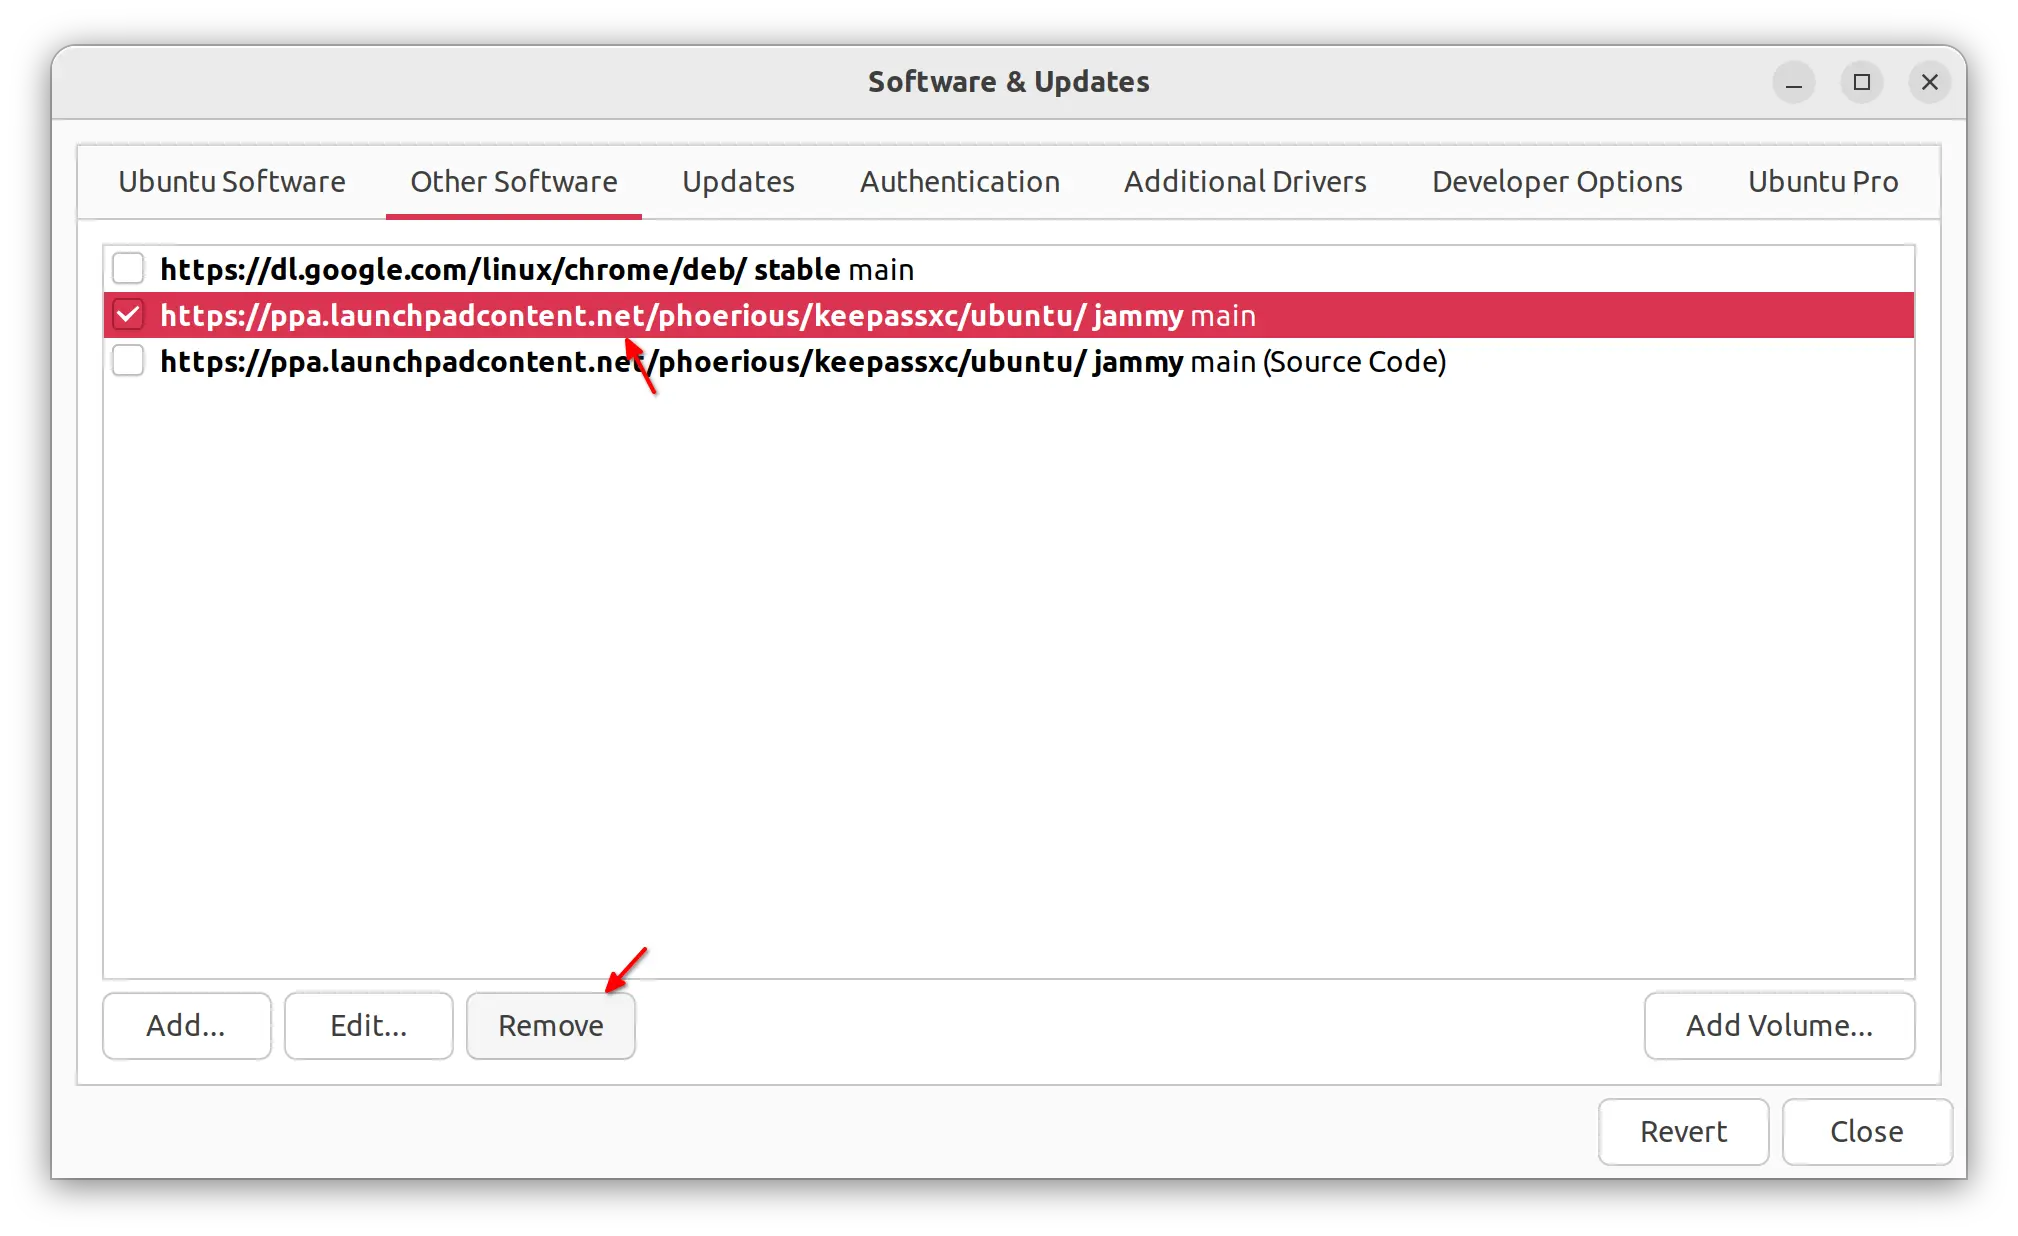
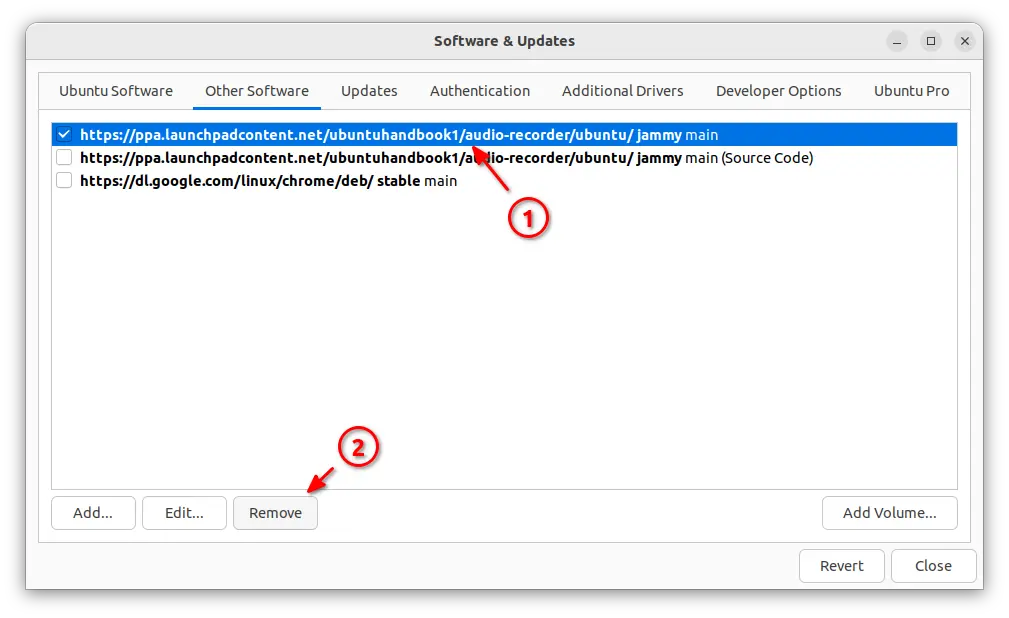
And remove the PPA repository either via ‘Software & Updates‘ tool under ‘Other Software‘ tab,
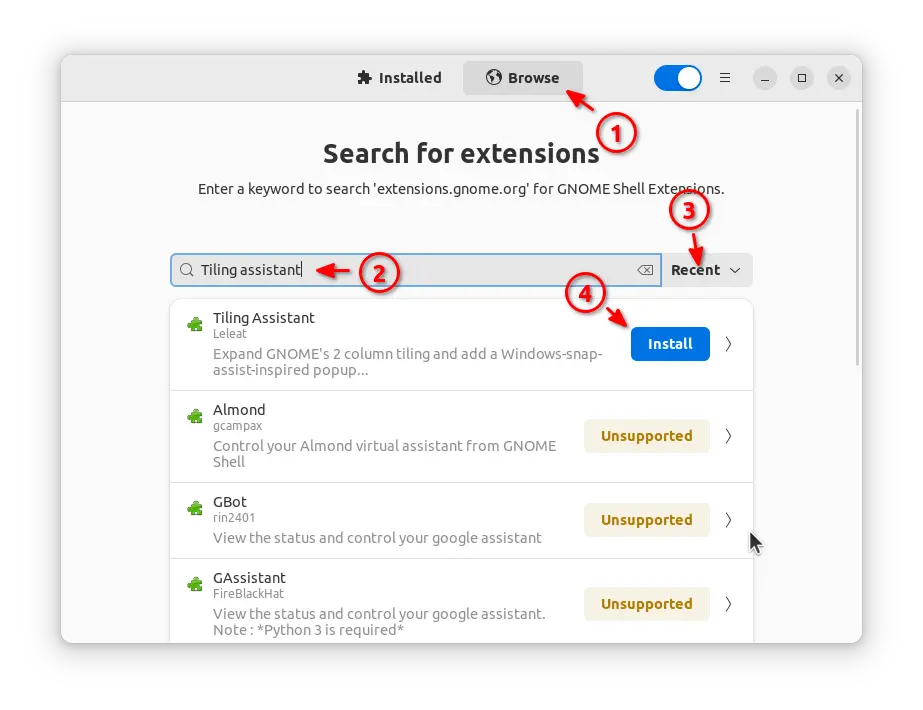
Ubuntu (since 23.10) introduced new enhanced tiling window support! Here’s how you can try it out in Ubuntu 22.04 & Ubuntu 20.04.
For those who don’t know what is window tiling, it’s a window management behavior that snap window to screen edge/corner to be half or quarter-tile. So, you can work with 2, 3, or 4 app windows side by side in your screen.
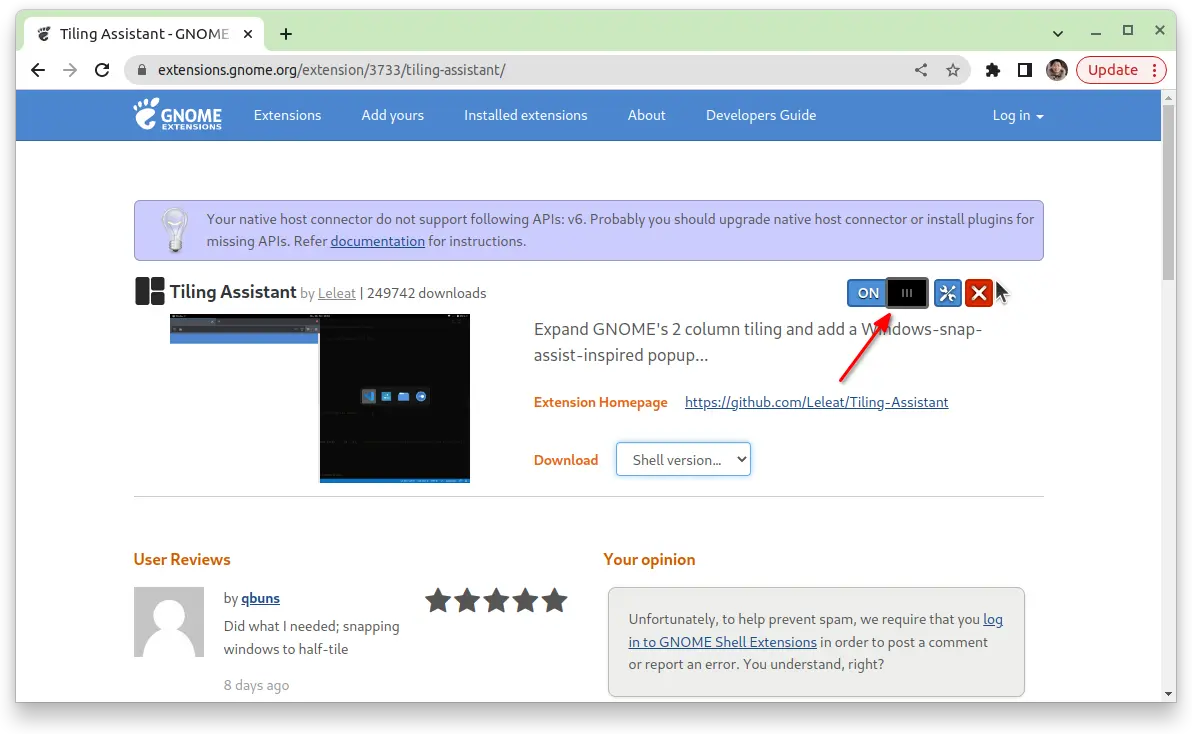
Ubuntu so far has basic tiling support, that can only snap window to left or right half-tile. An enhanced tiling is available soon via a new built-in extension called “Tiling Assistant”.
By either dragging or use keyboard shortcut, user can tile window to left, right, top and bottom half, which is called Edge Tiling. And, tile window to top-left, top-right, bottom-left, and bottom-right quarter of screen, called Corner Tiling.
And, after tiling a window, it has a tiling pop-up feature that automatically show you ‘Super + Tab’ app switcher style pop-up to choose which app to auto-tile to the remaining screen space. And, when clicking focus (raise) a tiled window, all windows in the tile group raise together.
Like ‘Ubuntu Dock’, the new extension is a fork of the community maintained ‘Tiling Assistant’ extension. Which, support GNOME desktop from version 3.36 to 44 at the moment.
Ubuntu 22.04 user can firstly search for and install “Extension Manager” from Ubuntu Software.
Install Extension Manager in Ubuntu 22.04+
Then, launch the tool and use it to search & install “Tiling Assistant” extension under Browse tab.
For Ubuntu 20.04, first press Ctrl+Alt+T on keyboard to open terminal and run command to install the agent and Extensions app packages:
If you don’t see the ON/OFF switch, install browser extension with link in the page and then refresh!
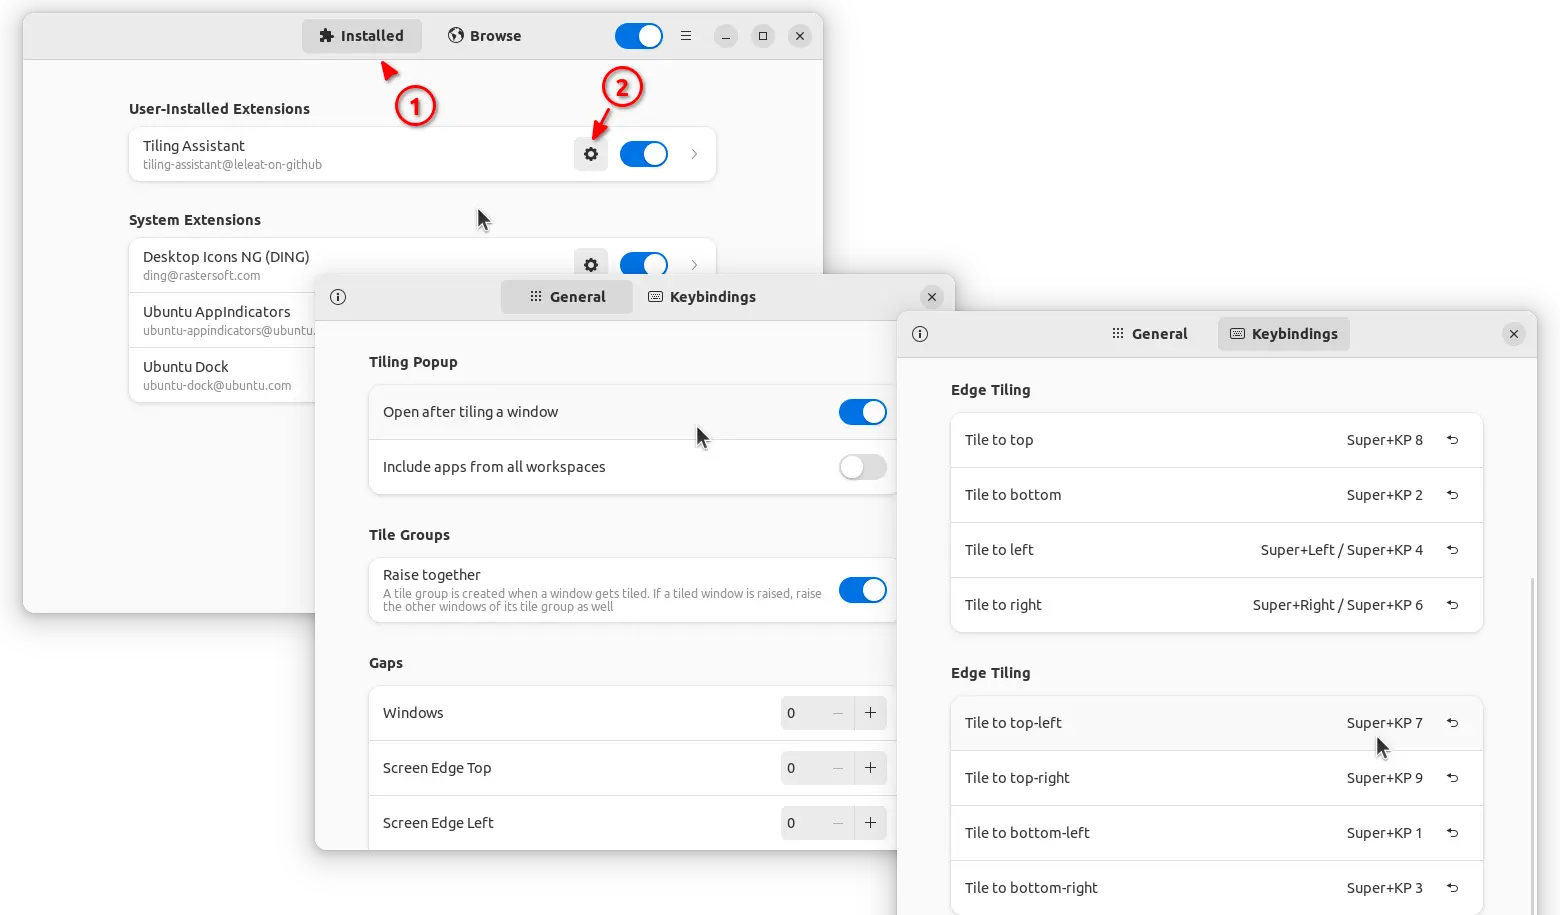
After installed the extension, launch either “Extension Manager” or “Gnome Extensions” app and open the settings for that extension to configure the new tiling behavior.
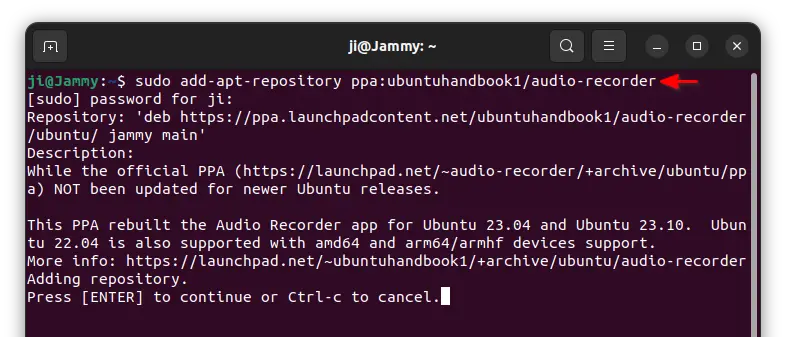
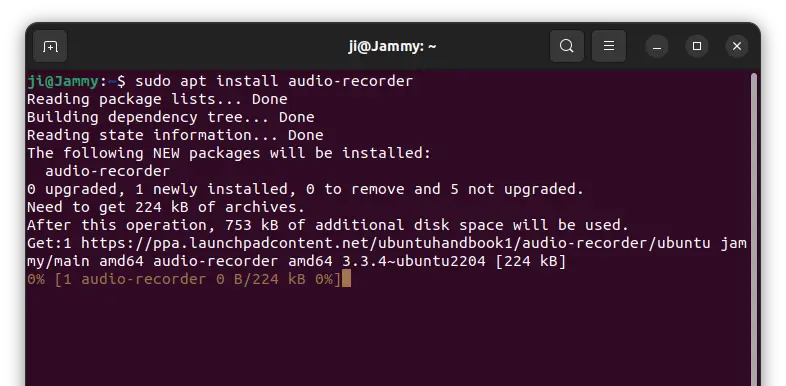
For those who want to install the simple Audio Recorder application in Ubuntu 23.10 and Ubuntu 24.04, here’s new Ubuntu PPA.
UPDATE: The PPA support until Ubuntu 24.04. No longer updates for 24.10 and higher due to lack of upstream source development!!
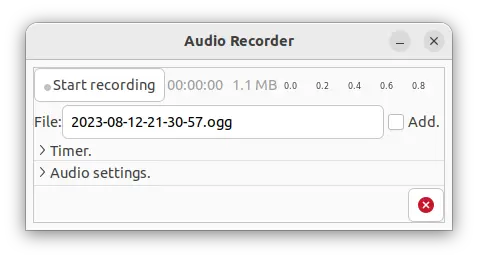
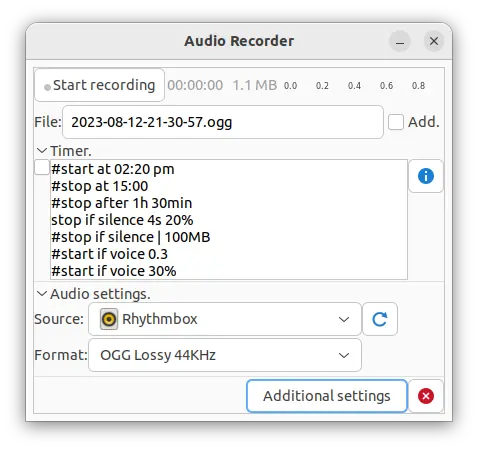
Audio Recorder is a free open-source GTK3 audio recording application for Linux. It has a stupid simple user interface, while can record any sound from your computer.
Audio Recorder simple UI
This app can record sound from your speaker, microphone, music player applications, and mixed source, such as recording speaker and microphone at the same time.
Sound can be recorded into OGG, FLAV, MP3, WAV, OPUS, M4A audio formats. And, it has a timer to start/stop recording automatically on given time and/or voice, silence.
This audio recorder is one of my most favorite Linux applications. But don’t know why, it’s excluded in Debian/Ubuntu repositories. And, the official Ubuntu PPA support so far until Ubuntu 22.04.
Some users reported it does NOT install in Ubuntu 23.04, so I made a new PPA contains this software packages, with support for Ubuntu 22.04, Ubuntu 24.04, and Ubuntu 23.10 on amd64 (X86_64), arm64/armhf (for Apple M1/M2, Raspberry Pi, etc) CPU architecture types.
And thankfully, the new PPA package seems working good (with only minor testing). Since you may know, Ubuntu 23.04 switched to Pipewire sound server while 22.04 and earlier are using classic PulseAudio.
1. Add the new PPA
To add the PPA, simply press Ctrl+Alt+T on keyboard to open terminal. Then run command:
Can’t wait to try out the new Thunderbird 128 ESR, but hate Snap and Flatpak packages? Here’s how to install it from Ubuntu PPA!
Thunderbird 128 is a new esr release series with refined look and feel. It now uses GNOME CSD style header bar instead of the old title-bar. Which has a more compact header bar, that looks better in Ubuntu, Fedora, and other Linux with GNOME.
As well, it provides menu options to change the header-bar height to meet your need.
Besides the headerbar, menu, tool-bar, etc, are also redesigned to look better in today’s Linux desktop. As well, it takes use the new logo announced few months ago. See more about Thunderbird 128.
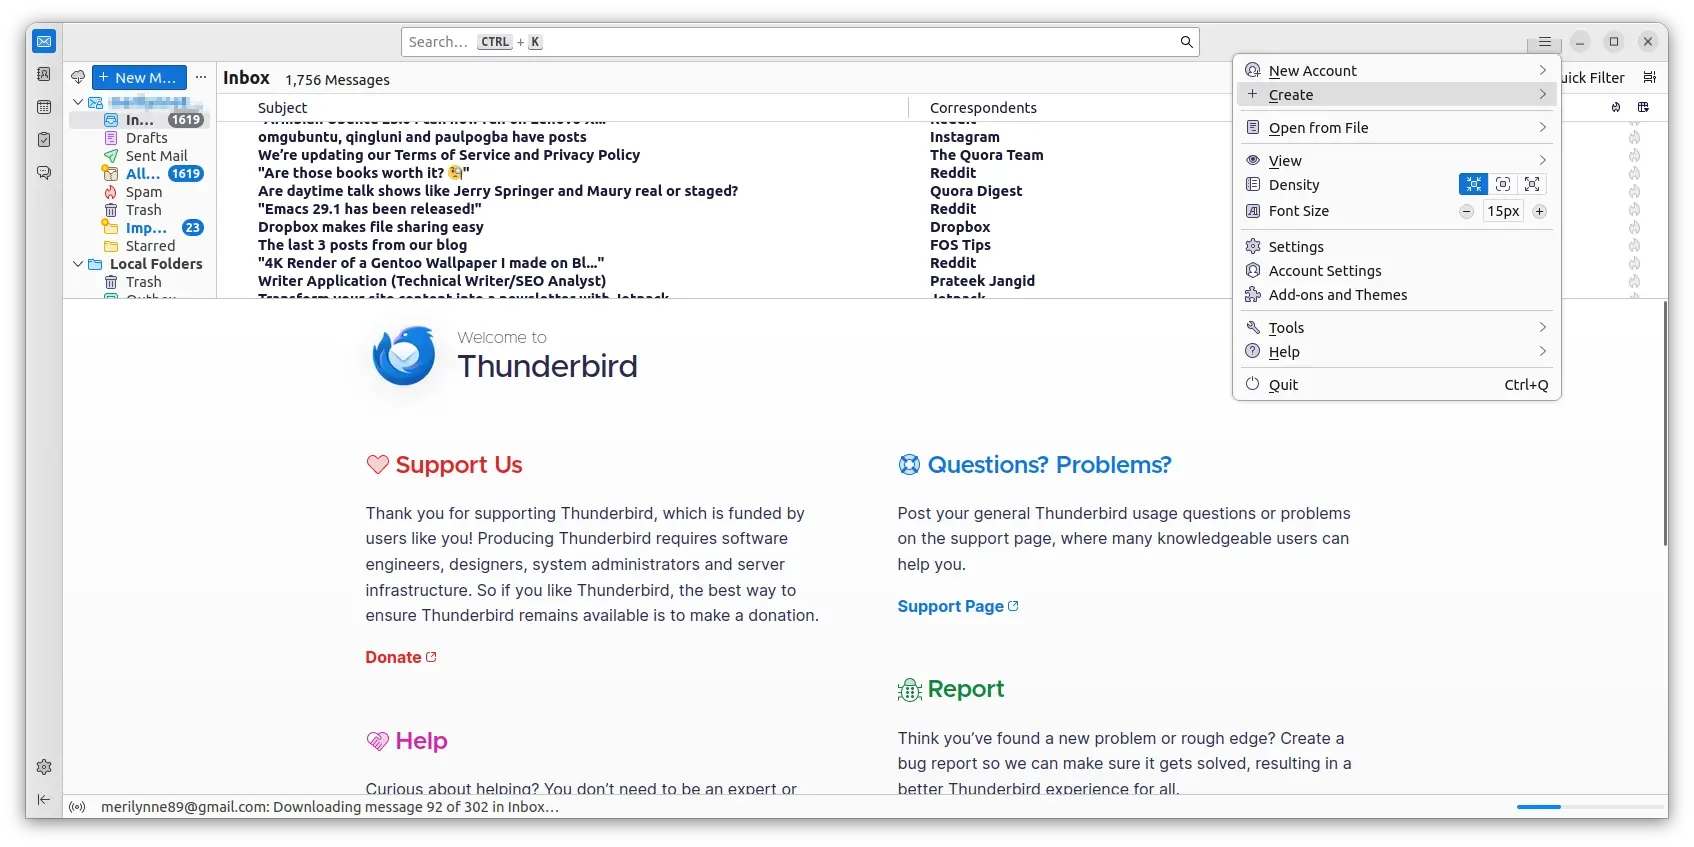
How to Install Thunderbird 128 via PPA
Ubuntu is most likely to build the new Thunderbird 115 package into system repository! Check this page for Ubuntu’s official package status.
Before that, user can easily search for and install Thunderbird Snap package from Ubuntu Software. Or, install the Flatpak package in Flathub repository. However, both are running in sandbox and support 64-bit X86 CPU architecture type only.
If you hate sandboxed applications, and/or running Ubuntu on ARM devices (e.g., Apple M1/M2, Raspberry Pi) or IBM POWER platform, then, there are Ubuntu PPAs for choice.
1. Add Ubuntu PPA
The Mozilla Team PPA has already built the packages for Ubuntu 20.04, Ubuntu 22.04, Ubuntu 24.04, and Ubuntu 24.10
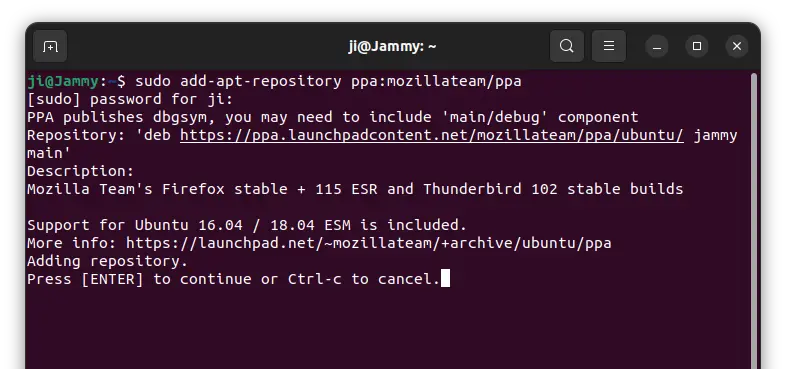
First, press Ctrl+Alt+T on keyboard to open terminal. When it opens, run command to add the PPA:
sudo add-apt-repository ppa:mozillateam/ppa
Type user password (no asterisk feedback) when it asks and hit Enter to continue
2. Install/Update Thunderbird
NOTE: Ubuntu 24.04 and higher now default to Thunderbird Snap package that runs in sandbox. See this tutorial for how to get rid of it and switch to Deb version.
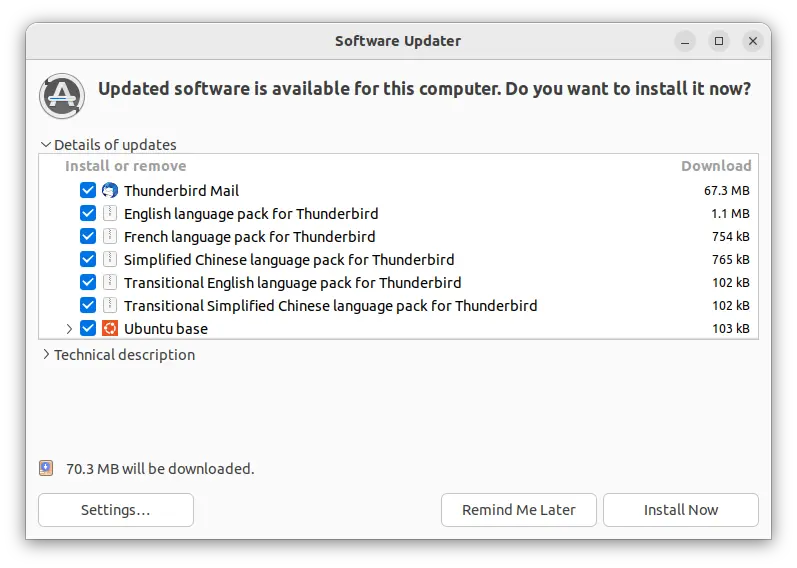
After adding the PPA, simply launch “Software Updater” and wait for checking for updates. Until done, install the updates to install Thunderbird 128.
Or, just run command in terminal to install/update the package:
sudo apt install thunderbird
Linux Mint user need to run sudo apt update first to refresh package cache.
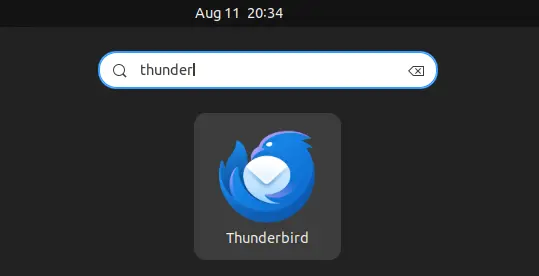
After installation, search for and launch the email client from ‘Activities’ overview or start menu depends on your desktop environment.
Uninstall Thunderbird.
If you have problem with the new release package, or Ubuntu updated the package in its official repository, then you can purge the Ubuntu PPA to switch back the stock version of Thunderbird package.
To do so, just open terminal (Ctrl+Alt+T) and run command:
Don’t like the green number badges on the left (or bottom) dock app icons? Ubuntu (since 23.10) now has hidden option to show/hide it.
Ubuntu since 23.10 has introduced some visible changes, such as enhanced tiling window support, remove ‘minimal installation’ and drop some pre-installed applications.
The Ubuntu Dock has been updated to the latest version 84 with more options to control the emblems visibility.
Don’t know if Ubuntu 22.04 will update its Ubuntu Dock extension with the new features, but Ubuntu users of 23.10 and 24.04 can now follow the steps below to toggle display the green number badges.
Option 1: Use Dconf Editor (Graphical Way)
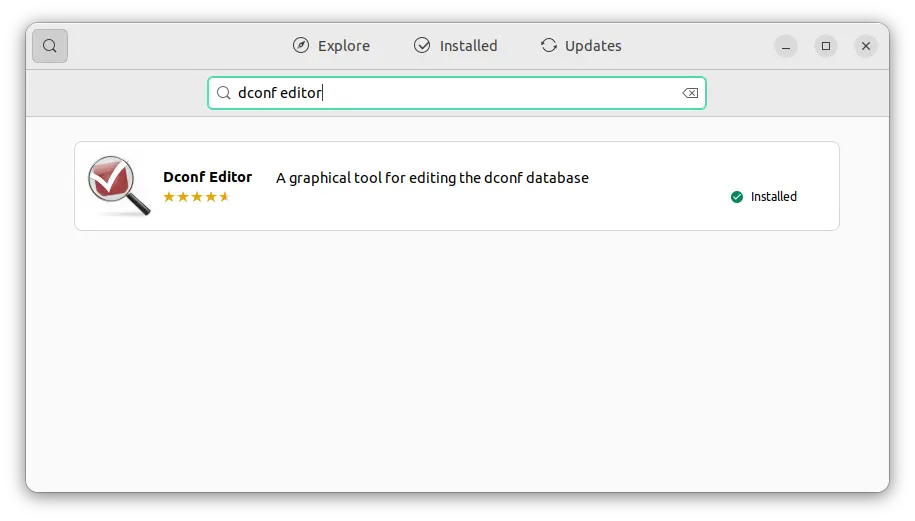
Firstly, search for and install the “Dconf Editor” tool from Ubuntu Software.
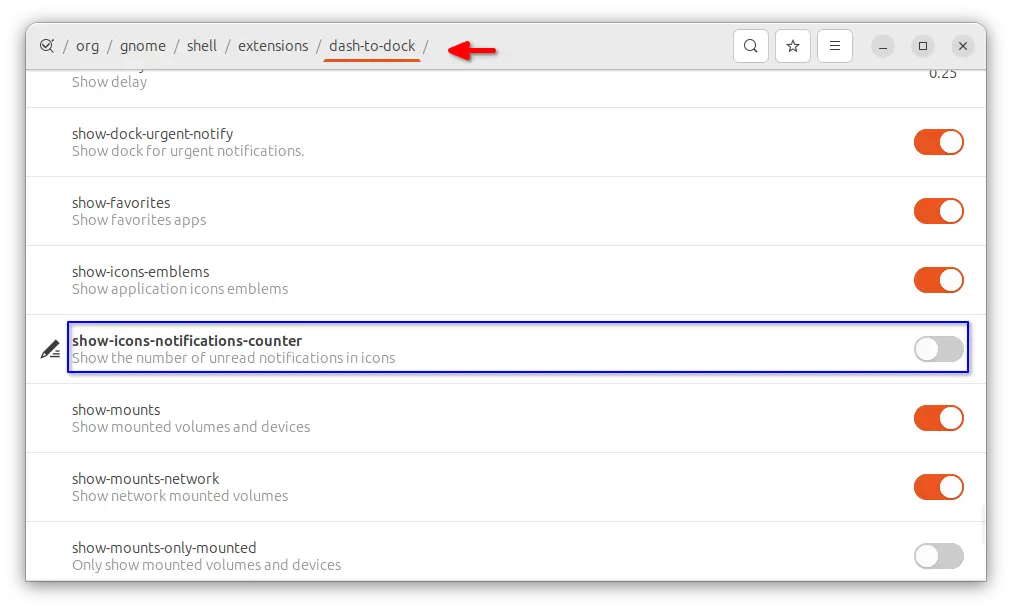
Then, launch “Dconf Editor” and navigate to ‘org/gnome/shell/extensions/dash-to-dock’. Finally, scroll down, find out and turn off the “show-icons-notifications-counter” option.
And, the change applies immediately when you toggle off that option.
Option 2: Use “Extension Manager”
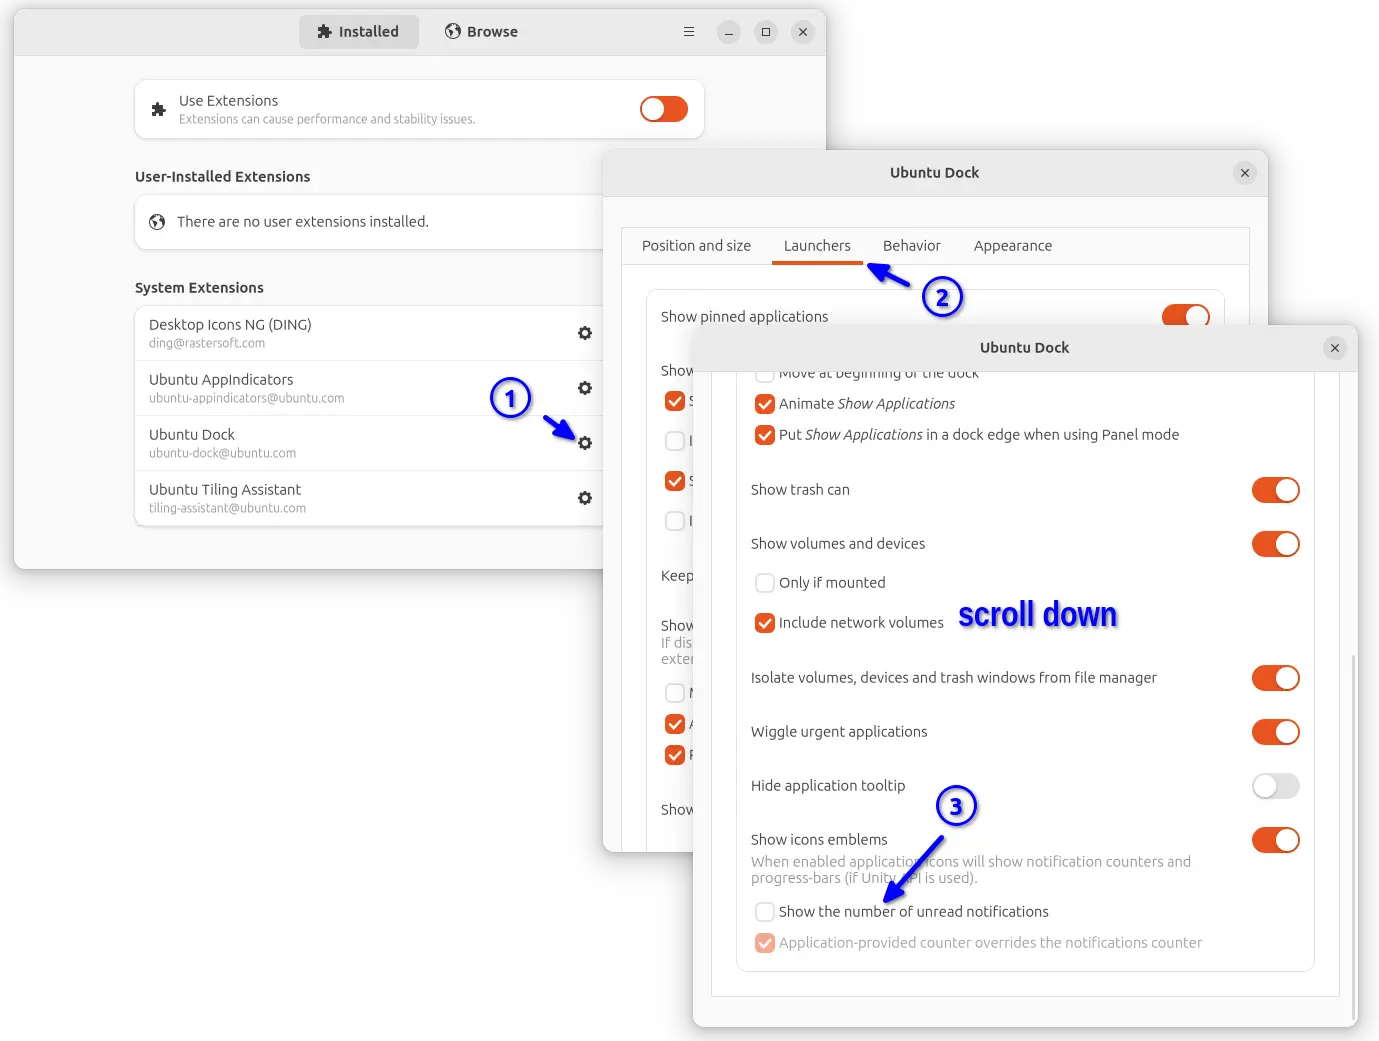
So far in the development release, ‘Ubuntu Dock’ provides a configuration dialog like other extensions.
First, search for and install “Extension Manager” (or Gnome Extensions) from Ubuntu Software.
Install Extension Manager in Ubuntu 22.04+
Then, launch either “Extension Manager” or “Gnome Extensions” app. Click on ‘Settings’ or gear icon for the Ubuntu Dock extension to open the configuration dialog.
Finally, navigate to ‘Launchers’ tab, scroll down and turn off the “Show the number of unread nofitications” option.
Option 3: Run single command in terminal
For those who are familiar with Linux command, this thing can be done simply by running a single command in terminal.
First, press Ctrl+Alt+T on keyboard to open terminal. When it opens, run command:
gsettings set org.gnome.shell.extensions.dash-to-dock show-icons-notifications-counter false
Want to customize the startup, and shutdown animation screen with a single background image? Here’s how to do the trick in Ubuntu 22.04 and Ubuntu 23.04.
For request, this is a step by step guide shows how to create a basic plymouth theme with only a background image. And, it should work in all current Ubuntu releases, and even other Linux distributions.
Step 1: Create Plymouth Theme
As you may know, the startup, shutdown and restart animation screens are handled by Plymouth with themes.
Each Plymouth theme has its theme-name folder under /usr/share/plymouth/themes/ directory, which usually contains:
theme-name.plymouth
theme-name.script
Image files (.png).
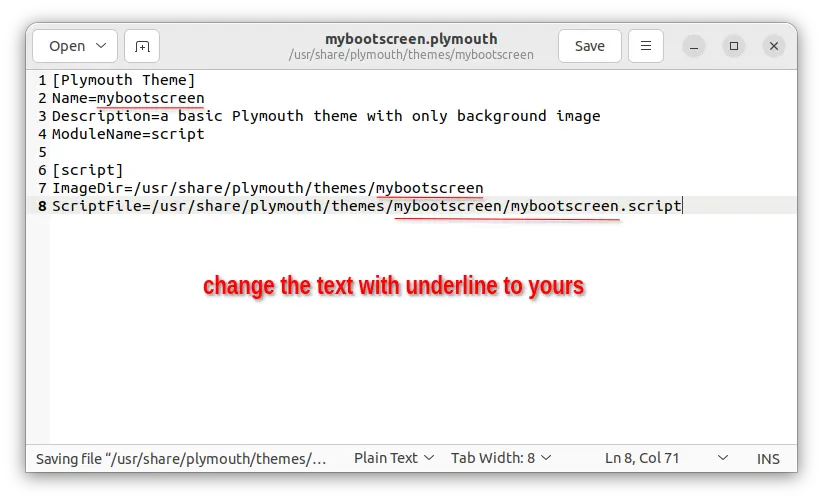
NOTE: In all commands/config files below, replace ‘mybootscreen’ with your desired name. Lazy men can just copy & paste without changing anything.
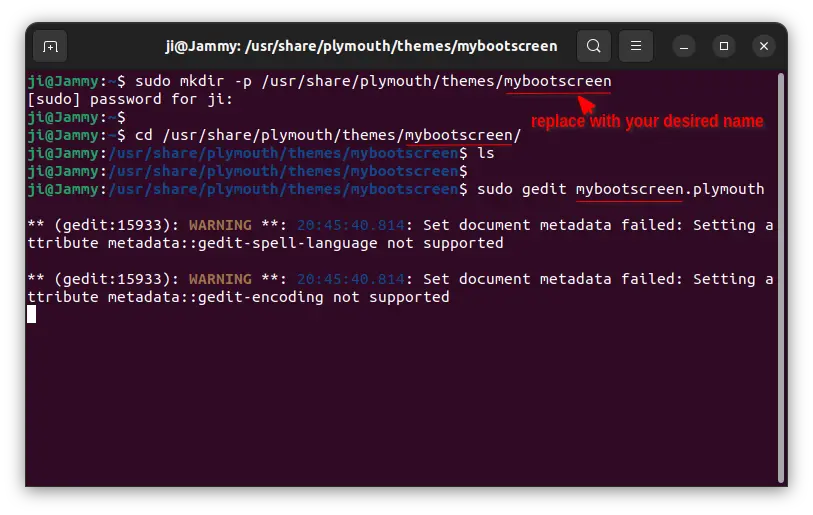
1. To create a Plymouth theme, first press Ctrl+Alt+T on keyboard to open a terminal window.
When terminal opens, run command to create a theme folder, named “mybootscreen“:
2. Then, run command to navigate to that folder as working directory:
cd /usr/share/plymouth/themes/mybootscreen
3. Now, create & edit the “theme-name.plymouth” file by running command:
sudo gedit mybootscreen.plymouth
replace gedit with gnome-text-editor for Ubuntu 24.04. Or, use nano that works in most Linux.
4. When file opens, paste following lines and save it!
[Plymouth Theme]
Name=mybootscreen
Description=a basic Plymouth theme with only background image
ModuleName=script

[script]
ImageDir=/usr/share/plymouth/themes/mybootscreen
ScriptFile=/usr/share/plymouth/themes/mybootscreen/mybootscreen.script
For nano text editor, press Ctrl+X, type Y and hit Enter to save file.
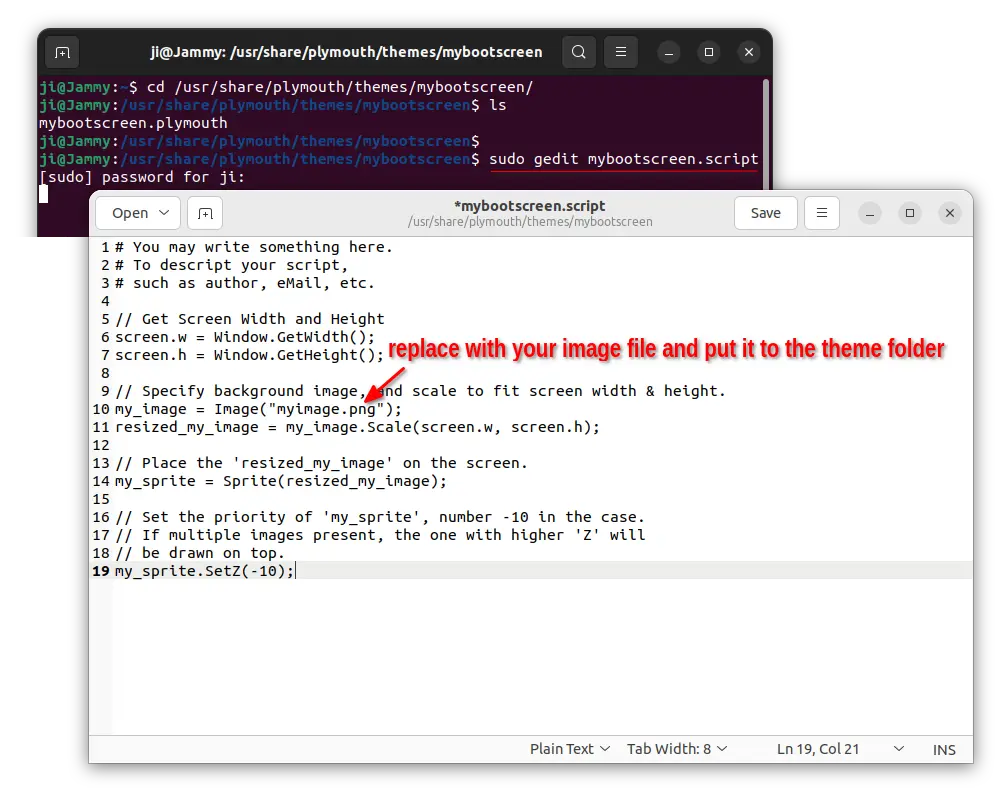
5. Next, create and edit the ‘theme-name.script’ file by running command:
sudo gedit mybootscreen.script
Also, replace gedit with gnome-text-editor or nano accordingly.
When file opens, paste the following lines and save it:
// Get Screen Width and Height
screen.w = Window.GetWidth();
screen.h = Window.GetHeight();

// Specify background image, and scale to fit screen width & height.
my_image = Image("myimage.png");
resized_my_image = my_image.Scale(screen.w, screen.h);

// Place the 'resized_my_image' on the screen.
my_sprite = Sprite(resized_my_image);

// Set the priority of 'my_sprite', number -10 in the case.
// If multiple images present, the one with higher 'Z' will
// be drawn on top.
my_sprite.SetZ(-10);
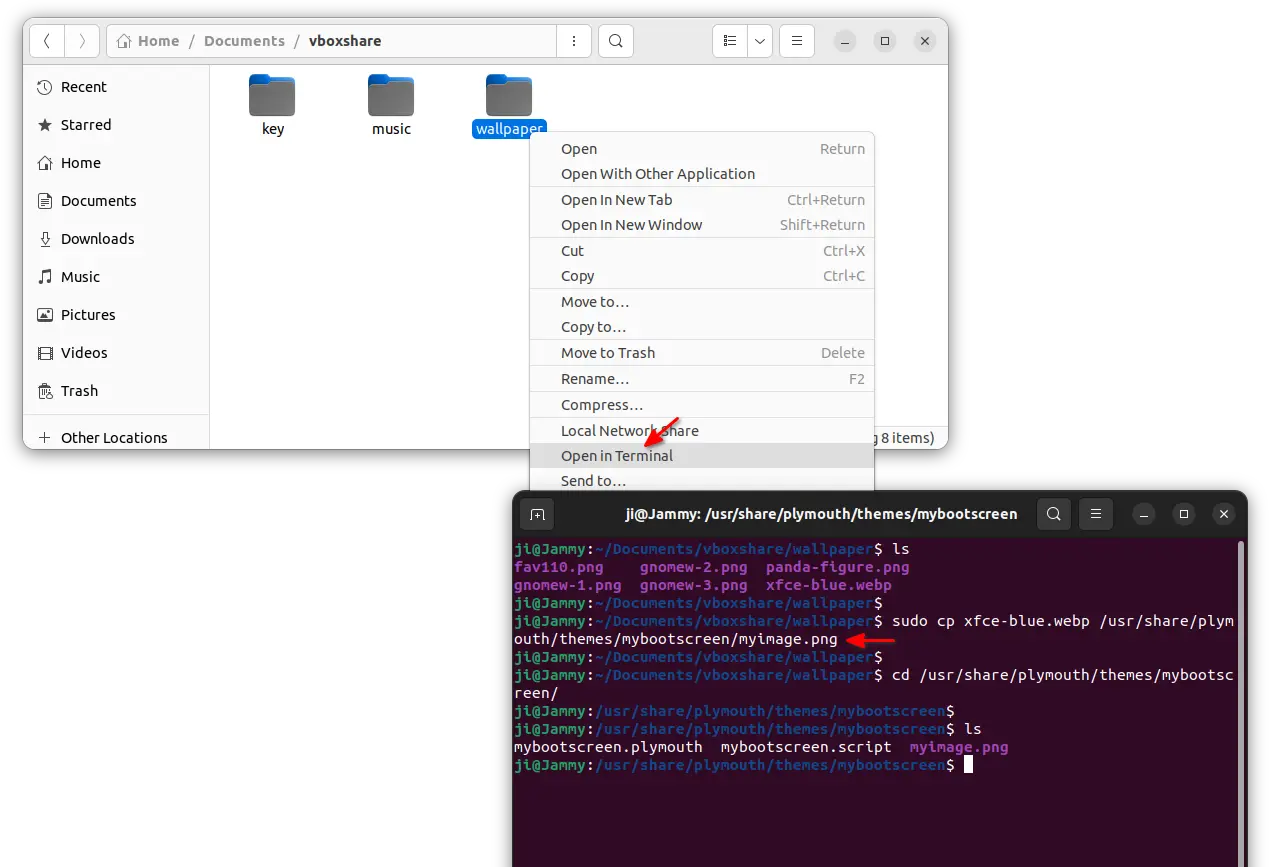
6. Copy or move your desired background image (PNG) to the ‘/usr/share/plymouth/themes/mybootscreen‘ directory.
To do so, you may right-click on the folder that contains your photo image, then select “Open in Terminal” to open that folder as working directory. Finally, run command to copy/move the file:
Here you HAVE to replace “your_image_file.png” accordingly.
Step 2: Change file permissions
This step is optional if you did the previous step in local machine. In case you moved the theme folder to reimplement in another machine, try changing the theme folder permission by running command: