


Installing Ubuntu is quite easy today using an USB stick. Here’s the step by step guide that shows the details about the installing process for those new to this operating system.
Step 1: Create boot-able USB installer
We usually burn the Ubuntu iso image into a USB stick, then boot PC with it to get into a live Ubuntu system, and finally start the wizard to install the system to hard disk.
Firstly, a USB stick with 4 GB+ memory is required, download ISO image from releases.ubuntu.com, and follow this guide to burn it:
Step 2: Boot your PC with the USB
Next, plug the USB stick into the target PC, start or restart and press F2/F10 (or other keys depends on your machine) to get into BIOS/UEFI. Select boot the USB, and you should see the following screen:

live-USB boot menu
Finally, select boot the first menu entry, or the second “safe graphics” if the first entry does not work for your machine.
Step 3: Start install wizard, choose language & keyboard layout
It will automatically launch the install wizard after successfully boot into the live system.
In the first page, choose the language for this wizard and live system. Then:
- click “Try Ubuntu” to try the live system. There’s a shortcut icon to launch installer again if you decide to install the system on your disk.
- or click “Install Ubuntu” to get to next page.

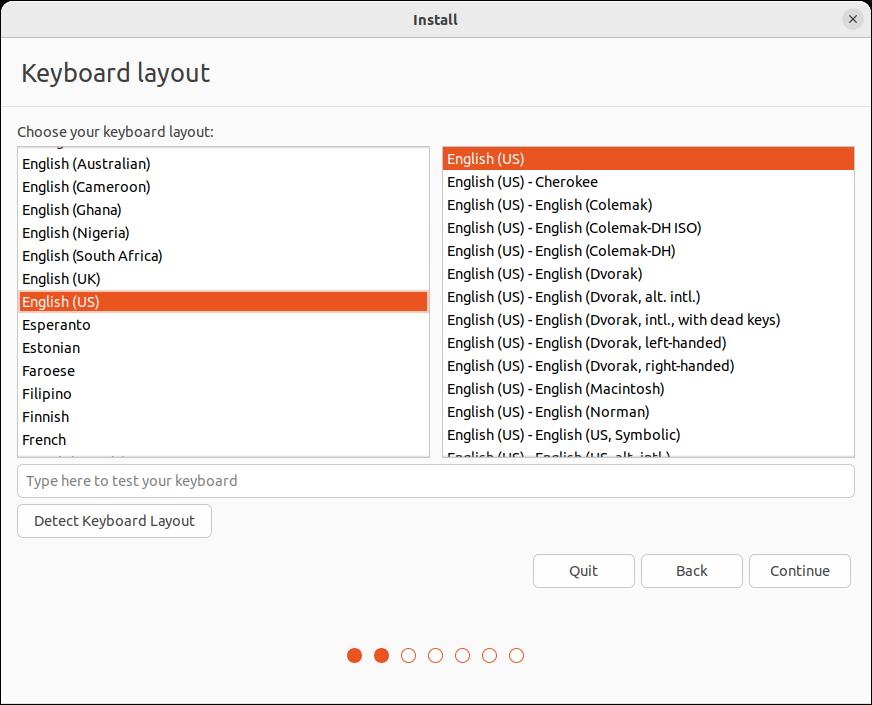
In the next keyboard layout page, it should automatically select the correct keyboard layout. You may press any key on keyboard and see the screen output to verify. Use “Detect Keyboard Layout” or select layout manually if the default is not correct.
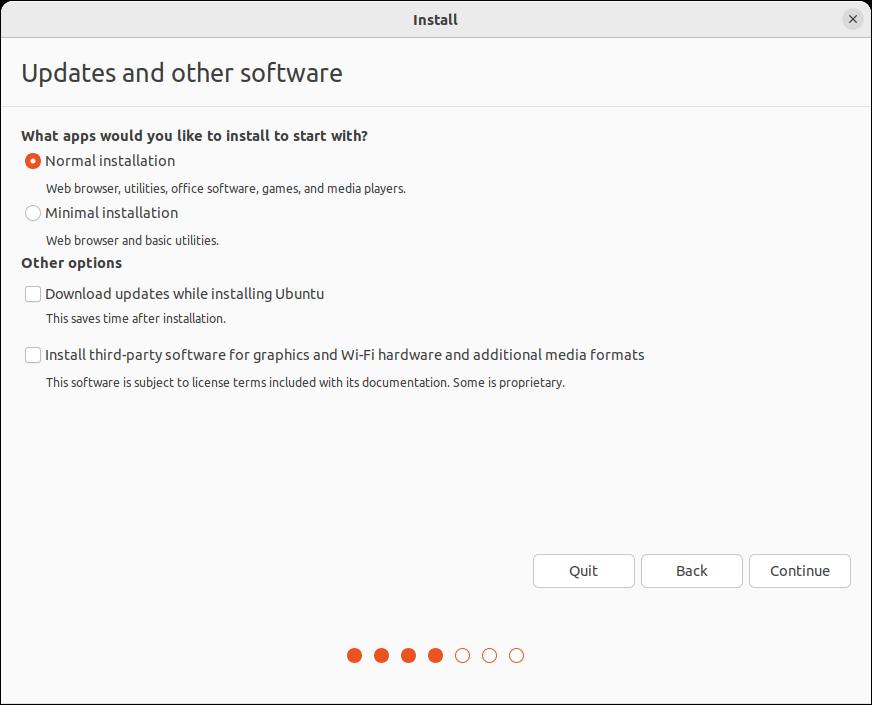
Next, it will prompt to choose between “Normal Installation” and “Minimal Installation”. We usually choose the former one, unless you just need a web browser along with core system libraries.
For updates and third-party software under “Other options”, check the boxes as you prefer if you has internet connection. They are also available to install after system installation.
Step 4: Choose disk or assign partition manually
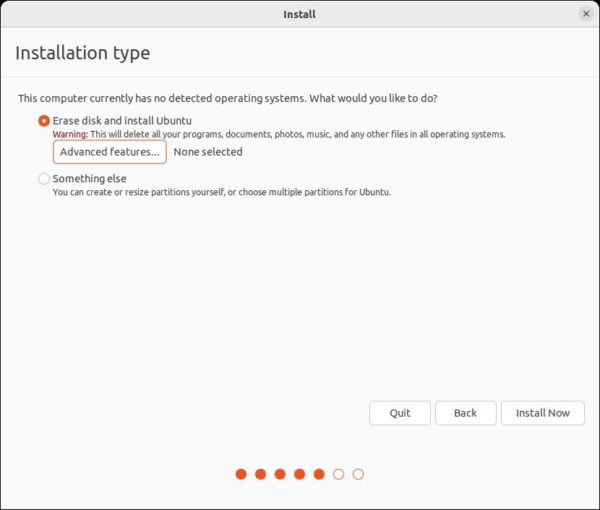
In the next page, it will ask where to install the Ubuntu system. There are usually following options:
- Erase disk and install Ubuntu – use the whole hard disk for Ubuntu. You’ll lost all the data in your disk. There’s also “Advanced features” allows to encrypt the system.
- Install Ubuntu beside Windows – If you’ve a Windows system in the disk, there’ll be the option to use all the left space for Ubuntu installation. So you’ll have Ubuntu and Windows dual-boot.
- Install/Reinstall Ubuntu on top of … – Clear the old Ubuntu system and use the disk partition for new Ubuntu system.
- Something else – edit disk partition manually.
Step 5: Manually create system partition
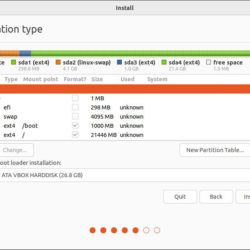
If you choose “Something else” in the previous screen. It will bring you into the partition table.
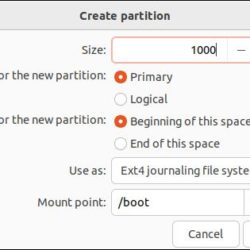
In this page, you need to create following partitions using the free disk spaces (or remove and re-use unused spaces):
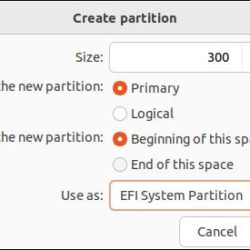
- EFI – 100 ~ 500 MB. (optional for old legacy BIOS without secure boot)
- Swap area – as large as RAM (optional if you have large RAM. And, a swap-file can take the job after installation)
- /boot Ext4 partition – 500 ~ 1000MB (optional, but required for LVM or disk encryption)
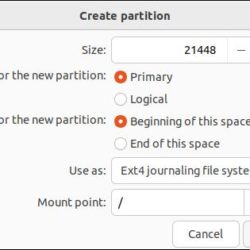
- Ext4 mounted at “/” – 20GB + the bigger the better (required)
Here are some partition combinations for installing Ubuntu:
- EFI + Ext4 mounted at “/”
- EFI + Swap + Ext4 mounted at “/”
- EFI + Ext4 mounted at “/” + separated “/boot” partition
- EFI + Swap + Ext4 mounted at “/” + separated “/boot” partition
- Ext4 mounted at “/” (for legacy boot only)
- Ext4 mounted at “/” + separated “/boot” partition (for legacy boot only)
- Swap + Ext4 mounted at “/” (for legacy boot only)
- Swap + Ext4 mounted at “/” + separated “/boot” partition (for legacy boot only)
- EFI + Ext4 mounted at “/” (Encrypted) + separated “/boot” partition (no swap and /boot is required)
Here are the screenshots of example partition table and partition create dialog (use ‘+’ to create yours).

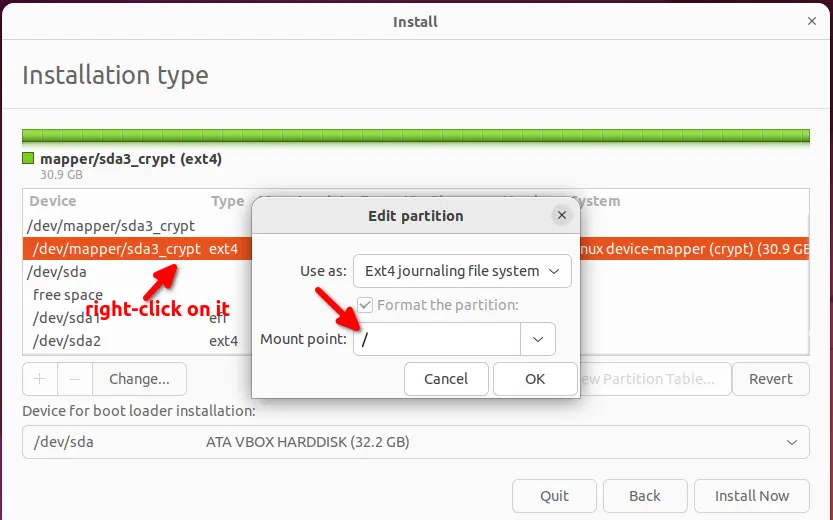
For encrypted Ubuntu system, instead of directly creating “Ext4 file system” mount at ‘/’, create and select use as “physical volume for encryption”.
In this mode, you’ll need to type the secure key (password) every time you boot Ubuntu. And mount Ubuntu system volume from another machine/system need this key too.

Then right-click on it in partition table and select mount point “/”. NOTE: you have to remove Swap area if any and create separated ‘/boot’ partition first for encryption mode.
And under “Device for boot loader installation”, use the default “/dev/sdx” will install the Grub boot-loader for loading all systems in the disk. Though UEFI still allows to choose boot-loader at boot.
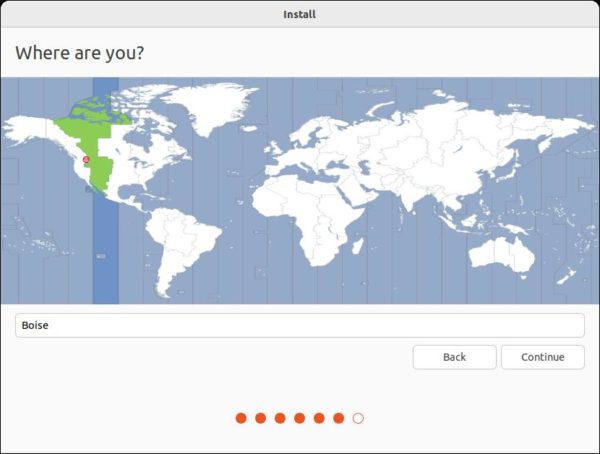
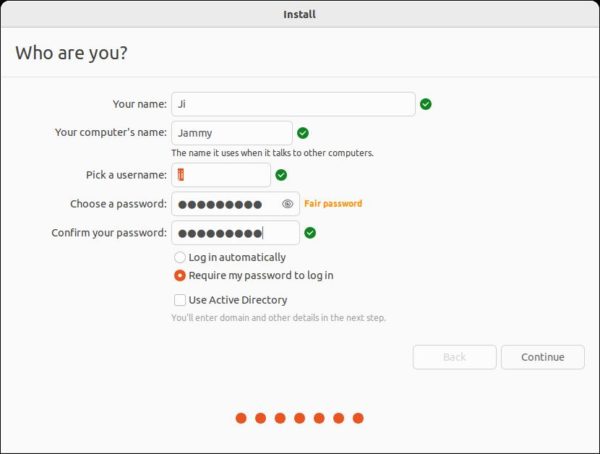
Step 6: Setup Account, Location and done
After click “Install Now” and confirm on pop-up dialog. The wizard will prompt to set up your account, computer name, and select location.
You may add more accounts after installation, and other information can be changed later. So just do the settings as you prefer.
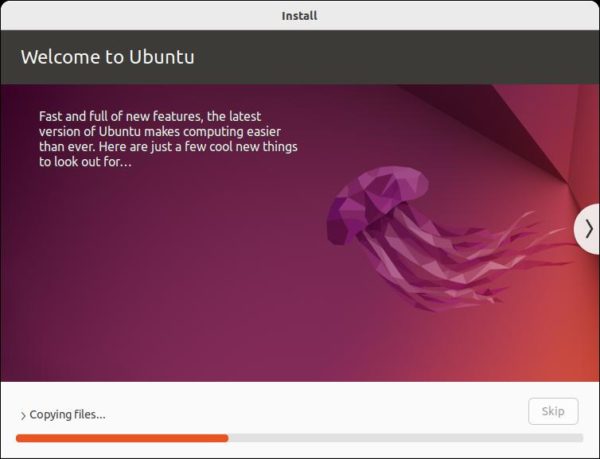
Finally, wait the process done. If no error occur, it should prompt installation done with option to restart your computer.
It may sometimes refuse to restart after clicked the button. That’s not a big deal, just press and hold the power key to force shutdown and boot it again.


This is an outstanding guide. There is a lot of detail and the screen images help a lot.
lenovo idea3 doesnt know touch pad. thus i edit the /etc/default/grub
after update-grub
and reboot.i have IRQ9 err
I am having a corrupted hard disk and can’t get r/w access to it. It says partitions are supported to windows which was the is I was having on the disk. So now I want to have ubuntu, how can I configure that ?
problem : I have no problem with a single disk system. However I have 1 system with 2 nvme ssds with windows on 1 and ubuntu 20.04 on the other, neither of which I want to risk damaging. I want to install on a usbkey which I can test on different systems. How do I ensure that I can install a zfs encrypted ubuntu 22.04 system on that disk and not on the nvme disks.
On two different machines I can’t get past step 2 of this guide. It gets into the purple screen and the screen just hangs indefinitely.
In an earlier attempt I managed to install it on one machine, but this install consistently can’t find the required updates via apt-get update && apt-get -y dist-upgrade.
This is the first time since 2008 I have the feeling that ubuntu took a turn for the worse.
Nem og overskuelig guide til installering af Ubuntu
I have 2 HDs installed, one with Win7 and one with Ubuntu 16.04. My system is legacy Bios only. After adding a new empty HD how do i make sure the 22.04 OS is installed in it and not on the other drives?
Usually I use “Something else” option (See Step 4) to go partition table. Then, choose use the correct disk according to the device name (/dev/sda, /dev/sdb, /dev/sdc etc for HHD or /dev/nmve… for SSD). Your HD may have different size, and/or file partitions, so you can easily find out which one to install Ubuntu onto it.
How can I change the LVM partition size? They seem to be fixed in size and need to be changed. No encryption.
Hi, Ji m. Great article. Thanks much. I want to install just Ubuntu 22.04 on a new laptop that has two 2TB NVMe SSD drives. Both blank/empty/unformatted. Q: Am I better off putting all of my OSes on 1 NVMe and a single home folder on the other? If so, how can I partition the second NVMe so that my Home folder uses all of the space on the drive?
Also, if I create different OS partitions on the first drive for multiple Ubuntu versions, how should I partition this drive? Thanks so much. Be blessed today.
Never tried home folder in a separate partition. But I think you just need to create a EXT4 partition mounted on /home, while another EXT4 system partition mounted on /, a 500MB EFI, and optional Swap area. It should work if all of them are in same disk drive. But I’m not sure if it works on different disks.
For multiple Ubuntu versions, just create multiple system partitions for mounting on /. They can use single shared Swap area, and only one EFI is OK on modern machines. Your PC should boot the last installed Ubuntu version, and, you need to re-enable OS-prober in GRUB to make them all visible in boot menu.
Thanks much for the quick response, Ji m. Great thoughts.