Archives For November 30, 1999

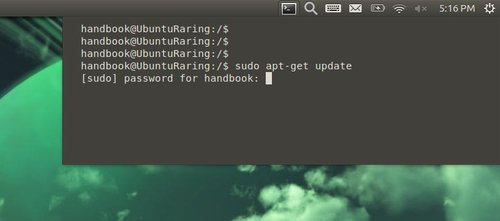
Indicator-terminal is an applet in Ubuntu top panel that shows a terminal window for running commands when you click on the icon.

terminal indicator

Install Indicator-terminal in Ubuntu:

NOTE: This project is still in early development. It has bugs and may break you system. Use it at your own risk!

There’s a PPA for Ubuntu 13.10 Saucy, Ubuntu 13.04 Raring, Ubuntu 12.10 Quantal. Press Ctrl+Alt+T to open terminal, when it opens, run below commands one by one:

sudo add-apt-repository ppa:erasmo-marin/indicator-terminal

sudo apt-get update

sudo apt-get install indicator-terminal

Once installed, restart you machine.

To remove this indicator, run below commands in terminal:

sudo apt-get install ppa-purge

sudo ppa-purge ppa:erasmo-marin/indicator-terminal

sudo apt-get remove indicator-terminal
LibreOffice 4.1 has been officially released. It’s available for Ubuntu 13.04 Raring and 12.04 Precise users from the main LibreOffice PPA repository.

LibreOffice 4.1 features a large number of improvements in the area of document compatibility, which increases the opportunities of sharing knowledge with users of proprietary software while retaining the original layout and contents.

New Features:

  • Rotate images in Writer in 90 degree increments
  • Writer, Calc and Impress now allow embedding fonts in their documents.
  • It is now easy to include a series of photos in Impress with the “Photo Album” feature.
  • Add a Stepped Lines line type to Line and XY (Scatter) graphs
  • Especially for migrations, LibreOffice adds a number of significant improvements of interoperability with MS Office formats.
  • A very large number of bugs have been fixed
  • More.

Install LibreOffice 4.1

Press Ctrl+Alt+T on your keyboard to open terminal. When it opens, run below commands to add the LibreOffice Main repository.

sudo add-apt-repository ppa:libreoffice/libreoffice-4-1

After that, update your package lists and install the office suit. To do so, run below command:

sudo apt-get update; sudo apt-get install libreoffice

Now you can start LibreOffice 4.1 from the Unity Dash. Enjoy!

As you may know, Jupiter is a powerful and lightweight power and hardware control applet. It has been retired and last supported release is up to Ubuntu 12.10 Quantal. However, Jupiter is available for Ubuntu 13.04 from JoliCloud Desktop Environment PPA.

The webupd8team add the packages to the ppa and it’ll be used as a background program for JoliCloud session. I’ve installed it on my laptop and it’s working well.

Install Jupiter on Ubuntu 13.04:

Note that don’t install it on a product machine. Use it as your own risk!

Press Ctrl+Alt+T on your keyboard to open terminal. When it opens, run below command to add the PPA repository:

sudo add-apt-repository ppa:jolicloud-team/ppa

Then update package lists and install:

sudo apt-get update; sudo apt-get install jupiter

To install Jupiter support package for Eee PCs:

sudo apt-get install jupiter-support-eee

BitDefender Anti-virus is available for Linux from its official repository. Here I’ll show you how to install it on Ubuntu 13.04 Raring Ringtail.

Ubuntu itself has few virus, you can install anti-virus program on Ubuntu Linux to scan USB devices or Windows NTFS partitions.

Objectives:

  • Install BitDefender on Ubuntu from official repository
  • Enjoy!

To get started, press Ctrl+Alt+T key combination to open terminal, then run below command to add BitDefender official repository for Linux.

sudo sh -c 'echo "deb http://download.bitdefender.com/repos/deb/ bitdefender non-free" >> /etc/apt/sources.list.d/bitdefender.list'

Then download and install the key via below command:

wget -O- -q http://download.bitdefender.com/repos/deb/bd.key.asc | sudo apt-key add -

After adding the repository, use your package manager to install BitDefender. Or run below commands to update packages list and do install:

sudo apt-get update; sudo apt-get install bitdefender-scanner-gui

Once installed, run GUI via below command. Read this tutorial to manually add a launcher.

/opt/BitDefender-scanner/bin/bdgui

In this tutorial I’ll show you a lightweight sticky notes software for Ubuntu users. It’s indicator-stickynotes which allows you to jot down thoughts, lists, and reminders on your desktop. This simple tool works on Unity, Gnome Shell, XFCE/Xubuntu, with partial support for KDE/Kubuntu and Linux Mint (MATE and Cinnamon).

Objectives:

  • Install Indicator Stickynotes on Ubuntu and Linux Mint.
  • Enjoy!

To get started, add the ppa repository which supports Ubuntu 13.04 Raring, 12.10 Quantal, 12.04 Precise and Linux Mint 13 Maya, 14 Nadia, 15 Olivia. To do so, press Ctrl+Alt+T to open a terminal window, run below commands:

sudo apt-add-repository ppa:umang/indicator-stickynotes

Then update the package lists and install the software:

sudo apt-get update; sudo apt-get install indicator-stickynotes

Enjoy!

When you’re running your laptop on battery, Ubuntu dims the screen after a few seconds of inactivity. It annoying and here’s how to increase the timeout.

Objectives:

  • Increase Ubuntu screen dimming timeout on your laptop
  • Enjoy!

To get started, open dconf Editor from the dash search results.

In next window, navigate to org -> gnome -> settings-daemon -> plugins -> power. You’ll find the key which says “idle-dim-time”, change its value to what you want.

Enjoy!

DownVerter is a popular Youtube downloader which also has the ability to convert videos to MP3, M4A, MPEG, 3GP, OGG and other formats. It’s free!

Objectives:

  • Install DownVerter Youtube downloader and fix can not open error.
  • Enjoy!

To get started, download DEB package from the official site. You may check 32-bit or 64-bit via ‘Details’ utility.

DownVerter for Linux

Then press Ctrl+Alt+T to open terminal.

Run below command to install the package:

sudo dpkg -i ~/Downloads/downverter*.deb

That’s it. The installed executable script is /opt/downverter/Downverter. But Ubuntu keeps looking for /opt/downverter/downverter when you open Downverter from Unity Dash. To fix this problem, run below commands to rename it:

sudo mv /opt/downverter/Downverter /opt/downverter/downverter

Then give executable permission:

sudo chmod +x /opt/downverter/downverter

Enjoy!

Create Desktop Shortcuts on Ubuntu 13.04 Unity

Last updated: November 1, 2013

This brief tutorial is going to show you how to create application shortcuts on Unity Desktop in Ubuntu 13.04 Raring. You can just drag and drop icons to your desktop, but it won’t always work. Some of them have the permission issues which can be fixed by below steps:

UPDATES: For Ubuntu 13.10 Saucy, copy and paste the programs .desktop file from /usr/share/applications to user’s Desktop folder

1.) Search for applications from Unity Dash, drag and drop them onto desktop:

2.) After added all app icons to your desktop, press Ctrl+Alt+T to open a terminal.

Change the ownership of them. My username is handbook, in below command change it to yours.

sudo chown handbook ~/Desktop/*.desktop

Make sure all icons are executable:

sudo chmod +x ~/Desktop/*.desktop

You are done. Enjoy!

The latest stable kernel 3.10.1 has been released. All users of the 3.10 kernel series are urged to upgrade as soon as possible. Here is what’s new and how to install / upgrade kernel 3.10.1 on your system.

Linux kernel 3.10.1 is a small release that includes a few updated drivers, fixes for the HPFS and NFS file systems, as well as other small changes. See the announcement.

Below steps shows you how to install or upgrade this kernel:

1.) Press Ctrl+Alt+T to open terminal. Run below command to download the Deb packages

For 32-bit:

wget http://kernel.ubuntu.com/~kernel-ppa/mainline/v3.10.1-saucy/linux-headers-3.10.1-031001-generic_3.10.1-031001.201307131550_i386.deb http://kernel.ubuntu.com/~kernel-ppa/mainline/v3.10.1-saucy/linux-headers-3.10.1-031001_3.10.1-031001.201307131550_all.deb http://kernel.ubuntu.com/~kernel-ppa/mainline/v3.10.1-saucy/linux-image-3.10.1-031001-generic_3.10.1-031001.201307131550_i386.deb

For 64-bit:

wget http://kernel.ubuntu.com/~kernel-ppa/mainline/v3.10.1-saucy/linux-headers-3.10.1-031001-generic_3.10.1-031001.201307131550_amd64.deb http://kernel.ubuntu.com/~kernel-ppa/mainline/v3.10.1-saucy/linux-headers-3.10.1-031001_3.10.1-031001.201307131550_all.deb http://kernel.ubuntu.com/~kernel-ppa/mainline/v3.10.1-saucy/linux-image-3.10.1-031001-generic_3.10.1-031001.201307131550_amd64.deb

2) Install the Debs:

sudo dpkg linux-headers-3.10.1*.deb linux-image-3.10.1*.deb

After installation, update grub via:

sudo update-grub