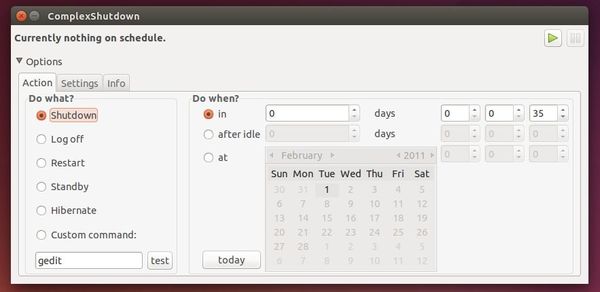
Archives For November 30, 1999

google calendar ubuntu 13.10

Calendar-indicator is a system tray applet which integrates Google Calendar into Ubuntu Unity Desktop. It allows to quickly add new calendar / event, sync with Google Calendar, and more.

The developer has made this app with Ubuntu 13.10 Saucy support, and this tutorail shows you how to install it via PPA repository.

Tutorial Objectives:

  • Install Google Calendar indicator in Ubuntu 13.10
  • Enjoy!

To get started, press Ctrl+Alt+T on your keyboard to open terminal. When it opens, run command below to add the PPA:

sudo add-apt-repository ppa:atareao/atareao

Then update system package lists:

sudo apt-get update

Finally install the indicator:

sudo apt-get install calendar-indicator

Once installed, open calendar-indicator from Unity Dash. Turn on “Allow access to Google Calendar” and authenticate with your Google account.

Google Calendar indicator ubuntu 13.10

Wireshark, the most popular network protocol analyzer has reached v1.10.3. Wireshark 1.10.3 fixed lots of bugs and updated many protocols support.

This tutorial shows how to install Wireshark 1.10.3 via PPA in Ubuntu 13.10 Saucy, Ubuntu 13.04 Raring, Ubuntu 12.10 Quantal, Ubuntu 12.04 Precise, Linux Mint and their derivatives.

What’s New in Wireshark 1.10.3:

The following vulnerabilities have been fixed:

  • The IEEE 802.15.4 dissector could crash.
  • The NBAP dissector could crash. Discovered by Laurent Butti.
  • The SIP dissector could crash.
  • The OpenWire dissector could go into a large loop. Discovered by Murali.
  • The TCP dissector could crash.
  •  
    The following bugs has been fixed:

  • new_packet_list: EAP-TLS reassemble does not happen when NEW_PACKET_LIST is toggled.
  • TLS decryption fails with XMPP start_tls.
  • Wrong Interpretation of GTS starting slot.
  • “Follow TCP Stream” shows only the first HTTP req+res.
  • The value of SEND_TO_UE in the DIAMETER Gx dictionary for Packet-Filter-Usage AVP is 0 instead of 1.
  • Crash then try to delete the same entry (length range) twice.
  • Crash if wrong “packet lengths range” entered.
  • Bssgp ⇒ SGSN-INVOKE-TRACE use the wrong function…
  • Minor correction to dissection of DLR frames in Ethernet/IP dissector.
  • WebSphere MQ V7 Bug Fix 8322 TSHM_EBCDIC.
  • EDNS0 “Higher bits in extended RCODE” incorrectly decoded in packet-dns.c.
  • Files with pcap-ng Simple Packet Blocks can’t be read.
  • Bug in RTP dissector if RTP extension is present.
  • Improve “eHRPD Indicator” NVSE dissection in 3GPP2 A11 Registration Request.
  • “make debian-package” fails, missing wsicon32.xpm.
  • Fix typo in MODCOD list of DVB-S2 dissector.
  • Ring buffer crash when tshark gets too far behind dumpcap.
  • PTP Dissector Wrongfully Reports Malformed Packet.
  • Wireshark lua dissector unable to load for media_type=application/octet-stream.
  • Wireshark crash when dissecting packet with NTLMSSP.
  • Padding in uint64 field in DCERPC protocol wrongly reported.
  • DCERPC data_blobs are not correctly dissected when NDR64 encoding is used.
  • Multiple PDUs in the same DCERPC packet are not correctly decrypted.
  • The tshark summary line doesn’t display the frame number or displays it sporadically.
  • Bluetooth: SDP improvements and minor fixes.
  • Duplicate IRC header field abbreviation breaks filter (example: irc.response.command).
  •  
    Updated Protocol Support:

    3GPP2 A11, Bluetooth SDP, BSSGP, DCERPC, DCERPC NDR, DCERPC NT, DIAMETER, DNS, DVB-S2, Ethernet, EtherNet/IP, H.225, IEEE 802.15.4, IRC, NBAP, NTLMSSP, OpenWire, PTP, RTP, SIP, TCP, WiMax, and XMPP

    Read Wireshare 1.10.3 release note.

    Install Wireshark 1.10.3:

    It’s recommended to upgrade to this version because it fixed lots of vulnerabilities and bugs that affected in versions that are available by default in Ubuntu repository.

    To get started, press Ctrl+Alt+T on your keyboard to open terminal. When it opens, run commands below one by one to install Wireshark 1.10.3 from PPA:

    sudo add-apt-repository ppa:pi-rho/security
    
    sudo apt-get update
    
    sudo apt-get install wireshark

    For Ubuntu 14.04 Trusty, the version of Wireshark is available in Ubuntu Software Center.

    wireshark 1.10.3 in ubuntu 13.10

    Virtualbox 4.3.2, the first maintenance release of virtualbox 4.3 was released with lots of bugfixes. Here’s how to upgrade it in Ubuntu 13.10 Saucy, Ubuntu 13.04 Raring, Ubuntu 12.04 Precise, Ubuntu 12.10 Quantal and Linux Mint.

    What’s New in Virtualbox 4.3.2:

    • VMM: fixed restoring of the auxiliary TSC MSR in VT-x that caused host BSODs on Windows 8.1 hosts and unpredictable behavior on other hosts
    • VMM: provide fake values for a couple of MSRs to make more guests happy on certain hosts
    • VMM: fixed detection of VT-x on certain machines where the BIOS would not set the VMX LOCK feature bit, which affected the VM settings in the GUI
    • VMM: fixed TPR threshold which caused BSODs on Windows XP guests that use the I/O APIC (VT-x only;
    • VMM: fixed PATM saved state incompatibility for software virtualized VMs
    • VMM: don’t fail if AMD-V isn’t available if the VM is configured to use software virtualization
    • GUI: fixed guest resize breakage on visual representation mode change (when switching from normal to fullscreen etc)
    • GUI: make sure the guest screen is resized after restoring a VM from a saved state if the host screen size changed
    • GUI: disabled SCROLL LED sync from HID LEDs synchronization (Mac OS X hosts only)
    • Webcam passthrough improvements including GUI support (see the manual for more information)
    • Guest Control: implemented more IGuestSession methods
    • Guest Control: added support for deleting and renaming guest files + directories in VBoxManage
    • Guest Control: various bugfixes
    • API: incorrect handling of hardware UUID default value, resulting in an all zero DMI/SMBIOS UUID, which leads to Windows requesting re-activation
    • 3D support: fixed crash on shutdown if 2D video acceleration is enabled (Mac OS X hosts only)
    • 3D support: miscellaneous fixes
    • Storage: fixed detection of CD/DVD media when switching from an empty to a host drive with passthrough enabled
    • Storage: fixed hang of the VM process when the disk is full under certain circumstances
    • NAT: listen for changes of NAT Network setting at runtime
    • NAT: NAT Network DHCP server now saves leases to a persistent storage
    • Main: monitor changes in host DNS configuration
    • Mac OS X host: reworked a mechanism of adding a VM desktop alias from the VM selector
    • Mac OS X installer: remove old kernel extensions during upgrade
    • Linux Additions: correctly set umask before installing
    • X11 Additions/3D: fix freezes starting 3D desktop
    • X11 Additions/3D: fix depth buffer support
    • X11 Additions/3D: fix Age Of Empires 3 rendering
    • Windows Additions/3D: fix Google Earth plugin rendering
    • Windows Additions/WDDM: autoresize fixes

    Install or Upgrade Virtualbox 4.3.2:

    You can easily get this version from Virtualbox for Linux official download page.

    Or install it from Virtualbox repository for Linux. Press Ctrl+Alt+T on your keyboard to open terminal. When it opens, run commands below one by one to add the repository:

    sudo sh -c 'echo "deb http://download.virtualbox.org/virtualbox/debian $(lsb_release -sc) contrib" >> /etc/apt/sources.list.d/virtualbox.list'
    
    wget -q http://download.virtualbox.org/virtualbox/debian/oracle_vbox.asc -O- | sudo apt-key add -

    In the code, change $(lsb_release -sc) to:

    • raring for Ubuntu 13.10, Linux 15 & 16.
    • quantal for Linux Mint 14
    • precise for Linux Mint 13 & Elementary OS Luna.

    After that, update packages list and install Virtuablox via:

    sudo apt-get update; sudo apt-get install virtualbox-4.3

    virtualbox 4.3.2 in ubuntu 13.10

    Grub 2, the Ubuntu and Linux Mint’s default bootloader typically gets overridden when you install Windows as a dual-boot OS. To make Ubuntu and its derivatives boot again, you need to reinstall (repair/restore) Grub using a bootable Ubuntu/LinuxMint CD or USB.

    Typically you’ll get the following error boot screen:

    error: no such partition.
    
    grub rescue> _

    Tutorial Objectives:

    • Reinstall Grub 2 when Ubuntu or Linux Mint won’t boot
    • Enjoy!

    To get started, insert your Ubuntu USB into computer and boot up. When you’re in, follow the steps below to reinstall grub 2:

    1. Open Gparted Partition Editor from Unity Dash to check out which partition your Ubuntu/Linux Mint system installed. It is usually a EXT4 Partition.

    In my case, there’re 3 Ext4 partitions. We can check the user names on each partition after step 2 by command cd /mnt/ && ls home/

    gparted partition editor

    2. Press Ctrl+Alt+T on keyboard to open terminal. When it opens, run command below to mount the partition:

    sudo mount /dev/sda7 /mnt

    3. Now reinstall Grub2 via command below:

    grub-install --root-directory=/mnt /dev/sda

    If the installation is successful, you will get the similar output:

    Installation finished. No error reported.

    4. Finally update grub boot loader and done!

    sudo update-grub

    Gpaste is a clipboard manager allows you to keep a trace of what you’re copying and pasting. It is really useful when you go through tons of documentation and you want to keep around a bunch of functions you might want to use, for example. The clipboard manager will store a history of everything you do, so that you can get back to older copies you now want to paste.

    Gpaste 3.2.2 and the couple of following ones (3.3 and maybe 3.4) are the last releases supporting GNOME Ubuntu Unity applet.

    What’s New in Gpaste 3.2.2:

    • “Paste and Pop” is now only “Pop”
    • Fix SEGV at startup
    • Fix SEGV when deleting last item of history

    gpaste extension in Ubuntu 13.10 gnome shell

    Install Gpaste entension for Gnome Shell in Ubuntu 13.10

    Ubuntu Gnome 13.10 uses GNOME 3.8, so your can run commands below one by one in terminal (Ctrl+Alt+T) to install paste 3.2.2:

    sudo add-apt-repository -y ppa:webupd8team/gnome3
    
    sudo apt-get update
    
    sudo apt-get install gnome-shell-extensions-gpaste

    Then log out and back in. Enable this extension in Gnome Tweak Tool:

    enable gpaste in gnome shell

    Whisker Menu for Xfce released v1.2.0 with more options and bugfixes. Here’s how to install it in XUbuntu 13.10, XUbuntu 13.04, Xubuntu 12.04, XUbuntu 12.10 and other Linux distributions.

    Whisker Menu is an alternate application launcher for Xfce. With it, you can browser, search, and marked as favorites through all of your installed applications.

    What’s New in version 1.2.0:

    • Fix popup script to show correct version information
    • Fix memory leak when reloading applications
    • Fix favorites and recent deleted when menu failed to load
    • Add option to load menu hierarchy
    • Add option to not include favorites in recently used
    • Add options to set custom commands
    • Add option to show recently used by default
    • Add option to position search entry next to panel button
    • Add option to position command buttons next to search entry
    • Add manual page for popup script
    • Use tabs for configuration dialog layout
    • Translation updates: Brazilian Portuguese, Bulgarian, Catalan, Croatian, Danish, Dutch, Finnish, French, German, Greek, Hebrew, Italian, Japanese, Malay, Norwegian Bokmål, Polish, Portuguese, Romanian, Russian, Serbian (Latin), Slovak, Spanish, Uzbek.

    Install Whisker Menu 1.2 for Xfce4:

    Press Ctrl+Alt+T on your keyboard to open terminal. When it opens, run commands below one by one:

    sudo add-apt-repository ppa:gottcode/gcppa
    
    sudo apt-get update
    
    sudo apt-get install xfce4-whiskermenu-plugin

    For Debian / Fedora / openSUSE and others, see installation guide on Whisker Menu Homepage

    Once installed, right-click on panel and add this launcher by navigating to panel -> Add new item…

    whisker menu in Ubuntu 13.10 Xfce4

    IceWeasel web browser is a fork from Firefox for the purpose: backporting of security fixes to declared Debian stable version and no inclusion of trademarked Mozilla artwork. Beyond that, they will be basically identical.

    This simple tutorial shows you how to install IceWeasel 17 in Ubuntu 13.04 Raring and Ubuntu 12.04 Precise and their derivatives such as Linux Mint 13/15, Elementary OS Luna via PPA repository.

    iceweasel 17 on Ubuntu 12.04

    To get started, press Ctrl+Alt+T on your keyboard to open terminal. When it opens, run command below to add the PPA:

    sudo add-apt-repository ppa:dirk-computer42/c42-backport

    Then update and install the browser:

    sudo apt-get update; sudo apt-get install iceweasel

    IceWeasel was also built into this PPA for Ubuntu 13.10 Saucy Salamander, but it’s failed.

    Install TV-MAXE in Ubuntu 13.10 or Linux Mint 16

    Last updated: October 31, 2013

    TV-MAXE is an app to watch TV stations and listen radio via different streams, such is SopCast. Now it’s available for Ubuntu 13.10, Linux Mint 16 in its PPA.

    TV-MAXE has a large number of channels, both romanian and international:

    ABC,    Acasă,    A and E TV,     Alfa Omega Movies,
    Alfa Omega TV,     Alfa Omega Youth TV,
    Animal Planet,    Antena 1,     Antena 2,
    Antena3,    AXN,     AXN Crime,     AXN Sci-Fi
    B1 TV,   BBC News,    BBC World
    Biography channel,     Boomerang
    Cartoon Network,   CBS,     CNBC,      CNN
    Comedy Central,   Cosmos TV,       Dance TV
    Digi Sport Plus,    Discovery Channel,    Discovery Science
    Discovery Travel&Living,     Discovery World
    Discovery ID,    Disney Channel,      DIVA International
    DR1,     ESPN,    Eurosport,    Eurosport 2
    Film4,     FOX 43,    FOX Sports,     France 24
    France 24 (english),     GSP TV,    HBO
    History Channel,    Hit Music TV,    Iaşi TV Life
    Jurnal TV,  Kanal D,    KISS TV,    Lifetime Movie Network
    Musicbox,    NatGeo Wild,   National Geographic
    Naţional TV,    Nickelodeon,     OTV,     Prima TV
    ProCinema,    Pro TV,    Pro TV Internaţional
    Publika MD,     Realitatea TV,      Romstyle TV
    Sony Entertainment,     Sport.ro,      Taraf TV
    TBS,      TCM,      Tele'M Iaşi,     TNT
    TV 1000,    TVM Piatra Neamţ
    TVR 1,     TVR 2,     TvRM Cultural,     TvRM Educaţional
    USA,    UTV,    Wgal 8

    Also TV-MAXE allows you to listen to the following radio channels: BBC Radio 2
    Europa FM, Impact FM, Kiss FM, Magic FM, Naţional FM, PRO FM, Radio Iaşi, Radio Intens, Radio România Actualităţi, Radio România Cultural, Radio Vocea Evangheliei, Radio ZU, Rock FM, Sky FM Dance, Sky FM Top Hits, Vibe FM.

    Install TV-MAXE via PPA:

    The latest TV-MAXE now is available in its PPA for Ubuntu 13.10, Ubuntu 13.04, Ubuntu 12.04, Ubuntu 12.10 and their derivatives, such as Linux Mint and Elementary OS.

    To add the ppa, press Ctrl+Alt+T on your keyboard to open terminal. When it opens, run command below:

    sudo add-apt-repository ppa:venerix/pkg

    Then update system package lists and install the app:

    sudo apt-get update; sudo apt-get install tv-maxe

    tv-maxe in ubuntu 13.10

    This tutorial shows you how to install LEMP stack in Ubuntu 13.10. LEMP stands for Linux, Nginx (pronounced “engine x”), MySQL and PHP. The nginx project started with a strong focus on high concurrency, high performance and low memory usage. So it’s a good alternative to Apache webserver for building websites on low memory hosts.

    Tutorial Objectives:

    • Install Nginx, Php5, MySQL (LEMP) in Ubuntu 13.10 Server
    • Enjoy!

    To get started, first login your Ubuntu Server and follow the steps below:

    1. Intall MySQL

    MySQL is a database management system which stores and organizes references to the information the webserver needs.

    To install it, run command:

    sudo apt-get install mysql-server mysql-client

    While the installing process, you’ll be asked to type a password for MySQL root user.

    2. Install Nginx

    Nginx is available in Ubuntu’s repository, run command below to install it:

    sudo apt-get install nginx

    Or you can install the latest stable version from Nginx PPA:

    sudo apt-get install python-software-properties
    
    sudo add-apt-repository ppa:nginx/stable
    
    sudo apt-get update
    
    sudo apt-get install nginx

    Once installed, start Nginx by:

    sudo service nginx start

    To check out if nginx is working, go to http://serverip:

    nginx is working ubuntu 13.10

    3. Install PHP5

    PHP is a reflective programming language, which makes it possible for all these different parts to work together.

    We can make PHP5 work in nginx through PHP-FPM, which is an alternative PHP FastCGI implementation with some additional features useful for sites of any size, especially busier sites.

    Run command below to install php5-fpm:

    sudo apt-get install php5-fpm

    4. Setup Nginx

    The nginx configuration is in /etc/nginx/nginx.conf, read this configuration example.

    Now, let’s modify the default site example:

    sudo vi /etc/nginx/sites-available/default

    Here you can define root directory (to put WordPress files there), your site domain, as well as other settings. See the example below:

    server {
    	listen 80 default_server;
    	listen [::]:80 default_server ipv6only=on;
    
    	root /usr/share/nginx/html;
    	index index.php index.html index.htm;
    
    	# Make site accessible from http://localhost/
    	server_name localhost;
    
    	location / {
    
    		try_files $uri $uri/ /index.php;
    
    	}
    
    	location /doc/ {
    		alias /usr/share/doc/;
    		autoindex on;
    		allow 127.0.0.1;
    		allow ::1;
    		deny all;
    	}
    
    	#
    	error_page 500 502 503 504 /50x.html;
    	location = /50x.html {
    		root /usr/share/nginx/html;
    	}
    
    	location ~ \.php$ {
    
    		# With php5-fpm:
                    try_files $uri =404;
    		fastcgi_pass unix:/var/run/php5-fpm.sock;
    		fastcgi_index index.php;
    		include fastcgi_params;
    	}
    
    	# deny access to .htaccess files, if Apache's document root
    	# concurs with nginx's one
    	#
    	location ~ /\.ht {
    		deny all;
    	}
    }

    After that, reload Nginx:

    sudo service nginx reload

    4. Check out if PHP is working

    Create the test file:

    sudo vi /usr/share/nginx/html/info.php

    Add following lines and save the file:

    <?php
    phpinfo();
    ?>

    Go to http://serverip/info.php in client’s web browser and you’ll see:

    php is working

    5. Get MySQL working with PHP

    Install Xcache, a free and open PHP opcode cacher for caching and optimizing PHP intermediate code, as well as other PHP modules:

    sudo apt-get install php5-mysql php5-curl php5-gd php5-intl php-pear php5-imagick php5-imap php5-mcrypt php5-memcache php5-ming php5-ps php5-pspell php5-recode php5-snmp php5-sqlite php5-tidy php5-xmlrpc php5-xsl php5-xcache

    Then restart php5:

    sudo service php5-fpm restart

    Now reload http://serverip/info.php page and scroll down to find out if there’s a section about MySQL:

    mysql is working with php

    Now your LEMP server is up and running, see how to install wordpress on Ubuntu 13.10