#
# background = Background file to use, either an image path or a color (e.g. #772953)
# theme-name = GTK+ theme to use
# icon-theme-name = Icon theme to use
# font-name = Font to use
# xft-antialias = Whether to antialias Xft fonts (true or false)
# xft-dpi = Resolution for Xft in dots per inch (e.g. 96)
# xft-hintstyle = What degree of hinting to use (none, slight, medium, or full)
# xft-rgba = Type of subpixel antialiasing (none, rgb, bgr, vrgb or vbgr)
# show-language-selector (true or false)
# show-indicators = semi-colon “;” separated list of allowed indicator modules (e.g. libsoundmenu.so)
# show-clock (true or false)
# clock-format = strftime-format string, e.g. %H:%M
# keyboard = command to launch on-screen keyboard
#
[greeter]
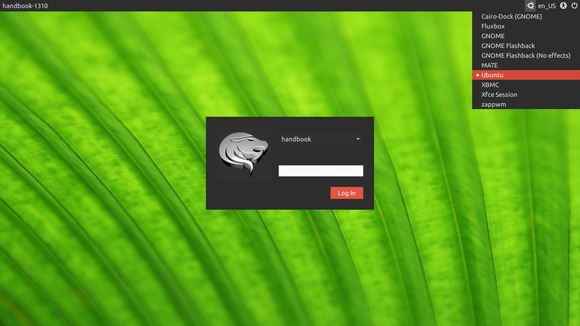
background=/usr/share/backgrounds/mate/nature/Blinds.jpg
theme-name=Numix
icon-theme-name=LoginIcons
default-user-image = /usr/share/pixmaps/griffon_icon.png
font-name=Ubuntu 11
xft-antialias=true
xft-dpi=96
xft-hintstyle=slight
xft-rgba=rgb
show-language-selector=true
This simple tutorial is going to show you how to disable disk write caching in Ubuntu to prevent data loss when you may experience power failure.
Enable write caching improves disk performance, but a power outage or equipment failure might result in data loss or corruption. It’s recommended only for disks with a backup power supply.
Some third-party programs require disk write caching to be enabled or disabled. If your disk are used for Event Store databases, it’s highly recommended to disable disk caching to help ensure that data is durable when the machine might experience a power, device or system failure.
In Ubuntu, it’s easy to check out whether disk caching is enabled on your disk or not by running below command:
sudo hdparm -i /dev/sda
Replace /dev/sda with your device and you’ll see below similar outputs:
The words in red, WriteCache=enabled, means caching is enabled! To disable it, edit the “/etc/hdparm.conf” with your favorite editor, here I use vi as example:
sudo vi /etc/hdparm.conf
Uncomment the line “#write_cache = off” (without quotes) by removing the # at its beginning. So it looks like:
# -W Disable/enable the IDE drive’s write-caching feature
write_cache = off
After that, restart your computer and check out the write caching status again to make sure it’s disabled.
This simple tutorial shows how to upgrade your system from Ubuntu 13.10 Saucy to Ubuntu 14.04 Trusty Tahr for both Desktop and Server editions.
Ubuntu 14.04 Trusty is scheduled to be released on April 17th. At the moment of writing this article, the alpha release is available to upgrade in Saucy’s updater for testing purpose.
Important: Production machines please wait until the Ubuntu 14.04 final is released. By then, we can follow below steps to upgrade our systems.
Before starting any upgrades, you need to:
Backup important files, documents, bookmarks and other data.
If you’ve manually installed proprietary drivers directly from the manufacturer’s website, then before upgrading I recommend removing these drivers first and reverting to the open-source drivers
Open Software & Updates utility from Unity Dash. Disable all third-party repositories under Other Software tab.
Desktop Upgrade:
Press Ctrl+Alt+T on keyboard to open the terminal. When it opens, run the commands below to update your system:
sudo apt-get update; sudo apt-get dist-upgrade
Now start the updater via -d option:
sudo update-manager -d
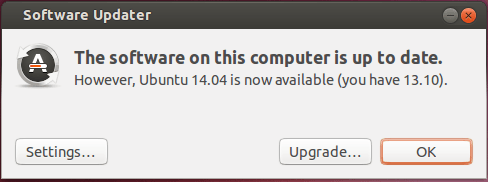
The Software Updater will open and tell you your system is up to date and a new release Ubuntu 14.04 is available.
Click on the Upgrade button and confirm again in next window. Software Updater will fetch and install the files and prompt you to remove unnecessary applications.
Finally you’ll be asked to restart your computer to finish the upgrade. That’s it.
Upgrade Ubuntu Server:
NOTE: Please backup your configuration files if you’re running any services on Ubuntu server.
For Ubuntu Server edition, we need to install the update-manager-core first by executing the command below:
sudo apt-get install update-manager-core
Then edit the config file:
sudo vi /etc/update-manager/release-upgrades
Make sure there’s a line that says “Prompt=normal” or “Prompt=lts”.
QtWebKit browser QupZilla 1.6.0 has been released a few days ago. Here’s how to install it via PPA in Ubuntu 13.10, Ubuntu 13.04, Ubuntu 12.10, Ubuntu 12.04, Linux Mint and their derivatives.
This release comes with new TabBar implementation that supports scrolling through all tabs when tabs don’t fit at all into TabBar. So it means, no more overflowing of tabs!
LocationBar received new completion feature – inline completion. You can now write only first letter and the most used domain will be completed. Once you see the completion, you can just press Enter and load the site.
For details, see the changelog:
added support for Proxy Auto-Config (PAC)
added option to open another private window from private window
added option to detach tabs from window
added delete action in edit context menu on page
added possibility to remove EasyList from AdBlock
added inline domain completion to urlbar
added KWallet password backend plugin
added Gnome-Keyring password backend plugin
added StatusBar Icons plugin that adds extra icons to statusbar
added support for POST method in search engines manager
added context menu for translating webpage
added possibility to export bookmarks to html file
great performance improvement for matching basic rules in AdBlock
themes can now be loaded from profile directories
pagescreen can now save output into number of formats, including PDF
proxy exceptions now supports wildcards (*, ?)
cancel upload when trying to upload non-readable files
select previous / next engines with ctrl+up/down in websearchbar
ask user first before closing all but the current tab from tabbar
last 2 sessions are now backuped in profile directory
always show tab previews after a small delay
GreaseMonkey: added icon in statusbar
GreaseMonkey: added support for GM_Settings
GreaseMonkey: fixed userscripts when first loading plugin
GreaseMonkey: run userscripts in all frames on page
oxygen: set rounded corners for tooltips
oxygen: workaround for transparent background of tooltips
X11: Set correct WM_CLASS property to windows
fixed: size of preferences dialog on low-res screens
fixed: loading plugins with relative paths in portable build
fixed: displaying a lot of RSS feeds in RSS widget in locationbar
fixed: enabling disabled rules in AdBlock now works everytime
fixed: parsing OpenSearch files with XML declaration
fixed: don’t show urls multiple times in url completer
fixed: drag & drop moving folders under bookmarks toolbar
fixed: files with relative paths can now be opened from command line
fixed: issues with overflowing tabs, it is now possible scroll through all tabs
Install QupZilla Browser:
Press Ctrl+Alt+T on keyboard to open terminal. When it opens, run commands below one by one:
Linus Torvalds finally announced the Linux Kernel 3.13 on Jan 19, 2014. In this tutorial you’ll see what’s new in this kernel release and how to install / upgrade to Linux Kernel 3.13 in Ubuntu 13.10, Ubuntu 13.04, Ubuntu 12.04, Ubuntu 12.10, Linux Mint and also Ubuntu 14.04 daily build.
Linus Torvalds wrote on the mailing list (read the announcement):
The release got delayed by a week due to travels, but I suspect that’s just as well. We had a few fixes come in, and while it wasn’t a lot, I think we’re better off for it. At least I hope so – I’ll be very disappointed if any of them cause more problems than they fix..
Anyway, the patch from rc8 is fairly small, with mainly some small arch updates (arm, mips, powerpc, s390, sparc, x86 all had some minor changes, some of them due to a networking fix for the bpf jit). And drivers (mainly gpu and networking). And some generic networking fixes. The appended shortlog gives more details.
Anyway, with this, the merge window for 3.14 is obviously open.
What’s New in Linux Kernel 3.13:
Below exciting new features comes from phoronix.com:
The multi-queue block layer (blk-mq) was merged. It provides better disk (SSD) performance and with lower disk latencies by allowing I/O load to now be balanced across multiple CPU cores, supporting multiple hardware queues, etc. The multi-queue block layer can scale much better and developers have reported improvements in the range of 3.5 to 10 times greater IOPS and a 10 to 38x reduction in latency.
The AMD hardware on the open-source driver now supporting the reading of ELD audio information, 7.1 channel audio support on capable hardware, and DTS HD-MA and TrueHD audio support. The Radeon HDMI driver is now enabling HDMI audio support by default where as on earlier kernels it required a special kernel command-line switch due to some users experiencing problems.
AMD has published open-source Hawaii GPU support to allow the Radeon R9 290 series to work on Linux without Catalyst. Besides needing Linux 3.13, you will also need other new code in user-space.
For users of the open-source Radeon driver there is now dynamic power management being enabled by default. It allows AMD GPUs to dynamically adjust their clock speeds and voltages based upon load, allowing for lower heat output and energy consumption while idling.
There’s now NFTables as the eventual replacement to IPTables.
New power management and re-clocking code for the open-source NVIDIA (Nouveau) driver. With the new power management code is now fan management being enabled by default. The re-clocking work does include support for GeForce 400/500 “Fermi” and GeForce 600/700 “Kepler” GPUs, but this re-clocking support isn’t yet ready for use or enabled by default.
There’s now an Armada DRM driver in the mainline kernel along with PRIME and Render Nodes improvements to the MSM driver, overall continuing to improve the open-source ARM graphics landscape on Linux.
There’s ongoing work with Btrfs performance tuning.
Samsung’s F2FS supports new features as the promising Flash-Friendly File-System.
In making the Linux power efficiency and performance competitive, there’s been a number of changes to ACPI and power management, including more hardware having CPUfreq drivers.
While part of the power management work, Linux 3.13 introduces a Linux Power-Capping Framework and Run-Time Average Power Liming driver from Intel. The RAPL driver allows limiting power consumption of certain components from exceeding defined thresholds.
Intel’s open-source Direct Rendering Manager driver now supports HDMI Stereo/3D. This support is for the HDMI specification’s handling of a standardized stereoscopic 3D display format since version 1.4.
Install / Upgrade Kernel 3.13:
The Ubuntu Kernel Team has made the deb packages available in this page. If you’re comfortable with command line, follow below steps to download & install this kernel.
Press Ctrl+Alt+T on keyboard to open terminal. When it opens:
1. Download DEBs for this kernel:
For 32-bit Ubuntu, Linux Mint and alternatives run commands below one by one:
If you’re using a proprietary video driver, you may need to re-build or re-install to get it work with the new kernel.
If for some reason this kernel release doesn’t work properly for you, reboot into previous kernel (Grub -> Advanced -> select previous kernel) and run this command to remove Linux Kernel 3.13:
The native Linux virus scanner ClamTK (ClamAV GUI) has released version 5.03. In this release, the scheduler was re-added by demand, it’s mostly the same as it was in the 4.xx series. It also updated requirement for some distros with gnome-icon-theme and brought lots of clean-up.
ClamTK 5.03 changelog:
Re-add scheduler (Google Issue #1). This adds cron or cronie back as a dependency.
Update requirement for some distros to gnome-icon-theme-full, and gnome-icon-theme for some distros (Google Issue #2); for Fedora, it seems we need gnome-icon-theme-legacy. Depends on the distro.
Remove extra gettext subs
Fix ugly copyright symbol
Update year in multiple places, 2013 -> 2014
Minor help documentation and man page tweaks.
Translation updated
Download ClamTK:
Download .deb packages for Ubuntu and .rpm packages for Fedora from the links below:
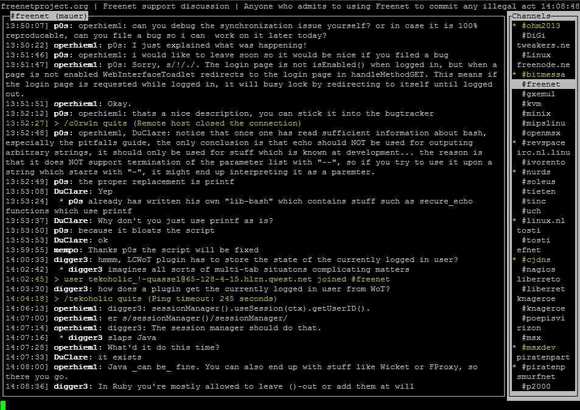
F-IRC, an irc client for terminals/command-line/console now is at version 1.31 which brings several improvements.
As you may know, F-IRC aims to be as user friendly as possible with easy navigation and keyboard shortcuts for quick navigation. The learning curve should be as shallow as possible.
The latest version F-IRC 1.31 brings below changes:
rewrites IRC protocol handling (much more stable)
Nicks can now be aligned in a column. You can now add a marker line to see where you left off (this is also automatic when changing channels)
An improved configuration editor
A tab-completion dictionary
Improved scroll-back window navigation. You can now invoke an external program/script when there’s a nick-hit
A “headlines” window has been added. You can now set custom highlight words
How to Install F-IRC in Ubuntu:
I’ve uploaded the latest builds to launchpad PPA, so we can easily install the client by running below commands one by one in terminal (Ctrl+Alt+T):
Gmusicbrowser is an open-source jukebox for large collections of mp3/ogg/flac/mpc/ape files. This tutorial will show you how to install the latest version, so far it’s gmusicbrowser 1.1.11, in Ubuntu via PPA.
Gmusicbrowser 1.1.11 was released a few days ago, and here’s the changelog:
improve search responsiveness (improve responsiveness of SimpleSearch)
add auto-update mode that keeps browser lists sorted and filtered (on by default, can be disabled in the songlist/songtree option menu)
picture finder plugin: update google image, add bing and yahoo, various small changes
albuminfo plugin: update and fix parsing of Allmusic’s pages
various improvements to song properties and mass-tagging dialogs
gstreamer : add option to monitor pulseaudio’s volume, off by default as it is unstable due to thread problems with the libraries
close-to-tray option no longer depends on the use-tray option
various improvements and small fixes to error dialogs asking to retry
fix default filters “added today” and “played today” doing the opposite of what they say (only fixed for new users, if you were affected you have to edit them to fix it)
add a new-page button on TabbedLists/Context/NB (can be disabled with newbutton=0)
better handling of vertical scripts in vertical tabs
fix combo boxes for setting artist options in the misc tab of preferences
fix dialog for selecting label icons up-scaling small icons
Press Ctrl+Alt+T on keyboard to open terminal. When it opens, run below commands one by one. It will always install the latest packages from launchpad PPA:
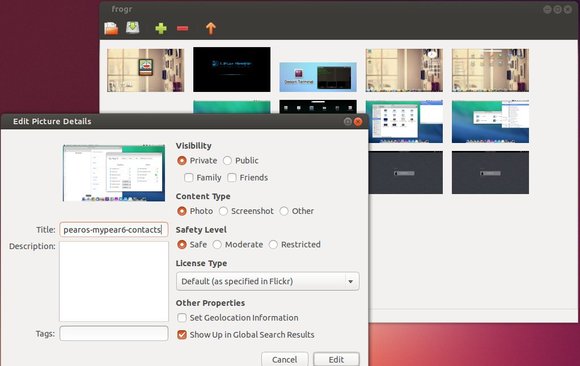
Frogr is a Gnome app allows to manage your accounts in the Flickr image hosting website. It supports all the basic Flickr features, including uploading pictures, adding descriptions, setting tags and managing sets and groups pools.
You see, the GUI is simple and very easy to use. Right click on an image file allows you to edit the picture details.
How to Install Frogr:
Frogr is available in Ubuntu Software Center by default, but the default versions are old. To install the latest version, press Ctrl+Alt+T to open terminal. When it opens, run below commands one by one:
This will install the app from its official PPA. So far, it supports Ubuntu 13.10, Ubuntu 13.04, Ubuntu 12.10, Ubuntu 12.04, Linux Mint, Elementary OS Luna.
The free and open source bittorrent client qBittorrent 3.1.5 has been release a few hours ago. Let’s see what’s new and how to install or upgrade to new version in Ubuntu 13.10, Ubuntu 13.04, Ubuntu 12.10, Ubuntu 12.04, Linux Mint and their derivatives.
qBittorrent 3.1.5 Mainly Fixed below bugs:
Fix compilation with Qt 4.7. Closes #1215.
Third attempt at fixing saving settings on OS shutdown.
Preview now correctly uses the selected file.
Allow to resize the columns in Add New Torrent dialog.
Ensure that at least one column in the tranferlist is always visible.
Ensure that the options window will always be placed onscreen.
Delete temporary files after they aren’t needed.
Correctly detect libtorrent version.
Various code cppcheck fixes
Remove isohunt search engine and update thepiratebay url
Fix rss settings corruption when checking regexp and going to other rule.