If you’ve using Ubuntu for a period of time, you may have old kernels that are no longer useful on your system. It may be annoying to have these kernel entries in Grub boot menu. So here’s how to remove the old kernels in Ubuntu 13.10 Saucy, Ubuntu 13.04 Raring.
The efficient way to do the job is using the Ubuntu Tweak, which lists all un-used kernels and gives an option at right-bottom corner to clean them up.
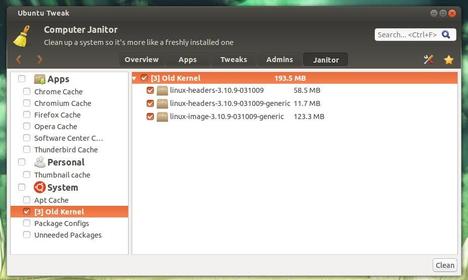
To install Ubuntu Tweak, download the DEB package in the right sidebar of this page. Then double-click to install via Ubuntu Software Center.
At the moment, Ubuntu Tweak is not ready for Ubuntu 13.10 Saucy. So below is the command line way:
1.) Press Ctrl+Alt+T to open terminal for running commands. Check current running kernel version.
uname -r
Don’t remove this kernel!
2.) Copy and paste below command and hit run to check list of installed Kernels on your system:
dpkg --list | grep linux-image
3.) Find out the kernels you want to remove, and run below command to accomplish it: Change x.x.x.x to the kernel version
sudo apt-get purge linux-image-x.x.x.x-generic