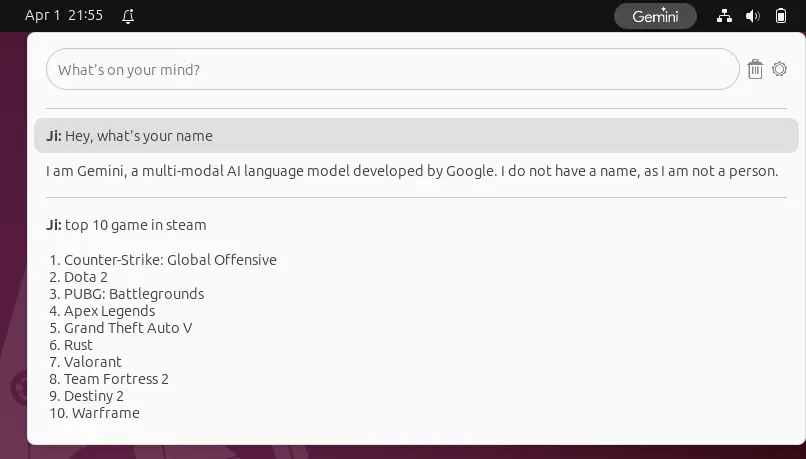
This simple tutorial shows how to install and setup SABnzbd, Usenet download tool, in Ubuntu 22.04 and Ubuntu 24.04.
SABnzbd is a free open-source program to download binary files from Usenet servers. Many people upload all sorts of interesting material to Usenet and you need a special program to get this material with the least effort.
The app makes Usenet as simple and streamlined as possible by automating everything. All you have to do is add an .nzb. SABnzbd takes over from there, where it will be automatically downloaded, verified, repaired, extracted and filed away with zero human interaction.
This is a step by step beginner’s guide shows how to install Telegram instant messaging app in Ubuntu 22.04 & Ubuntu 24.04.
The popular Telegram Messenger is available in most platforms. For Linux, it available as official tarball, universal Flatpak ans Snap packages. And, Ubuntu has third-party repositories to make it easy to keep updated.
So, as far as I know there are 4 ways to install the app in Ubuntu Linux. Choose any one that you prefer.
Scribus, the popular free open-source desktop publishing software, announced the new stable 1.6.x release series on the first day of 2024!
It’s been more than 4 years since the last stable 1.4.8, while 1.5.x release series is available as development branch.
The new Scribus 1.6 includes many new features! If you have the default 1.5.8 dev package from Ubuntu system repository, then most of them are already in use.
Features include:
Resource Manager for online resources such as dictionaries
canvas rendering improvements on Hi-DPI screens.
New commands added to scripting engine
New PDF-based output preview
Adobe® Illustrator® look like “Symbol” or clone feature.
This simple tutorial shows how to install the most recent xxHash for faster hash checking in Ubuntu Linux.
xxHash is extremely fast non-cryptographic hash algorithm, working at RAM speed limit. It can be useful to check integrity for large amounts of data, index data, and/or used in cryptographic applications like digital signatures.
The library includes the following algorithms:
XXH32 : generates 32-bit hashes.
XXH64 : generates 64-bit hashes.
XXH3/XXH128 (since v0.8.0): generates 64 or 128-bit hashes, using vectorized arithmetic.
I’m new to hash algorithm, but doing hash check regularly when trying out different Linux distributions. And I use sha256, since the most sites provide sha256sum files for the hash code of their disco images.
This is a step by step beginner’s guide shows how to install VS Code IDE and keep it up-to-date in Ubuntu 22.04, Ubuntu 23.04, Ubuntu 24.04 using 3 different ways.
Microsoft provides official code packages for Linux through native .deb (for Debian/Ubuntu), .rpm (for Fedora/SUSE), and universal Snap package run in sandbox.
For choice, there’s also a community maintained Flatpak package which also runs in sandbox.
So, there are 3 common ways to install this IDE in your Ubuntu Desktop!
Alacritty, is a free and open-source terminal emulator, written in Rust programming language. It works in Linux, Windows, MacOS, and uses OpenGL API for GPU hardware acceleration for fast response and high performance.
The terminal emulator features vi mode, allows to move around the viewport and scrollback using the keyboard. And, vi search and normal search for anything in the scrollback buffer.
Option 1: Install Alacritty via Snap package
For Ubuntu users, the easily way to install the terminal emulator is using the Snap package. It’s available in Ubuntu Software (App Center for 23.10), though run in sandbox.
Alacritty terminal emulator in App Center
Or, user can install it by running the command below in terminal:
snap install alacritty --classic
Option 2: Install Alacritty through Cargo (official)
The terminal emulator is also available to install through Cargo, the Rust package manager.
1. Just open terminal (Ctrl+Alt+T) and run command to install Cargo first:
sudo apt install cargo
2. Then, install the required dependency packages:
Next, open the Downloads folder, then either double click on the package or use right-click menu “Open With Other Application” and select open the .deb package you just downloaded via Software Install (or App Center). Finally, click install button to install it.
NOTE: The installing process may fail sometimes due to old package in your system, in the case, just uninstall the old one (go to bottom for how) then try to re-install again.
Once installed, search for and launch it either from start menu or ‘Activities’ overview depends on your desktop environment.
Step 2: Add VirtualBox repository to keep it up-to-date
The .deb package you installed via ‘Step 1’ used to automatically add the repository. However, it does NO longer do the trick in recent versions.
So, here’s how to do it step by step via the new Ubuntu PPA policy.
1. Download & install the key
First, press Ctrl+Alt+T on keyboard to open up a terminal window.
When it opens, run command to make sure “/etc/apt/keyrings” directory exist:
sudo mkdir -p /etc/apt/keyrings
Then, run command to use wget to download key, dearmor it (so unreadable), and finally save it to that directory:
You can finally verify the key file, by running command:
cat /etc/apt/keyrings/oracle-virtualbox-2016.gpg
As the screenshot above shows you, it should outputs unreadable text.
2. Add VirtualBox repository
Before adding the source repository, first run command to get system code name:
cat /etc/os-release
The apt repository so far only support Debian Stable (& old stable), Ubuntu 22.04 & 20.04 LTS (focal, jammy). For all their based systems, use the code-name you got via this command.
Then, in terminal window, run command to create & edit a sources file:
This simple tutorial shows how to install and setup the rEFInd boot manager in your Ubuntu 22.04, and/or Ubuntu 24.04 computer.
Most Linux uses Grub2 as default boot-loader. Though, there’s a good alternative called rEFInd. It’s a free open-source boot manager for EFI/UEFI enabled computers, such as all Intel-based Macs and recent (most 2011 and later) PCs.
rEFInd with Matrix theme
Why rEFInd:
Compare to Grub2, rEFInd has a more eye candy boot interface, and a simple and easy to tweak config file.
No need to update something, it auto-scans for all boot-able systems on every boot, and displays you the OS menu entries from both local disk and removable device, such as USB drive and CD-R.
It’s more reliable at booting Windows with Secure Boot active. And, it provides handy options to shutdown, restart, and/or go to BIOS settings.
How to Install rEFInd:
The boot manager is quite easy to install in Debian, Ubuntu, and Linux Mint, since it’s available in system repositories.
1. First, launch terminal (press Ctrl+Alt+T on keyboard) and run command to verify if UEFI enabled on your machine:
ls /sys/firmware/efi
The command will list content of ‘/sys/firmware/efi‘. It will show you No such file or directory, if UEFI not enabled.
2. To install rEFInd from system repository, simply run command:
sudo apt install refind
The package in system repository may be old. To install the most recent version, use the official PPA maintained by software developer.
Run command to add the PPA:
sudo add-apt-repository ppa:rodsmith/refind
Update system package index:
sudo apt update
Finally, re-run apt install command to install the package:
sudo apt install refind
Remove duplicate icons in boot menu
After installing rEFInd, you can now restart your machine to see the new boot menu.
In menu, use left/right arrow keys to switch menu entries, hit Enter to boot, or press Tab (or F2) for more options.
For duplicate icons issue, simply use left/right arrow to select the icon (menu entry), and hit Delete key on keyboard, finally answer yes to remove that icon (menu entry). Though, deleting icon may NOT work when 3rd party theme is in use.
Install Themes
The menu interface is easy to tweak by editing the refind.conf file under “/boot/efi/EFI/refind/” directory. Every option has description text telling what does it do and how it works.
Most themes have how to install steps in Readme file, they are usually:
Open “Files”, and navigate to “Other Location -> Computer (or system, root, etc) -> boot -> efi -> EFI -> refind”. (Some Desktop may need to open File Manager as root first!)
Create “themes” folder in that directory if not exist.
Drag and drop the themes you downloaded (extract & re-name first) into that “themes” folder.
Finally, apply new theme by editing the refind.conf file under “/boot/efi/EFI/refind/“, and adding new line in the end (replace rEFInd-glassy accordingly):
include themes/rEFInd-glassy/theme.conf
NOTE: the theme folder name, rEFInd-glassy in the case, is unique according to the PATH to icons/imgs in ‘theme.conf’ file.
In case the boot menu screen resolution is low, you may also add (or uncomment by removing #) resolution max line to set the maximum available resolution, or use resolution 1024 768 for certain resolution (Note that not all resolutions are supported).
Uninstall:
To uninstall refind in Debian and Ubuntu based systems, open terminal and run command:
sudo apt remove --autoremove refind
Also remove the PPA (if added) by running command:
This simple tutorial shows how to install Chatterino, a Twitch Chat app with enhanced features, in Ubuntu 22.04, 20.04, 23.10 via PPA.
Chatterino is a free and open-source chat app for Twitch.tv. With it, you can connect as many channels as you like to, either in tabs or in single tab side-by-side.
The client supports features, such as Chat Replies by right-clicking a message and choose “Reply to message”.
Left clicking a user will open dialog for user info, message history, as well as buttons to block, ignore highlight, etc. And, right-click on user allows to @ mention him/her in message.
It supports emotes from BetterTTV, FrankerFaceZ, and 7TV, allows to drag’n’drop image or paste image from clipboard to upload to custom service, such as imgur.com, though not enabled by default.
Other features include:
Hotkeys (customizable)
Link preview (not enabled by default)
Ignore or highlight messages
Search, filters, regular expressions
And more.
How to Install Chatterino via Ubuntu PPA
The app provides Windows .exe, macOS .dmg, Ubuntu .deb and Linux .AppImage packages for downloading in its Github releases page.
For Ubuntu/Linux Mint users, the official PPA is a better choice to keep the app up-to-date. Which, so far supports Ubuntu 20.04, Ubuntu 22.04, Ubuntu 23.04, & Ubuntu 23.10 on amd64 (Intel/AMD) and arm64/armhf (Apple M1/M2, Raspberry Pi) devices.
1. First, press Ctrl+Alt+T on keyboard to open terminal. Then, run command to add the PPA:
Type user password (no asterisk feedback) when it asks and hit Enter to continue.
2. Then, run command to install the chat client:
sudo apt install chatterino
Linux Mint user needs to run sudo apt update first to refresh system package cache.
After installation, you can launch the app from start menu, app grid, or Gnome overview depends on your desktop environment. And, use “Software Updater” (Update Manager) to receive updates.
Then, you can join Twitch channel by their names (the part after www.twitch.tv/ in channel URL). And, see the wiki for more usage.
Uninstall:
To uninstall the Twitch chat app, simply open terminal (Ctrl+Alt+T) and run command:
sudo apt remove --autoremove chatterino
Also remove the Ubuntu PPA, either by running command in terminal:
Darkable, the popular photography app and raw developer, released new major 4.6.0 version a day ago!
The new release introduced auto-save feature for editing history. By default, it save changes every 10 seconds. User can go to ‘Preferences -> storage‘ to change the time interval, or set it to 0 to disable it.
Darktable 4.6.0 also features new rgb primaries processing module. It allows delicate color corrections and creative color grading, by moving the red, green and blue primary colors around using “hue” and “purity” controls.
Darktable 4.6.0
The release also has a big performance improvements. OpenCL is now initialized in the background to speed up the app launching. Image display speed in the map view has been increased by 25%. And, the chromatic aberrations module is now approximagely 10% faster when run on the CPU.
Other changes in Darktable 4.6.0 include:
sigmoid module now includes a new primaries section, to gracefully handle difficult lighting situations (e.g. LEDs) and tune the overall look of the image
The full uncropped image is now always shown when working with the liquify and retouch modules.
The hot pixels module now supports monochrome images.
long-running import session can now be canceled.
built-in “Display P3” color profile
And much more! See the official release note for details
How to Install Darktable 4.6.0 in Ubuntu Linux
Option 1: Snap
Darktable is easy to install as Snap package, which runs in sandbox, using Ubuntu Software (or App Center for 23.10).
Option 2: Official deb package
The developer team offers official RPM and DEB packages for Debian, Fedora, Ubuntu, openSUSE, through the OBS building repository.
Also, it’s NOT updated to v4.6.0 at the moment of writing. Keep an eye on this page if you prefer the official package.
Option 3: Flatpak package
Darktable is also available to install as Flatpak package, another universal Linux package format runs in sandbox!
Linux Mint 21 user can directly search for and install the Flatpak package from Software Manager.
While, Ubuntu user can open terminal (Ctrl+Alt+T) and run the 2 commands below one by one to install the Flatpak:
Besides using the official DEB package (See Option 2), I’ve also upload the package into this unofficial PPA for Ubuntu 22.04, Ubuntu 23.04, and Ubuntu 23.10.
NOTE: The PPA includes updated libheif (1.16.2) library for Darktable to support HEIF in Ubuntu 22.04. Please report if it’s running into conflict with other packages in your system!!
1. First, press Ctrl+Alt+T on keyboard to open terminal. When it opens, run command to add PPA:
2. Linux Mint needs to update system package cache manually after adding PPA:
sudo apt update
3. Finally, install Darktable 4.6.0 via command:
sudo apt install darktable
In addition for old Ubuntu 20.04, 18.04, & 16.04, keep an eye on this PPA. However, it has tons of updated libraries that MAY run into dependency hell and/or package conflict!
Uninstall Darktable
Depends on which package your installed, remove Darktable via one of the commands below:
For Snap package, just remove it from Ubuntu Software.