The free and open source bittorrent client qBittorrent 3.1.5 has been release a few hours ago. Let’s see what’s new and how to install or upgrade to new version in Ubuntu 13.10, Ubuntu 13.04, Ubuntu 12.10, Ubuntu 12.04, Linux Mint and their derivatives.
qBittorrent 3.1.5 Mainly Fixed below bugs:
Fix compilation with Qt 4.7. Closes #1215.
Third attempt at fixing saving settings on OS shutdown.
Preview now correctly uses the selected file.
Allow to resize the columns in Add New Torrent dialog.
Ensure that at least one column in the tranferlist is always visible.
Ensure that the options window will always be placed onscreen.
Delete temporary files after they aren’t needed.
Correctly detect libtorrent version.
Various code cppcheck fixes
Remove isohunt search engine and update thepiratebay url
Fix rss settings corruption when checking regexp and going to other rule.
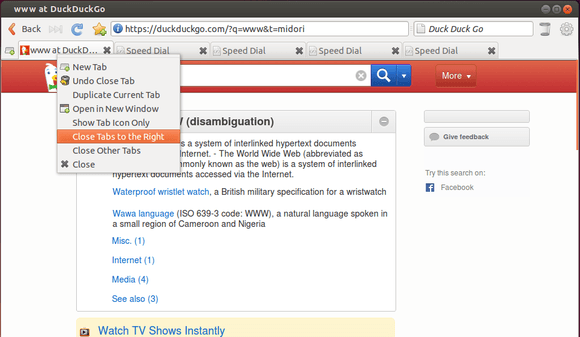
Midori, the lightweight, fast, and WebKit based web browser now is at version 0.5.7. As you may know, Midori is also the default web browser of the beautiful elementary OS.
In the new release you’ll find that the session management gets smarter about reacting to crashes by not loading the faulty website and running commands on the command line properly. Private browsing has also benefited from some bug fixing, such as not wrongly attempting to load favicons from disk and enabling the sidepanel.
There’s also a small new feature in Midori 0.5.7: Close Tabs to the Right, which may be useful for those who are opening too many tabs.
See the changelog:
Modify actions and internal items in browser without changing settings
Delay tab loading after Midori crashed
Uncomment failing assertions about view_source in tab test
Fallback to about:home if startup is anything but blank
Don’t try to create formhistory database if config_dir is NULL
Handle url arguments for blank sessions
Execute commands given at start time
Introduce high-level prepare/ DatabaseStatement API
Drop unused GraniteClutter-based animation support
Drop uncommented contractor support
Drop deprecated StaticNotebook used in KatzePreferences
Introduce notebook class converging separate implementations
Work around symbol relocation issue old version of gcc present on Ubuntu LTS
NULL-check treeview in midori_search_action_get_editor
Adjust CMakeList .ico check to not skip nojs icons
Enable sidepanel in private mode
Move Preferences menu entry above About
Set minimum value of 0 on spin button for maximum cache size
Give NextForward its own label for toolbar editor
Correctly disable favicon database in app and private mode
Change preferences to refer to proxy address as a “URI” (not “hostname”)
Add close tabs to right feature
Allow printing without confirmation dialog on kiosk setups
Install Midori Browser:
It’s easy to install / upgrade to this release in Ubuntu 14.04, Ubuntu 13.10, Ubuntu 13.04, Ubuntu 12.10, Ubuntu 12.04, Linux Mint and Elementary OS Luna.
Press Ctrl+Alt+T on keyboard to open terminal. When it open, run below commands one by one:
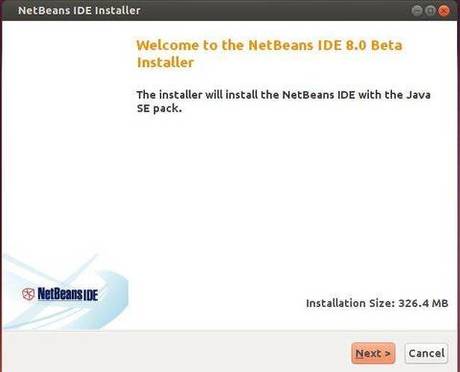
NetBeans IDE 8.0 Beta has been released recently. The new release provides out-of-the-box code analyzers and editors for working with the latest Java 8 technologies–Java SE 8, Java SE Embedded 8, and Java ME Embedded 8. The IDE also has a range of new enhancements that further improve its support for Maven and Java EE with PrimeFaces; new tools for HTML5, in particular for AngularJS; and improvements to PHP and C/C++ support.
This simple tutorial will show you how to install NetBeans IDE 8.0 Beta in Ubuntu and other Linux distributions.
The Long Term Support Linux Kernel 3.10 now is at its 27th updates. Greg Kroah-Hartman announced this release on January 15 and urged users of this Kernel series to upgrade as soon as possible.
Linux Kernel 3.10.27 is a small release which brings various improvements to x86, ARM architectures and some network fixes. See the changelog for details.
Install / Upgrade Kernel 3.10.27:
The Ubuntu Kernel Team has made the DEB packages available in this page. If you’re comfortable with Linux commands, follow the below steps to download & install them.
1. Press Ctrl+Alt+T on keyboard to open terminal and run commands to download the DEBs:
For 32 bit system:
cd /tmp/ && wget http://kernel.ubuntu.com/~kernel-ppa/mainline/v3.10.27-saucy/linux-headers-3.10.27-031027-generic_3.10.27-031027.201401151935_i386.deb

wget http://kernel.ubuntu.com/~kernel-ppa/mainline/v3.10.27-saucy/linux-headers-3.10.27-031027_3.10.27-031027.201401151935_all.deb

wget http://kernel.ubuntu.com/~kernel-ppa/mainline/v3.10.27-saucy/linux-image-3.10.27-031027-generic_3.10.27-031027.201401151935_i386.deb
For 64 bit system:
cd /tmp/ && wget http://kernel.ubuntu.com/~kernel-ppa/mainline/v3.10.27-saucy/linux-headers-3.10.27-031027-generic_3.10.27-031027.201401151935_amd64.deb

wget http://kernel.ubuntu.com/~kernel-ppa/mainline/v3.10.27-saucy/linux-headers-3.10.27-031027_3.10.27-031027.201401151935_all.deb

wget http://kernel.ubuntu.com/~kernel-ppa/mainline/v3.10.27-saucy/linux-image-3.10.27-031027-generic_3.10.27-031027.201401151935_amd64.deb
2. Install the Kernel:
cd /tmp/ && sudo dpkg -i linux-headers-3.10.27-*.deb linux-image-3.10.27-*.deb
Restart your computer and done.
If you’re using a proprietary video driver, you may need to re-build or re-install to get it work with the new kernel.
If for some reason this kernel release doesn’t work properly for you, reboot into previous kernel (Grub -> Advanced -> select previous kernel) and run commands to remove Linux Kernel 3.10.26:
The latest Linux Kernel 3.12.8 has been announced a few hours ago. According to the changelog, Kernel 3.12.8 is a small release that mainly brings improvements to x86, ARM architectures, as well as some network fixes.
All users of the 3.12 kernel series are urged to upgrade this kernel as soon as possible and here’s how to do it in Ubuntu 13.10, Ubuntu 13.04, Ubuntu 12.04, Ubuntu 12.10, Linux Mint and their derivatives.
Install / Upgrade Kernel 3.12.8:
Ubuntu Kernel Team has made the DEB packages which are available in this page. If you’re comfortable with command line, follow below steps to download & install them.
1. Download the Kernel Debs:
For 32 bit system, open terminal by Ctrl+Alt+T and run below commands:
cd /tmp/ && wget http://kernel.ubuntu.com/~kernel-ppa/mainline/v3.12.8-trusty/linux-headers-3.12.8-031208-generic_3.12.8-031208.201401151952_i386.deb

wget http://kernel.ubuntu.com/~kernel-ppa/mainline/v3.12.8-trusty/linux-headers-3.12.8-031208_3.12.8-031208.201401151952_all.deb

wget http://kernel.ubuntu.com/~kernel-ppa/mainline/v3.12.8-trusty/linux-image-3.12.8-031208-generic_3.12.8-031208.201401151952_i386.deb
For 64 bit system:
cd /tmp/ && wget http://kernel.ubuntu.com/~kernel-ppa/mainline/v3.12.8-trusty/linux-headers-3.12.8-031208-generic_3.12.8-031208.201401151952_amd64.deb

wget http://kernel.ubuntu.com/~kernel-ppa/mainline/v3.12.8-trusty/linux-headers-3.12.8-031208_3.12.8-031208.201401151952_all.deb

wget http://kernel.ubuntu.com/~kernel-ppa/mainline/v3.12.8-trusty/linux-image-3.12.8-031208-generic_3.12.8-031208.201401151952_amd64.deb
2. Install the DEBs:
cd /tmp/ && sudo dpkg -i linux-headers-3.12.8-*.deb linux-image-3.12.8-*.deb
Restart your computer and done.
If you’re using a proprietary video driver, you may need to re-build or re-install to get it work with the new kernel.
If for some reason this kernel release doesn’t work properly for you, reboot into previous kernel (Grub -> Advanced -> select previous kernel) and run commands to remove Linux Kernel 3.12.7:
GNOME image viewer and browser utility gThumb 3.3.1 has been released recently, which is the first release of the development series that will lead to the next major version 3.4.
gThumb 3.3.1 contains below new features and user visible changes:
Use a GtkHeaderBar instead of a menu and a toolbar.
Use the dark theme.
Better raw image support, using libraw instead of libopenraw.
Image viewer: show a frame around the image; use an overview window to scroll the image instead of the scrollbars;
better quality for zoomed out images.
Faster image loader for big images.
Media player: hide the mediabar after a timeout.
Filterbar: added buttons to view the selections.
File properties: show only the basic properties, allow to
show all of them.
Image tools: use a grid layout for the buttons
Use a separate dialog for the file tool options.
Use symbolic icons everywhere.
Added a custom tiff loader.
Add a rating-based filter. (Louis-Marie Mouton)
App menu: removed ‘keyboard shortcuts’.
Histogram view: save and restore the scale type.
It also fixed below bugs:
Help: fix calling help from withing the application. (Dominique Leuenberger)
Fixed saving of TGA files
Fixed the video player stopping after saving a screenshot.
Rotating image destroys XMP and IPTC metadata
Command line ignored for the second window
Empty Options dialog after Canceling it once
Buttons with label toolbutton1 and toolbutton2 in Bookmark window
Default parameters for image resizing are misleading (Christian Krause)
Fixed broken window layout with gtk+ 3.10
Find duplicates: fixed crash when using a predefined directory (Christian Krause)
gThumb crashes when attempting to play a video. (Christian Krause)
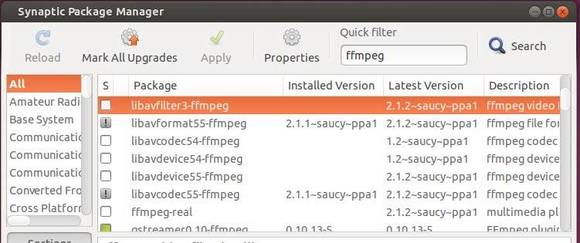
This tutorial is going to show you how to install the latest version of FFmpeg, so far it’s FFmpeg 2.1.2, in Ubuntu, Linux Mint and their derivatives via PPA.
FFmpeg is a complete, cross-platform solution to record, convert and stream audio and video. 2.1.2 was released on 2014-01-13. It is the latest stable FFmpeg release from the 2.1 release branch, which was cut from master on 2013-10-28. Amongst lots of other changes, it includes all changes from ffmpeg-mt, libav master of 2013-10-27, libav 9 as of 2013-10-27.
Sam Rog has been maintaining the most recent FFmpeg packages in his PPA for Ubuntu, Linux Mint and their derivatives. The PPA is trustable and so far it supports Ubuntu 14.04, Ubuntu 13.10, Ubuntu 13.04, Ubuntu 12.10.
To add the PPA, press Ctrl+Alt+T on keyboard to open terminal. When it open, run below command:
sudo add-apt-repository ppa:djcj/vlc-stable
Then you can check for updates via Synaptic Package Manager. Or just run below commands instead:
This simple tutorial is going to show you how to install and apply the latest Faenza icon theme in Ubuntu 14.04 while the PPA is not available yet.
It’s pretty easy to install an icon theme on Ubuntu Linux. Because Ubuntu stores icons in /usr/share/icons for global and user’s .icons folder for single use, all you need to do is put your icon theme folder into one of previous location and that’s it.
To install Faenza icons:
1. Download the latest package at Google Code. So far, it is Faenza 1.3.
2. Extract the package and you’ll see Faenza-Radiace, Faenza-Darkest, Faenza-Darker, Faenza-Dark, Faenza-Ambiance and Faenza packages.
3 Unpack all of them and move the result folders to:
For single use, move them to .icons folder. Under your home folder, press Ctrl+H to view/hide hidden folders. Create one if .icons is not exist.
For global use, move them to /usr/share/icons/ folder. You’ll need to press Alt+F2 and run gksudo nautilus to open file browser with root to do copy and paste things.
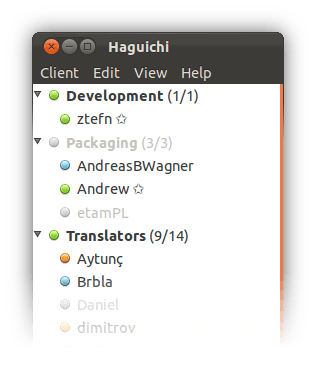
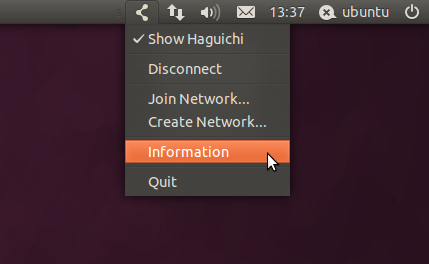
Haguichi is a graphical frontend for LogMeIn Hamachi on Linux. It is free and open source software licensed under GPLv2. Haguichi 1.0.23 has been released on January 11th, 2014.
Improved internet connection check by using netcat and web request as fallback if ping fails (fixes bug #1258361).
Wait for internet connection cycle is now using a separate thread.
Configuration folder is now always opened in the default file manager.
Added stock icons to open and save configuration menu items.
Added scrollbar policy to the commands editor in the preferences dialog.
Added complete Asturian translations (thanks to Tornes Llume).
Updated Bulgarian translation.
Other minor fixes, improvements and optimizations.
Install Haguichi:
Haguichi is available in Launchpad PPA for Ubuntu 14.04, Ubuntu 13.10, Ubuntu 13.04, Ubuntu 12.10, Ubuntu 12.04, Ubuntu 10.04, Linux Mint and their derivatives.
To add the PPA, press Ctrl+Alt+T on keyboard to open terminal. When it opens, paste below code and hit enter:
Nvidia Driver for Linux 331.38 has been released on January 13 with OpenGL promotion, bug fixes and other improvements. Here’s how to install it in Ubuntu 14.04, Ubuntu 13.10, Ubuntu 12.04 and Linux Mint.
Before getting started, let’s take a look at what’s new in Nvidia 331.38:
Fixed a bug that caused the X server to crash if video memory is exhausted and the GPU does not support rendering to system memory.
Updated nvidia-installer to make the –multiple-kernel-modules option imply the –no-unified-memory option: Unified memory is incompatible with multiple kernel modules.
Updated the behavior of the nvidia-settings PowerMizer Preferred Mode drop-down menu, to make the setting apply consistently across all GPUs in an SLI group.
Improved the robustness of the NVIDIA X driver in scenarios where GPU-accessible memory for allocating pixmaps was exhausted.
Added NV-CONTROL attributes to control the brightness of the illuminated logos on certain graphics boards.For example, to turn off the illumination of the “GEFORCE GTX” lettering on the GeForce GTX 780, use
nvidia-settings –assign GPULogoBrightness=0
Fixed a bug that prevented screen transformations from being applied properly when starting X.
GLX protocol for the following OpenGL extensions from OpenGL 2.1 and OpenGL 3.0 have been promoted from unofficial to ARB approved official status:
GL_ARB_pixel_buffer_object
GL_NV_conditional_render
GL_ARB_map_buffer_range
GL_EXT_texture_integer
GL_ARB_vertex_array_object
GL_ARB_pixel_buffer_object was the last piece of protocol needed to have official support for indirect rendering with all OpenGL 2.1 commands.
GLX Protocol for the miscellaneous OpenGL 3.0 commands not associated with specific extensions has also been promoted from unofficial to ARB approved status.
Deprecated display mask related configuration of display devices via NV-CONTROL and nvidia-settings.Display target specifications should be used instead – A display target is one of the display’s valid names, with an optional GPU or X screen qualifier.
Deprecated the following NV-CONTROL attributes:
NV_CTRL_CONNECTED_DISPLAYS
NV_CTRL_ENABLED_DISPLAYS
NV_CTRL_ASSOCIATED_DISPLAYS
NV_CTRL_NOTEBOOK_INTERNAL_LCD
NV_CTRL_FRAMELOCK_MASTER
NV_CTRL_FRAMELOCK_SLAVES
NV_CTRL_FRAMELOCK_MASTERABLE
NV_CTRL_FRAMELOCK_SLAVEABLE
Also, although NV_CTRL_PROBE_DISPLAYS is still operational, the return value has been deprecated and should not be used.
Added deprecation warning messages in nvidia-settings when deprecated attributes are used.This also includes display mask usage.
Download & Install Nvidia Driver 331.38
The official installer is available for downloading at this page.
If you’re not sure your system type, press Ctrl+Alt+T to open terminal and run:
uname -m
You can also run below command to download the Nvidia installer:
For 32 bit (x86):
cd && wget us.download.nvidia.com/XFree86/Linux-x86/331.38/NVIDIA-Linux-x86-331.38.run
For 64 bit (x86_64):
cd && wget us.download.nvidia.com/XFree86/Linux-x86_64/331.38/NVIDIA-Linux-x86_64-331.38.run
Now start the installer via below steps:
0. Remove previous proprietary driver if any:
sudo apt-get purge nvidia-current
1. Press Ctrl+Alt+F1 to switch to command console. Login with your username and password.
2. Stop the graphic session by:
sudo service lightdm stop
You may change the lightdm to gdm or mdm if you’re using Ubuntu Gnome or Linux Mint.
3. Make the installer executable:
chmod +x NVIDIA-Linux-*-331.38.run
4. Finally start the installer and follow the on screen prompts:
sudo sh NVIDIA-Linux-*-331.38.run
You may keep the installer file so that you can remove this driver via below command if for some reason this driver does not work properly:
sudo sh NVIDIA-Linux-*-331.38.run --uninstall
You may also add blacklist nouveau to a file in /etc/modprobe.d/ if you get blank screen after installed the new driver.