Linux Mint 17 Qiana, a long term support release which will be supported until 2019, is finally available for download for both the Cinnamon and the MATE flavors.
Linux Mint 17 “Qiana” is based on Ubuntu 14.04 Trusty Tahr LTS and all future Mint releases will be based only on Ubuntu LTS.
The first flavors released are Cinnamon and MATE and the ISOs come before the official announcement, available for download at Irish mirror:
The official announcement is coming soon, be sure to check out release details at LinuxMint.com
Linux Mint 16 “Petra” KDE & Xfce has been released on 22 Dec. Both releases feature Xfce 4.10 / KDE 4.11, MDM 1.4, a Linux kernel 3.11 and an Ubuntu 13.10 package base. Let’s see what’s NEW in these two release and how to upgrade from a previous version of Linux Mint.
Are you still using Linux Mint 13 Maya? Well, there’s a good news! Linux Mint developer has made a few backports from Petra to Maya. Which means you can now upgrade to MDM 1.4, Cinnamon 2.0 or MATE 1.6, and the latest versions of mintwelcome, mintstick, mintnanny, mintupload, mintupdate, mintinstall, mintsystem, mintmenu, and mintdesktop in Mint 13 Maya from the Mint backport repository.
To get started:
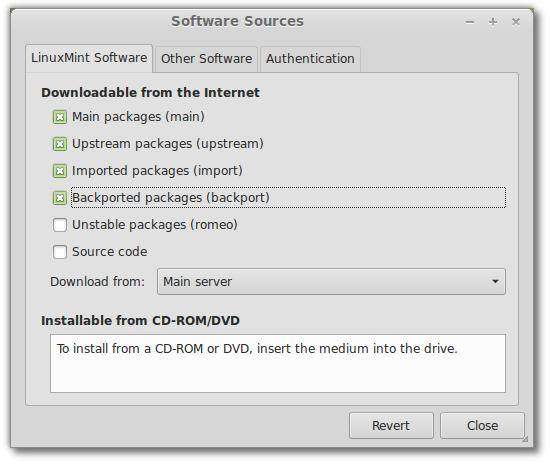
1. Open up Software Sources from start menu. In the first tab, check the box which says “Backported packages (backport)”
2. Launch the Update Manager from Menu. After checking for updates (Update Manager do it automatically), you’ll see a list of available updates, including Cinnamon 2.0 or MATE 1.6, MDM 1.4 and other latest packages.
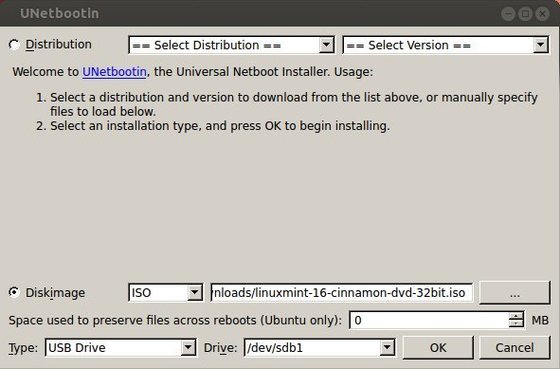
a. Insert 2GB+ USB and format it into FAT32 (DON’T check the “quick format” box).
b. Download Unetbootin, which allows you to create bootable Live USB drives for Ubuntu, Fedora, and other Linux distributions without burning a CD.
c. Open Unetbootin, choose the downloaded image file and click OK to start burning.
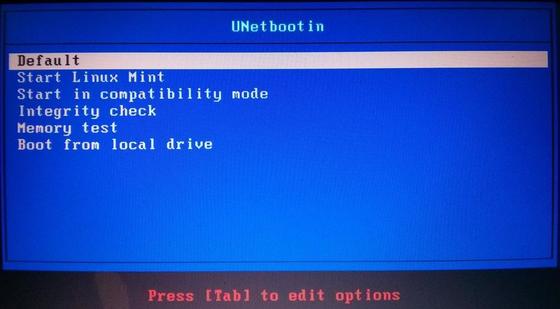
d. Once done, in BIOS choose to boot with USB. You’ll see the screen below:
3. Install Linux Mint 16 from USB:
In previous boot screen choose “Start Linux Mint”. When system boots up, click “Install Linux Mint” icon on Desktop to bring up install wizard and then you can follow this step by step guide to install Linux Mint.
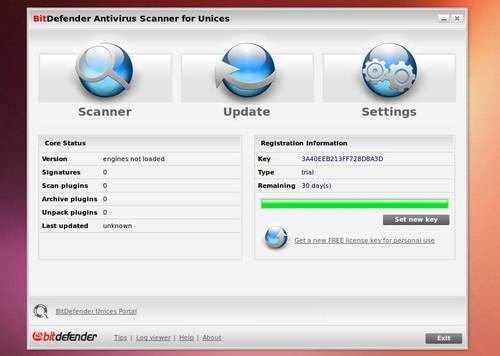
This tutorial shows how to install BitDefender Antivirus Scanner in Ubuntu 13.10 Saucy or Linux Mint 16 Petra from bitdefender repository.
Bitdefender is an antivirus software suite developed by Romania-based software company Softwin. You can use the Free Edition on Ubuntu Linux to scan remove devices and ntfs partitions.
Tutorial Objectives:
Install BitDefender Scanner in Ubuntu 13.10 or Linux Mint 16
Enjoy!
To get started, press Ctrl+Alt+T on your keyboard to open terminal. When it opens, run commands to add BitDefender repository for Linux:
sudo sh -c 'echo "deb http://download.bitdefender.com/repos/deb/ bitdefender non-free" >> /etc/apt/sources.list.d/bitdefender.list'
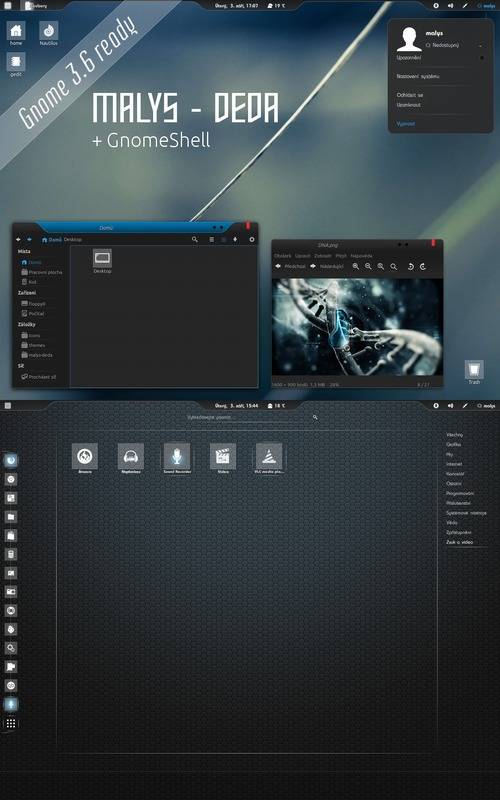
This tutorial shows you how to install the beautiful Malys-Deda GTK Theme in Ubuntu 13.04, Ubuntu 12.10, Ubuntu 12.04 and Linux Mint.
The installation is very easy, just download the theme and put the extracted folder to themes folder and finally you can apply it via gnome tweak tool or unity tweak tool. Follow the steps below to get started:
1.) Open Ubuntu Software Center, search for and install gtk3-engines-unico or gtk2-engine-pixbuf
Have a HP printer connected with your Ubuntu machine? Well, here’s how to install HP Linux Printer Driver in Ubuntu 13.10 Saucy, Ubuntu 13.04 Raring, Linux Mint and Elementary OS.
HP Linux Printer Driver (HPLIP) is an HP developed solution for printing, scanning, and faxing with HP inkjet and laser based printers in Linux.
The HPLIP project provides printing support for over 2,080 printer models–including; Deskjet, Officejet, Photosmart, PSC (Print, Scan, Copy), Business Inkjet, LaserJet, Edgeline MFP, and LaserJet MFP.
The latest HPLIP 3.13.9 added Support for the Following New Printers:
HP Designjet Z5400 44-in PostScript ePrinter
HP Deskjet Ink Advantage 1018 Printer
HP Deskjet Ink Advantage 1518 All-in-One Printer
HP Deskjet Ink Advantage 2540 All-in-One Printer Series
HP Deskjet Ink Advantage 2545 All-in-One Printer
HP Deskjet Ink Advantage 2546 All-in-One Printer
HP DeskJet Ink Advantage 4515 e-All-in-One Printer
HP DeskJet Ink Advantage 4518 e-All-in-One Printer
HP Envy 4504 e-All-in-One
HP LaserJet Pro MFP M435nw
HP Officejet 4630 e-All-in-One
HP Officejet 4632 e-All-in-One Printer
HP Officejet 4635 e-All-in-One Printer
HP OfficeJet Pro 8600 Premium e-AiO N911n
HP Photosmart 5521 e-All-in-One Printer
Download & Install HP Linux Printer Driver
Press Ctrl+Alt+T on your keyboard to open terminal. When it opens, run below command to download hplip 3.13.9:
cd ~/Downloads && wget http://prdownloads.sourceforge.net/hplip/hplip-3.13.9.run
Or you can check out the latest version on this page.
Once downloaded, execute command to start the installation:
sh ~/Downloads/hplip*.run
Answer the questions and wait for the installing process. It’ll properly install & configure the driver for your printer. When done, you can open the HP device manager from the panel indicator. Enjoy!
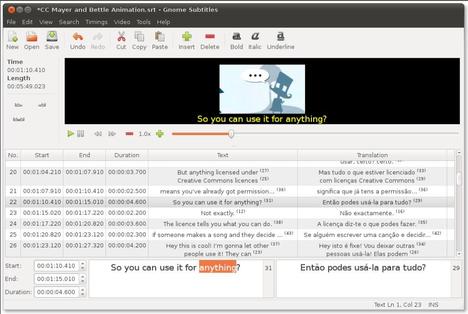
Gnome Subtitles is a subtitle editor for the GNOME desktop (also works in Unity). It supports the most common text-based subtitle formats, video previewing, timings synchronization and subtitle translation.
Some supported subtitle formats are: Advanced Sub Station Alpha, FAB Subtitler, MicroDVD, Mplayer 1/2, MPSub, SubRip, SubViewer 1/2.
The latest version has reached 1.3 which allows to set the gap between subtitles, to be used when inserting or splitting subtitles. Also there are a lot of bug fixes and other improvements.
Install Gnome Subtitles 1.3 via PPA
For Ubuntu 13.04, Ubuntu 12.04, Ubuntu 12.10 and their derivatives, such as Linux Mint and Elementary OS. Press Ctrl+Alt+T and run below commands one by one in pop-up terminal:
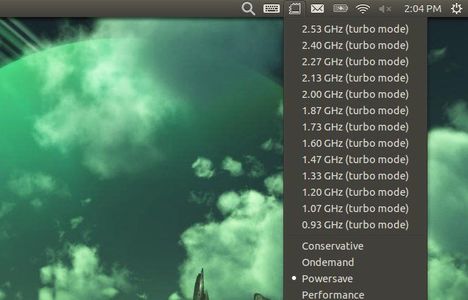
This simple tutorial shows you how to easily change the CPU frequency via indicator applet in Ubuntu 13.10, Ubuntu 13.04, Ubuntu 12.10, Ubuntu 12.04 and their derivatives, such as Linux Mint and Elementary OS.
Indicator-freq is an applet for displaying and change cpu frequency on the fly. Also it allows to choose powersaving mode to save power.
To install this indicator, open Ubuntu Software Center and search for and install the indicator-cpufreq package.
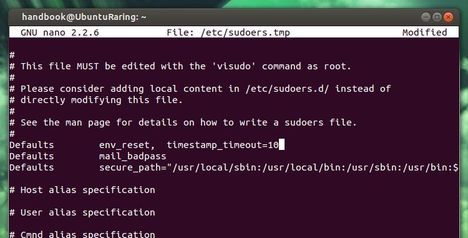
As you may know, when you’re running commands in terminal with sudo at beginning, you have to enter user password to get past. Within a certain time, you don’t need to enter the password again to run another sudo command.
The default timeout is about 5 minutes, here’s how to change it in Ubuntu 13.10, Ubuntu 13.04, Linux Mint and Elementary OS.
To get started, press Ctrl+Alt+T on your keyboard to open terminal. When it opens, run below command to edit the config file:
sudo visudo
Use the arrow keys to scroll down and find out below line:
Defaults env_reset
Change it into:
Defaults env_reset, timestamp_timeout=10
Replace 10 with other number of minutes as you want.
After that, press Ctrl+X and followed by Y to save the changes.