Archives For November 30, 1999

A Virtual Private Network (VPN) connection is an encrypted connection to a server. When you connect to a VPN server and type in a web address, the request is sent via an encrypted signal to the VPN server which then sends you back the web page.

Establishing a VPN connection will keep your ISP or government from recording your browsing history. It can also be used to visit sites that your network administrator has blocked (in some countries like China youtube is blocked). An OpenVPN connection is the most secure type of VPN, because not only is the connection encrypted by
a password, but also by three certificates.

There are many places online that sell VPN services. In this tutorial, I will use vpnbook.com’s service, because it is completely free, and runs entirely off donations.

PART 1: Get A Free OpenVPN Account

Please skip this part if you already have a VPN server set up.

1. Open up your web browser or just click the link to go to www.vpnbook.com.

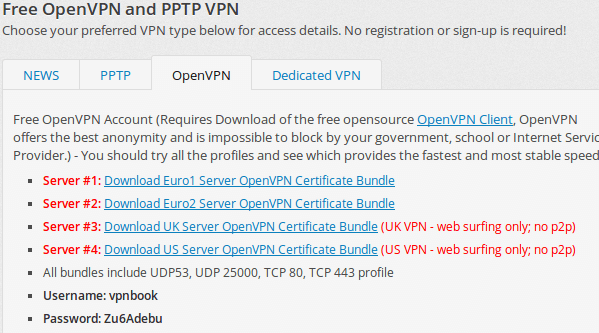
2. Scroll down and click on the tab that says OpenVPN (as the picture shown below). Download one of the certificate bundles and also remember the username and password.

Download OpenVPN Account

3. Decompress the downloaded package. Create 3 new empty text files in the result folder and called them: ca.crt, certificate.crt, key.key.

4. Open up one of the .ovpn files (All of the .ovpn files are the same, but with different configurations.) with gedit text editor, here I use vpnbook-us1-tcp443.ovpn as example.

5. In the .ovpn file, do following copy and paste things and finally save the changes.

Copy everything between <ca> </ca> tags and paste into ca.crt file.

Copy everything between <cert> </cert> tags and paste into certificate.crt file.

Copy everything between <key> </key> tags and paste into key.key file.

PART 2: Setup OpenVPN connection:

1. Press Ctrl+Alt+T on keyboard to open the terminal. When it opens, run the command below to install VPN plugin for network manager:

sudo apt-get install network-manager-openvpn

2. Go to system area network icon -> VPN Connections -> Configure VPN:

3. Click the Add button in next window and choose OpenVPN in drop-down menu as the connection type.

4. Now in VPN editing window, type in:

Connection name: type a name as you want
Gateway: the IP address in the vpnbook-us1-tcp443.ovpn file.
Type: Password with Certificates (TLS)
Username: see the picture under PART 1 -> step 2.
Password: see the picture under PART 1 -> step 2.
User Certificate: choose the certificate.crt file.
CA Certificate: choose the ca.crt file.
Private Certificate: choose the key.key file.
Private Key Password: leave it empty.

5. NOTE: Advanced settings depend on the .ovpn file you selected in PART 1 (step 4), find the ip, port, cipher and so forth at the top of .ovpn file

Click the Advanced button. Check the boxes which say:

Use custom gateway port: 443
Use LZO data compression
Use a TCP connection

Under Security tab, set Cipher to AES-128-CBC

6. When everything is done, connect to the VPN from network menu:

You’re connected to the VPN if you see this message:

Enjoy!
Install Miro 6 in Ubuntu 14.04 via PPA

Last updated: October 24, 2014

Miro, formerly named Democracy Player or DTV, is an audio, video player and Internet television application. It integrates an RSS news aggregator and podcatcher, a BitTorrent client (based on libtorrent), and xine media player (or GStreamer) under Linux.

Miro is free software, released under the terms of the GNU General Public License. While Ubuntu repositories still have Miro 4, the latest release has reached Miro 6 which brings flash support for Linux and big speed improvements for launching the app, navigating, downloading, etc.

Install Miro 6 in Ubuntu 14.04:

I’ve made the packages for Miro 6 into my PPA, available for Ubuntu 14.04 Trusty Tahr. To install it, follow the steps below:

UPDATE: Sorry that I have moved the packages from the ppa:ubuntuhandbook1/apps repository to ppa:ubuntuhandbook1/ppa as a workaround , because someone copied my content (without even a link back) and got indexed by google before this post. So my post becomes duplicate in Google’s search result!

I’ve emailed the guy who copied my content to ask a link back, but with no luck. I feel so sad because hours of my hard work has been stolen. Please help me if you know what should I do.

1. Press Ctrl+Alt+T on keyboard to open the terminal. When it opens, run the command below to add the PPA:

sudo add-apt-repository ppa:ubuntuhandbook1/ppa

2. Because Ubuntu 14.04 started shipping the libav fork instead of FFmpeg, we also need the PPA for FFmpeg libraries.

sudo apt-add-repository ppa:djcj/vlc-stable

3. Finally update packages lists and install Miro 6 as well as dependencies:

sudo apt-get update

sudo apt-get install ffmpeg miro

That’s it. Enjoy!

This quick tutorial is going to show you how to install Python 3.3.5 (or 3.4.0) and set as default in Ubuntu 14.04 and Ubuntu 12.04.

Python 3.3.5 was released on March 9th, 2014. It fixed:

  • a 3.3.4 regression in zipimport
  • a 3.3.4 regression executing scripts with a coding declared and Windows newlines
  • potential DOS using compression codecs in bytes.decode()

Python 3.4.0 was released one week later than 3.3.5 with below new features:

  • a “pathlib” module providing object-oriented filesystem paths
  • a standardized “enum” module
  • a build enhancement that will help generate introspection information for builtins
  • improved semantics for object finalization
  • adding single-dispatch generic functions to the standard library
  • a new C API for implementing custom memory allocators
  • changing file descriptors to not be inherited by default in subprocesses
  • a new “statistics” module
  • standardizing module metadata for Python’s module import system
  • a bundled installer for the pip package manager
  • a new “tracemalloc” module for tracing Python memory allocations
  • a new hash algorithm for Python strings and binary data
  • a new and improved protocol for pickled objects
  • a new “asyncio” module, a new framework for asynchronous I/O

Install:

A third party launchpad PPA contains older and newer Python version for Ubuntu. The two Python releases are available in the PPA for Ubuntu 14.04 and Ubuntu 12.04.

To add the PPA, press Ctrl+Alt+T on keyboard to open the terminal and run:

sudo add-apt-repository ppa:fkrull/deadsnakes

You may read the PPA description in the output and then:

Install Python 3.3.5 via:

sudo apt-get update; sudo apt-get install python3.3

Or install python 3.4.0 via:

sudo apt-get update; sudo apt-get install python3.4

To set your installed python as default, run the below commands one by one (You may change python3.3 to python3.4 in the code):

rm /usr/local/bin/python  

ln -s /usr/local/bin/python3.3 /usr/local/bin/python

Want to really exit Rhythmbox when clicking on the close button? Thanks to fossfreedom, he has written an external plugin that does just this – clicking the close button (window ‘x’ button) really does mean quit.

In the default way of working, Ubuntu has a specific patch to ensure that when music is playing, clicking the close button minimizes the application.

The reason for this is that some people like music to be playing, but they don’t actually want to see the application visibly on the desktop. Control of Rhythmbox then passes to the Sound Indicator.

However, for those that do not like this behavior, you cannot by default quit the application via the close button if something is playing. You have to either, stop what is playing and then quit. Alternatively, use the Menu – File – Quit method.

Install the Plugin:

Press Ctrl+Alt+T on keyboard to open the terminal. When it opens, follow the steps below:

1. Install git:

sudo apt-get install git

2. Navigate to Rhythmbox plugins directory:

cd ~/.local/share/rhythmbox/plugins

Create the directory if not exist and run the previous command again:

mkdir ~/.local/share/rhythmbox/plugins

3. Get the plugin:

git clone https://github.com/fossfreedom/close-on-hide

4. For Ubuntu 13.10 and earlier with Rhythmbox 2.99 or earlier, edit the plugin file via:

gedit ~/.local/share/rhythmbox/plugins/close-on-hide/close-on-hide.plugin

Change Loader=python3 to Loader=python and save the file.

5. Now open Rhythmbox, go to Tools -> Plugins and enable the line which says “Close on Hide”.

Enjoy!

via:xpress-ubuntu

The first release of LXQt, the Qt port and the upcoming version of LXDE, has been announced a few hours ago. It is the product of the merge between the LXDE-Qt and the Razor-qt projects: A lightweight, modular, blazing-fast and user-friendly desktop environment.

The LXDE and Razor-qt teams are proud to announce LXQt 0.7.0, the first release of LXQt, the Qt Lightweight Desktop Environment. This beta release is considered a stable continuation of the Razor desktop.

It has been almost a year since the Razor-qt project and the LXDE-Qt project decided to merge. Since then, the LXQt desktop has been under active development by 13 developers and dozens of contributors and
translators.

Read the full announcement at sourceforge.net

Install LXQt session in Ubuntu:

For Ubuntu 14.04 and Ubuntu 13.10, press Ctrl+Alt+T on keyboard to open the terminal. When it opens, paste the commands below and run one by one:

sudo apt-get install software-properties-common

sudo add-apt-repository ppa:lubuntu-dev/lubuntu-daily 

sudo add-apt-repository ppa:gilir/q-project

sudo apt-get update

sudo apt-get upgrade

sudo apt-get install lxqt-metapackage

Once installed, log out current session and select log in with LXQt Desktop:

Links:

LXQt website: lxqt.org
Report issues: github.com/lxde/lxde-qt

The latest stable Linux Kernel 3.14.3 has been announced by Greg Kroah-Hartman a few hours ago. All users of Kernel 3.14 series are urged to upgrade as soon as possible.

This tutorial will show you how to install or upgrade to this kernel release in Ubuntu 14.04, Ubuntu 13.10, Ubuntu 12.04 and Linux Mint.

Linux kernel 3.14.3 has gathered more drivers and a host of Arch improvements. See the changelog for details.

Install / Upgrade to Kernel 3.14.3:

For graphical way, download the .deb packages from kernel.ubuntu.com and double-click to install them via pop-up Ubuntu Software Center in the below order:

1. linux-headers-3.14.3-031403_3.14.3-xxxx_all.deb

2. linux-headers-3.14.3-031403-generic_3.14.0-xxxx_i386(or amd64).deb

3. linux-image-3.14.3-031403-generic_3.14.0-xxxx_i386(or amd64).deb

For command line way, press Ctrl+Alt+T on keyboard to open terminal. When it opens, follow the steps below:

1. For 32 bit system, download .deb packages via:

wget http://kernel.ubuntu.com/~kernel-ppa/mainline/v3.14.3-utopic/linux-headers-3.14.3-031403-generic_3.14.3-031403.201405061153_i386.deb

wget http://kernel.ubuntu.com/~kernel-ppa/mainline/v3.14.3-utopic/linux-headers-3.14.3-031403_3.14.3-031403.201405061153_all.deb

wget http://kernel.ubuntu.com/~kernel-ppa/mainline/v3.14.3-utopic/linux-image-3.14.3-031403-generic_3.14.3-031403.201405061153_i386.deb

For 64 bit system:

wget http://kernel.ubuntu.com/~kernel-ppa/mainline/v3.14.3-utopic/linux-headers-3.14.3-031403-generic_3.14.3-031403.201405061153_amd64.deb

wget http://kernel.ubuntu.com/~kernel-ppa/mainline/v3.14.3-utopic/linux-headers-3.14.3-031403_3.14.3-031403.201405061153_all.deb

wget http://kernel.ubuntu.com/~kernel-ppa/mainline/v3.14.3-utopic/linux-image-3.14.3-031403-generic_3.14.3-031403.201405061153_amd64.deb

2. Install the downloaded packages:

sudo dpkg -i linux-headers-3.14.3-*.deb linux-image-3.14.3-*.deb

3. If you’re using a proprietary driver, you may rebuild (or re-install) it to make it work with the new kernel.

Finally restart your computer.

Uninstall:

If for some reason this kernel release doesn’t work properly for you, reboot into previous kernel (Grub -> Advanced -> select previous kernel) and run this command to remove Linux Kernel 3.14:

sudo apt-get remove linux-headers-3.14.3-* linux-image-3.14.3-*

Finally reboot your computer.

Ubuntu 14.04 LTS: File Sharing With Samba

Last updated: May 6, 2014

This tutorial will show you how to install and configure Samba, a free software that allows you to share files, printers and other common resources across a network, in Ubuntu 14.04 Trusty Tahr.

1. Install Samba and the graphical configuration tool:

Press Ctrl+Alt+T on keyboard to open the terminal. When it opens, paste the command below and hit run:

sudo apt-get install samba samba-common system-config-samba python-glade2 gksu

2. Open Unity Dash, search for and open the samba configuration tool:

3. When the tool opens, go to Preferences -> Server Settings.

Under Basic tab:

  • Workgroup. Same to your Windows Workgroup name (case-sensitive). In Windows 7, right-click Computer icon and go to Properties, there you’ll see Windows Workgroup name.
  • Description.This is the name of your computer as seen by Windows Users.

As it is not advisable to allow ‘Guests’ there should be no reason to change the ‘security’ settings tab unless you wish to do so.

Finally click the OK button to save it.

(Optional) 4. Create a special user for network file sharing

Go to System Settings -> User Accounts -> Click unlock -> Click + (plus) icon -> Choose Standard account and type in names.

Remember to set a password to enable the new account.

5. Next go to Preferences -> Samba Users. Click Add User:

  • Unix Username: Select a user on this Ubuntu machine. You’ll access the shares from Windows machine with this user privilege. You can create a special user for file sharing by step 4
  • Windows Username: When accessing from Windows machine, you’ll be asked to type this username and the password below.
  • Samba password: When accessing from Windows machine, you’ll be asked to type the username above and this password.
  • Confirm Samba password.

Finally, restart Samba service and done!

sudo restart smbd && sudo restart nmbd

To share a folder, click the green + (plus) button in Samba Server Configuration tool and you can then easily set the directory, name, read/write permissions and access users.

Tips: If you set the Unix Username to current login user in step 5, you can easily share a folder by “Local Network Share” option in its context menu.

Converseen, a free batch image processor, now is at version 0.7.0 with the ability to transform an entire PDF file into a bunch of images with the characteristics you prefer.

Converseen is a free cross-platform batch image processor for Windows and Linux that allows you to convert, resize, rotate and flip an infinite number of images with a mouse click.

Thanks to the Magick++ image libraries it supports more than 100 image formats like DPX, EXR, GIF, JPEG, JPEG-2000, PhotoCD, PNG, Postscript, SVG, and TIFF and many others.

The latest release Converseen 0.7.0 brings following changes:

  • Now is possible to convert an entire PDF in a bunch of pictures.
  • Now is possible to extract single images from a Windows icon (ico) file.
  • Added various code improvements.

Install Converseen:

I’ve made this release into Launchpad PPA as a third-party repository. You can install or upgrade it in Ubuntu 14.04, Ubuntu 13.10, Ubuntu 12.10 and Ubuntu 12.04 via below commands.

Press Ctrl+Alt+T on keyboard to open the terminal. When it opens, run the commands below one by one:

sudo add-apt-repository ppa:ubuntuhandbook1/apps

sudo apt-get update

sudo apt-get install converseen

Links:

Homepage: converseen.sourceforge.net
Github: github.com/Faster3ck/Converseen

XBMC 13.0 Gotham edition was finally released a few hours ago. This tutorial will show you how to upgrade or install this free and open-source media center in Ubuntu 14.04, Ubuntu 13.10, Ubuntu 12.10 and Ubuntu 12.04.

According to the announcements, XBMC 13 brings:

  • Android hardware decoding
  • Raspberry Pi and Android speed improvements
  • Stereoscopic 3D rendering
  • Improved UPnP capabilities
  • Dramatic audio engine improvements
  • making subtitle search better
  • An extended Python and JSON-RPC API for developers
  • Update to FFMPEG v1.2 used for audio/video playback
  • Stereo audio can now be up-mixed to 5.1 and sent through optical/SPDIF devices
  • Various visual changes throughout the skin which should improve usability and logic.
  • Improve the handling of subtitle downloading and selection
  • Extend and improve the User-interface Engine which developers use to create a variety of skins to be used.
  • Drop of support for Windows XP.
  • When initiating a library cleaning, XBMC will send a wake-on-lan request to any sleeping servers first, before cleaning the library, to ensure that content isn’t unnecessarily cleaned
  • Numerous PVR fixes and updates with additional new features updated on a per-platform basis.
  • Copy/paste support on Windows, OSX, and iOS to match copy/paste support elsewhere
  • Movie sets are now user editable
  • Episodic bookmarks
  • More details, go to official release page
  •  
    Install / Upgrade to XBMC 13 in Ubuntu:

    IMPORTANT NOTICE: 1. Backup your your current userdata folder before upgrading; 2. Due to changes related to the add-on system and skin improvement, certain plugins, scripts and skins may become incompatible when upgrading from Frodo to Gotham.

    Press Ctrl+Alt+T on keyboard to open terminal and run the commands below one by one will added XBMC PPA and install/upgrade to XBMC 13.0:

    sudo add-apt-repository ppa:team-xbmc/ppa
    
    sudo apt-get update
    
    sudo apt-get install xbmc