Ubuntu since 22.04 has Firefox web browser pre-installed as Snap package that runs in sandbox. While, the native .deb package in system repository is just an empty wrapper.
If you prefer the .deb package, then here’s how to install it back in Ubuntu 22.04, Ubuntu 24.04, and Ubuntu 26.04 via the 2 ways below:
Ubuntu 22.04 has a new in-shell screenshot UI for taking screenshots and recording desktop. The old default screenshot app (GNOME Screenshot) is no longer available out-of-the-box.
For those somehow sticking to the old screenshot tool, here’s how to install it back and configure keyboard shortcuts in Ubuntu 22.04.
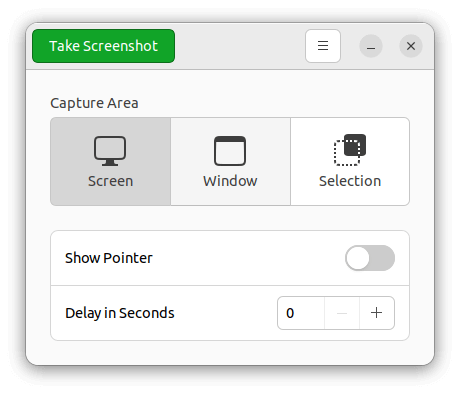
old default Gnome Screenshot app
Install Gnome Screenshot:
Press Ctrl+Alt+T on keyboard to open terminal. When it opens, run the command below will install the app back from Ubuntu universe repository:
sudo apt install gnome-screenshot
Type user password (no visual feedback) for sudo authentication and hit Enter
Install Gnome Screenshot
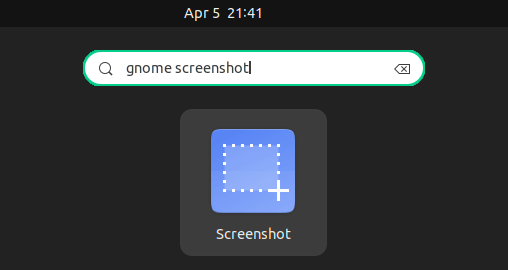
After installation, you may search for and open the app from ‘Activities’ overview screen.
Or use the steps below to set up keyboard shortcuts for this tool.
Set shortcut keys for GNOME Screenshot:
By default, you may press Shift+Print to immediately capture the full-screen, and use Alt+Print to capture focused app window. And, Print key is used to bring up the in-shell screenshot UI. For choice, you may replace the shortcuts keys via Gnome Control Center.
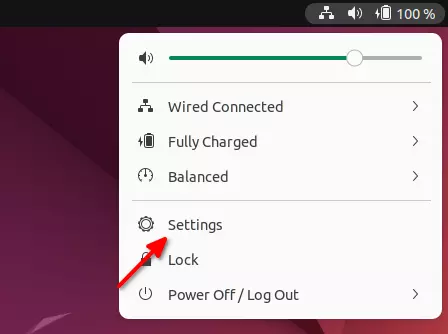
1. Firstly, open system settings (aka, gnome-control-center) from system tray menu:
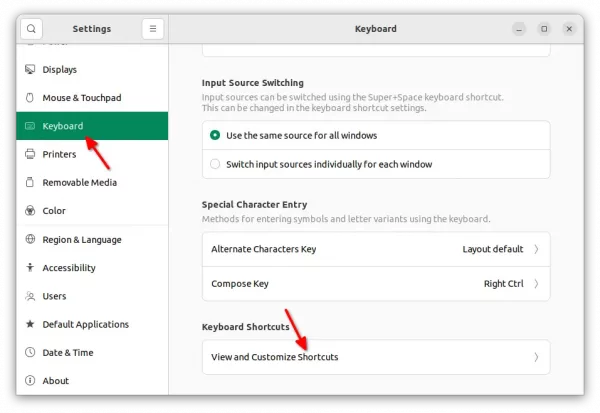
2. When it opens, navigate to ‘Keyboard‘ in the left. Then click ‘View and Customize Shortcuts‘ in bottom right.
3. If you want to re-bind Print, Alt+Print, Shift+Print shortcut keys via other screenshot actions, disable them (press Backspace in set shortcut dialog) in under ‘Screenshots’ shortcuts page.
4. Next, go back ‘Keyboard Shortcuts’ page, scroll down and select “Custom Shortcuts“. Then you may click ‘Add Shortcut’ (or ‘+’ icon) button to add new custom shortcuts.
Name: type name of the shortcut as you prefer.
Command:
gnome-screenshot --window – grab the current active window immediately.
gnome-screenshot --area – start area selection.
gnome-screenshot – capture the full-screen immediately.
Shortcut: click ‘Set Shortcut…’ and press the key combination to bind the keyboard shortcut.
For more command line options of Gnome Screenshot, run man gnome-screenshot in terminal.
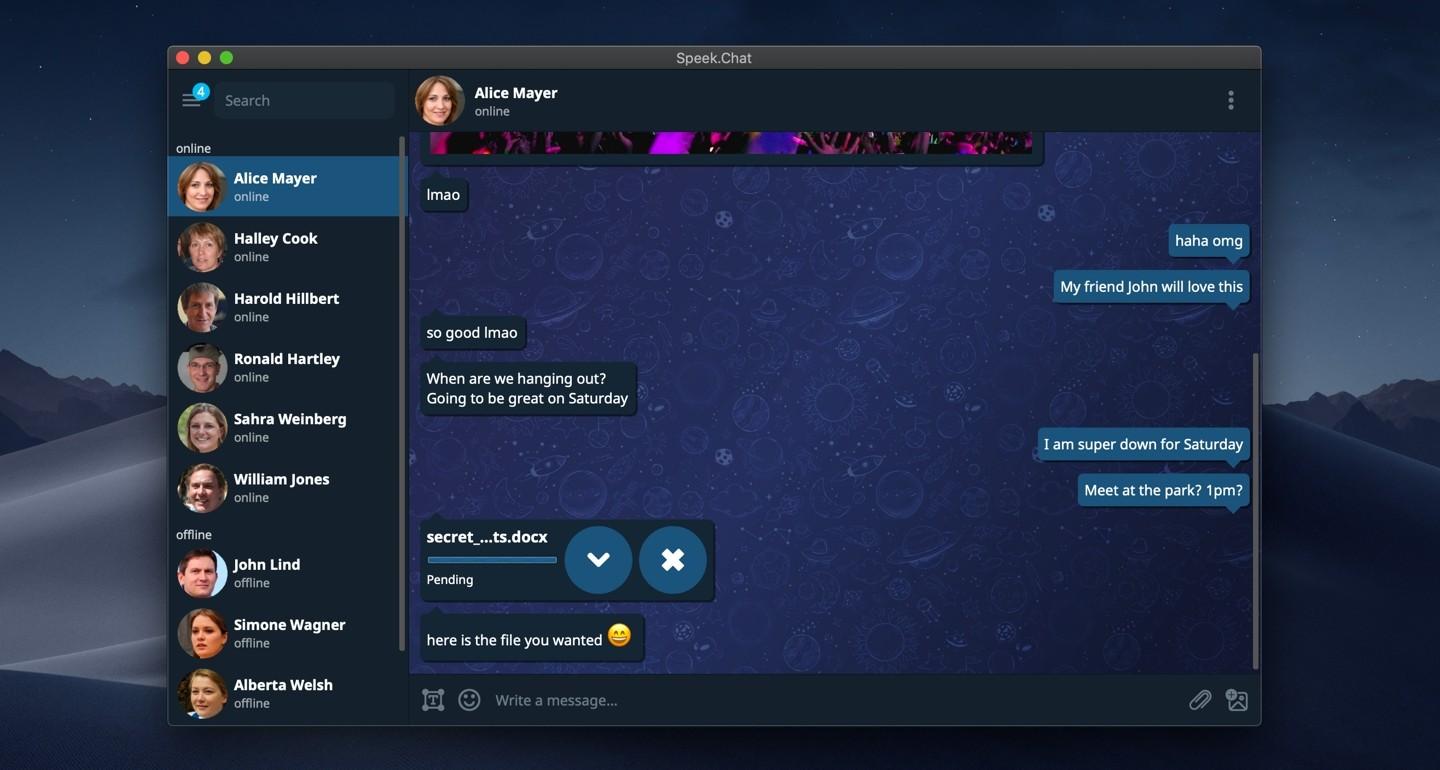
Looking for a secure instant messaging app? Speek.Chat is a free open-source messenger based on Tor hidden network services.
No server, no metadata, no ID or phone number! With it, users are only identified via public keys. By sharing the key to others, they can send request to add you into contact list and then start chatting.
All messages and files are end-to-end encrypted and routed via the Tor network. No middleman server that could be compromised, taken down or leak user information. You can chat anonymous without exposing your identity (or IP) to anyone.
Speek.Chat messenger features:
Serverless, no metadata, anonymous.
Peer to peer encrypted using TLS/SSLv3, routed via Tor network.
Nothing is stored. All messages deleted on app close.
Get Speed.Chat
The app is available in Microsoft Store for Windows, and app store for macOS 10.12 or later.
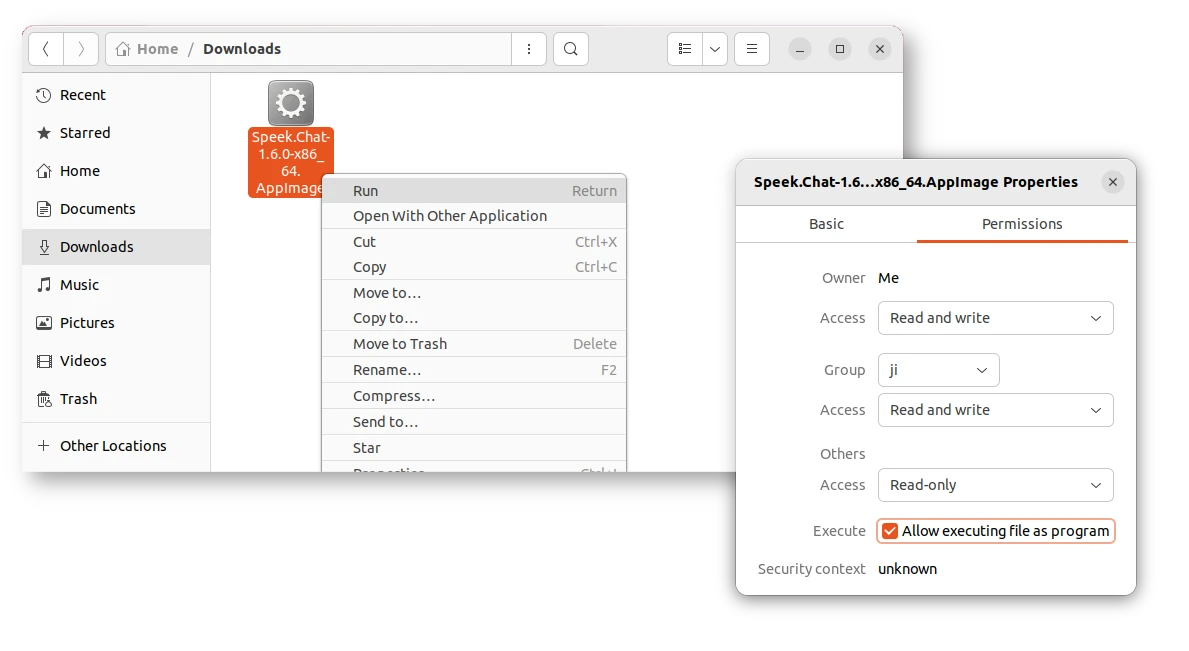
For Linux, it provides the non-install Appimage available to download at the project releases page:
Grab the package from ‘Assets’ section, then right-click on it and go to file ‘Properties’. After adding permission to ‘Allow executing file as program‘, you can right-click and select run to launch the messenger.
If you don’t want to use it anymore, just remove the .appimage package and that’s all.
Ubuntu 22.04 Jammy Jellyfish now is in final beta stage! Here’s how you can upgrade to the new LTS from Ubuntu 20.04!
NOTE: the steps below now will upgrade to Ubuntu 22.04 Beta at the moment. Though, the beta will be upgraded to the final stable release automatically in next month by running regular updates.
What’s New in Ubuntu 22.04:
The new Ubuntu 22.04 LTS features Linux Kernel 5.15 and GNOME 42 desktop. It’s a long term support release with 5 years support. The Final Beta was announced with changes including:
Full dark/light mode via appearance settings.
10 accent colors.
New screenshot UI (press Print-Screen to start it).
Before getting started, there are some things need to do first! They are important to prevent upgrade failure.
1.) Backup! Backup! Backup! The upgrade process may fail due to different reasons. So, it’s important to back your data, bookmarks, etc.
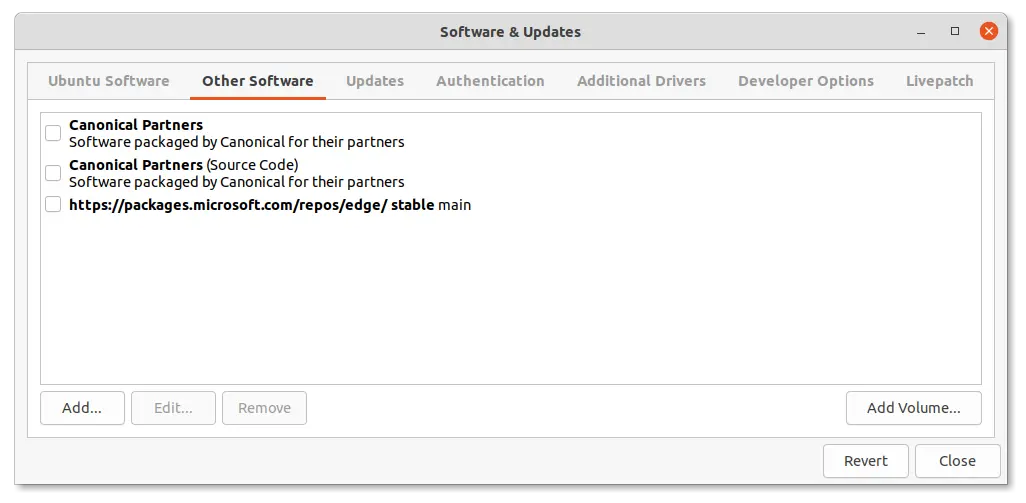
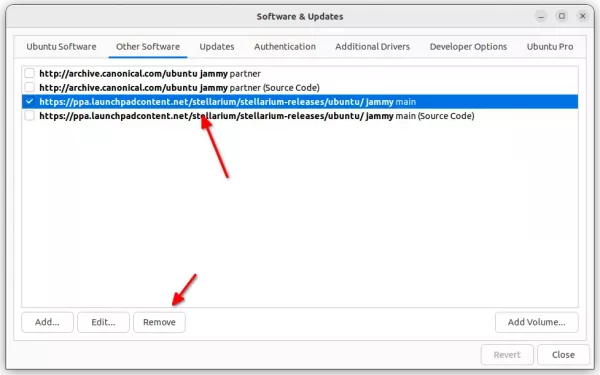
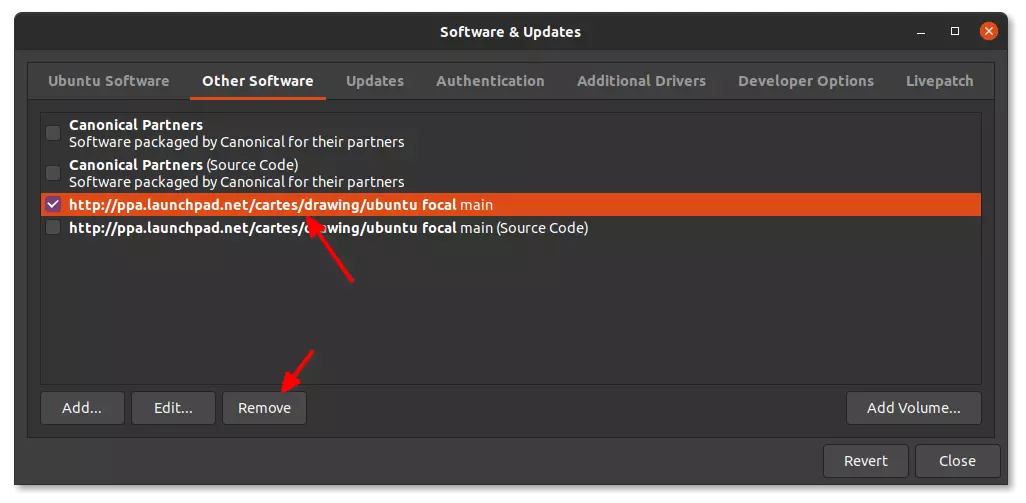
2.) Disable third-party PPAs. This can be done by launching ‘Software & Updates’ utility and navigate to ‘Other Software’ tab.
If possible, I’d recommend to purge PPAs which also downgrade these third-party software packages. Especially for ffmpeg, mesa, etc.
Disable or remove 3 party PPAs
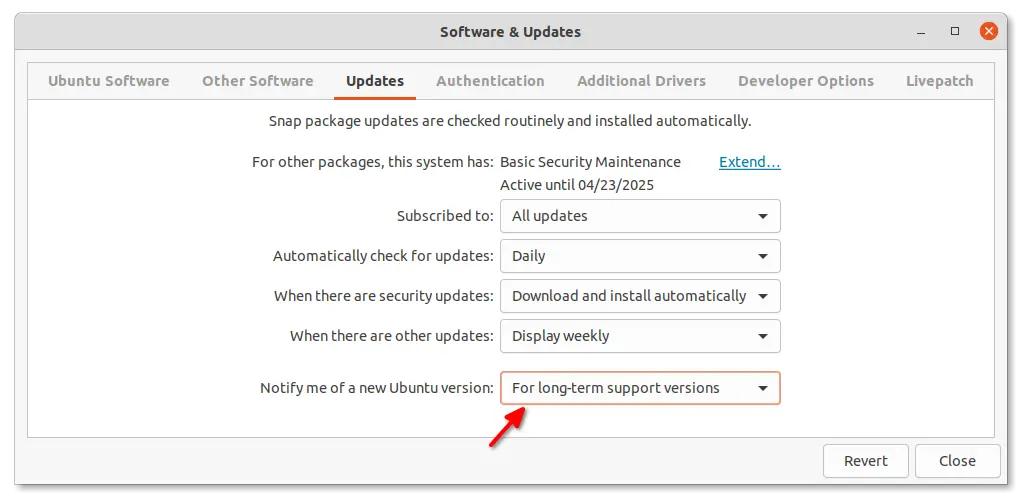
3.) Also in ‘Software & Updates’ tool, navigate to ‘Updates’ tab. There choose ‘Notify me of a new Ubuntu version: For long term support versions‘.
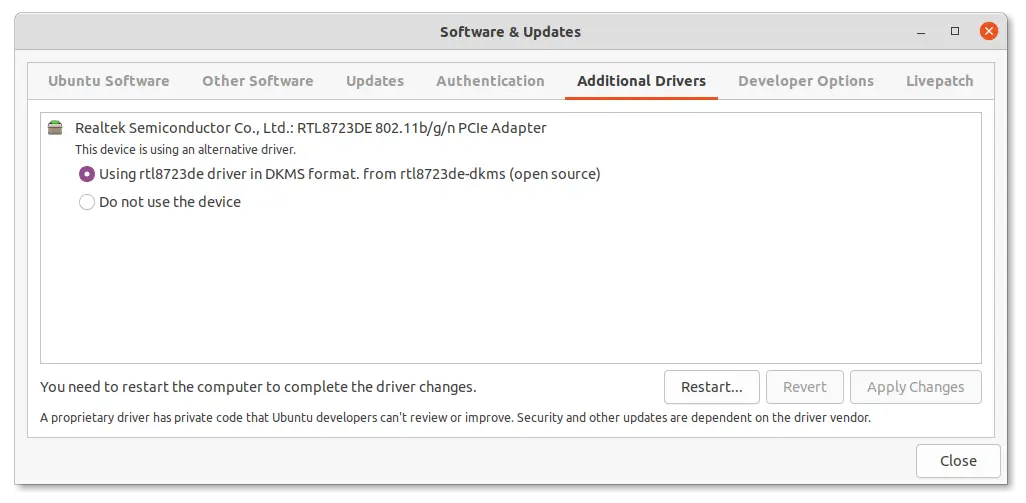
4.) Remove proprietary drivers from ‘Additional Drivers’ tab, and use an open-source driver instead. You may skip this step if your PC does not have a dedicated GPU.
5.) Remove other Desktop Environments! If you have other desktops (e.g., KDE, XFCE, Cinnamon), it’s better to remove them, so to speed up the upgrade process.
6.) Disable User Extensions. Disable user installed Gnome Extensions via Gnome Tweaks tool!
Upgrade to Ubuntu 22.04:
NOTE: The upgrade process may fail! If you can’t afford to have a broken system, please do a clean install instead of upgrading it!
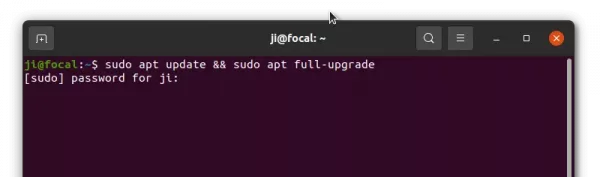
1.) Firstly, press Ctrl+Alt+T on keyboard to open terminal. When it opens, run the command below to install all available system updates:
sudo apt update && sudo apt full-upgrade
install all available system updates
And, restart your computer if you have not run system updates for a long time.
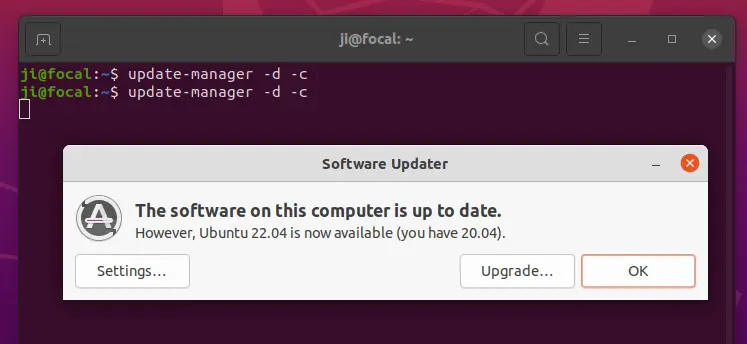
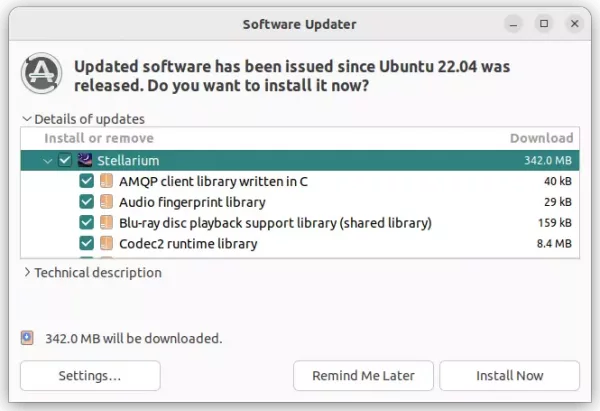
2.) Next, in terminal run the command below to run update manager to check distribution update:
update-manager -d -c
If there are still available updates or removals, click on ‘Install Now’ and re-run the command.
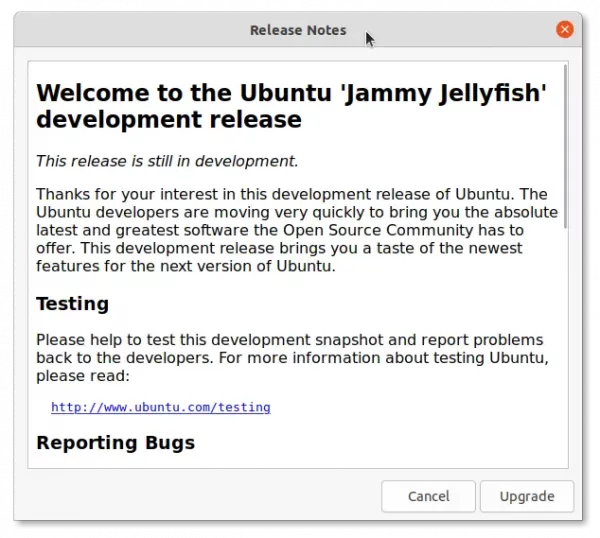
3.) Once you see the prompt for Ubuntu 22.04. Click on “Upgrade” button, and confirm in the next ‘Release Notes’ dialog.
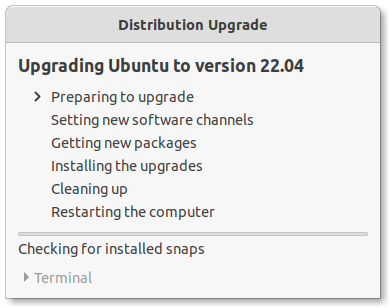
4.) It will pop-up another dialog asks to confirm via ‘Start Upgrade’ button. Once you click on it, the ‘Distribution Upgrade’ wizard will pop-up indicates the upgrading process.
5.) Don’t go far away from your computer!! There will be a few more confirm dialogs, so you have to keep an eye on the screen.
If everything goes well, there will be a dialog asks to “Restart” to complete the upgrade.
Sadly, I went out when it was ‘Getting new packages‘. And the upgrade process failed at blank screen when I was back! So there’s no screenshot for this step.
Troubleshoot:
There may be various reasons that the upgrade failed. Here are the issues in my case.
As mentioned, the upgrade failed in my case and the laptop run into blank screen. And, I did following steps that successfully finish the upgrade.
1.) Force reboot and login. Press Ctrl+Alt+F2 (F3 ~ F6) and type username, then password to log into tty console if GDM (login screen) does not start. Or, select boot “Advanced -> recover mode -> drop root shell prompt” from boot-loader if Ubuntu refused to boot!
2.) Once logged in, try running command to configure unfinished packages:
sudo dpkg --configure -a
3.) And, try to fix broken dependencies via command:
sudo apt -f install
In my case, some third-party packages (e.g., libfilezilla12 from xtradeb PPA, and libreoffice-common from LibreOffice Fresh PPA) break the dependencies! And, the command failed with something look like:
trying to overwrite ‘…’, which is also in package libfilezilla12 0.27.1~extradeb1
Errors were encountered while processing:
…
E: Sub-process /usr/bin/dpkg returned an error code(1)
To fix the issue, just remove the package via command (replace package name ‘libfilezilla12’ accordingly):
sudo dpkg -P libfilezilla12
Then re-run the sudo apt -f install until it’s done successfully without error!
4.) Install all available system updates via command:
sudo apt full-upgrade
If everything goes well, clean up via command:
sudo apt remove --autoremove
And finally restart computer via reboot command.
5.) Some packages are however missing in my case after restart. They were fixed by manually installing the packages via the commands below.
No login screen or non-gnome login screen, run command and then reboot:
Running Ubuntu laptop without power supply? It’s wise to keep an eye on the battery percentage. And, here’s how to make Ubuntu 22.04 display the info in top-right corner just besides the battery icon.
Method 1: Single command toggle display battery percentage
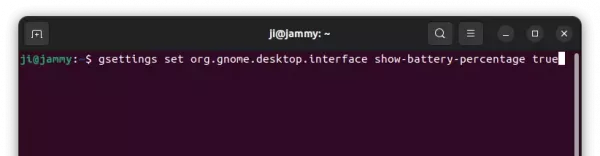
For those OK with Linux commands, just press Ctrl+Alt+T on keyboard to open terminal. When it opens, paste the command below:
gsettings set org.gnome.desktop.interface show-battery-percentage true
You’ll see the change immediately after hitting Enter to run the command.
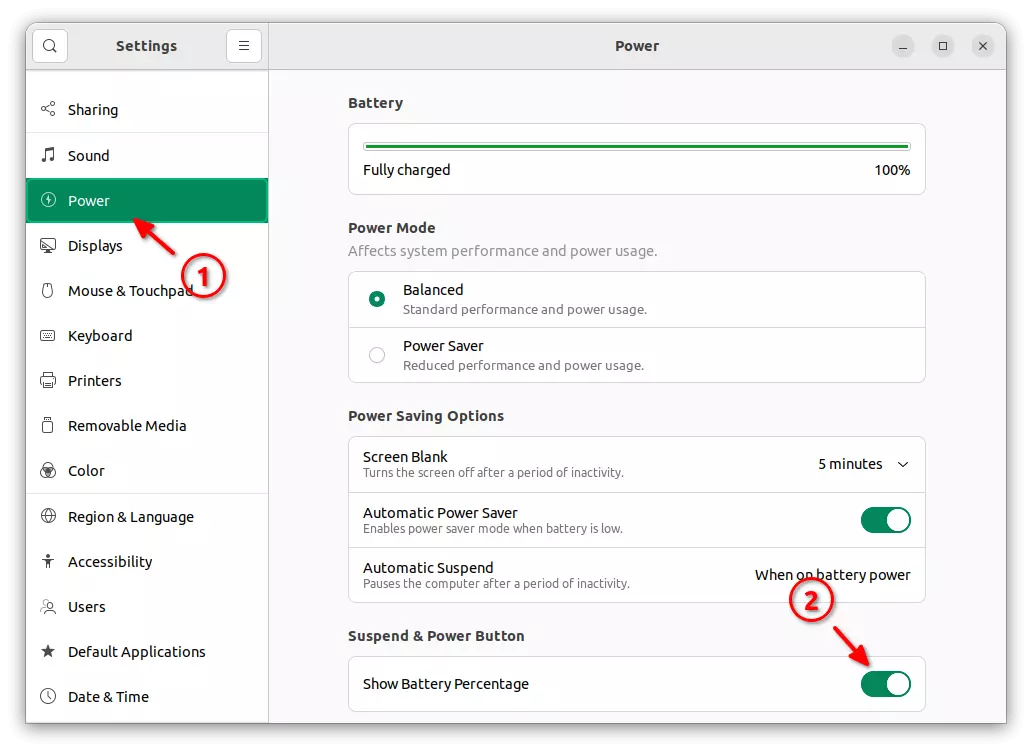
Method 2: Use Gnome Control Center -> Power settings
In Ubuntu 22.04, the GNOME Tweaks tool no longer provide the option to toggle display battery percentage. Because, GNOME has merged this option into system settings (aka gnome-control-center).
1.) Firstly, open ‘Settings’ either from the dash or top-right system tray menu.
2.) When it opens, navigate to Power panel in the left. And, finally use the on/off switch in bottom right to toggle display battery percentage:
There are quite a few weather apps for Ubuntu Linux. Here’s a new one for GNOME desktop 40+.
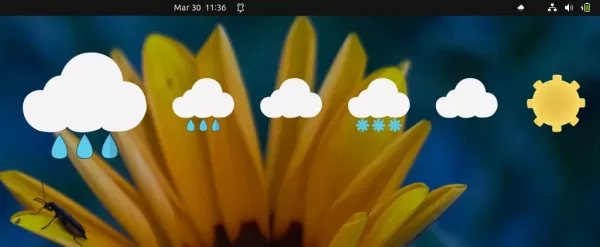
Different to other apps, the extension show a little icon in system tray area for current weather condition. By clicking on it will display weather forecast for next days as desktop widget.
Though it only shows the basic icons (e.g., cloudy, clear, rain, or snow.), and allows to control via:
single click on indicator icon to display widget.
right-click on desktop widget to hide.
middle click to refresh.
Scroll up/down to increase/decrease days.
As you see in the picture, the icons are somehow too big in my case in Ubuntu 22.04 laptop. And, it so far only supports for getting weather information from OpenWeatherMap.org.
How to Install the weather widget:
NOTE: the extension works on Ubuntu 21.10, Ubuntu 22.04, Fedora 34+, and Arch Linux etc with GNOME 40+.
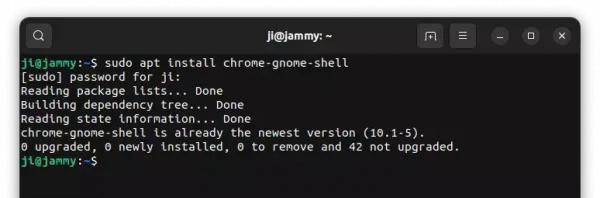
1.) Ubuntu user needs to first press Ctrl+Alt+T to open terminal, and run command to install the browser agent:
sudo apt install chrome-gnome-shell
2.) Next, click the link below to go to extension page and turn on the slider icon to install it.
NOTE: The pre-installed Firefox in Ubuntu 21.10+ is SNAP that so far does not support this thing! Use another browser or install Firefox as deb.
And, if you don’t see the on/off switch, install browser extension via ‘click here to install browser extension‘ link and refresh the page.
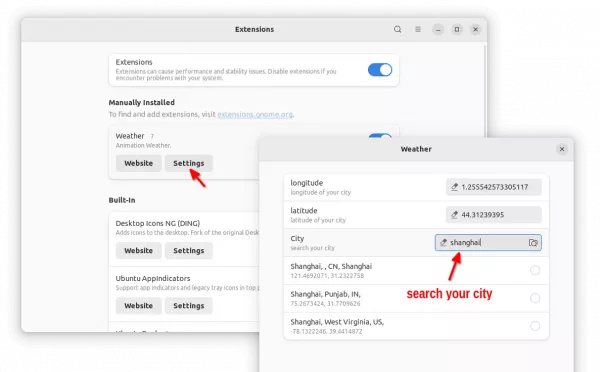
3.) Finally, open “Extensions” app (install via sudo apt install gnome-shell-extension-prefs). And, configure the extension to search and set your location.
As you see, the app also has option to disable or remove the extension as you want.
This simple tutorial shows how to install the latest Oracle Java (JDK 21, 25 LTS or JDK 26) in Ubuntu Linux via the official binary package.
There used to be unofficial Ubuntu PPA to automate the process of installing Java JDK and setup the environment, however, discontinued. So, here’s the tutorial to manually install the Java package and set as default.
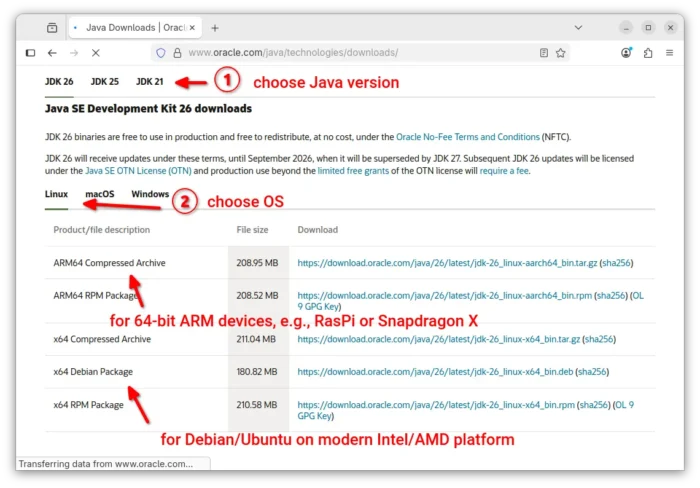
Step 1: Download the pre-build binary package
Oracle provides the pre-build binary packages for Linux, Windows, macOS, available to download via the link below:
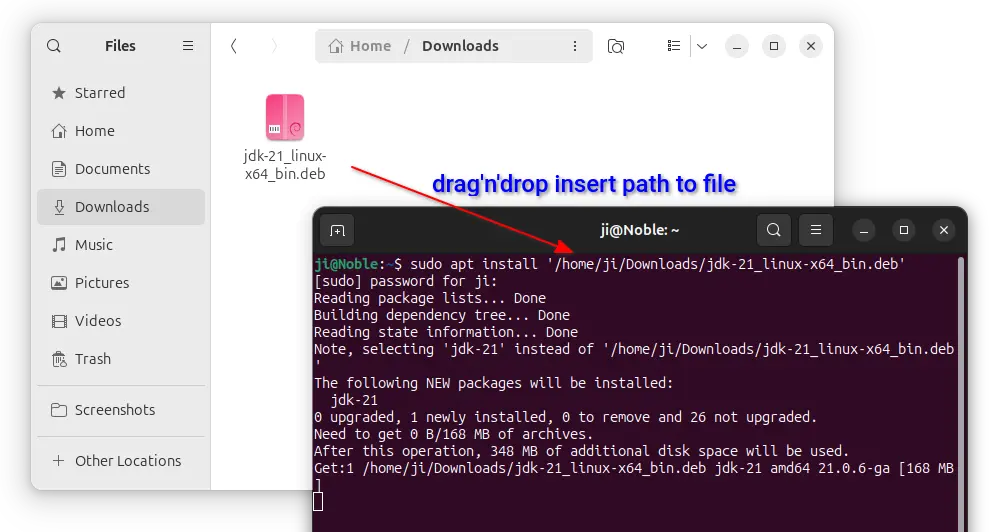
Here replace 21 in command if you downloaded JDK 25 or 26. Or, just drag and drop the .deb package from your downloads folder into terminal to auto-insert path to that file.
The .deb package include a post-install script that automatically set the JDK installation with a higher priority. So, it should be default if you have multiple java.
Just in case, you may run the command below to manually set default Java:
sudo update-alternatives --config java
In the output, input the number for your desired Java version and hit Enter.
Similarly, you may run the command below to configure default Javac, Jshell, Jar, etc.
sudo update-alternatives --config javac
For Intel/AMD platform, you’re done!
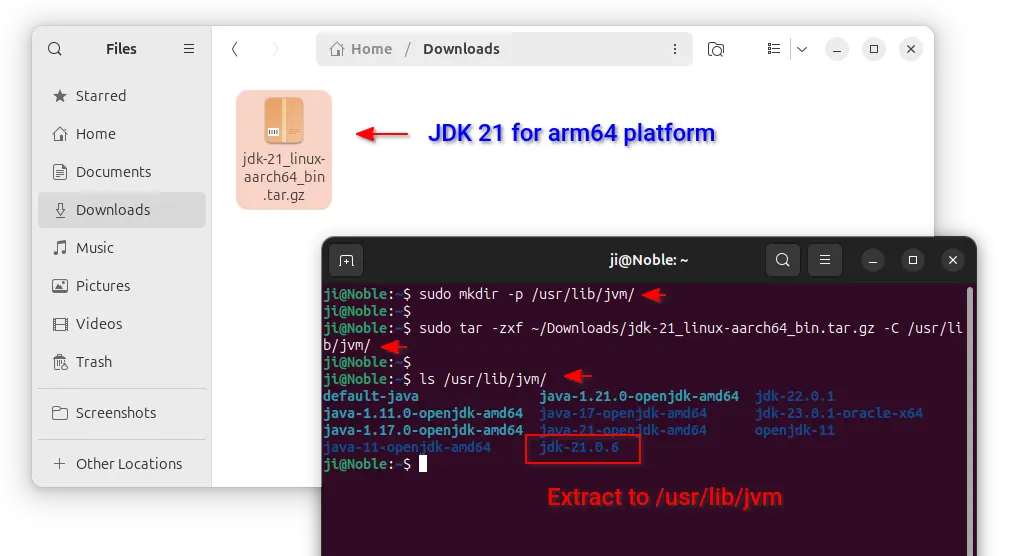
Install the Compressed Archive for ARM devices
For the ARM computers (e.g., Raspberry Pi, Snapdragon X, Apple M1/2, etc processors), first open terminal (Ctrl+Alt+T) and run command to make sure the /usr/lib/jvm directory is exist:
sudo mkdir -p /usr/lib/jvm
Then, extract the downloaded archive to that directory by running command:
sudo tar -zxf ~/Downloads/jdk-21_linux-aarch64_bin.tar.gz -C /usr/lib/jvm/
Also, replace 21 in command with 25 or 26 if you selected JDK 25/26. After that, you may run the command below to list that directory content which should include the new generated jdk-21 (or jdk-21.x.x) sub-folder.
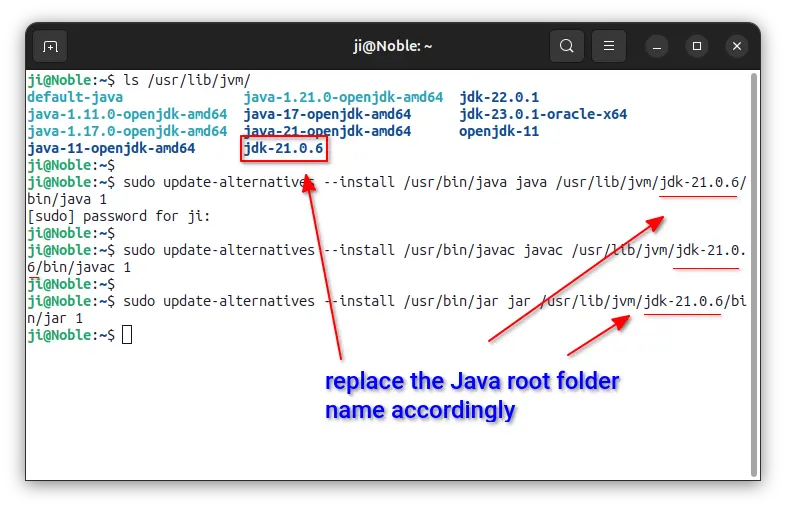
3. Set JDK 21/25/26 as default (for ARM only):
NOTE 1: For Intel/AMD, you’re DONE after installed the .deb package which set default Java automatically. This is only required for ARM platform.
NOTE 2: The JDK root folder-name may vary depends on which package you installed. It may be ‘jdk-21’, ‘jdk-21.0.1’, ‘jdk-25’, ‘jdk-25.0.1’, ‘jdk-26’, ‘jdk-26.0.1’ and so on. Run ls /usr/lib/jvm to tell and replace jdk-21 in commands below accordingly.
a.) Create symbolic links for the executable files:
sudo update-alternatives --install /usr/bin/jar jar /usr/lib/jvm/jdk-21/bin/jar 1
As mentioned, you need to replace “jdk-21” in command with e.g., jdk-21.0.1, jdk-21.0.6, jdk-25, jdk-25.0.1, etc. accordingly!!!
Similarly, add links for other executable files (e.g., jarsigner, jlink, javadoc) as you need.
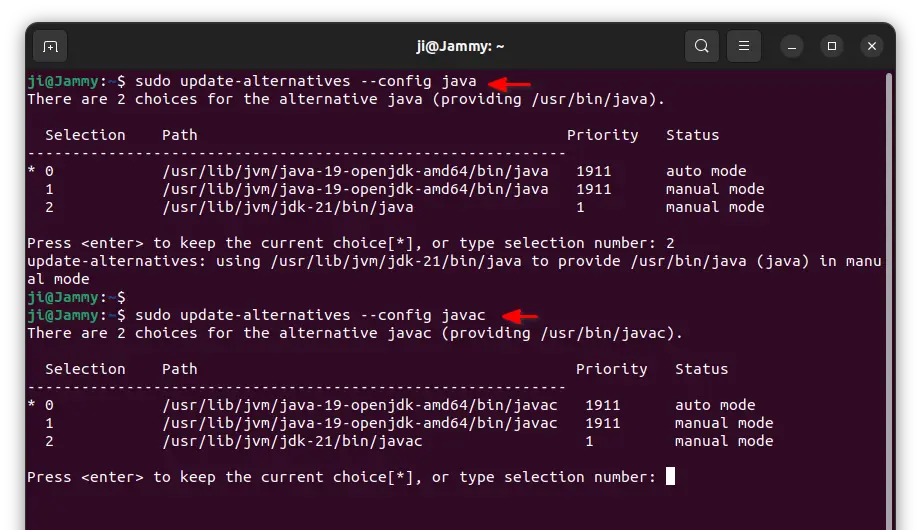
b.) Next, run the commands below one by one, and type number to select Java JDK 21 as default.
sudo update-alternatives --config java
sudo update-alternatives --config javac
sudo update-alternatives --config jar
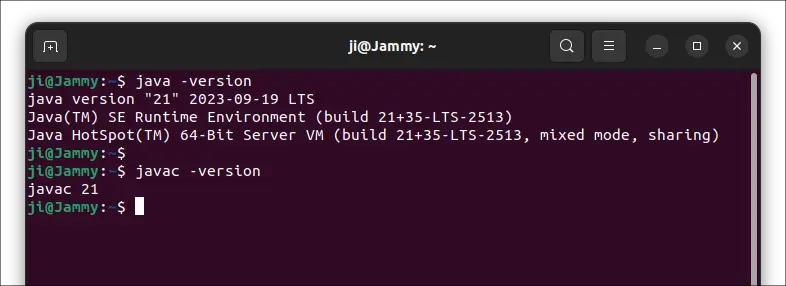
When done, verify by running command in terminal:
java -version
javac -version
4. Set JAVA_HOME (for ARM only):
As well, you only need to do this for ARM package. If installed the .deb version, just verify JAVA HOME via the bottom command.
Also, replace ‘jdk-21’ below according to ls /usr/lib/jvm command output (e.g., jdk-21.0.6, jdk-25, jdk-25.0.x).
Option 1.) Set JAVA_HOME for current terminal console, that will work until you close it:
export JAVA_HOME=/usr/lib/jvm/jdk-21
setenv JAVA_HOME=/usr/lib/jvm/jdk-21
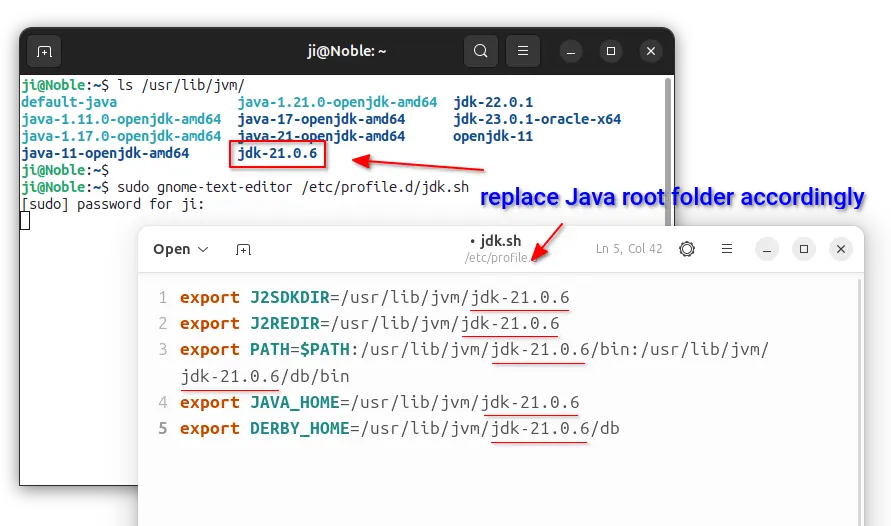
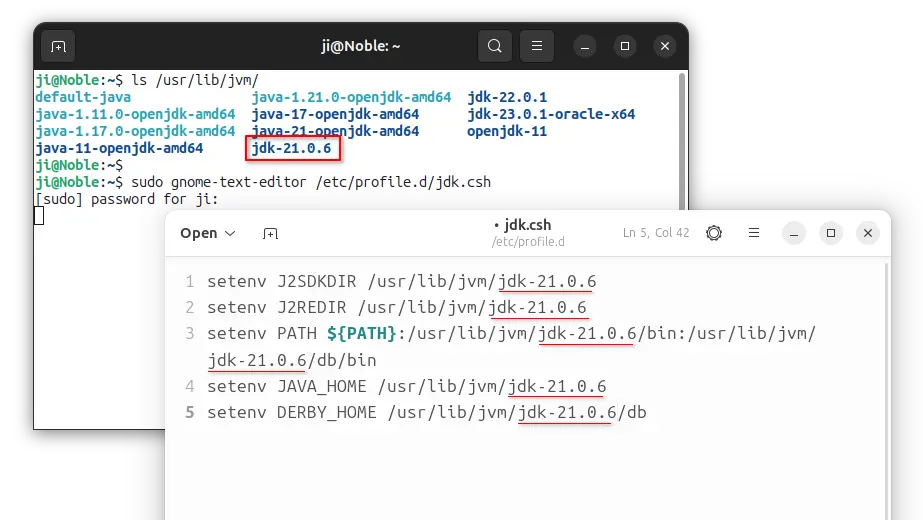
Option 2.) To make it permanent, create and edit config file via command:
sudo gnome-text-editor /etc/profile.d/jdk.sh
Depends on your desktop environment, you may replace gedit with mousepad for XFCE, xed for Linux Mint, pluma for MATE, kate for KDE Plasma, gedit for Ubuntu 22.04 or older.
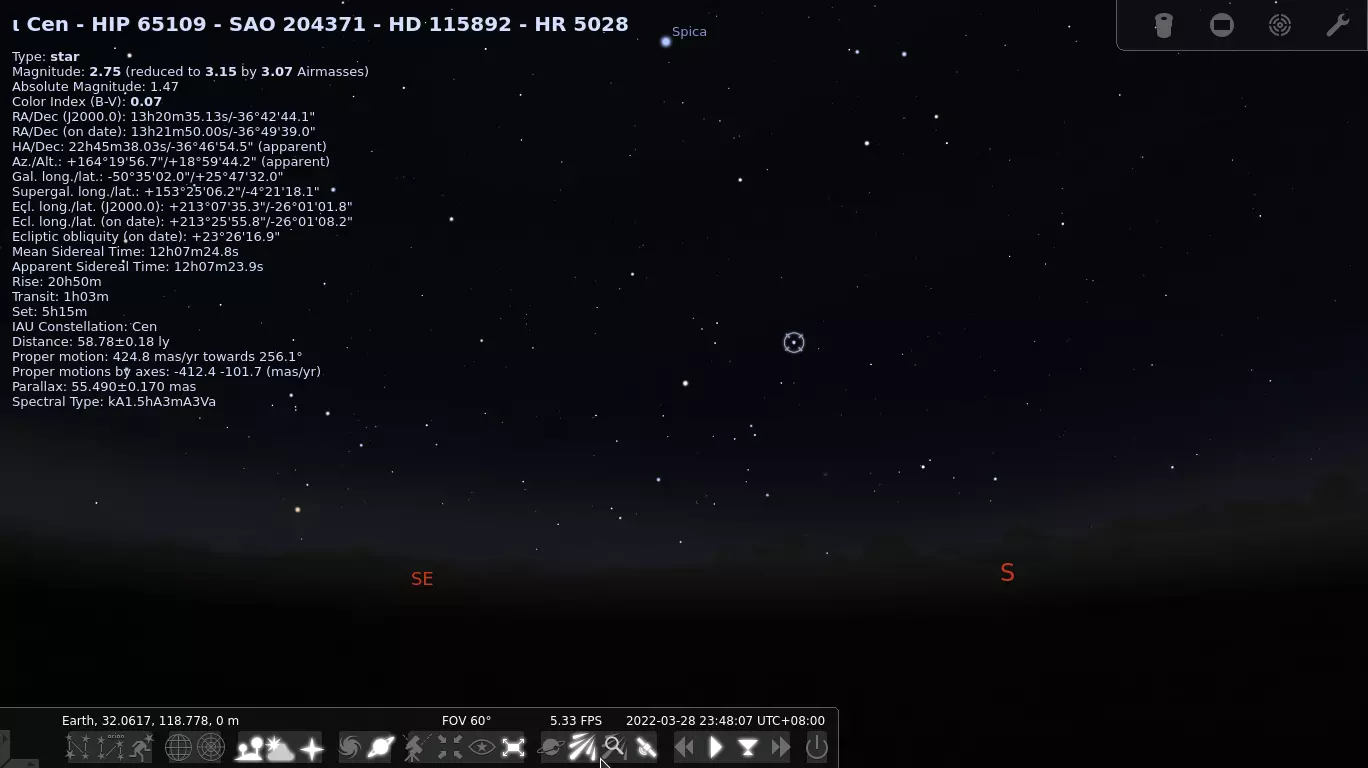
Stellarium 0.22.0 released! Here’s how to install and keep it up to date in Ubuntu 22.04, Ubuntu 20.04 via PPA.
Stellarium is a free open source planetarium for Linux, Windows, and macOS. It shows a realistic sky in 3D, just like what you see with the naked eye.
While the software package in Ubuntu repository is always old, the latest version so far is Stellarium 0.22.0 that features:
AstroCalc: Eclipse Finder
AstroCalc: RTS (Rises, Transits, Settings)
Switch from Bortle scale to physical brightness values for light pollution.
Allow tweaks for the atmosphere brightness/color model and tone mapping
Several new calendars in the Calendars plugin
Seasonal polar caps on Mars
New and improved sky cultures
Larger textures allowed in Scenery3D
Improved OnlineQueries and Satellites plugin
Many fixes in core and plugins.
A large number of bug fixes and closed feature requests and enhancements
How to install Stellarium:
The software developer team provides Ubuntu packages via PPA repository. So far, it supports Ubuntu 18.04, Ubuntu 20.04, Ubuntu 21.10, and upcoming Ubuntu 22.04.
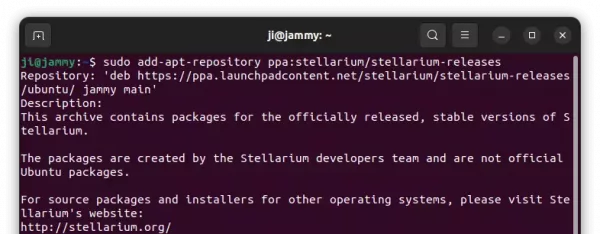
1. Add the PPA
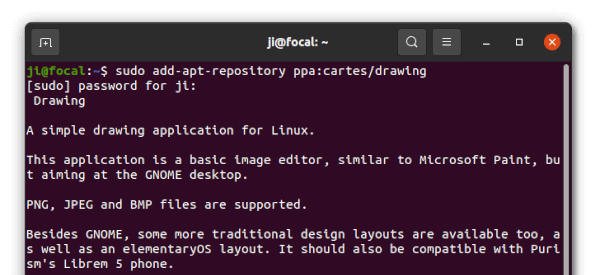
Press Ctrl+Alt+T on keyboard to open terminal. When it opens, run the command below to add the PPA repository:
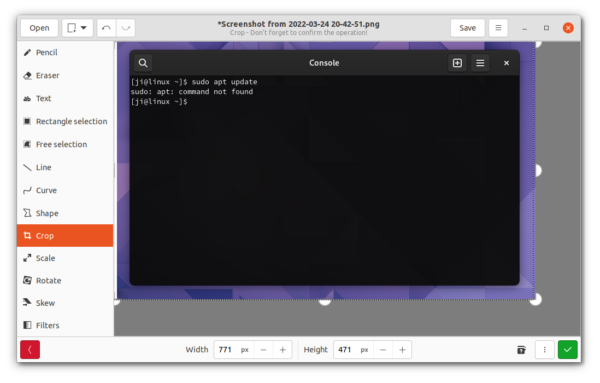
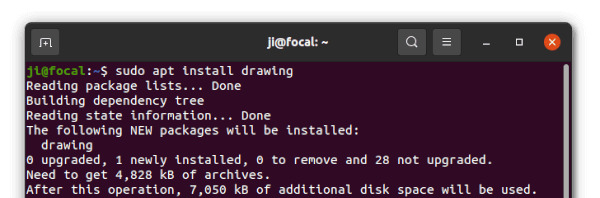
There are quite a few image editing tools for Linux desktop. ‘Drawing’ is the one that promoted itself a Microsoft Paint alternative for Linux.
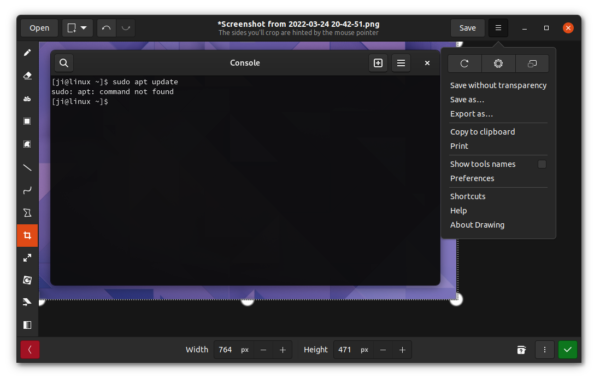
The app provides basic editing features, including crop, resize, skew and rotate images, apply simple filters, insert or censor text. As well, it supports for drawing with pencil, straight line, curve tool, many shapes, several brushes, with colors and other common used options.
Drawing. Tools with text
The app is targeted for GNOME, but also works on other desktop, e.g, elementaryOS Pantheon. And, it should also be compatible with the Pinephone and Librem 5 smartphones.
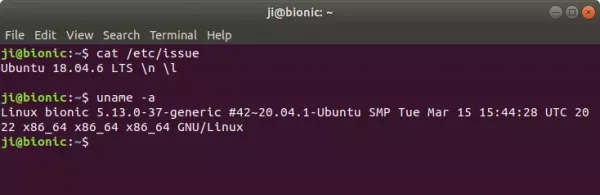
For those sticking to the old Ubuntu 18.04, but need higher Linux kernel version for specific hardware support, here’s how to install the Linux Kernel 5.13 from Ubuntu 20.04 repository.
NOTE: Ubuntu 20.04’s kernel package does install and seems running good in Ubuntu 18.04. But I’m not sure if it will cause compatibility issues. Install it ONLY that you do require it, and use it at your own risk!!
Linux Kernel 5.13 features include:
Initial and early support for Apple M1.
New “Landlock” Linux security module.
Initial graphics support for Alder Lake S.
AMD FreeSync HDMI support.
New Intel cooling driver
Realtek RTL8156 and RTL8153D support
New drivers support for Amazon’s Luna game controller.
Apple Magic Mouse 2 support .
Realtek RT1019, RT1316, RT711 and RT715 support.
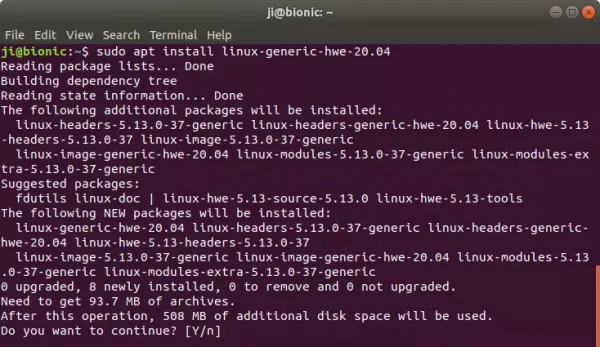
Install Linux Kernel 5.13 in Ubuntu 18.04:
You know, the Mainline Kernel PPA maintains the latest kernel package. However, it’s now built against the most recent Ubuntu libc6 library.
The Kernel package from Ubuntu 20.04 repository could be the only way to get recent Kernels for Ubuntu 18.04, except for building by yourself.
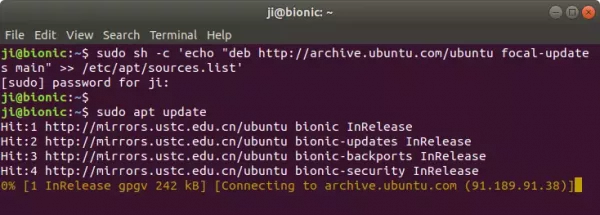
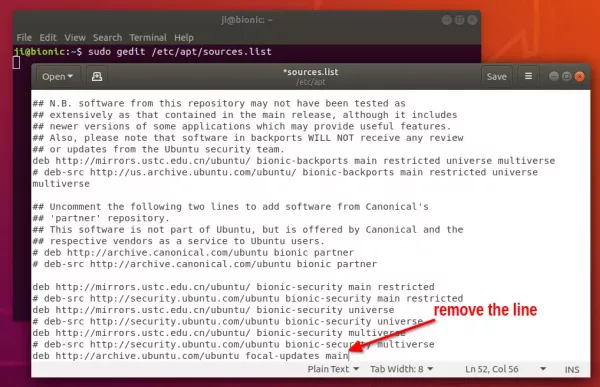
1. Add Ubuntu 20.04 Updates repository:
Firstly, press Ctrl+Alt+T on keyboard to open terminal. When it opens, paste the command below and hit enter:
sudo sh -c 'echo "deb http://archive.ubuntu.com/ubuntu focal-updates main" >> /etc/apt/sources.list'
The command adds focal-updates repository to your system software sources.
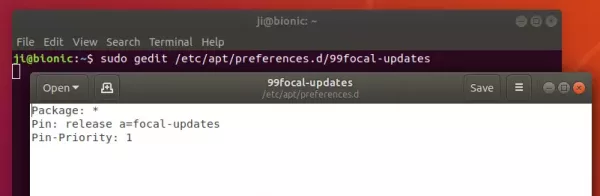
2. Set lower priority for the repository:
Also in terminal window, run command to create and open a config file via Gedit text editor:
sudo gedit /etc/apt/preferences.d/99focal-updates
When the file opens, add following lines and save it: