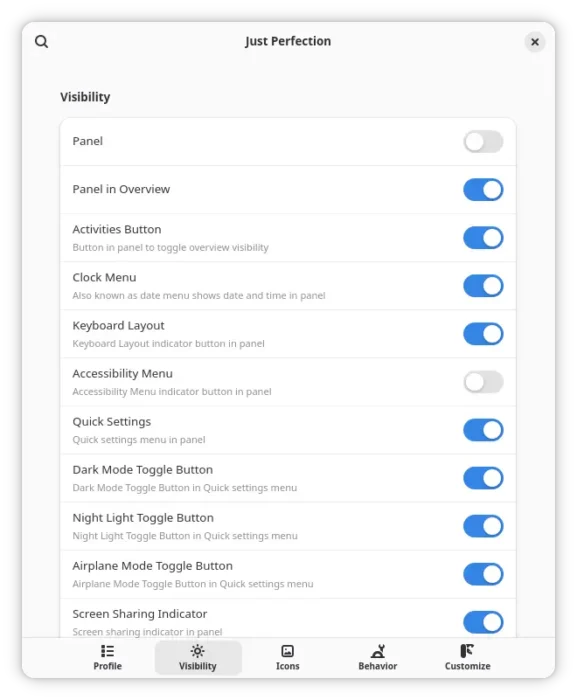
Archives For November 30, 1999

Ubuntu 23.10 with GNOME 45 has replaced the top-left ‘Activities’ with a workspace indicator. By hovering over it, you can use mouse scroll to switch workspaces.

This is done by a simple extension called “Workspace Scroll”. Like the volume icon, with that extension, you can move mouse cursor over the top-left indicator, then scroll the middle mouse button to switch workspaces (aka Windows’ Virtual Desktop).

This can be useful for mouse heavily users, since it saves you a few mouse clicks!

UPDATE: This behavior has been enabled OUT-OF-THE-BOX now!!! You don’t have to follow any tutorial, just move mouse cursor over the workspace indicator and scroll middle button.

How to Install Workspace Scroll

To install the extension for this feature, firstly press Ctrl+Alt+T on keyboard to open terminal.

Then, run command to install “Extension Manager” app:

sudo apt install gnome-shell-extension-manager


Next, click on top-left button to open overview, search for and launch “Extension Manager”.

Finally, use the tool to search and install the “Workspace Scroll” extension under ‘Browse’ tab.

For other Linux with GNOME 45, such as the upcoming Fedora 39, Arch/Manjaro etc, just open the link below:

Then use the ON/OFF switch to install that extension. If you don’t see the switch, install browser extension via the link in the page and refresh.

After installed the extension, just move your cursor to top-left indicator button, and scroll the middle wheel to verify.

In the recent update of Ubuntu 23.10 daily build, the GNOME desktop has been updated to v45 beta. And, here are some visual changes.

The default wallpaper now has a dark variant. Meaning changing Ubuntu Desktop to dark style will also change to dark style wallpaper. Though, the final wallpaper is not revealed yet!

The ‘Files’, aka Nautilus file manager, has been redesigned with more stylish layout. Which, supports drag and drop web image into file, and implements Global Search.

Redesigned Nautilus File Manager

And, there’s new system extension to enhance tiling window support. Not only half screen tiling, it also support tiling window to quarter screen size, with either drag’n’drop or keyboard shortcuts, as well as features such as Tiling Pop-up and Tiling group.

By going to ‘Settings’ -> ‘Ubuntu Desktop’, you’ll see the new toggle options. Though, you can get even more by using “Extension Manager”.

Via the latest Gnome Shell package updates, the top-left ‘Activities’ button is finally replaced by an indicator. Now, it displays a white pill that indicates which workspace you’re on. Depends on how many workspaces you have, all others are indicated via gray dots.

As well, you may found the app menu, to indicate which app window is on focus, has also been removed. Though, the new Window Focus animation is not implemented at the moment.

They are even more great new features in Ubuntu 23.10. To try it out, just download the latest daily build image from the link below and install it in either real or virtual machine.

For Ubuntu 23.04, Debian 12, Fedora 38 and other Linux with GNOME 43/44, there’s now an extension allows to monitor and control your remote Transmission downloads via system tray indicator.

It uses Transmission RPC protocol for interacting with remote PC/server that is running Transmission GTK, daemon, or Fragments.

With the indicator, user can easily add new download via torrent link, monitor all the downloading process, and one click to open the web UI with more options.

How to Install the Indicator Applet

For Ubuntu 23.04 user, firstly search for and install “Extension Manager” from Ubuntu Software.

Install Extension Manager in Ubuntu 22.04+

Then launch “Extension Manager” and use the tool to search and install “Transmission Daemon Indicator NG” extension.

For other Linux with GNOME 43/44, just go to the link below:

Then, turn ON the toggle switch to install the extension. If you don’t see the ON/OFF switch, install browser extension and refresh the page.

Configure the Indicator Applet

Once installed, the applet should appear immediately on your panel. You can open the settings page either from applet’s drop-down menu, or via “Extension Manager”.

Of course, in the server (either local or remote) that’s running Transmission, you have to enable the Remote Control first from preferences.

Transmission GTK, enable Remote Control

For Transmission daemon running in the background, edit the ‘/etc/transmission-daemon/settings.json‘ file to enable RPC remote control, setup user & password, whitelist, etc, before being able to connect.

Remember to use systemctl reload transmission-daemon.service to apply changes, since start or restart may reset your password in the config file.

Ubuntu 23.10 is going to introduce new enhanced tiling window support! Here’s how you can try it out in Ubuntu 22.04 & Ubuntu 20.04.

For those who don’t know what is window tiling, it’s a window management behavior that snap window to screen edge/corner to be half or quarter-tile. So, you can work with 2, 3, or 4 app windows side by side in your screen.

Ubuntu so far has basic tiling support, that can only snap window to left or right half-tile. An enhanced tiling is available soon via a new built-in extension called “Tiling Assistant”.

By either dragging or use keyboard shortcut, user can tile window to left, right, top and bottom half, which is called Edge Tiling. And, tile window to top-left, top-right, bottom-left, and bottom-right quarter of screen, called Corner Tiling.

And, after tiling a window, it has a tiling pop-up feature that automatically show you ‘Super + Tab’ app switcher style pop-up to choose which app to auto-tile to the remaining screen space. And, when click focus (raise) a tiled window, all windows in the tile group raise together.

Install Tiling Assistant in Ubuntu 22.04/20.04

Like ‘Ubuntu Dock’, the new extension is a fork of the community maintained ‘Tiling Assistant’ extension. Which, support GNOME desktop from version 3.36 to 44 at the moment.

Ubuntu 22.04 user can firstly search for and install “Extension Manager” from Ubuntu Software.

Install Extension Manager in Ubuntu 22.04+

Then, launch the tool and use it to search & install “Tiling Assistant” extension under Browse tab.

For Ubuntu 20.04, first press Ctrl+Alt+T on keyboard to open terminal and run command to install the agent and Extensions app packages:

sudo apt install chrome-gnome-shell gnome-shell-extension-prefs

Then, go to the link below and use ON/OFF switch to install ‘Tiling Assistant’:

If you don’t see the ON/OFF switch, install browser extension with link in the page and then refresh!

After installed, the extension, launch either “Extension Manager” or “Gnome Extensions” app and open the settings for that extension to configure the new tiling behavior.

Run Ubuntu on laptop or other machine with touchscreen? You can enable touch feedback with an extension.

It’s ‘Touch X‘, an extension that support GNOME from version 40 to 44. Meaning for Ubuntu 22.04, 23.04, Debian 12, RHEL 9, Fedora, Arch, Manjaro and other Linux with recent GNOME.

In these systems, it supports ripple feedback where the screen is touched. The feedback looks a bit like the locate mouse pointer function as the screenshot below shows you.

I don’t have a touchscreen device running Ubuntu. However, you can install and try the extension out by following steps one by one.

Install Touch X Extension

Firstly, open Ubuntu Software and use it to search and install the “Extension Manager” app.

Install Extension Manager in Ubuntu 22.04+

Then, click on top-left ‘Activities’ to open overview screen. When it opens, search for and launch “Extension Manager”.

Finally, navigate to ‘Browse’ tab in Extension Manager, search and install “Touch X” extension.

Once installed, switch back to “Install” tab. Then, click on the gear icon for that extension to open configuration page.
There you can change the color and radius of the ripple feedback.

For other Linux with GNOME, go to the extension web page via link below:

Then turn on the toggle switch to install the extension. And, use GNOME Extensions (available in Gnome Software) app to configure it.

If you don’t see the ON/OFF switch, install browser extension via link in that page and refresh it.

Want to configure the OSD (on-screen display) pop-up in Ubuntu and other Linux with GNOME? There’s an extension to do the job in GNOME 42 ~ 44.

When changing volume, screen brightness, device status (e.g., Bluetooth), etc via keyboard shortcuts in GNOME, there will be on-screen pop-ups indicate the status changes.

By default, these pop-ups occur in bottom center of screen and hide automatically in 1 seconds.

GNOME OSD

If you use “Just Perfection” extension, then you can find options to enable/disable OSD, and/or change its location on screen.

In this tutorial, I’m going to introduce “Custom OSD” that can do:

  • Move OSD to any screen position through horizontal / vertical percentage.
  • Increase/Decrease OSD size.
  • Configure how long the pop-up being displayed.
  • Enable background transparency.

As you see in the screenshot below, advanced users can also edit the CSS file to adjust background color, transparency, padding, and shadow parameters.

Custom OSD configuration page

How to Install Custom OSD extension

For Ubuntu 22.04 and Ubuntu 23.04, firstly search for and install “Extension Manager” from Ubuntu Software.

Install Extension Manager in Ubuntu 22.04+

Then, launch “Extension Manager”, navigate to ‘browse’ tab, and finally search and install ‘Custom OSD’ extension.

Once installed, go back ‘Installed’ tab in Extension Manager and click on gear icon for that extension to start configuring your on-screen display pop-ups.

As mentioned, the extension works in GNOME from version 42 to 44. So, it should also works in Debian 12, Fedora 37/38, Arch, etc with GNOME. In these Linux, you just need to go to the link below:

Then, use the ON/OFF toggle to install/remove the extension. NOTE: If you don’t see the toggle switch, install browse extension via the link in that page and refresh it!

For those who prefer light theme, there’s an extension now to make all the GNOME Shell components to be light!

Ubuntu so far has light and dark mode options available in the ‘Appearance’ settings page. It can switch the color scheme for system menu, notification, and app windows.

However, other components, such as panel and dock, are always dark!

GNOME developer team has been working on the full light mode support. Before it’s going official, user can try it out via an unofficial extension.

With the extensions, the following part of your desktop will also go light:

  • Top panel.
  • Ubuntu Dock (left panel)
  • OSD (volume down/up pop-up)

Light Shell

Install Light Shell Extension

1. The extension so far supports GNOME 42, 43 and 44. Ubuntu user can first search for and install “Extension Manager” from Ubuntu Software.

Install Extension Manager in Ubuntu 22.04+

2. Then, click on top-left ‘Activities’ to open overview screen. Search for and launch “Extension Manager” tool.

3. When the tool opens, navigate to ‘Browse’ tab. Search for and install ‘Light Shell’ extension.

In case ‘Extension Manager’ does not work for you, go to the extension web page via the link below:

Then turn on the toggle to install it!

If you don’t see the ON/OFF toggle, install browser extension via link in that page and also press Ctrl+Alt+T on keyboard to open terminal and run command:

sudo apt install chrome-gnome-shell

Finally, refresh the web page.

Turn Off or Remove Light Shell

With the extension enabled, the dark mode (via Appearance settings option) will NOT go fully dark.

In the case, you can launch “Extension Manager“. Then either use the ON/OFF switch to disable the extension, or click expand and use “Remove” button to uninstall.

That’s all. Enjoy!

Running Ubuntu on Desktop PC or laptop with external monitor? You can add a slider in top-right system menu to control the screen brightness.

Unlike laptop’s built-in screen, most Linux today does not provide brightness control for external monitors.

Fortunately, there’s a ddcutil utility can do the job via ddc/ci protocol, which is supported in most external monitors. And, there’s an extension to add the slider control to system status menu.

brightness slider for external monitor

The extension supports all current Ubuntu releases, including Ubuntu 20.04, Ubuntu 22.04, Ubuntu 22.10 and Ubuntu 23.04, as well as other Linux with recent Gnome desktop, such as Fedora Workstation, Debian, RHEL.

NOTE: DDC/CI is usually enabled by default. Just in case, use your monitor’s physical button to make sure the option is enabled!

1. First of all, press Ctrl+Alt+T on keyboard to open terminal. When it opens, run command to install the ddcutil utility in Ubuntu:

sudo apt install ddcutil

2. Next, add your current user to ‘i2c’ group to grant permissions:

sudo gpasswd --add $USER i2c

3. Install “Extension Manager” tool from Ubuntu Software for installing and managing extensions.

Install Extension Manager in Ubuntu 22.04+

For Ubuntu 20.04, run command to install “Gnome Extensions” app instead, as well as agent package for browser integration.

sudo apt install gnome-shell-extension-prefs chrome-gnome-shell

4. Ubuntu 22.04 + can now launch “Extension Manager” and use the tool to search and install “Brightness control using ddcutil” extension.

For Ubuntu 20.04, go to this page in web browser, install browser extension if prompted (refresh after installation), and finally turn on the ON/OFF switch to install that extension.

5. The extension by default add an indicator applet in panel with brightness slider. To configure it, open ‘Installed’ tab in “Extension Manager” (or ‘Gnome Extensions’ app for Ubuntu 20.04).

Then, click on either gear button or ‘Settings’ button for that extension. Finally, set button location to “System Menu” and turn on “Hide System Indicator” for better integration.

That’s all. Enjoy!


Looking for an alternative on-screen keyboard for Ubuntu, Fedora or other Linux with GNOME? Try GJS OSK.

The built-in on-screen keyboard in Ubuntu and other Linux with GNOME is not so good. It lacks some keys, and does not raise up in most cases in Ubuntu 22.04.

In this tutorial, I’m going to introduce a new OSK application. It’s GJS OSK written in GNOME JavaScript. The application features on-screen keyboard with even more keys, such as F1 ~ F12, number 0,1,2,…9, Arrows, Ctrl buttons, and PrintScreen.

And, without sticking to the screen bottom, user can move the keyboard anywhere around the screen. Just click on quadruple arrow icon (see screenshot below) in the OSK, then you can drag moving it just like normal applications.

GJS OSK, allows to move around the screen

Also, it has an indicator applet on panel allows to one mouse click to show or hide the keyboard.

Click show/hide the on-screen keyboard

Other features of GJS OSK include:

  • Both Wayland and X11 support.
  • Support changing landscape and portrait size, font size, but sadly can NOT change the keyboard size.
  • Allow changing keyboard color.
  • Support QWERTY, QWERTZ, AZERTY, Dvorak layout.

GJS OSK with different background color

How to Install GJS OSK

NOTE: GJS OSK is a stand-alone on-screen keyboard. You need to disable system built-in on-screen keyboard first from Settings to avoid conflict.

Option 1: Install GJS OSK from Source

At the moment of writing, the on-screen keyboard supports GNOME from version 42 to 45. Meaning, you can install it in Ubuntu 22.04, Ubuntu 23.04, Ubuntu 23.10, Debian 12, Fedora 38/39, and other Linux with recent GNOME.

1. First, go to link below to download the source from Github release page:

2. Then, extract and move the “gjsosk@vishram1123.com” sub-folder into .local/share/gnome-shell/extensions directory.

NOTE: .local folder is hidden by default, press Ctrl+H to show/hide it.

3. Finally, log out and back in. Then, use either “GNOME Extensions” or “Extension Manager” app to configure the new on-screen keyboard.

Option 2: Install from EGO

For GNOME 43/44, meaning Ubuntu 23.04, Fedora 38 and Debian 12, the extension is also available to install via extensions.gnome.org.

1. For Ubuntu 23.04 user, first search for and install “Extension Manager” from Ubuntu Software.

Install Extension Manager in Ubuntu 22.04+

2. Then, launch “Extension Manager” and navigate to “Browse” tab. Finally, use it to search and install “GJS OSK” extension.

Once installed, an indicator applet should appear in top-right corner allows to toggle display or hide the on-screen keyboard.

To change the keyboard color, layout, etc, go back “Installed” tab in Extension Manager and click on the gear button for that extension to open the configuration page.

For Fedora 38 and other Linux, go to the extension web page and use ON/OFF switch to install it. Finally, install “Gnome Extensions” app either from Gnome Software or system package manager to access the extension’s configuration page.

Want to send your application shortcut icons onto desktop, so you can click them to launch the corresponding apps? This simple tutorial is going to show you how to do the job in Ubuntu 23.04.

1. Firstly, launch Ubuntu Software. Then use it to search and install the “Extension Manager” app.

Install Extension Manager in Ubuntu 22.04+

In case Ubuntu Software does not work for you, press Ctrl+Alt+T to open terminal and run command to install it:

sudo apt install gnome-shell-extension-manager

2. Once installed, press Super (the Windows logo) key on keyboard to open ‘Activities’ overview screen. Then search for and launch the ‘Extension Manager’ application.

3. When the tool opens, navigate to ‘Browse‘ tab. Search for and click install “Add to Desktop” extension.

The extension at the moment does NOT support GNOME 44 (Ubuntu 23.04). In the case, open ‘☰’ menu and enable “Show Unsupported”. Finally, click on “Unsupported” button to install the ‘Add to Desktop’ extension anyway.

4. This step is only required when ‘Add to Desktop‘ has not been updated with your system support.

Press Ctrl+Alt+T on keyboard to open terminal, then paste the command below and run to disable extension version validataion:

gsettings set org.gnome.shell disable-extension-version-validation true

5. Next, log out and back in. Re-launch “Extension Manager” and make sure the “Add to Desktop” extension is enabled under ‘Installed’ tab.

6. Finally, click on ‘Activities’ button on top-bar to open overview. Search for your desired application, right-click on its icon and use “Add to Desktop” menu option to pin it into the desktop.

Do the last operation repeatedly for all your favorite applications and enjoy!