Cinelerra, a professional video editing and compositing software designed for the GNU/Linux now reached v4.5. Here’s how to install it in Ubuntu 13.10 Saucy, Ubuntu 13.04 Raring, Ubuntu 12.04 Precise, Ubuntu 12.10 and Linux Mint.
What’s New in Cinelerra 4.5:
Speed curves mainly for video & in degraded quality for audio.
Some control over whether automation follows edits.
Ability to transfer keyframes between audio and video tracks.
Motion temporaries are stored in /tmp/m and /tmp/r files.
Time Avg clears the accumulator on keyframes.
Install Cinelerra 4.5:
The DEB installer for Ubuntu is available at this page. Download & installed the cinelerra-data_4.5-dmo1_all.deb & cinelerra_4.5-dmo1_amd64 (or i386).deb
If you’d like to install Cinelerra CV (community version of Cinelerra which adds new enhancements to the official source code.), run commands below in terminal one by one (Ctrl+Alt+T):
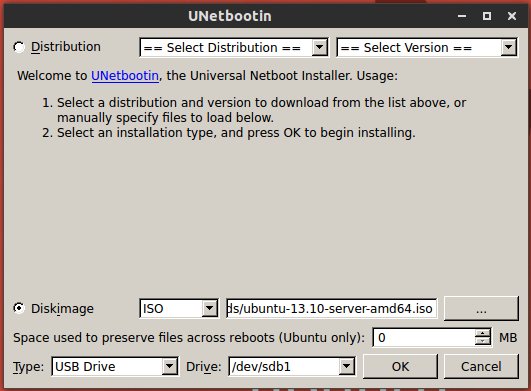
First download Unetbootin executable, a simple tool to install Linux/BSD distributions to a partition or USB drive. It works on Windows, Linux and Mac.
Insert USB stick to computer and format (don’t use’Quick format’) to FAT. Open Unetbootin, in the picture below choose the Ubuntu 13.10 Server iso and your usb device and finally click OK to start the burning process.
create bootable ubuntu server usb
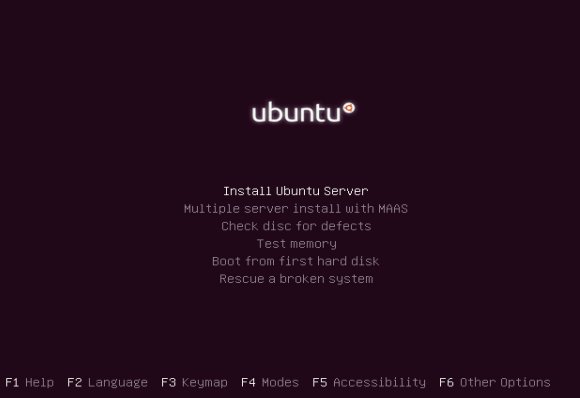
Once finished, connect the USB to the machine which you want to install Ubuntu Server on. Boot from the USB and you’ll see a screen with list of options include ‘Install Ubuntu Server’
Install Ubuntu 13.10 Server
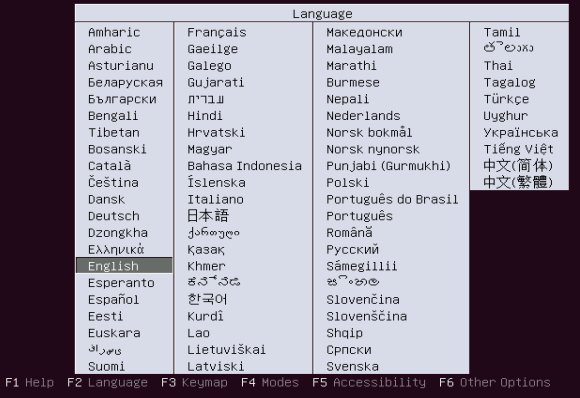
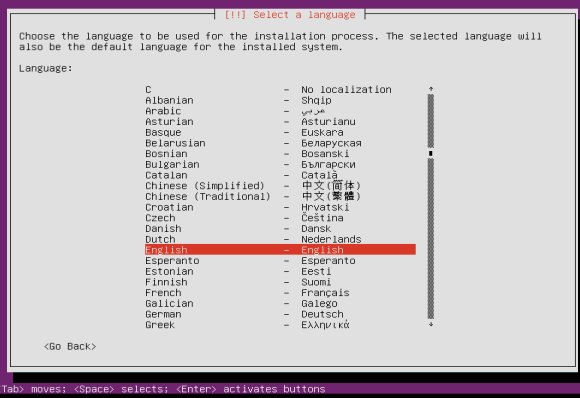
Select ‘Install Ubuntu Server’ from the Unetbootin boot screen, then select your desired language in the screen below:
Ubuntu 13.10 Server select language
Click Install Ubuntu Server
install ubuntu 13.10 server
Choose the language for installation process and installed system:
Ubuntu 13.10 server installation language
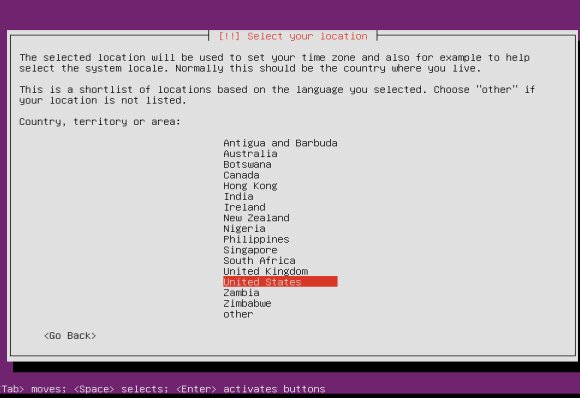
Select your Country which will used to set your time zone:
Ubuntu 13.10 Server select location
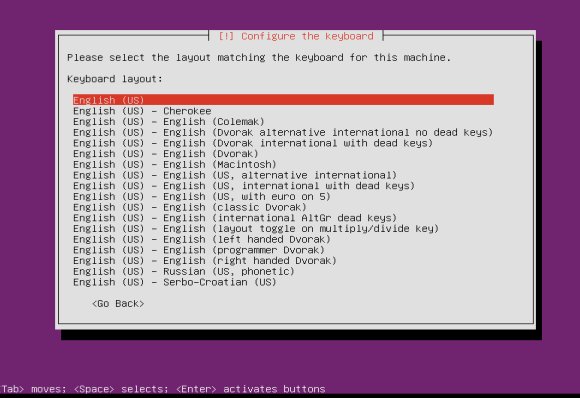
Choose your locale settings. Then select YES to detect keyboard layout or NO to select from list.
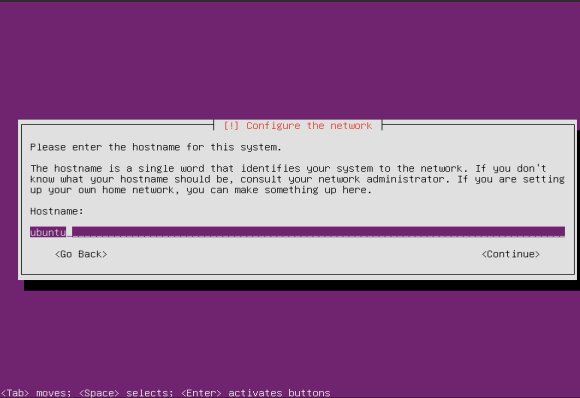
Setup the hostname (Computer name).
Ubuntu 13.10 Server hostname
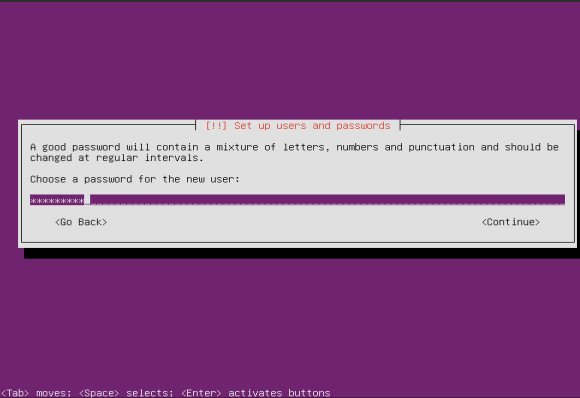
Enter your username and password to create an Administrator account. You can login with this user after installation:
Ubuntu 13.10 Server create user
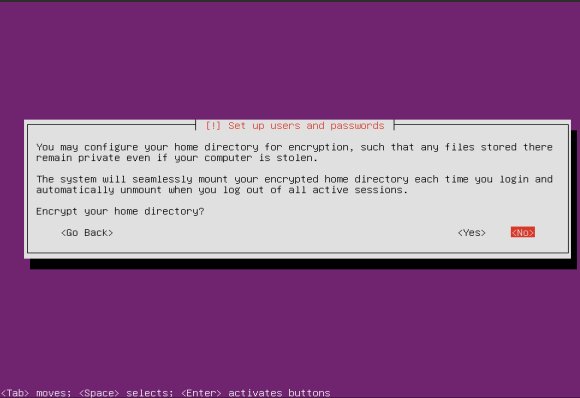
Encrypt previous created user’s home directory or not:
Ubuntu 13.10 Server encrypt home directory
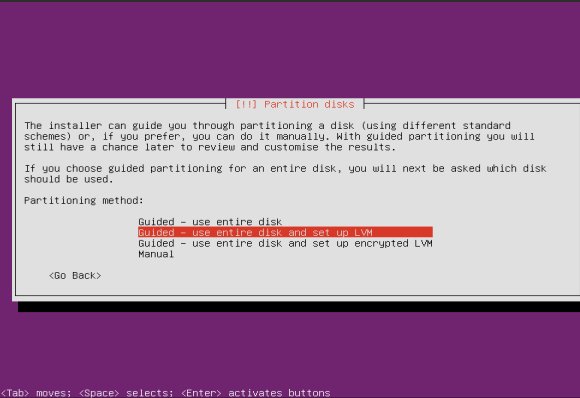
Select the partitioning method:
Guided – use the entire disk: it will automatically create the main EXT4 partition and swap area for Ubuntu using all disk storage.
Guided – use the entire disk and setup (encrypted) LVM: it will use the whole disk storage and you need to manually create EXT partition and Swap for Ubuntu Server.
Manual: If you have a dual-boot system or you want to keep a non-system partition on the disk, do it manually.
Ubuntu 13.10 Server partition
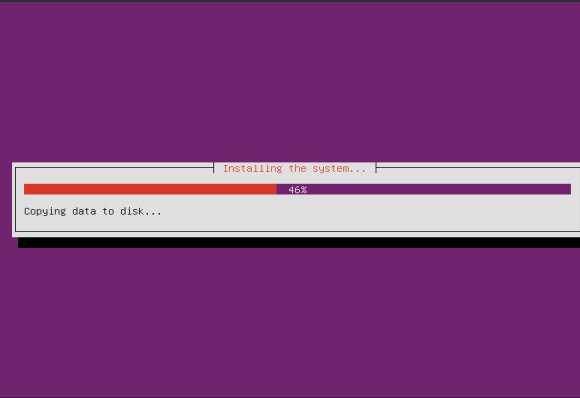
Confirm the partition and the installation will begin:
Ubuntu 13.10 Server installing process
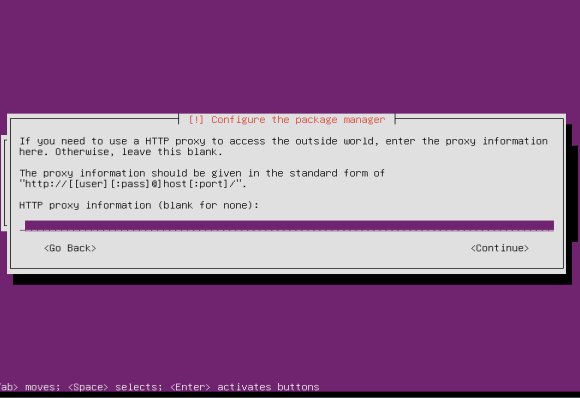
Input HTTP proxy server IP. Leave it empty if you don’t have one.
Ubuntu 13.10 Server HTTP setup
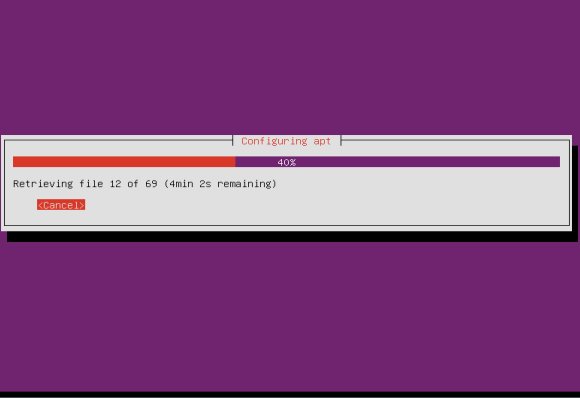
It’ll take a few minutes configuring apt. If want, cancel it and do it afterwards.
Ubuntu 13.10 Server configure apt
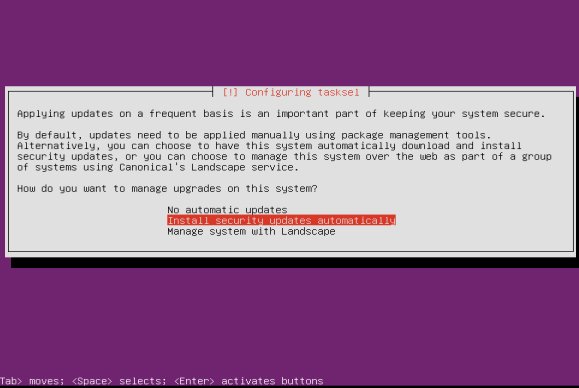
In order to keep your system security, select ‘Install security updates Automatically’ in next screen:
Ubuntu 13.10 Server security updates
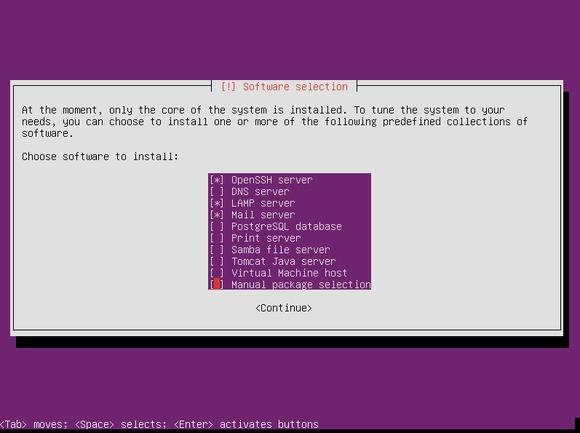
Now you can select to install OpenSSH server, DNS, LAMP, MAIL, PostgreSQL, Print, Samba, Tomcat, Virtual Machine Host from the list. Use arrow keys to highlight and Space to select, finally press Enter to go on.
Ubuntu 13.10 Server install software
Select to install Grub boot loader and finish the installation. Restart and login with the username and password you created:
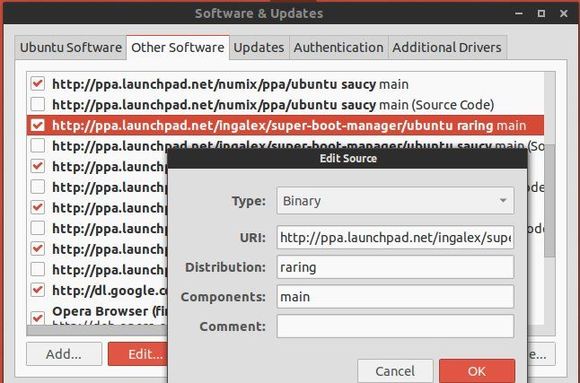
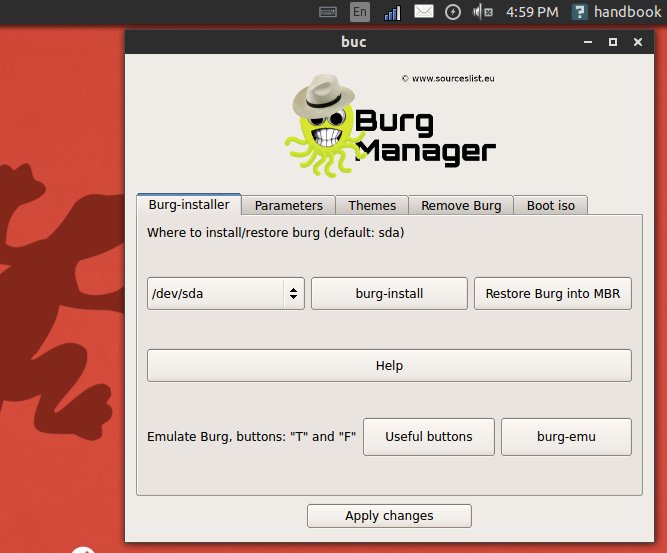
Super Boot Manager is a simple tool to configure Grub, Burg, and Plymouth. This interface also allows the installation of Burg, the installation of many graphic themes for Burg and Plymouth and it allows the creation of customized themes.
The Super Boot Manager PPA is not ready for Ubuntu 13.10 Saucy Salamander. So here’s how to install it using the Raring DEBs. It works great in my Ubuntu 13.10 64-bit machine.
Tutorial Objectives:
Install Super Boot Manager in Ubuntu 13.10
Enjoy!
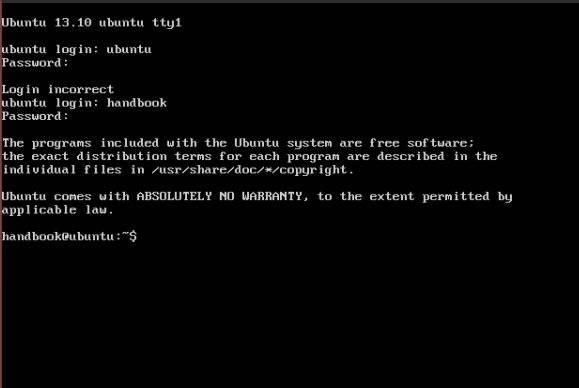
To get started, press Ctrl+Alt+T on your keyboard to open terminal. When it opens, run command below to add the PPA:
After added the PPA, open Software & Updates from Unity Dash. Under Other Software tab, find out the line says ‘http://ppa.launchpad.net/ingalex/super-boot-manager/ubuntu saucy main’. Edit and change the distribution from saucy to raring.
Now you can install the Super Boot Manager as well as buc by running below 3 commands one by one:
This simple tutorial shows you how to change the hostname (also known as computer name) in Ubuntu 21.10 Impish Idri.
The computer name is a unique identifier given to each computer. It’s not a big deal for small home networks or single use home computers. It matters however in larger organizations where you need to be able to identify servers. The name is a single word with no spaces, it has only letters, numbers or a hyphen with up to 253 characters.
The default name was set during installing the Ubuntu system. You can however change it at anytime as you want. And here’s the universal way to do the trick in either Ubuntu desktop or server editions.
Tutorial Objectives:
Change Computer Name / Hostname in Ubuntu 21.10
Enjoy!
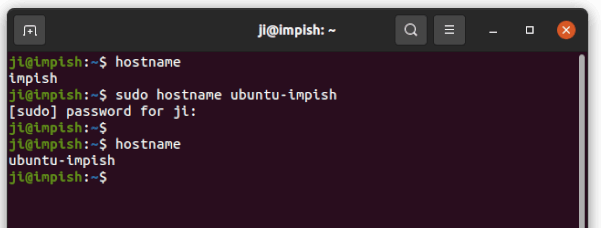
Change computer name until reboot:
To get started, first either connect to your Ubuntu server or open terminal by pressing Ctrl+Alt+T on keyboard or searching from the overview screen. When it opens, run command:
sudo hostname NEW_NAME
Replace ‘NEW_NAME’ in command with your desired computer name. And it will take place until reboot.
NOTE: the new name takes effect immediately but not visible until you start a new terminal window.
Change computer name permanently:
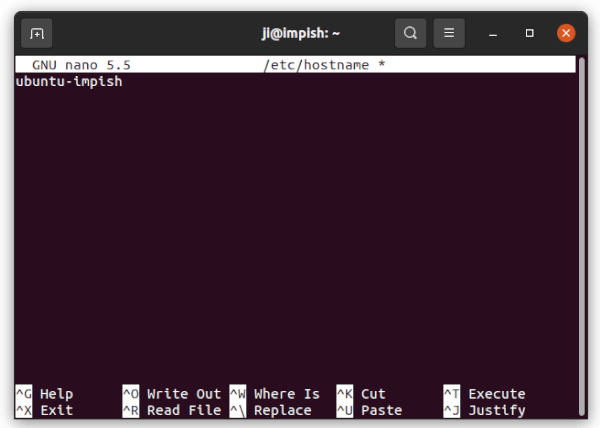
In most Linux distributions, you can edit the “/etc/hostname” configuration file to set new computer name.
1.) To do so, open terminal from start menu or connect to the command console of remote server, then run command:
sudo nano /etc/hostname
This command will edit the config file via nano, the universal command line text editor. You may replace it with your favorite text editor, such as gedit for GNOME desktop.
When the file opens, delete the old name and type a new one. And press Ctrl+X, then type y, and hit Enter to save changes!
2.) It’s important to edit /etc/hosts file to map the new name to 127.0.1.1 and/or the permanent IP address if any.
sudo nano /etc/hosts
NOTE: you have to set same name in both /etc/hosts and /etc/hostname to avoid networking issues. And save file by pressing Ctrl+X, type y, and hit Enter.
The NetBeans is an integrated development environment (IDE) written in Java and can run on Windows, OS X, Linux, Solaris and other platforms supporting a compatible JVM.
NetBeans IDE lets you quickly and easily develop Java desktop, mobile, and web applications, as well as HTML5 applications with HTML, JavaScript, and CSS. The IDE also provides a great set of tools for PHP and C/C++ developers. It is free and open source and has a large community of users and developers around the world.
See What’s new in latest NetBeans IDE 7.4:
HTML5 development for Android and iOS devices
HTML5 development in Java EE and PHP applications
Editing support for Knockout and AngularJS frameworks
Java SE 8 Support
Redesigned JavaFX support according to JDK 8 architecture
Additional enhancements are listed on the NetBeans IDE 7.4 New and Noteworthy page.
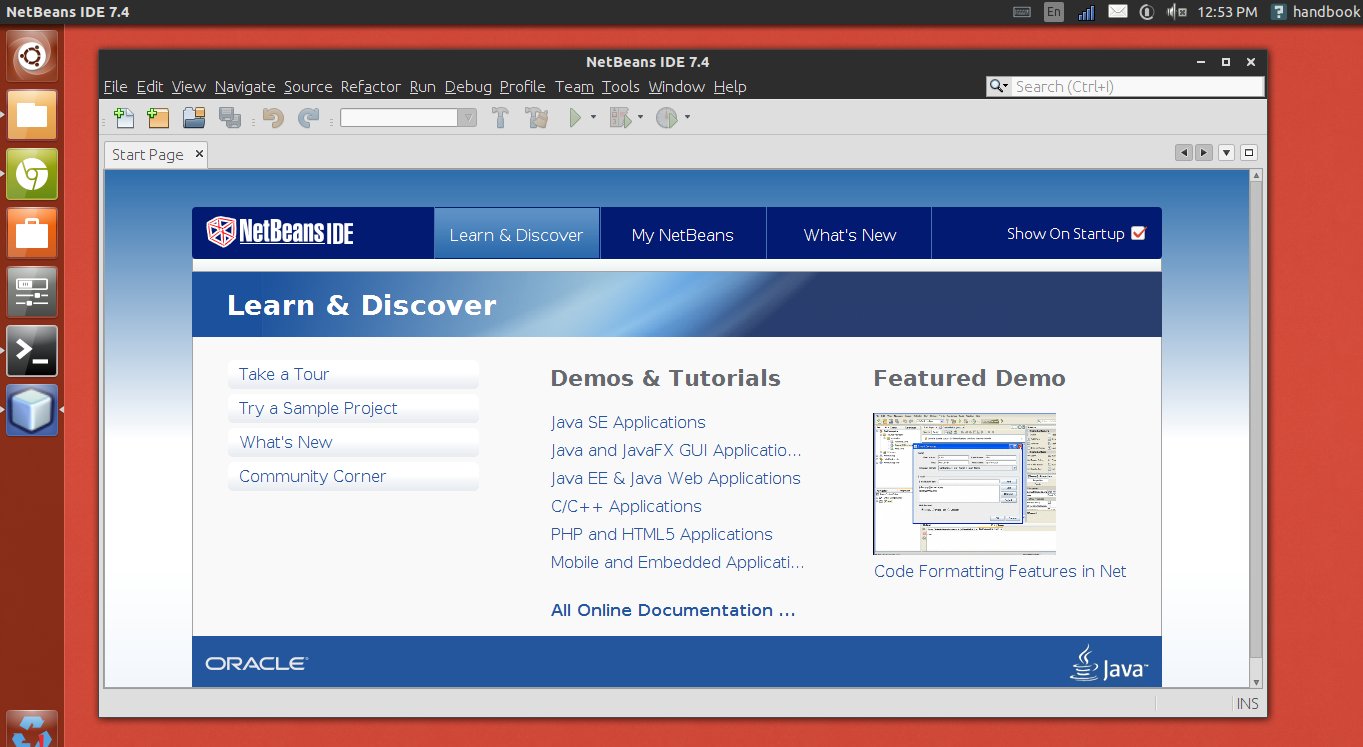
This tutorial shows you how to install NetBeans IDE 7.4 in Ubuntu 13.10 & Linux Mint 16 using oracle’s own JDK + NetBeans Co-bundled distribution package. It also works on Ubuntu 14.04, Ubuntu 13.04, Ubuntu 12.04 and other derivatives.
Install Netbean IDE 7.4 on Ubuntu & Linux Mint
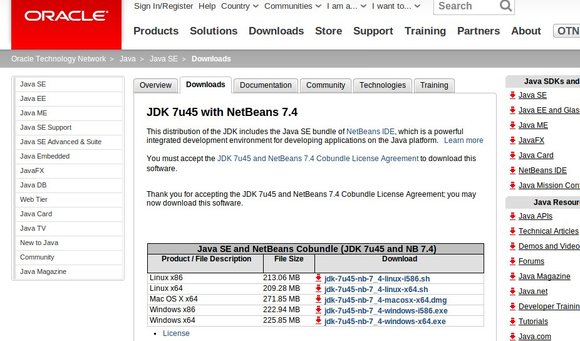
NetBeans IDE 7.4 works better and faster with JDK distribution, so first download the oracle’s Co-bundled package JDK 7u45 with NetBeans 7.4 Go and download:
jdk-7u45-nb-7_4-linux-i586.sh for the 32-bit Linux System.jdk-7u45-nb-7_4-linux-x64.sh for the 64-bit Linux System.
Download NetBean IDE
Go to the Downloads folder, set the permission by right-click on the installer -> Properties -> Permissions tab -> check ‘Allow executing file as program’. Or just run command below in terminal (Ctrl+Alt+T):
chmod +x ~/Downloads/jdk-7u45-nb-7_4-linux*.sh
Now run the installer:
cd ~/Downloads && ./jdk-7u45-nb-7_4-linux*.sh
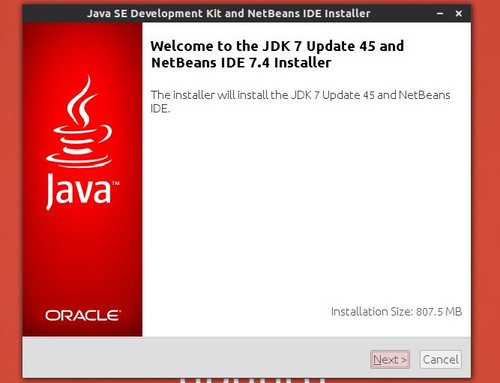
It brings up the install wizard:
Netbean IDE install wizard
Follow it. Finally you’ll get the NetBeans IDE 7 installed on your system:
NetBeans IDE 7.4 on Ubuntu 13.10
(Optional) To uninstall Netbeans IDE 7.4, run the uninstall.sh from the installation directory
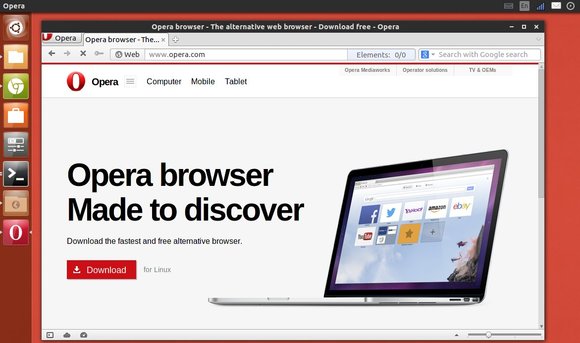
This tutorial shows how to install Opera browser in Ubuntu 13.10 Saucy Salamander or Linux Mint 16 Petra.
Opera is a web browser developed by Opera Software. The latest versions of Opera use the Blink layout engine, which is used in Chrome v28+.
The latest Opera 12.16 for Linux is a recommended upgrade offering security and stability enhancements.
How to install Opera:
It’s very easy to install Opera in Ubuntu and its derivatives. Just download the Debian package from its official site. Or check your OS type (32-bit or 64-bit) and download the installer from Opera repository:
Once downloaded, double-click to install the package via pop-up Ubuntu Software Center or Gdebi. If you’re missing dependencies, run below command in terminal (Ctrl+Alt+T):
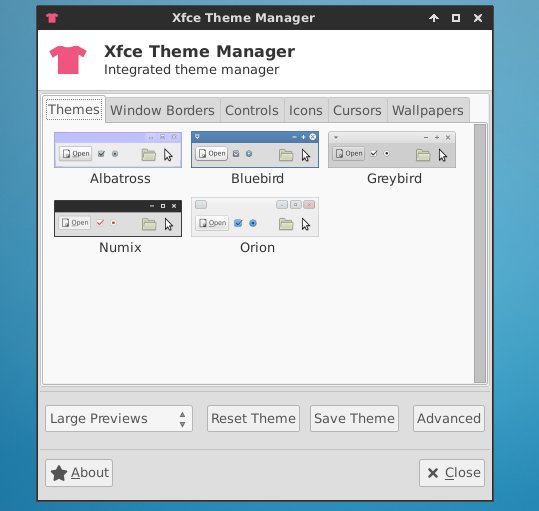
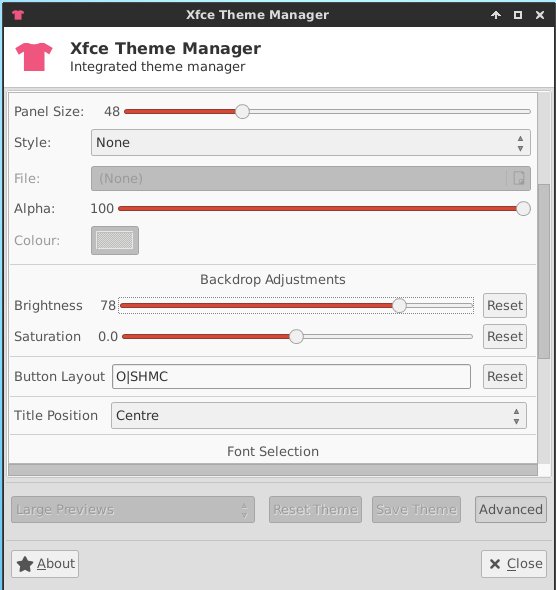
Xfce Theme Manager, an integrated theme manager for Xfce Desktop now is available for (X)Ubuntu 13.10 Saucy Salamander.
With this tool, you can manage:
GTK themes
window borders and controls
icon themes
cursors
wallpapers
panel size and style, backdrop adjustments, fonts and other view options
Screenshots:
xfce theme manager gtk
xfce theme manager advanced
xfce theme manager icons
To install Xfce Theme Manager in (X)Ubuntu 13.10 Saucy and Linux Mint 16 Xfce, press Ctrl+Alt+T on your keyboard to open terminal. When it opens, run commands below one by one:
Kid3 Audio Tag Editor has reached v3.0 with new features and improvements. It adds command-line interface kid3-cli and supports GStreamer 1.0.
If you want to easily tag multiple MP3, Ogg/Vorbis, FLAC, MPC, MP4/AAC, MP2, Opus, Speex, TrueAudio, WavPack and WMA files (e.g. full albums) without typing the same information again and again and have control over both ID3v1 and ID3v2 tags, then Kid3 is the program you are looking for.
With Kid3 you can:
Edit ID3v1.1 tags
Edit all ID3v2.3 and ID3v2.4 frames
Convert between ID3v1.1, ID3v2.3 and ID3v2.4 tags
Edit tags in MP3, Ogg/Vorbis, FLAC, MPC, MP4/AAC, MP2, Speex, TrueAudio, WavPack, WMA, AIFF and WAV files
Edit tags of multiple files, e.g. the artist, album, year and genre of all files of an album typically have the same values and can be set together.
Generate tags from filenames
Generate tags from the contents of tag fields
Generate filenames from tags
Rename and create directories from tags
Generate playlist files
Automatically convert upper and lower case and replace strings
Import from freedb2.org, MusicBrainz, Discogs, Amazon and other sources of album data
Export tags as CSV, HTML, playlists, Kover XML and in other formats
What’s New in Kid3 3.0:
New:
Command-line interface kid3-cli.
Use common shared libraries for KDE, Qt-only and CLI versions.
Plugins for metadata libraries and importers.
Support Opus files with TagLib 1.9.
Support GStreamer 1.0.
Support libavresample 0.0.3.
Improved:
Editing without leaving the keyboard.
When saving a file fails, tell user if it is not writable.
Escape metacharacters in HTML export.
Updated Czech translation.
Updated Finnish translation.
Cleaned up configuration option sections.
Fixed:
Crash when saving non-FLAC file with flac extension.
Support minimum Mac OS X version 10.5.
Load Qt libraries only from bundle on Mac OS X.
DEBs for Ubuntu 12.04, Ubuntu 13.10 and installer for MAC OS, Windows are available in Kid3 homepage
Numix is a modern flat theme with a combination of light and dark elements. It supports Gnome, Unity, XFCE and Openbox.
This simple tutorials shows how to install Numix GTK as well as Numix icons on Ubuntu 13.10 Saucy, Ubuntu 14.04 Trusty, Ubuntu 13.04 Raring, Ubuntu 12.04 Precise and Linux Mint.
First take a look at screenshots:
numix gtk Ubuntu 13.10 Unity
numix gtk & icons linux mint
numix icons & gtk xfce4
numix gtk & icons gnome shell
numix gtk & icons gnome shell
Install Numix GTK & Icons via PPA:
Numix project gets a launchpad PPA to make it easy to install Numix GTK, icons, wallpaper in Ubuntu 14.04, Ubuntu 13.10, Ubuntu 13.04, Ubuntu 12.10, Ubuntu 12.04 and their derivatives.
To get started, press Ctrl+Alt+T on your keyboard to open terminal. When it opens, run commands below one by one: