


![]()
This tutorial shows how to separate /home from an existing Ubuntu file-system, to individual disk partition or even USB stick, while preserving all personal data.
Linux can have separate /home partition, which is useful for re-installing system, or even trying different Linux distributions without losing most of custom settings, configurations, downloads, etc.
While installing Linux, there’s usually an option to create separate /home. If you didn’t do that, then here’s step by step guide shows you how to do the trick afterward.
NOTE: This tutorial is tested in Ubuntu 24.04 LTS, though it should work in most popular Linux Distributions, such as Debian, Fedora, Arch, and more.
Step 1. Create Disk Partition for /home
First, launch GNOME Disks. Choose the destination disk drive from the left pane. If there’s enough free unallocated space in right, then choose it and go to next step to create a Ext4 file partition.
If NOT, either format an existing partition or shrink it to make free room. In my case, I was going to use my USB stick for /home, so I can take it anywhere and use even on different machines.
However, the USB drive has NTFS file-system on it which is NOT recommended for Linux file system due to security reason. In the case, either shrink to make free space, while preserving existing data in the drive, or format to use full partition which will however remove all data on it.
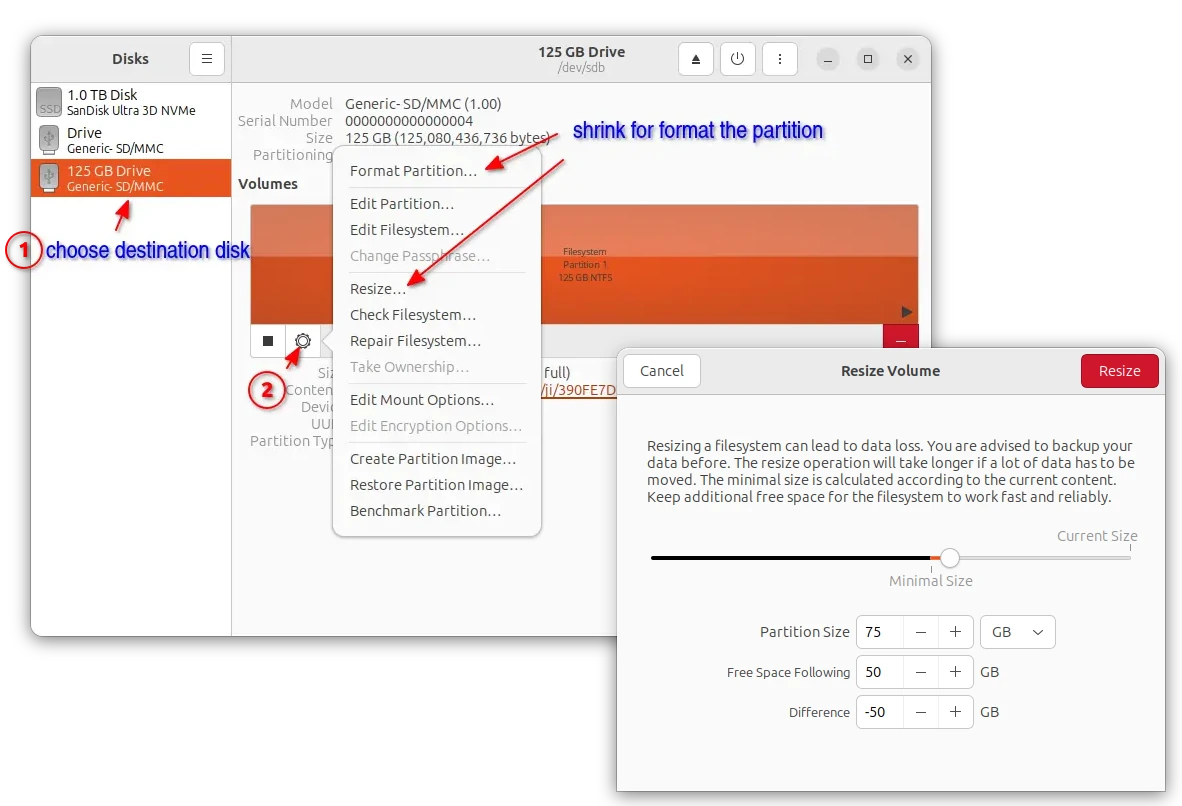
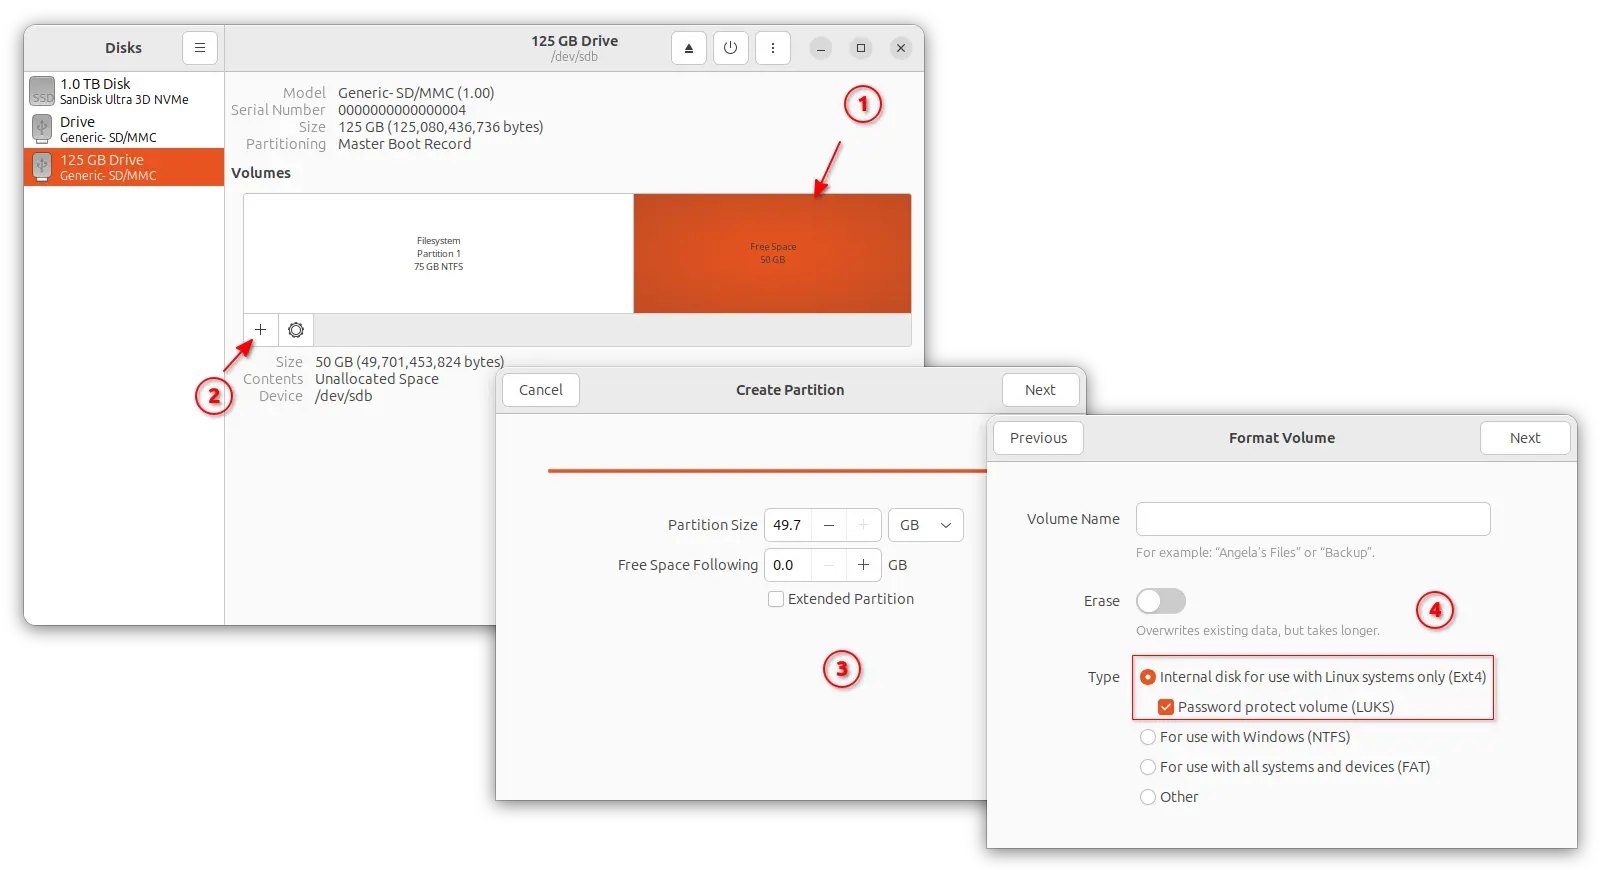
Once you have enough free space on the disk drive, choose it and click on “+” to create partition on it. Then, choose format to Ext4 file-system type, either with or without LUKS encryption as you want.
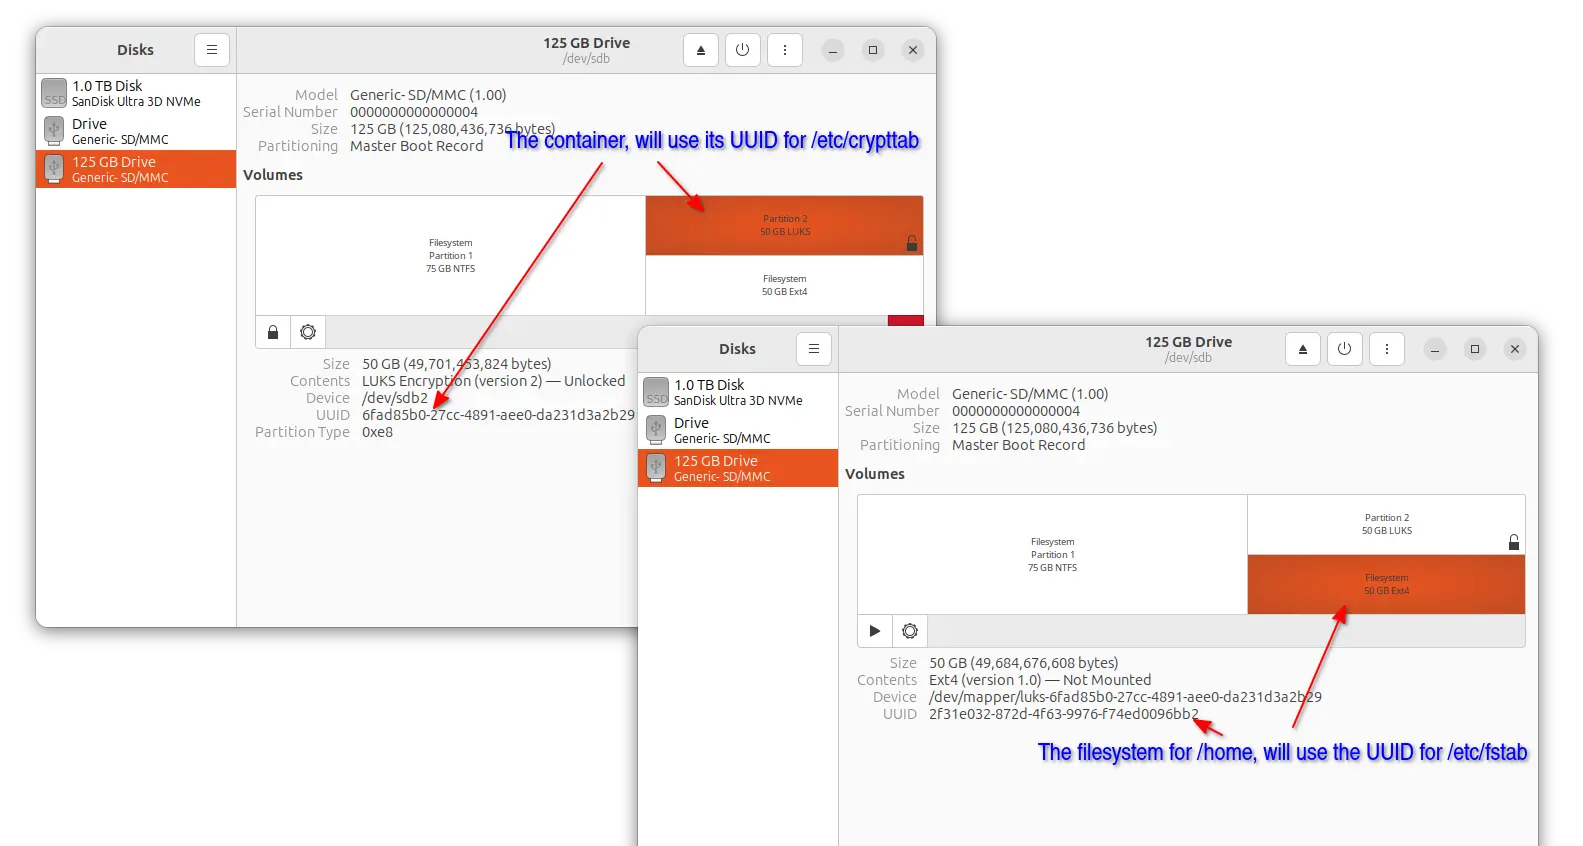
When done, you need to copy the UUID of the partition you’re going to use it for /home.
If encryption enabled, then unlock and use the UUID of top half (device marked as /dev/sdXY or /dev/nvmeXnYpZ) for /etc/crypttab, and, the UUID of bottom half (marked as /dev/mapper/xxxxxxx) for /etc/fstab in next step.
Step 2: Copy existing user contents to the Separate Disk Partition
After created the separated partition, click unlock (if encrypted) and mount using either file manager or Gnome Disks.
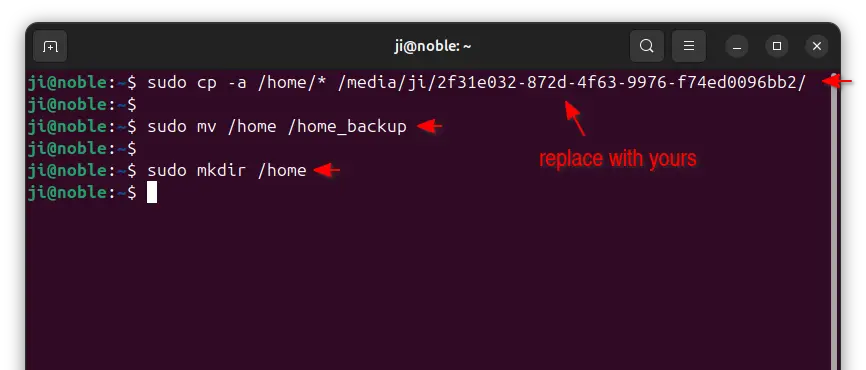
Then, open terminal (Ctrl+Alt+T) and run command to copy all existing users’ contents into the new separated partition. The -a command option is required to preserve the ownership, timestamp, etc, information.
sudo cp -a /home/* /media/ji/xxxxxxxx
NOTE: replace /media/ji/xxxxxxx in command to your mount point. Check it either in Gnome Disk, file manager, or by running command mount |grep /media/$USER.
Next, rename (move) the current /home as backup:
sudo mv /home /home_backup
NOTE: after running this mv command, all personal folders will be inaccessible until reboot with new separate /home. It’s better to close your apps, and stop any downloading before running this command.
Finally, re-create an empty /home directory as mount point for the new separate partition on every startup:
sudo mkdir /home
Step 3: Configure to let your system know the new /home partition
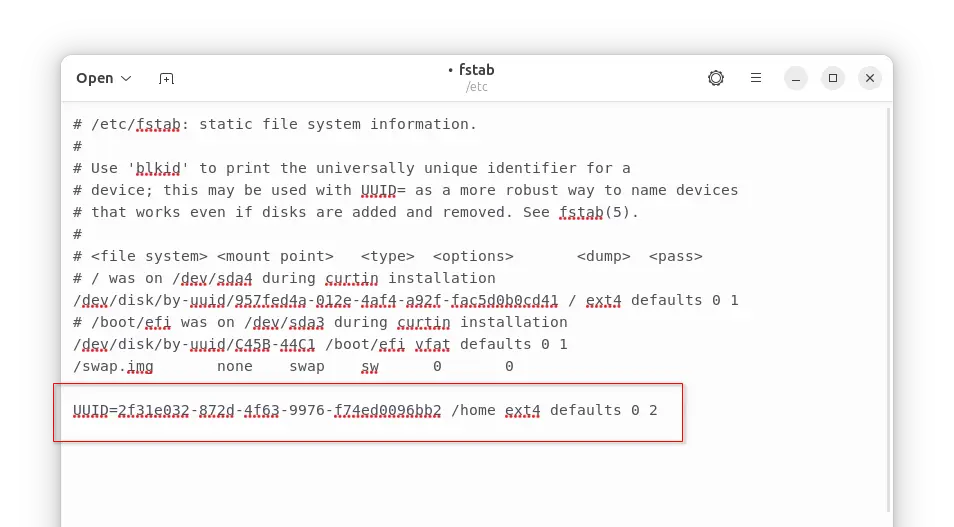
1. /etc/fstab is the configuration file to tell Linux to mount all the file partitions on start up.
To edit the file, open terminal (Ctrl+Alt+T) run command:
sudo gnome-text-editor /etc/fstab
Replace gnome-text-editor with your favorite editor, or use nano command line text editor that works in most Linux.
When it opens, add new line to tell it to mount the specified partition (via UUID) as separate /home:
UUID=xxxxxxxx-xxxx-xxxx-xxxx-xxxxxxxxxxxx /home ext4 defaults 0 2
NOTE: Replace the ID accordingly! Check it using ‘Gnome Disks’, and, if LUKS encryption enabled, use the UUID of bottom half marked as device /dev/mapper/luks-xxxxxxx
For nano text editor, press Ctrl+S then Ctrl+X to save and exit.
2. If you enabled LUKS encryption for that partition, then open terminal (Ctrl+Alt+T) and run command to install the required management tool.
sudo apt install cryptsetup
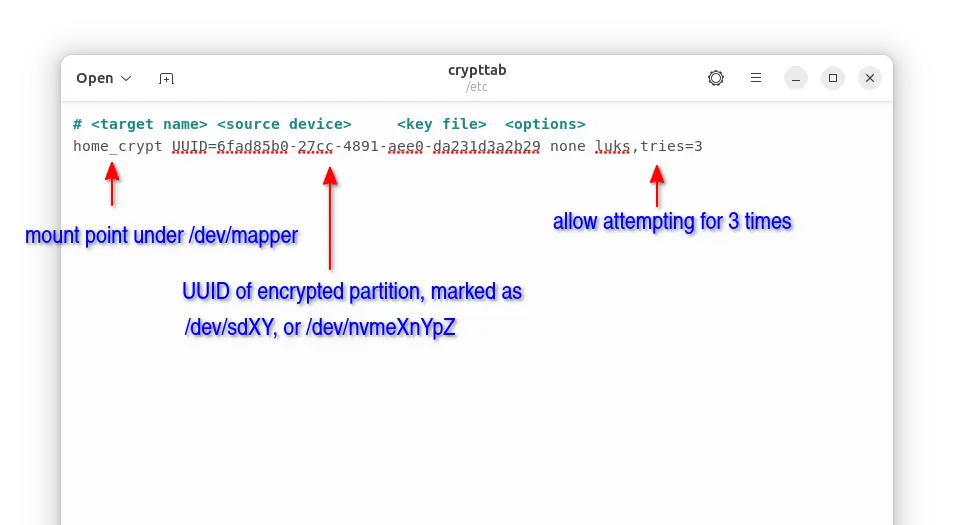
Then, edit the /etc/crypttab file via command:
sudo gnome-text-editor /etc/crypttab
Also replace gnome-text-editor with nano for non-GNOME desktop.
Finally, add new line to tell your Linux to unlock it (will ask you to type password) on every startup.
home_crypt UUID=xxxxxxxx-xxxx-xxxx-xxxx-xxxxxxxxxxxx none luks,retries=3
Here home_crypt specifies the mount point under /dev/mapper, you can change it to whatever as you want. And, replace the UUID according to the encrypted partition (the top half in GNOME Disk, marked as device /dev/sdXY or /dev/nvmeXnYpZ).
When done, save the file. And restart your computer to verify.
How to Restore
To restore the changes and use /home inside your root partition, boot your Linux and login.
Then, re-edit the /etc/fstab and /etc/crypttab files and remove the lines you added in the last step.
Next, restart your computer. Press Ctrl+Alt+F3(or F4/F5/F6) to switch to TTY command line console, since the login screen may refuse to let you in without /home directory content.
In the TTY console, login with your username and password, then run the command to restore backup:
sudo rm -R /home && sudo mv /home_backup /home
If you have deleted the backup, and there’s nothing to restore, then you may choose to re-generate a clean user home by running command:
sudo mkhomedir_helper ji
In command replace ji with your username, and re-run this command again and again for other users if any.


the line:
home_crypt UUID=xxxxxxxx-xxxx-xxxx-xxxx-xxxxxxxxxxxx none luks,retries=3
must be:
home_crypt UUID=xxxxxxxx-xxxx-xxxx-xxxx-xxxxxxxxxxxx none luks,tries=3
In the image corresponding to the instruction:
sudo cp -a /home/* /media/ji/xxxxxxxx
you have an additional slash at the end