


This is a step by step beginner’s guide shows how to install Ubuntu 24.04 LTS, Desktop Edition, in PC or laptop using an USB stick.
Ubuntu 24.04 is a long term support release with 5 years support (and other 7 years security updates via Ubuntu Pro). It features a new desktop installer. So, I re-write about this how to guide for beginners, with Windows 10/11 dual boot support.
NOTE: The new installer so far does NOT allow encryption for manually added partitions! Meaning encryption ONLY works when using entire disk for Ubuntu. See the bug reports here and here.
Requirements:
To follow this tutorial, you need to prepare following things:
- A 8GB or larger USB stick.
- PC/Laptop with Windows, macOS, or Linux with internet connection, for downloading .iso image and burn it into USB.
Step 1: Download & Verify Ubuntu 24.04 .iso image
First, select download the .iso image for Ubuntu 24.04 from either ubuntu.com/download, or via the link below:
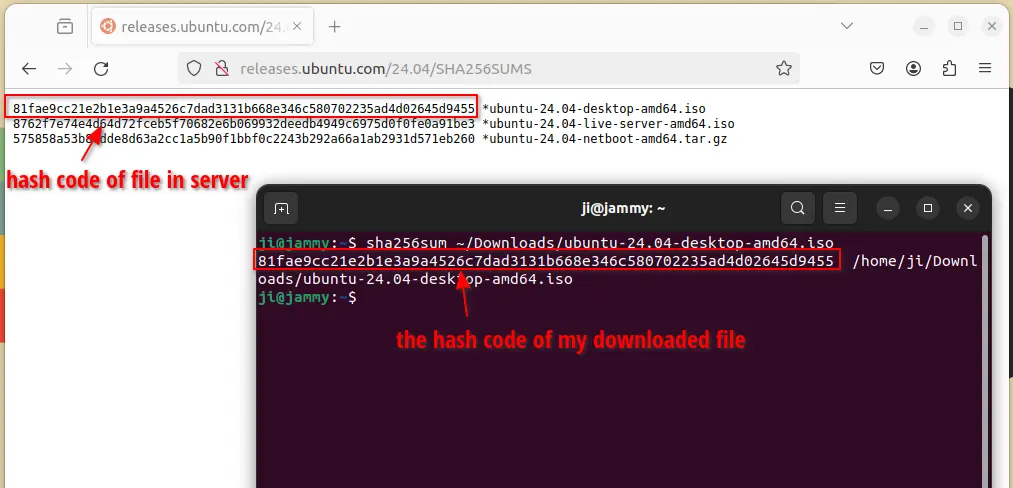
After downloaded the Disc image, it’s better to verify the file integrity, to make sure the downloaded file is completely same to the one in download server.
- If you’re on Windows, then search & open cmd, and run command to print the sha256sum for downloaded file:
cd Downloads && certutil -hashfile ubuntu-24.04-desktop-amd64.iso SHA256
- For Linux, use this command in terminal instead:
sha256sum ~/Downloads/ubuntu-24.04-desktop-amd64.iso
- And macOS can open terminal and run command:
shasum -a 256 ~/Downloads/ubuntu-24.04-desktop-amd64.iso
All the commands above assume that you saved the iso image in Downloads folder, and replace “ubuntu-24.04-desktop-amd64.iso” if you downloaded another file.
Once the command prints the hash code, compare it to the one in the download page. They must same before doing next step.
Step 2: Burn Ubuntu 24.04 ISO into USB
Next, you need to burn the .iso image into USB. So, you can boot the target machine into a live Ubuntu system from the USB, then start installing the system.
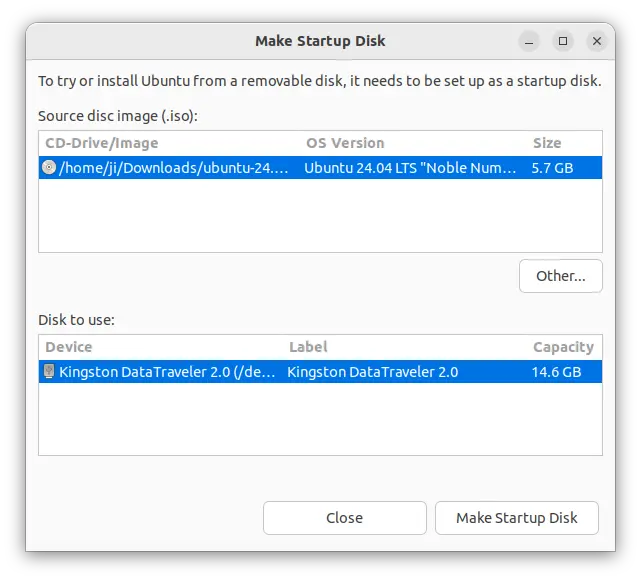
If you’re following this tutorial in Ubuntu, just plug-in the USB stick, then search for and launch the built-in “Startup Disk Creator” tool.
When it opens, it auto-detect the USB devices, auto-select the .iso image (if NOT, click “Other…” button and select manually). You just need to click the “Make Startup Disk” button, and wait until the process done!
For Windows, macOS, and other Linux, there are quite a few other tools can do the job. If you install different Linux distro frequently, then Ventoy is the best choice. Or, you may download and use the stupid simple tool Etcher that works in the previous platforms.
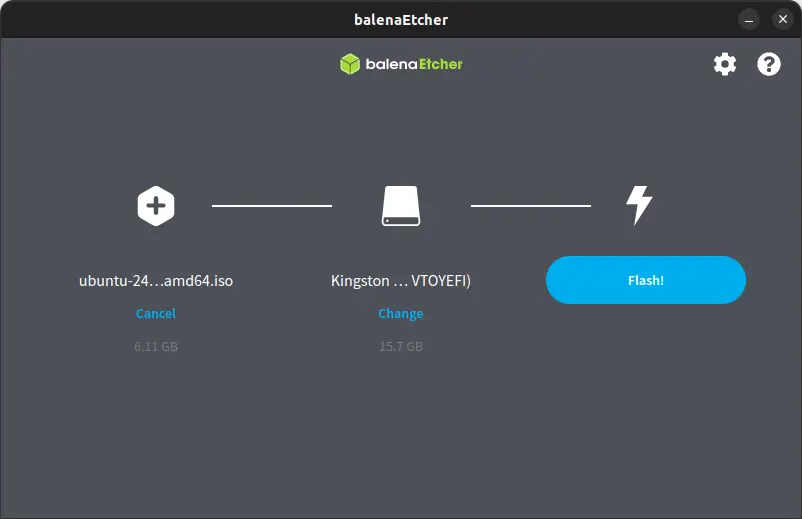
Burn iso to USB via Etcher in Windows, macOS and Linux.
Step 3: Boot the Ubuntu Live System from USB
Now, plug the USB stick into the target machine, and boot.
Depends on your machine, press del (the key varies on different machines, it may be Esc, F12, or else) at very beginning of boot process to launch UEFI menu and select boot from your USB. Or, go to BIOS settings, and set the USB as the first boot option.
NOTE: To avoid installing issues, it’s better to disable secure boot first! Then re-enable it after successfully installed Ubuntu.
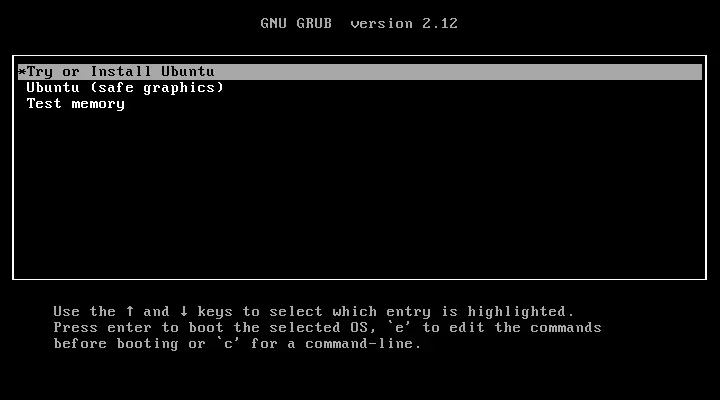
If the machine successfully boot from USB, it will show you the screen below.
The default “Try or Install Ubuntu” boot entry works great in my laptops with Intel CPU along with (and without) a dedicated GPU. But if your PC does NOT have an integrated GPU, then the second “Ubuntu (safe graphics)” is a good choice in case you have graphic rendering issue.
Step 4: Start installing Ubuntu
After booting into the live Ubuntu system from USB, it should automatically launch the installer wizard. If NOT, just move cursor to left to view the dock and click the first icon to launch manually.
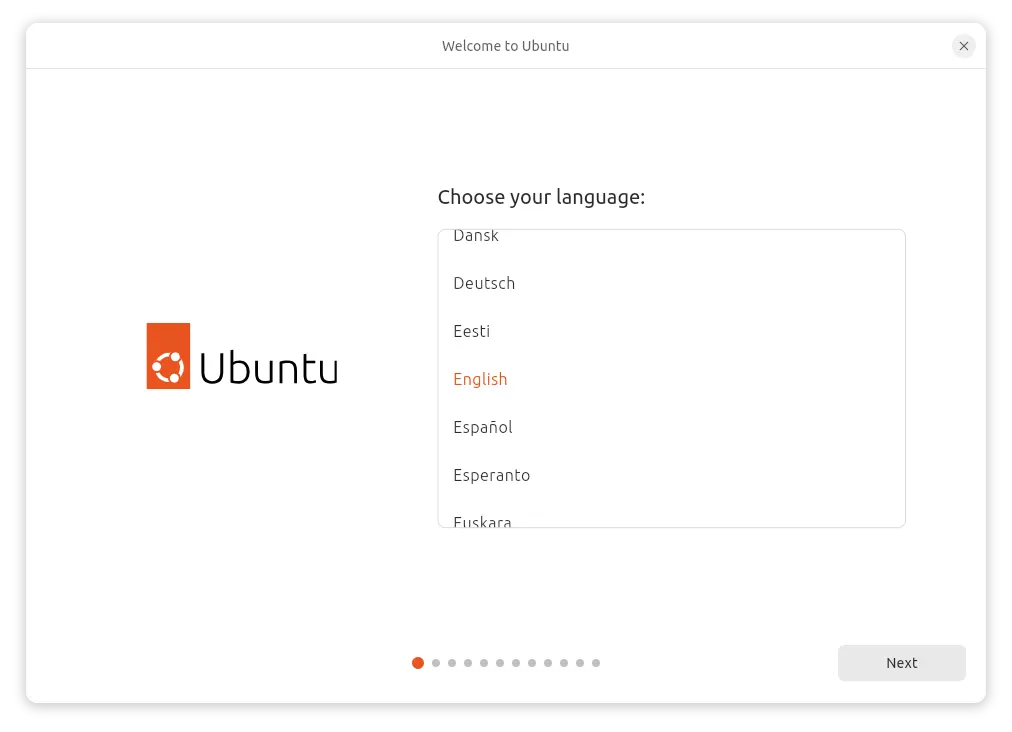
The Ubuntu 24.04 installer wizard
In the first page as the screenshot shows above, choose the language which will ONLY apply for this installer wizard.
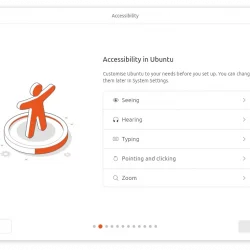
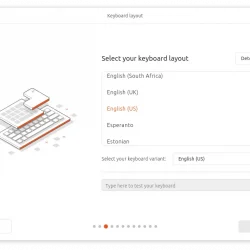
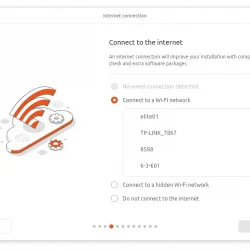
Then, go next pages to toggle accessibility options, such as screen reader, large text, desktop zoom, etc. All of them can be configured later after installation. So, you can click “Next” to leave them default. Also, choose keyboard layout, connect to internet (optional), etc.
Next, it will ask you whether to start installing Ubuntu. or try the live system. The installer wizard can be launch again any time from left panel, if you chose to try it out first.
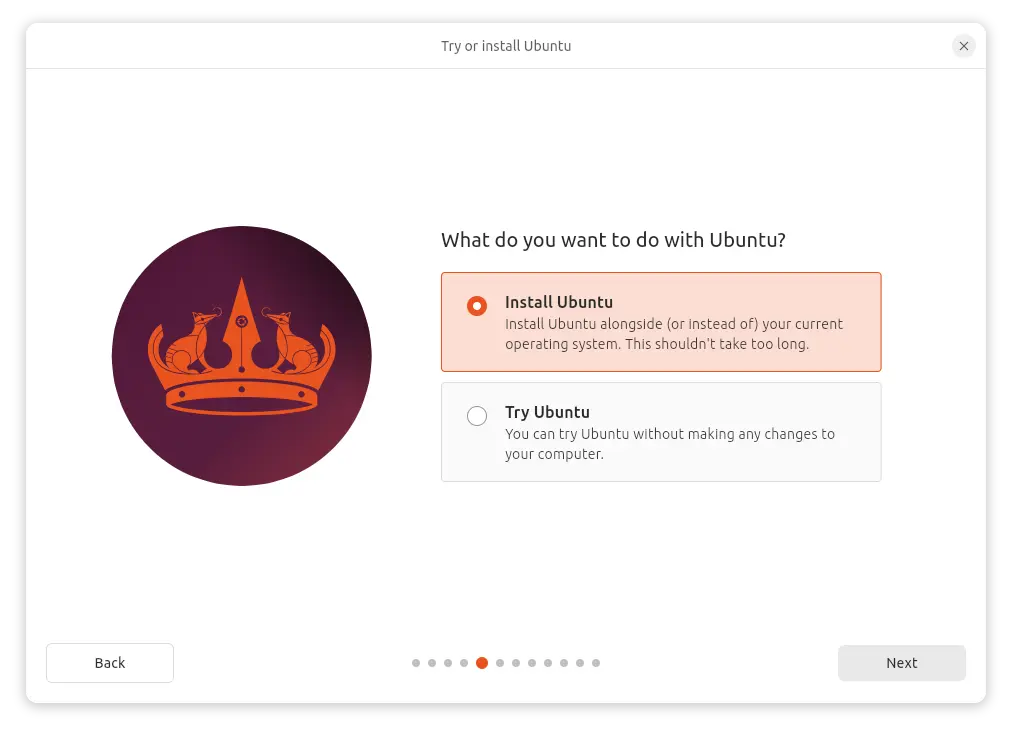
Try or Start Install
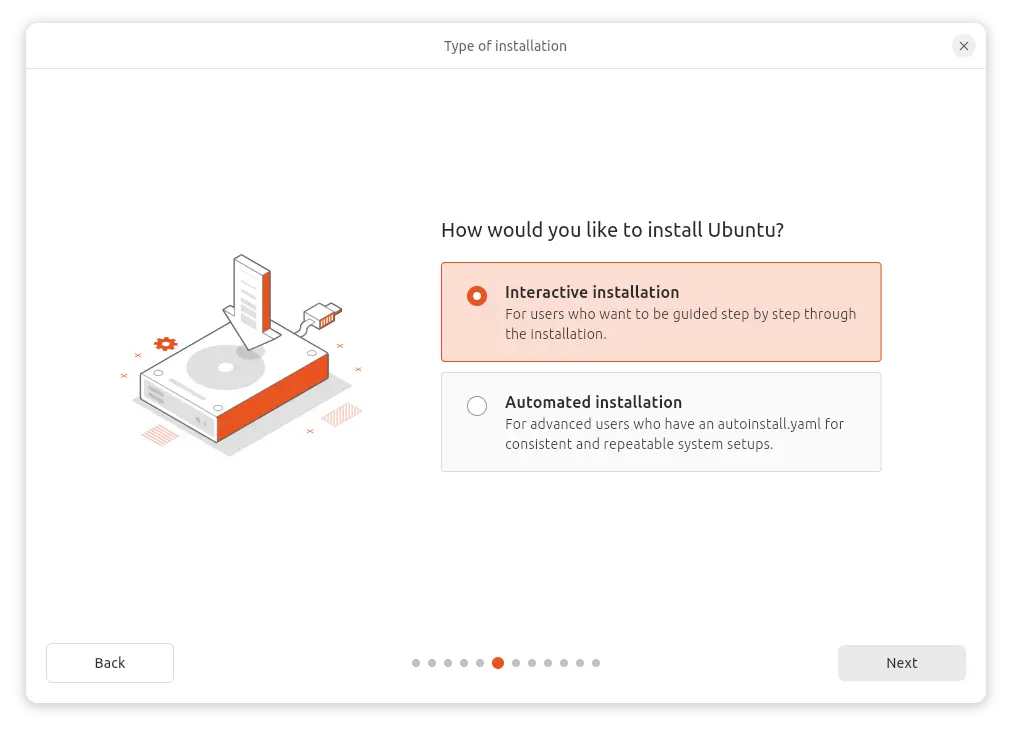
Once you go continue the wizard to install Ubuntu, it will ask to choose between:
- Interactive installation – the classic step by step guide installation.
- Automated Installation – need internet connection for getting .yaml file (See official guide).
In next page, it asks to choose between:
- Default selection – minimal installation excludes many default apps, such as video player, office suite. Though they are all available in system repository.
- Extended selection – full installation with all default apps.
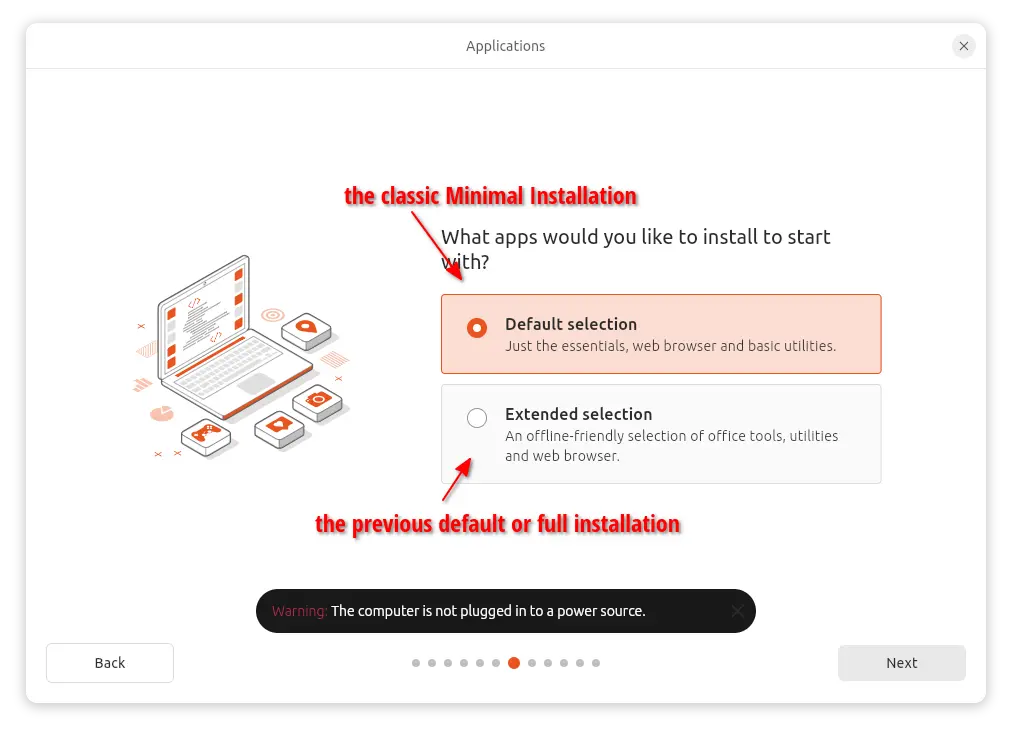
And, then it asks to choose whether to download updates while installing, and/or if to install the proprietary software, such as NVIDIA driver.
Disk Setup
Depends on your disk status, it MAY show you following options in the ‘Disk Setup’ page:
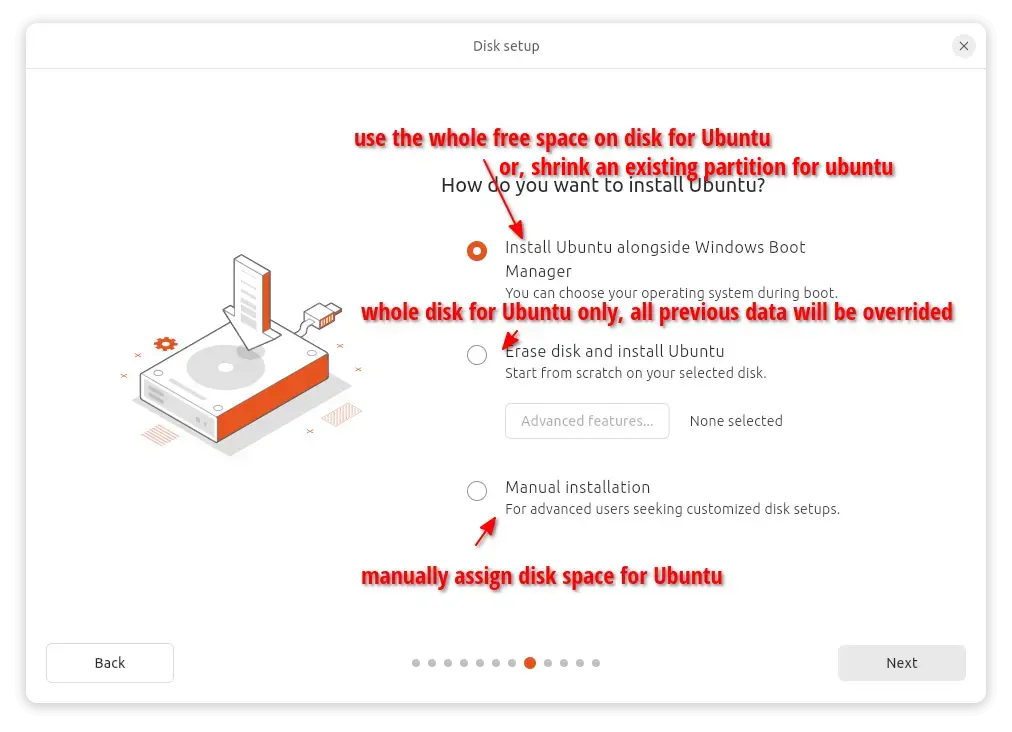
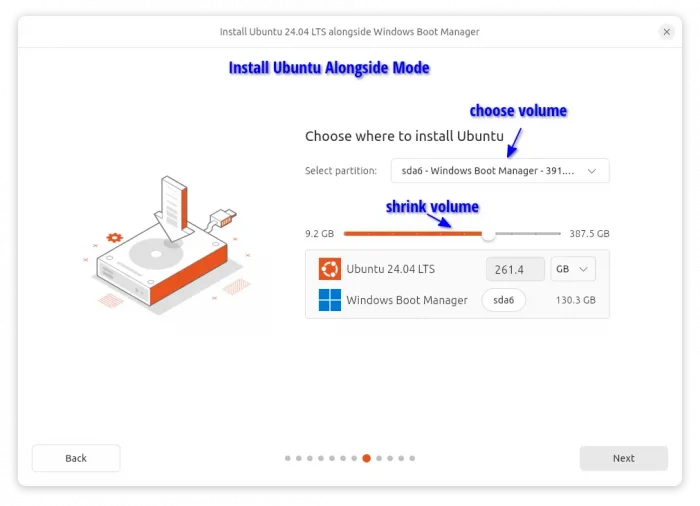
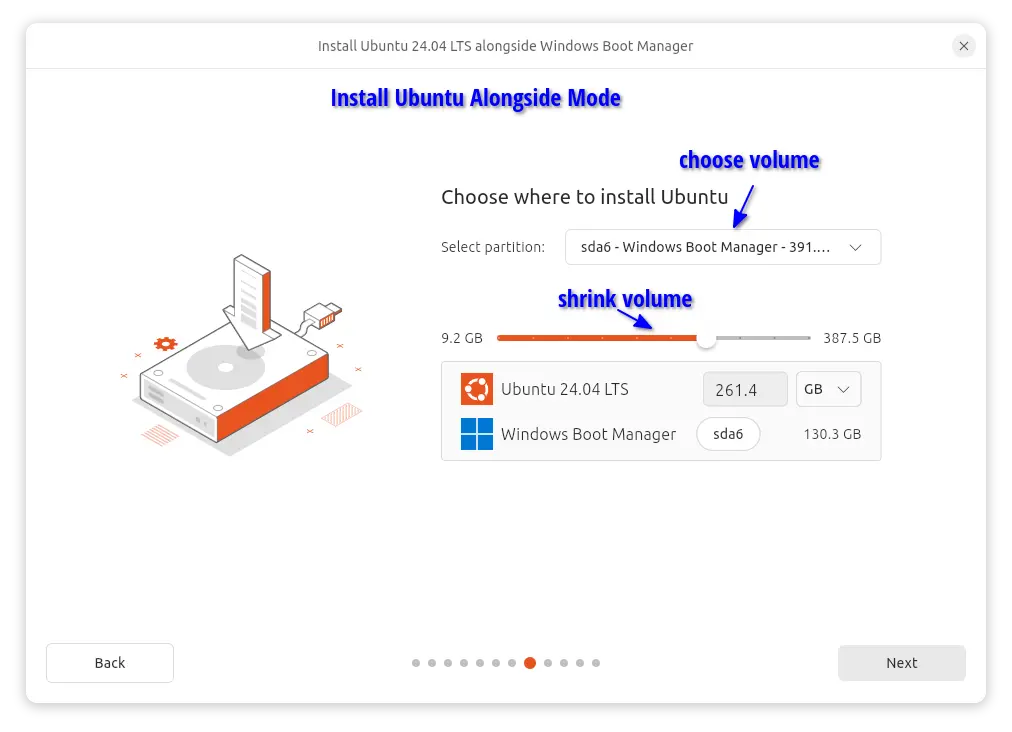
- Install Ubuntu alongside an existing OS. Which, will use all the free un-allocated space for Ubuntu.If there’s NO free space, then it shows dialog asks to choose destination volume/partition, then use slider-bar to shrink it to free up space for Ubuntu. The slider will prevent you from shrinking volume below the already used size.
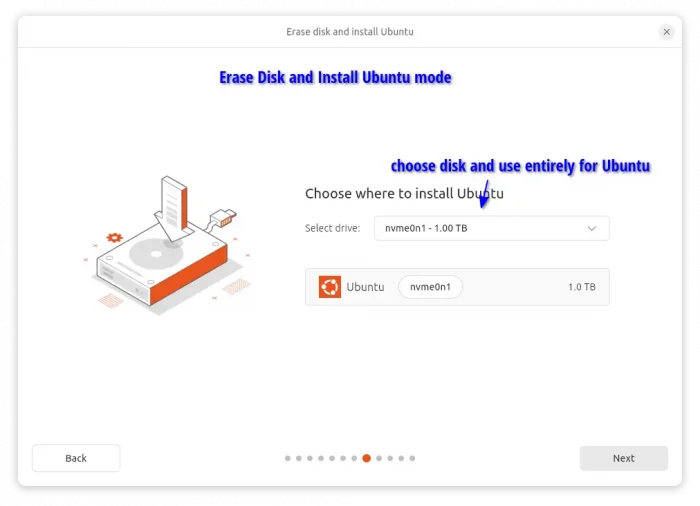
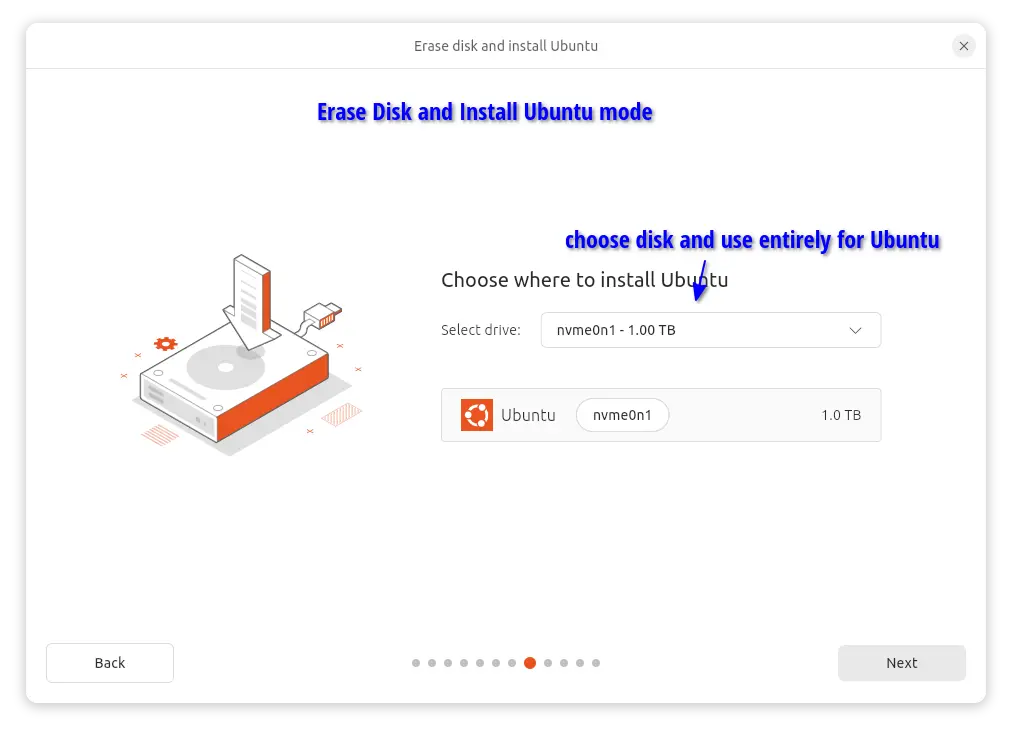
- Erase disk and Install Ubuntu – Use entire disk for Ubuntu only. Click “Advanced Features” for encryption options. If you have more than one disks in computer, then it will asks to choose which disk drive for Ubuntu in next screen.
- Manual Installation. – Manually assign disk space for Ubuntu.
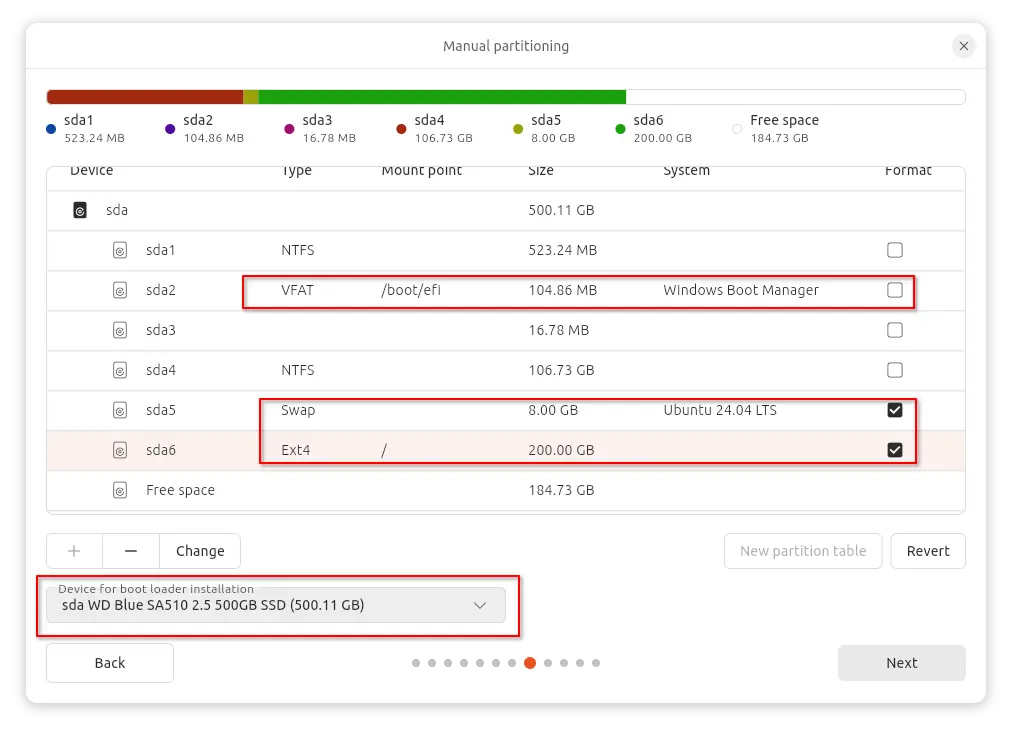
Manual Installation
If you selected the last option, then it goes into the partition table like the screenshot below shows you. There choose the destination disk, usually sda for SATA disk, or nvme0n1 for NVME SSD.
If you have multiple hard disks and can’t identify each other, then press Super (Windows Logo) on keyboard to go to overview screen. Search for and launch “Disks” tool, which can tell you all the disk model names as well as device names.
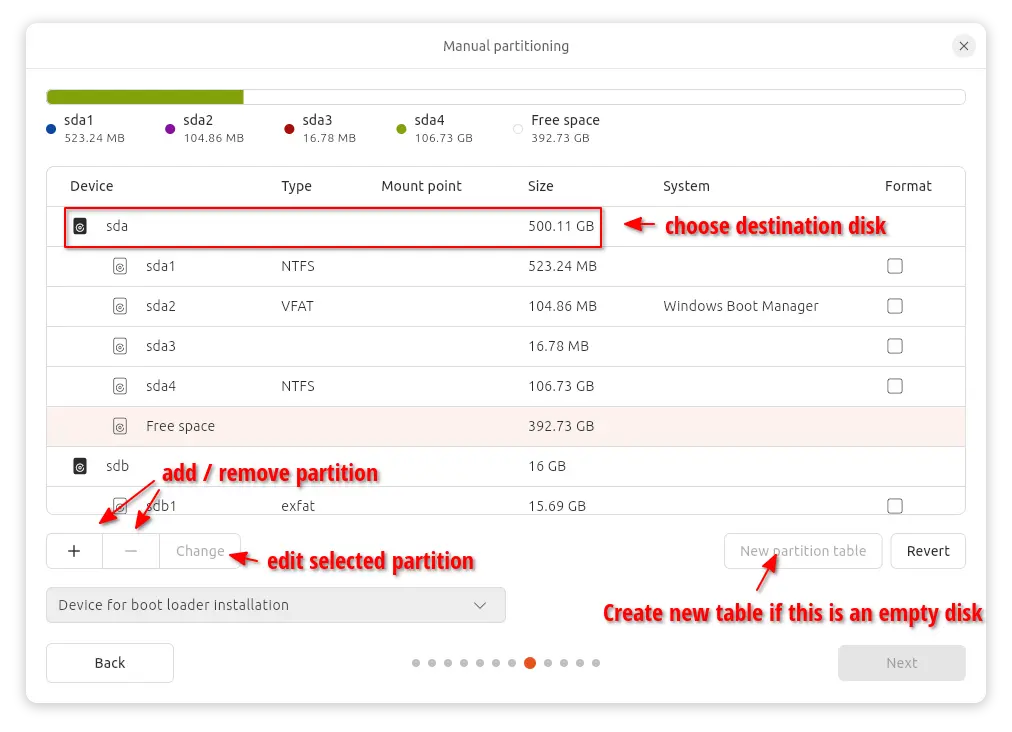
If the destination disk does not have enough free space, then choose un-used partitions and click “-” to delete them. For an empty disk,, then you may click “New partition table” and create a GPT table for it.
In case you don’t know if there’s important data in the volume/partition you’re going to delete, then launch “Disks”, click mount corresponding partition, finally open Files (Nautilus file manager) to browse its content and identify. And, plug-in another USB stick to backup your important data.
Once you got enough free space, you need to create following partitions for installing Ubuntu:
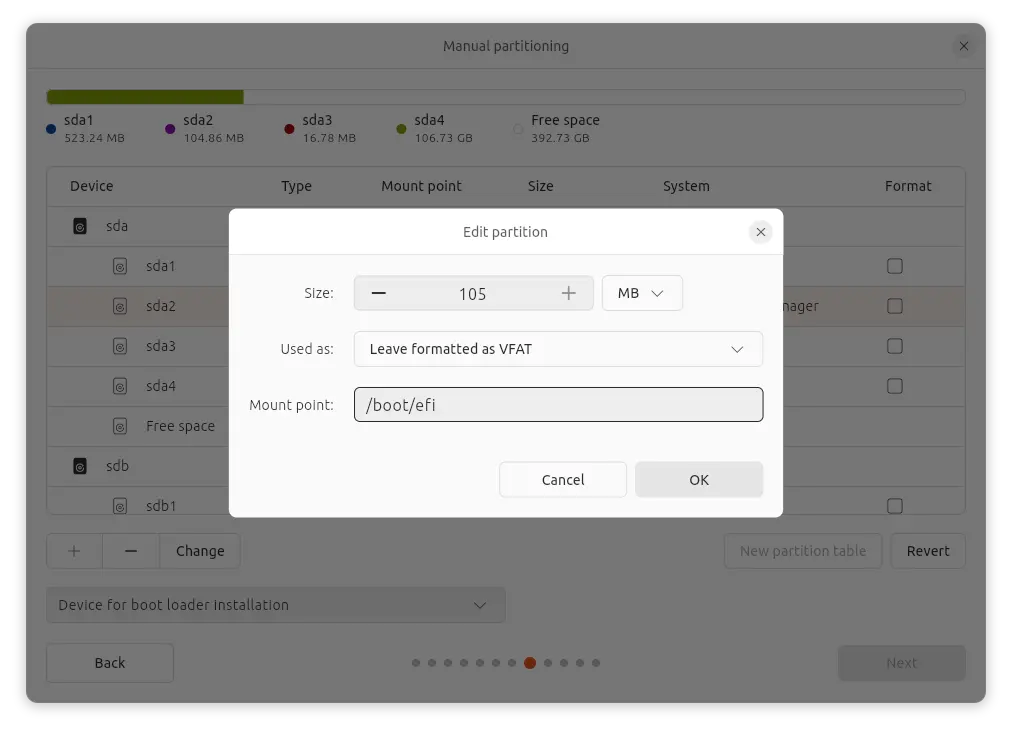
1. EFI (Required) – a “VFAT” file partition with 100MB ~ 500MB size, mounted on /boot/efi.
If there’s already an operating system on your disk, then there MAY already have that partition (sda2 in my case). Just choose it and click “Change“, then set mount point to /boot/efi in pop-up dialog.
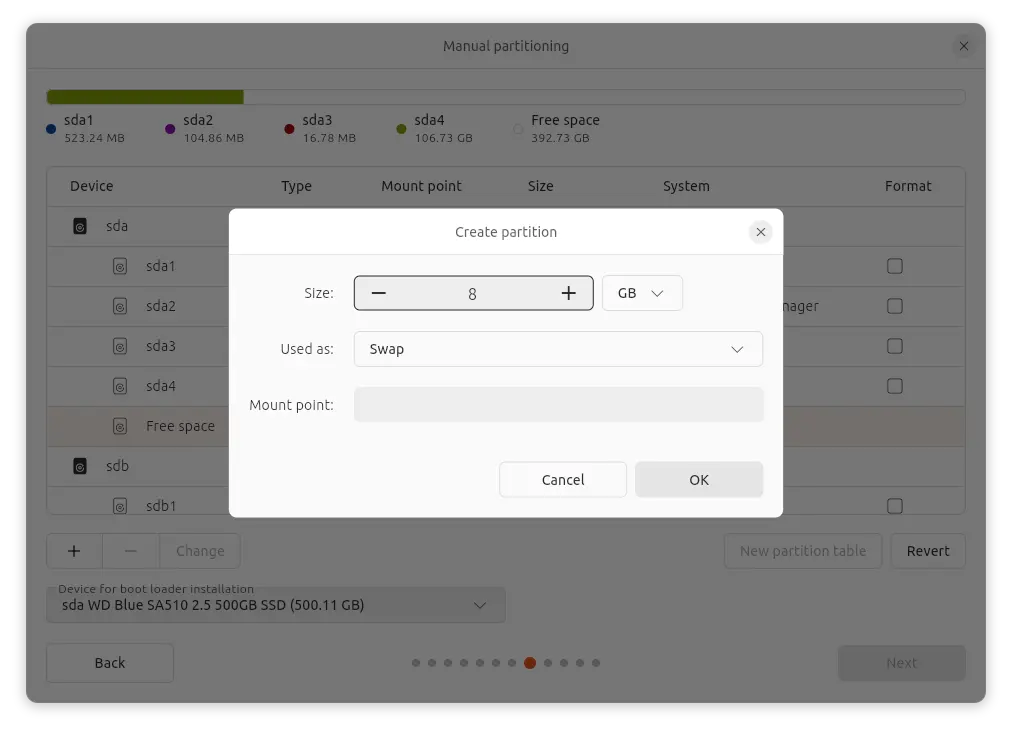
2. Swap (Optional) – For hibernation or small RAM, you may create a partition, with usually as large as RAM size, used as Swap.
This is optional, since after installed Ubuntu, you can manually add a swap file instead.
3. Root (Required) – For the file system, you need to create a partition usually formatted as EXT4, with 20 GB (though as large as possible for long time use, 100GB or higher recommended). And, mount it on /.
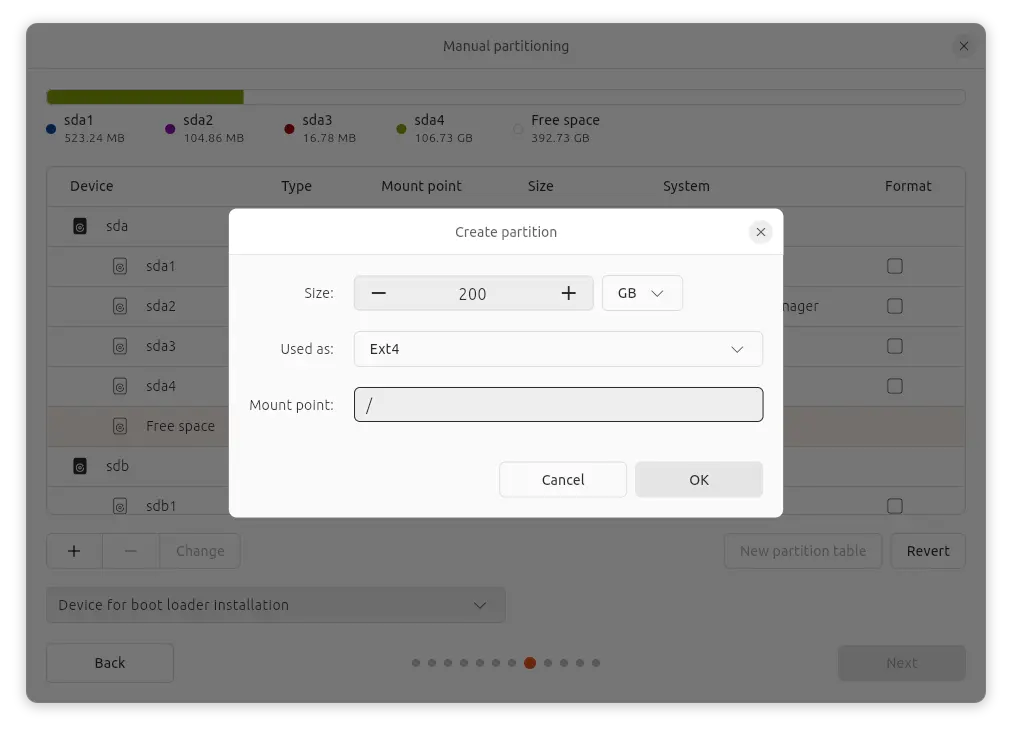
For choice, you may create other partitions, e.g., a EXT4 mounted on /home for separated user home directory, though that’s optional.
In my case, the partition table finally looks like the screenshot below shows you. It’s configured to dual-boot with MS Windows 10 (on sda4). And, do remember to choose the “Device for boot loader installation” (the destination disk) in bottom left.
When done, click “Next”, then choose your timezone, type in a username, password, and computer name. Finally, click “Install” and wait until the process done.
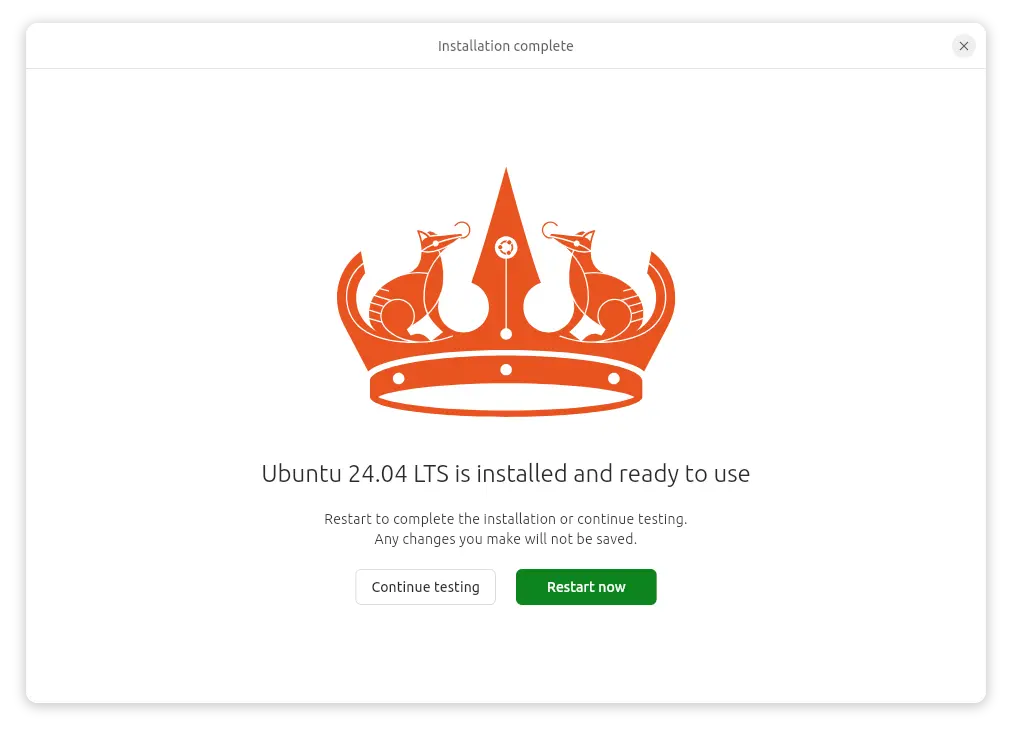
If successfully installed, it will show you “Ubuntu 24.04 LTS is installed and ready to use”. Then you can choose continue to test the live system, or restart into the new operating system.


My machine got stuck at step 4. After verifying the iso and creating a boot USB with Balena, I entered the default selection at the Grub screen in Step 3. The installer wizard screen at the beginning of step 4 did not appear. Instead, I got a window that said “unrecoverable error – please login again” with a login command button. The mouse did not work so I hit enter to click the button. Afterward, the machine hung on the Ubuntu splash screen. I have secure boot off and two SSDs in the machine – one is a Windows system disk, the other a now unpartitioned disk (unallocated space) that was intended for Ubuntu. The unpartitioned disk had contained Ubuntu 22.04 but I’d run out of space on the too small unextendable partition I’d originally created and couldn’t recover it. So I needed to start from scratch with 24.04. I use a Linux-based USB antenna for a wireless connection that used to work with Ubuntu 22.04. I also have an RTX 3060 graphics card. Both need drivers that could be causing issues.
Installing with “safe graphics” solved the previous problem I had. I’d highly recommend changing Step 3 to select “safe graphics” or explain what is needed to avoid errors if you don’t.
Installing with “safe graphics” solved the previous problem I had. I’d highly recommend changing Step 3 to select “safe graphics” or explain what is needed to avoid errors if you don’t. I’d also recommend some advice to users about “disk setup options”. I want to install Ubuntu on a separate SSD from Windows. However, the 1st Disk Setup option is unclear about what will actually happen if I select it. Will my Windows disk be repartitioned for Ubuntu? Or will I be asked to select my empty disk? Not knowing, I selected manual. The risks of the installer selecting the Windows disk instead of the empty disk was too large. This needs to be made extremely clear on the install. Manual partitioning is how I ran out of space in my 22.04 install so I’d rather not do it again. But there is very little choice given the instructions on disk setup.
Thanks for your feedback. So far, I have only one disk in my machine. So I don’t know which one will be used if “Erase disk and install Ubuntu” selected. I’ll try to update my computer, install Ubuntu 24.04 again, and update this tutorial.
The Dell XPS 8960 performs the full install up through the final ‘press restart’ , ‘remove installation media’, then finishes the reboot in what looks like a perfect installation. But when you try to boot from there it fails, and after a week trying boot-repair and any proposed solutions I could access I’ve given up. I bought the XPS 8960 because one or two years ago I bought an XPS 8950 and it took a perfect install of Ubuntu 22.04.4 and I’ve been happy with it.
Hello, I tried to install 24.04 from USB-Stick. I always got the message, that there is a system problem. I was told, that the partition at my stick was not correct. Please advice which partition format would be correct before I create the iso stick. Thanks for your help.
The process burning the iso should automatically format your USB stick to the supported one.
If you have a Windows PC, try format your USB to FAT32 WITHOUT “Quick Format” enabled, though it can take quite a few minutes doing the job.
Hi, I bought a new HP laptop with windows 11 on it and decided to do a clean install of Ubuntu 24 completely removing windows along with bitlocker. It installed fine letting me try it, but when booting into Ubuntu off the harddisk it would stop at BusyBox. the flashing prompt of. (initramfs)_ says type help for a list of commands. Any help would be greatly appreciated. Thank you
2well downloaded onto usb stick ubuntu-24.04.2-desktop-amd64 and rufus-4.8p
further unzipped at windows, and with balenaEtcher-linux-x64-2.1.2, and also for Linux downloaded ventoy-1.1.05-linux.tar.gz
At two different laptops usb cannot install.
1. Windows laptop does not respond at all
2. Laptop in linux mint, also the same result
At both still changed via the bios configuration all result completely zero.
No launch the installer wizard. In windows and linux it becomes dead.
Disappointing huge amount of info, terrible time investment for nothing.
The disadvantage of ubuntu huge amount of info on the net without any positive result, in numerous different mode of operation, laptops, hard and software. Where is organisation to be found?
Translated with DeepL.com (free version)
New Dell QC24250 all in one with Dell Safe BIOS. Win 11 Pro already installed on 512GB SSD-0. Additional 512GB SSD installed as SSD-1, to be used for Ubuntu
Ubuntu 24.04 installer starts fine, live version of Ubuntu works fine, when get to disk setup the only option presented is Manual Install. Had planned to select Erase Disk, select SSD-1 and let Ubuntu have it but that option isn’t present. Go into Manual Install and the only disk that shows up is the Ubuntu Installer USB Flash Drive; SSD-0 and SSD-1 do not appear. Back up until back into live Ubuntu and run GPARTED; same thing, only the USB flash drive is present.
Bit Locker is off, Fast Startup-off, Secure Boot-disabled, UEFI is only option available, no legacy BIOS support present, computer is shut all the way down before boot up with install USB.
Any idea of what could be hiding both SSDs from Ubuntu installer?
Try to set “SATA/NVMe Operation” to Advanced Host Controller Interface (AHCI) in BIOS. If it does not help, then it could be missing driver issue.
I’m trying to install to usb drive. but it stops at
OCT 27 18:38:50 ubuntu subiquity_event.4060[4060]: acquiring and extracting image from cp:///tmp/tmp9xuho4hd/mount
line
I have a broken Ubuntu24.04LTS on its own drive bit have ti use my old Ub16exm to download and burn the iso to a usb. I tried it but could not find a hash code in the downloaded file so proceeded anyway. It appeared to work once but ever since has failed,
Is it OK to use my Ub 16 system to download the iso and the disc start up tool to create the boot-able usb ?