


![]()
This is a step by step tutorial shows how to manually remap (or disable) keyboard keys in Ubuntu without using any third-party apps.
There are a few free open-source applications that can re-map your mouse, keyboard, and other input devices keys in Linux. As far as know, they include input remmaper and AntiMicroX.
For GNOME, the default desktop for Ubuntu and Fedora Workstation, there’s popular GNOME Tweak tool (available in AppCenter/GNOME Software) with options to remap Ctrl, Alt, and Caps Lock keys.
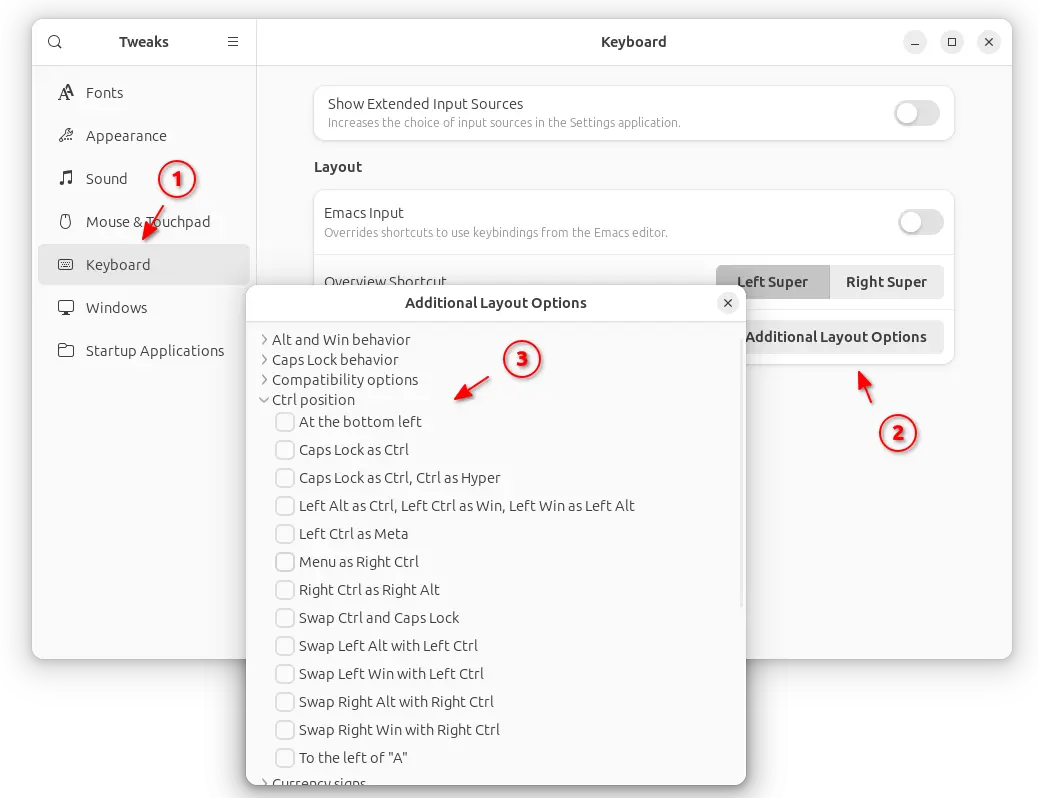
GNOME Tweaks
Without the tools mentioned above, Linux also provides system config files to manually re-map your keyboard key-codes. And, here I’m going to show you how to do the trick in Ubuntu (tested in 24.04).
NOTE: The method in this tutorial can be only used for simple 1:1 key remaps.
Step 1: Find out the scancodes of the keys you want to remap
When you pressing a physical key on keyboard, it sends a scancode to the computer. Then, your system maps the scancode to a virtual keycode. By re-mapping the scancode to another keycode as you want will do the job.
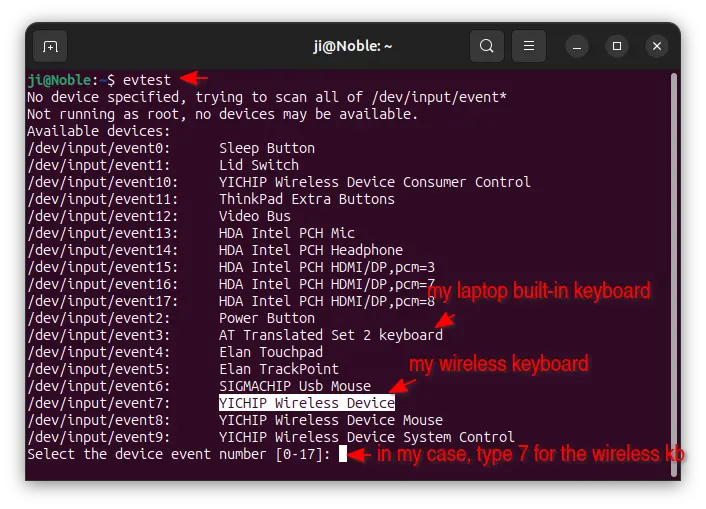
1. To find out the scancode of the keys, first, press Ctrl+Alt+T on keyboard to open up a terminal window. When it opens, run command:
evtest
If command not found, run sudo apt install evtest to install. And in the terminal output, it will print all the available input devices.
In my case, I have laptop’s built-in keyboard (AT Translated Set 2 keyboard) and wireless keyboard (YICHIP Wireless Device) using a USB receiver.
As the screenshot below shows, I have to type 7, the number in /dev/input/event7, for the wireless keyboard.
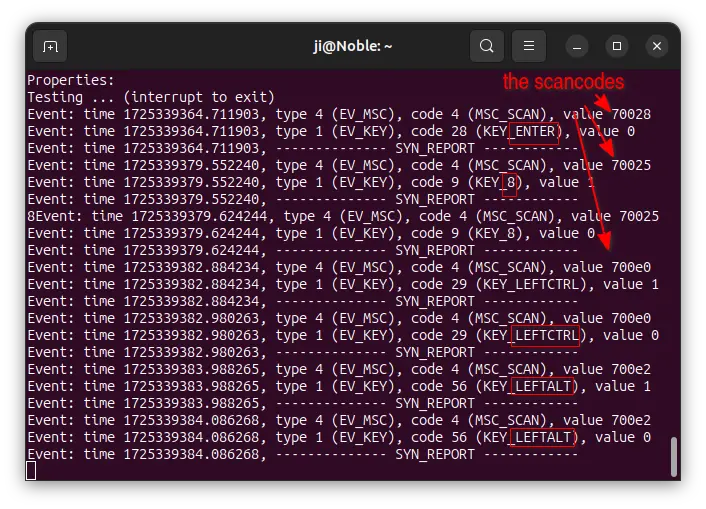
2. Once you input the corresponding number and hit enter in last command, you can then hit any key on keyboard. The terminal will output the information about what you pressed/released.
In the screenshot below, the value code (e.g., 70028, 70025, 700e0, 700e2) are the scancodes for the corresponding key press/release.
NOTE: Different keyboards have different scan-codes for even same key-codes. In my case, the built-in laptop keyboard includes 1d, 1e, 1f, 20, etc scancodes, while the wireless keyboard has 700e0, 700e2, 70025, and so forth.
Step 2: Get the ID of your Keyboard
Before remapping, you also need to find out the information to identify your keyboard.
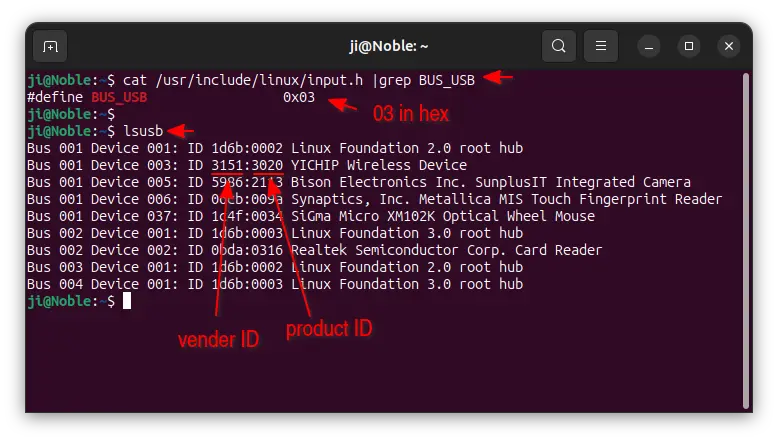
For USB keyboard, simply run the command below in terminal (Ctrl+Alt+T):
lsusb
In the output, find out your keyboard according to its name. And write down the ID. It’s usually xxxx:xxxx, while the first 4 numbers is vendor ID and later 4 is product ID.
Also, run the command below to tell the bus ID (usually 03 in hex):
cat /usr/include/linux/input.h |grep BUS_*
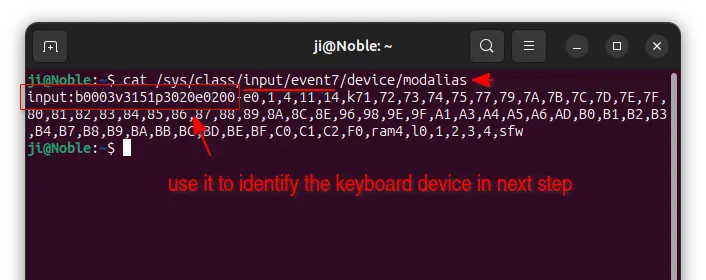
If it’s NOT USB device, try running the command below instead to get the modalias:
cat /sys/class/input/event7/device/modalias
In the command, replace event7 for the correct device according to the evtest command in “Step 1”. In terminal output, copy the “input:b****v****p****e****”
Step 3: Add udev rule to remap keyboard key
After found out the scancodes of the keys you want to remap, and the ID for your keyboard device, you can then edit the udev config file to remap.
First, in Ubuntu Linux there’s built-in /usr/lib/udev/hwdb.d/60-keyboard.hwdb config file for scancode and keycode mapping.
However, it’s recommended to create a rule under /etc/ directory for user custom key mapping.
1. First, run command in terminal (Ctrl+Alt+T) to create and edit the udev config file:
sudo gnome-text-editor /etc/udev/hwdb.d/61-keyboard-local.hwdb
Here, replace gnome-text-editor with gedit for 22.04, or mousepad for XFCE, pluma for MATE, or nano command line text editor that works in most desktop environments.
2. When files opens, add similar lines below:
evdev:input:b0003v3151p3020e0200*
 KEYBOARD_KEY_7001e=reserved
 KEYBOARD_KEY_700e2=leftctrl
 KEYBOARD_KEY_700e0=leftalt
The first line evdev:input:b0003v3151p3020e0200* is used to identify which keyboard device to remap. While input:b0003v3151p3020e0200 is the modalias you got in “Step 2”.
In my case, it can be replaced with evdev:input:b0003v3151p3020*. While, 0003 is the USB bus ID, 3151 is vendor ID, and 3020 is product ID. And, both has * in the end.
And following lines tell to remap the scan-codes to your desired key-codes:
KEYBOARD_KEY_7001e=reserved– tells to disable the key whose scancode is “7001e”.KEYBOARD_KEY_700e2=leftctrl– tells to remap the key whose scancode is “700e2” (Left Alt in my case) to Left Ctrl.KEYBOARD_KEY_700e0=leftalt– remap the key whose scancode is “700e0” (Left Ctrl in my case) to Left Alt.
The 3rd line tells to remap the key (left alt in my case) whose scancode is “700e2” to left ctrl. While the last line remap scancode 700e0 to left alt.
For choice, you may replace keycodes (lowercase) by adding ‘key_’ at beginning, so it will be ‘key_leftctrl’, ‘key_leftalt’, ‘key_1’, ‘key_2’, ‘key_a’, ‘key_b’, ‘key_comma’, ‘key_dot’, or something similar (evtest command output can tell)…
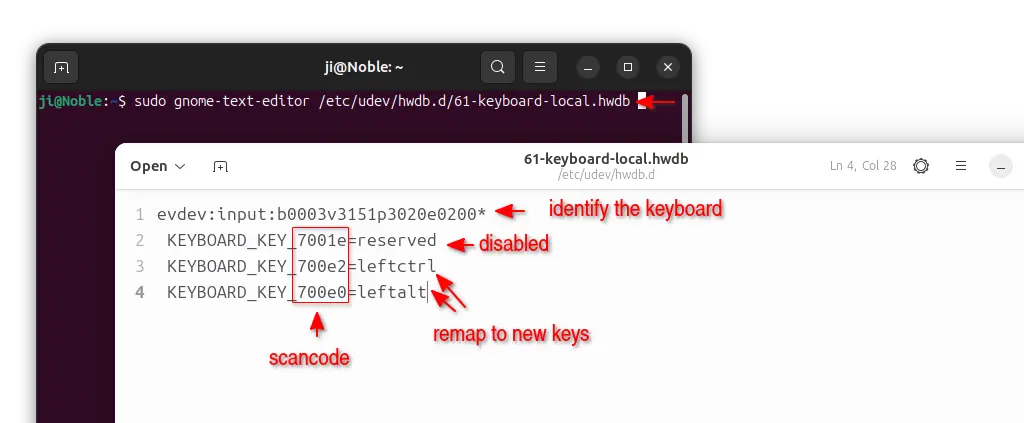
You can add as many lines as you want with KEYBOARD_KEY_scancode=keycode layout. While, each line has a blank space at beginning.
After editing, save file. For nano text editor, press Ctrl+S to save, then Ctrl+X to exit.
Step 4: Apply changes
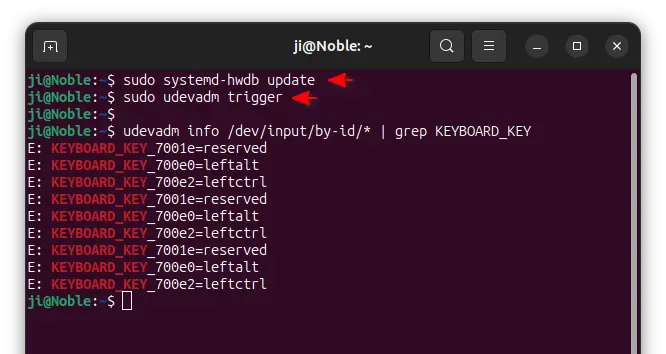
After editing udev rule to remap keyboard keys, you can run the commands below one by one to apply:
- First, update the hardware database index:
sudo systemd-hwdb update
- Next, reload the new key mappings:
sudo udevadm trigger
NOTE: The commands will NOT work for key remaps you later deleted from the udev rule. As workaround, either reboot or add/change rule to remap to original keycode.
Finally, try to either hit the keys on keyboard to see the changes, or use the command below
udevadm info /dev/input/by-id/* | grep KEYBOARD_KEY
The remapped keys will persistent after reboot, because the systemd-hwdb-update.service includes a trigger ConditionNeedsUpdate=/etc that automatically update hardware database index, and kernel auto-reload it on system boot.


A much easier remapping alternative is to edit the keyboard map in text editor. This is not for the faint-hearted because if you make an error you may be left without an operable keyboard and will need to recover using the screen keyboard. You can navigate the process below in safety using ‘files’ and plan what you are going to do without being able to save it.
1. Open a terminal – Ctl-Alt-T
2. Open the nautilus file manager as administrator – sudo nautilus admin:/ – You will get a warning, but it will load after a few seconds. Remember to keep the terminal open.
3. Navigate to the code for your keyboard layout – other locations/Ubuntu/usr/share/X11/xkb/symbols – and find your keyboard layout from the list.
4. Make a duplicate of this page for safety purposes.
5. Open the page.
6. Look for the details of the key(s) you wish to remap.
7. Edit them accordingly. Make sure you do this accurately. Each line must be in the form – key { [ a, A, aacute, Aacute ] }; – the position of the brackets, commas and semicolon are important
8. If you don’t know the precise name for the character you wish to use you may be able to find it by looking at other layouts. Alternatively you can use UTF8 definitions – e.g. U266D is the musical flat sign.
9. When you are completely satisfied with the new layout open the drop-down menu and click ‘Save’.
10. Close the Terminal.
11. Reboot the computer and your new layout will be working.
This worked as expected after realizing I needed a space at the beginning of the KEY_BOARD_KEY lines in the 61-keyboard-local.hwdb file.
Thanks! very nice.
I am having some issues ..
keyboard_map
keyboard_mapping
author: Kirkland,William
updated: 2025-05-27
$ date; uname -a
Tue May 27 17:25:38 CDT 2025
Linux ash.wek 6.11.0-25-generic #25~24.04.1-Ubuntu SMP PREEMPT_DYNAMIC Tue Apr 15 17:20:50 UTC 2 x86_64 x86_64 x86_64 GNU/Linux
ubuntu handbook (remap-keyboard)
# install ‘evtest’ if not available
01 # which evtest || sudo apt install evtest
#– disconnect the desired keyboard
01-a $ sudo evtest 2>&1 | tee /tmp/keys-a
^C
#– reconnect the desired keyboard
01-b $ sudo evtest 2>&1 | tee /tmp/keys-b
^C
01-c $ diff -u /tmp/keys-a /tmp/keys-b | grep ^+/
+/dev/input/event7: JosefAdamcik Sofle
+/dev/input/event8: JosefAdamcik Sofle System Control
+/dev/input/event9: JosefAdamcik Sofle Consumer Control
e r
asd asdfg
01-d $ sudo evtest 2>&1 | tee /tmp/keys-d
No device specified, trying to scan all of /dev/input/event*
Available devices:
/dev/input/event0: Sleep Button
/dev/input/event1: Power Button
/dev/input/event10: WIN 60 HE
. . .
/dev/input/event6: Razer Razer Tartarus Pro
/dev/input/event7: JosefAdamcik Sofle
/dev/input/event8: JosefAdamcik Sofle System Control
/dev/input/event9: JosefAdamcik Sofle Consumer Control
Select the device event number [0-27]: 7
Input driver version is 1.0.1
Input device ID: bus 0x3 vendor 0xfc32 product 0x287 version 0x111
Input device name: “JosefAdamcik Sofle”
Supported events:
Event type 0 (EV_SYN)
Event type 1 (EV_KEY)
Event code 1 (KEY_ESC)
. . .
Event code 17 (KEY_W)
Event code 18 (KEY_E)
Event code 19 (KEY_R)
Event code 20 (KEY_T)
. . .
Event code 29 (KEY_LEFTCTRL)
Event code 30 (KEY_A)
Event code 31 (KEY_S)
Event code 32 (KEY_D)
Event code 33 (KEY_F)
Event code 34 (KEY_G)
Event code 35 (KEY_H)
. . .
Event code 240 (KEY_UNKNOWN)
Event type 4 (EV_MSC)
Event code 4 (MSC_SCAN)
Event type 17 (EV_LED)
Event code 0 (LED_NUML) state 0
Event code 1 (LED_CAPSL) state 0
Event code 2 (LED_SCROLLL) state 0
Event code 3 (LED_COMPOSE) state 0
Event code 4 (LED_KANA) state 0
Key repeat handling:
Repeat type 20 (EV_REP)
Repeat code 0 (REP_DELAY)
Value 250
Repeat code 1 (REP_PERIOD)
Value 33
Properties:
Testing … (interrupt to exit)
Event: time 1749453962.231588, type 4 (EV_MSC), code 4 (MSC_SCAN), value 70008
Event: time 1749453962.231588, type 1 (EV_KEY), code 18 (KEY_E), value 1
Event: time 1749453962.231588, ————– SYN_REPORT ————
Event: time 1749453962.347482, type 4 (EV_MSC), code 4 (MSC_SCAN), value 70008
Event: time 1749453962.347482, type 1 (EV_KEY), code 18 (KEY_E), value 0
Event: time 1749453962.347482, ————– SYN_REPORT ————
Event: time 1749453963.516573, type 4 (EV_MSC), code 4 (MSC_SCAN), value 70015
Event: time 1749453963.516573, type 1 (EV_KEY), code 19 (KEY_R), value 1
Event: time 1749453963.516573, ————– SYN_REPORT ————
Event: time 1749453963.605457, type 4 (EV_MSC), code 4 (MSC_SCAN), value 70015
Event: time 1749453963.605457, type 1 (EV_KEY), code 19 (KEY_R), value 0
Event: time 1749453963.605457, ————– SYN_REPORT ————
Event: time 1749453965.789440, type 4 (EV_MSC), code 4 (MSC_SCAN), value 70004
Event: time 1749453965.789440, type 1 (EV_KEY), code 30 (KEY_A), value 1
Event: time 1749453965.789440, ————– SYN_REPORT ————
Event: time 1749453965.909542, type 4 (EV_MSC), code 4 (MSC_SCAN), value 70004
Event: time 1749453965.909542, type 1 (EV_KEY), code 30 (KEY_A), value 0
Event: time 1749453965.909542, ————– SYN_REPORT ————
Event: time 1749453966.498430, type 4 (EV_MSC), code 4 (MSC_SCAN), value 70016
Event: time 1749453966.498430, type 1 (EV_KEY), code 31 (KEY_S), value 1
Event: time 1749453966.498430, ————– SYN_REPORT ————
Event: time 1749453966.601426, type 4 (EV_MSC), code 4 (MSC_SCAN), value 70016
Event: time 1749453966.601426, type 1 (EV_KEY), code 31 (KEY_S), value 0
Event: time 1749453966.601426, ————– SYN_REPORT ————
Event: time 1749453967.195420, type 4 (EV_MSC), code 4 (MSC_SCAN), value 70007
Event: time 1749453967.195420, type 1 (EV_KEY), code 32 (KEY_D), value 1
Event: time 1749453967.195420, ————– SYN_REPORT ————
Event: time 1749453967.299418, type 4 (EV_MSC), code 4 (MSC_SCAN), value 70007
Event: time 1749453967.299418, type 1 (EV_KEY), code 32 (KEY_D), value 0
Event: time 1749453967.299418, ————– SYN_REPORT ————
Event: time 1749453967.902413, type 4 (EV_MSC), code 4 (MSC_SCAN), value 70009
Event: time 1749453967.902413, type 1 (EV_KEY), code 33 (KEY_F), value 1
Event: time 1749453967.902413, ————– SYN_REPORT ————
Event: time 1749453968.015412, type 4 (EV_MSC), code 4 (MSC_SCAN), value 70009
Event: time 1749453968.015412, type 1 (EV_KEY), code 33 (KEY_F), value 0
Event: time 1749453968.015412, ————– SYN_REPORT ————
Event: time 1749453968.661514, type 4 (EV_MSC), code 4 (MSC_SCAN), value 7000a
Event: time 1749453968.661514, type 1 (EV_KEY), code 34 (KEY_G), value 1
Event: time 1749453968.661514, ————– SYN_REPORT ————
Event: time 1749453968.750404, type 4 (EV_MSC), code 4 (MSC_SCAN), value 7000a
Event: time 1749453968.750404, type 1 (EV_KEY), code 34 (KEY_G), value 0
Event: time 1749453968.750404, ————– SYN_REPORT ————
#– get keyboard id
$ sudo grep -i BUS_USB /usr/include/linux/input.h
#define BUS_USB 0x03
$ sudo lsusb | grep “JosefAdamcik Sofle”
Bus 001 Device 012: ID fc32:0287 JosefAdamcik Sofle
$ cat /sys/class/input/event7/device/modalias
input:b0003vFC32p0287e0111-e0,1,4,11,14,k71,72,73,74,75,77,79,7A,7B,
7C,7D,7E,7F,80,81,82,83,84,85,86,87,88,89,8A,8C,8E,96,98,9E,9F,
A1,A3,A4,A5,A6,AD,B0,B1,B2,B3,B4,B7,B8,B9,BA,BB,BC,BD,BE,BF,C0,
C1,C2,F0,ram4,l0,1,2,3,4,sfw
#– create backup file ..
03 # export d=/etc/udev/hwdb.d; export f=61-keyboard-local.hwdb
# ls -dl /tmp/${f}.$(date +%F) || cp ${d}/${f} /tmp/${f}.$(date +%F)
# ls -dl ${d}/${f} /tmp/${f}.$(date +%F)
#– create/edit /etc/udev/hwdb.d/61-keyboard-local.hwdb
# ls -d /tmp/${f}.$(date +%F) && vi ${d}/${f} || touch /tmp/${f}.$(date +%F)
# cat ${d}/${f}
#– apply changes
# update hardware database:
04 # systemd-hwdb update
# reload key mappings:
# udevadm trigger
#– reboot
# shutdown -r now
Kubuntu 24.04
Linux TV5 6.8.0-85-generic #85-Ubuntu SMP PREEMPT_DYNAMIC Thu Sep 18 15:26:59 UTC 2025 x86_64 x86_64 x86_64 GNU/Linux
# udevadm info /dev/input/event2 | grep KEYBOARD_KEY
E: KEYBOARD_KEY_46=KEY_HOME
E: KEYBOARD_KEY_b7=KEY_INSERT
E: KEYBOARD_KEY_c7=KEY_END
E: KEYBOARD_KEY_d2=KEY_DELETE
E: KEYBOARD_KEY_de=reserved
E: KEYBOARD_KEY_df=reserved
E: KEYBOARD_KEY_e3=reserved
instead
udevadm info /dev/input/by-id/* | grep KEYBOARD_KEY
?
I have just bought a laptop with an irritating touch-to-click touchpad, and yearn for clicking away from the touchpad. I have clumsy fingers. i want to convert the R-alt to Left-Click and R-ctrl to Right-Click. I am right-handed, so I can click whilst using the touchpad to move around, and the left hand to work the Ctrl and Alt on the left.
What are the codes for Left-Click and Right-Click when remapping these keys?