


![]()
Want to run an operating system in virtual machine using VMware Workstation Pro? Here I’m going to show you how to install and use it in Ubuntu 24.04 and Ubuntu 22.04 LTS.
Personally, I use Oracle Virtualbox for trying out different operating systems in as virtual machines (VMs). Some however prefer VMware workstation, which is available free for non-commercial use.
1. Download & install VMware Workstation Pro
VMware Workstation Player discontinued! Now, it’s “VMware Workstation Pro” for Windows and Linux, and “VMware Fusion Pro” for MacOS. Both are free for personal use.
Download:
The vmware website offers a new page, see the link button below, for the new desktop hypervisors.
However, the download link does not bring you to the latest package. Instead, you need to first register and login with a free account.
Then go to this page for VMware Workstation Pro, or this page for VMWare Fusion Pro. Finally, click expand the latest branch for your system and choose a release to download.
Before being able to download the installer, it will ask you to complete your personal information …

Install:
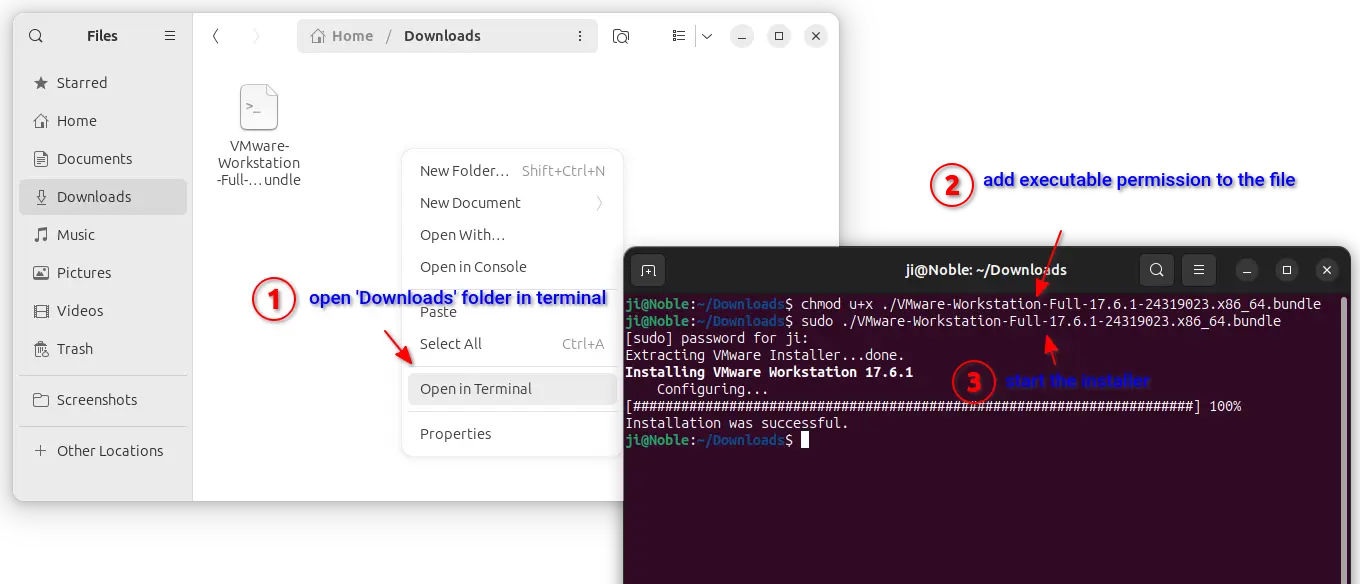
After downloaded the package, open your Downloads folder. Then, right-click on blank area and click “Open in Terminal” menu option to open up a terminal window with that folder as working directory.
In pop-up terminal window, run the commands below one by one (replace VMware-Player-*.bundle to your package name):
- Add executable permission to the downloaded package:
chmod u+x ./VMware-Player-*.bundle
- Then, run it with sudo permission:
sudo ./VMware-Player-*.bundle
This command will ask you to type user password (no visual feedback) for authentication. Then automatically extract the package, install and configure VMware Player in your system.
NOTE: If it refused to install, due to old VMWare Player, try following this tutorial to uninstall.
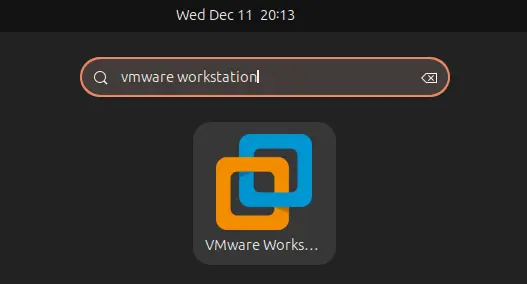
Once successfully installed the package, you can start the software from either start menu or GNOME ‘Show Apps’ (or overview) depends on your desktop environment.
2. Install vmmon and vmnet modules
UPDATE: This step seems no longer required for VMWare Workstation Pro.
When launching wmware player, it pops-up a dialog prompt to compile and install some modules. It’s however always failed after clicking “Install” button in my case.
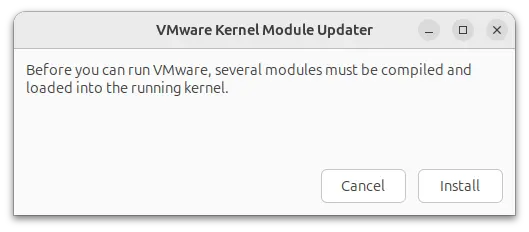
launch vmware prompts to build modules first. however it always fails
If you ran into same problem, then here’s a free open-source project that can help. The project has been maintaining the patches for building VMware host modules against recent kernels for several years.
NOTE: In commands below, replace 17.5.0 according to your installed VMWare player version. And, go check the link above if the steps below are outdated!
To apply the patch, you may have to disable Secure Boot first.
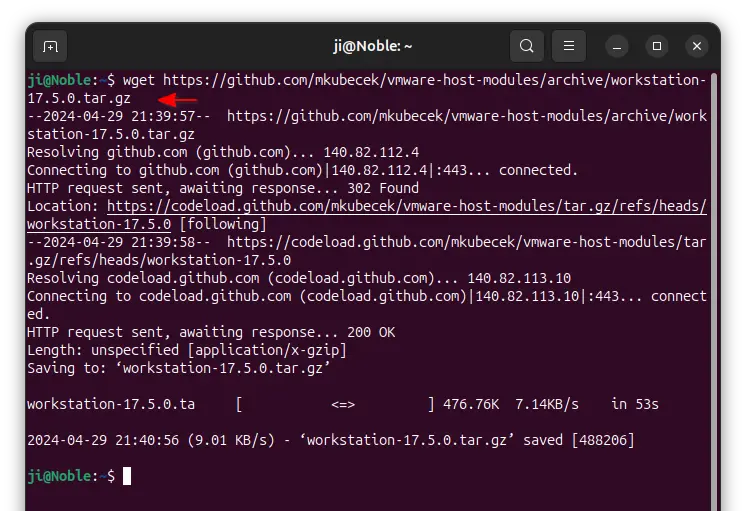
- First, press
Ctrl+Alt+Tto open terminal, and run commands to download the tarball from the project page:wget https://github.com/mkubecek/vmware-host-modules/archive/workstation-17.5.0.tar.gz

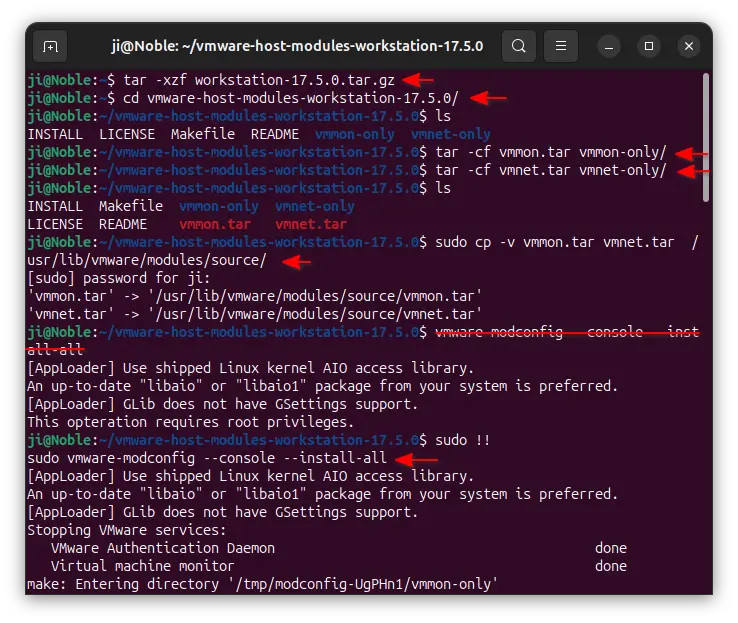
- Then, extract the tarball that you just downloaded:
tar -xzf workstation-17.5.0.tar.gz
- Next, navigate to the extracted folder:
cd vmware-host-modules-workstation-17.5.0/
- Compress the
vmmon-onlyandvmnet-onlymodules sub-folders into tar archives by running 2 commands one by one.tar -cf vmmon.tar vmmon-only/
tar -cf vmnet.tar vmnet-only/
- Then, move them into vmware module source directory:
sudo cp -v vmmon.tar vmnet.tar /usr/lib/vmware/modules/source/
- Finally, run
vmware-modconfigtool to build and install all the modules.sudo vmware-modconfig --console --install-all
If everything’s done without error, you can try launching VMWare player again and delete leftovers (the tarball and extracted folder) from user home directory.
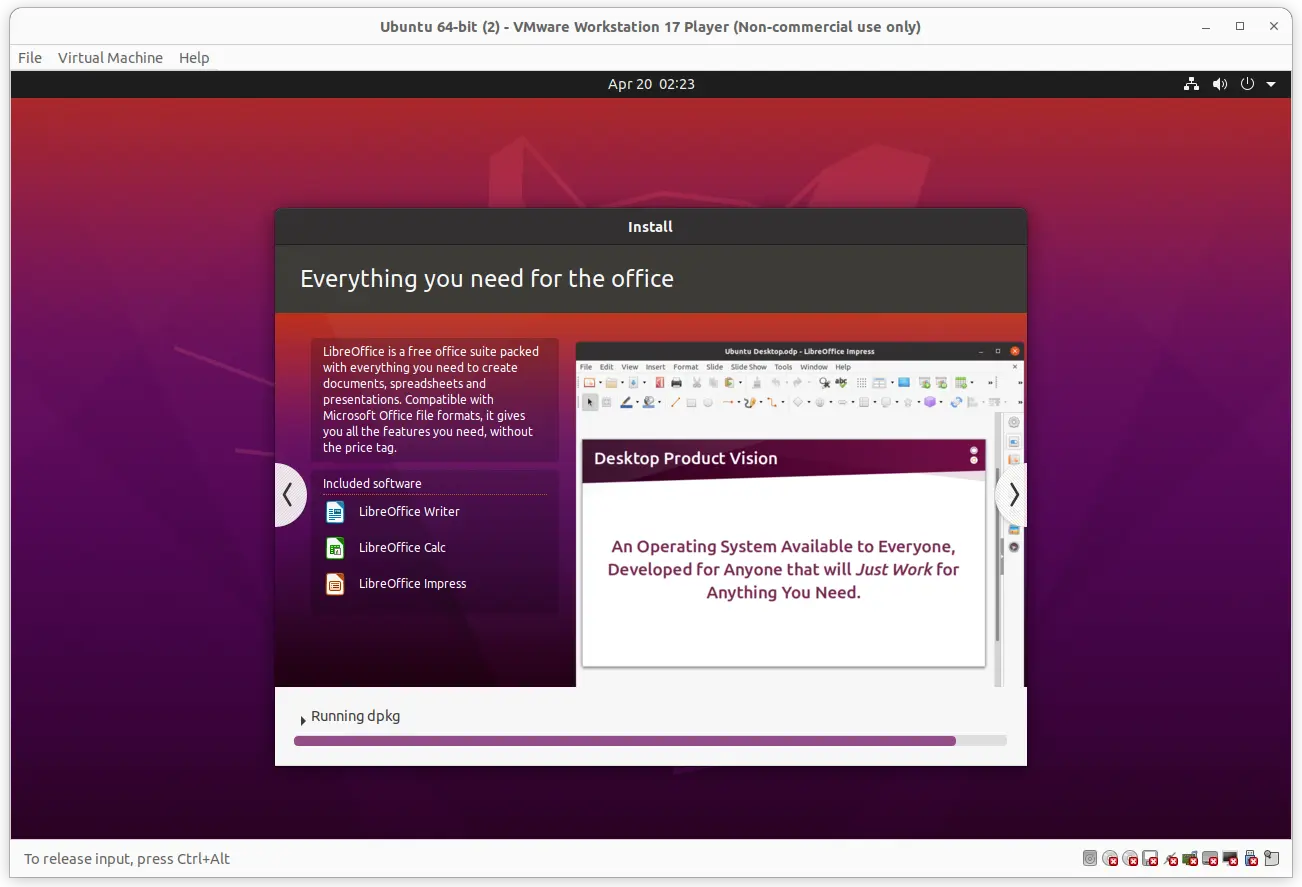
3. Install an OS in VM using VMware Player
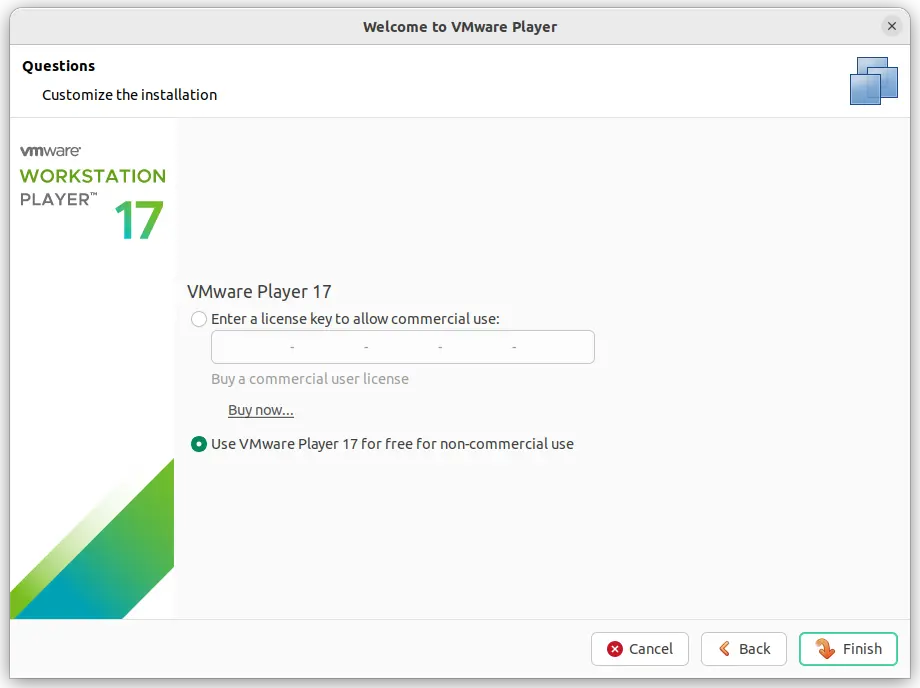
On first launch of the virtual machine software, you need to read and accept the license. Then, either enter a license key or select “Use VMware Player for free for non-commercial use”.
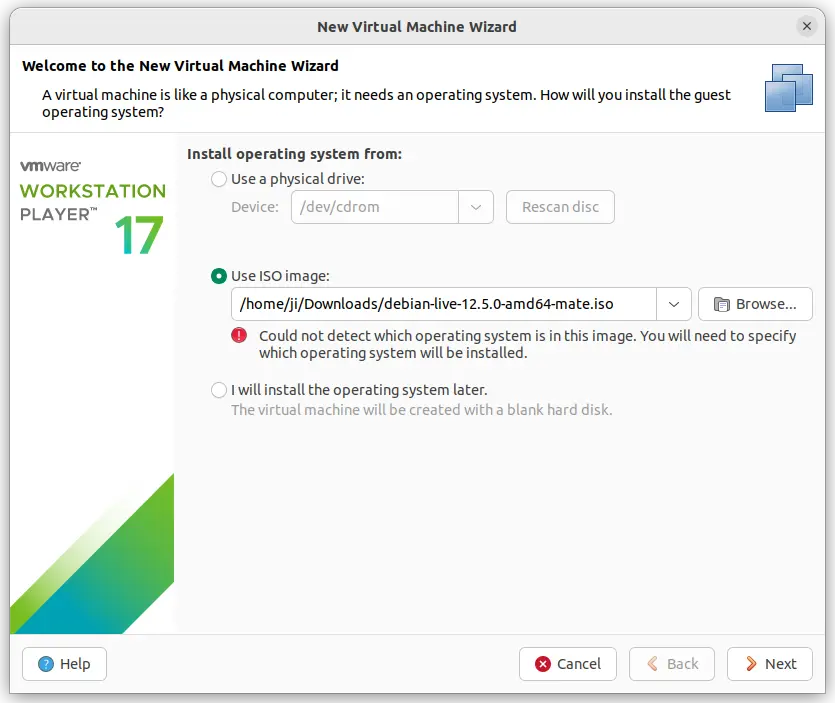
Then, it starts into a VirtualBox look like VM manager window. There you can either click “Open a Virtual Machine“, if you already have VMs exported as .vmx, .ovf, or .ova files. Or, click “Create a New Virtual Machine” to create new.

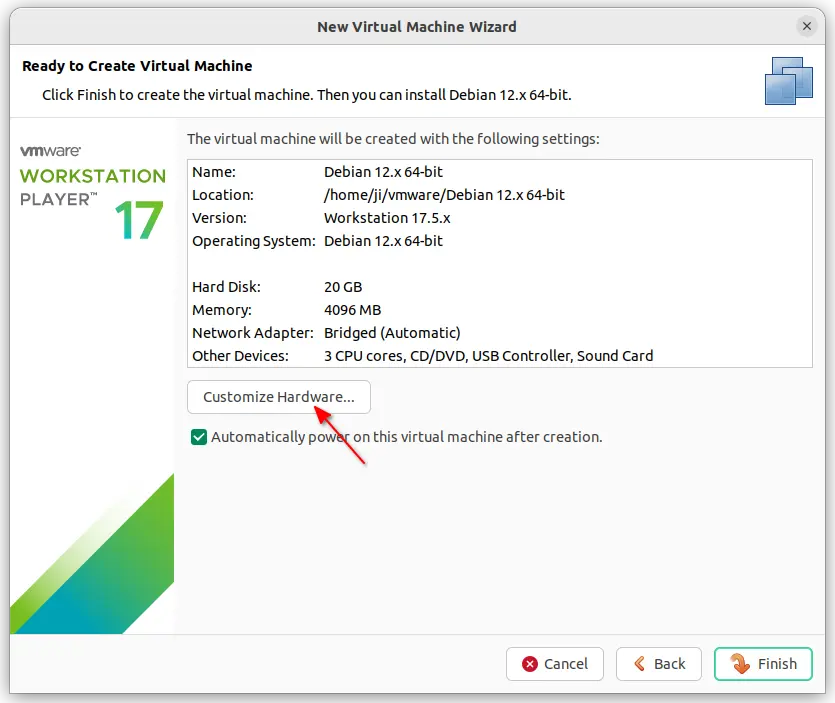
In the “New Virtual Machine Wizard”, click “Typical” then you can choose to install a system from either CD-ROM (if your real-machine have one) or an .iso image. Of course, you can also choose to create a blank disk for later use.
Then, just follow the wizard to select which operating system it is, set a VM name and where to store the VM files, allocate some disk space. Before your clicking “Finish” button, you can click the “Custom Hardware” button for more options, including:
- memory size for the VM.
- how many CPU cores to use.
- adjust hard disk size.
- configure network adapter, sound card, USB controller, etc.
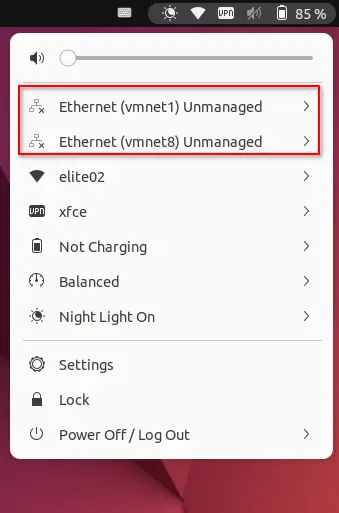
Tips: Here it’s better to choose “Bridged” option as network controller, or you’ll get a few “Ethernet (vmnet1) Unmanaged” options in top-right system status menu in Ubuntu 22.04, which is quite annoying (See the screenshot below).
If you already have those options in system status menu, then run command vmware-netcfg to launch the config dialog, and remove the virtual networks. Finally, re-configure them to “bridged” in their own VM settings dialog.
Once done the “New Virtual Machine Wizard”, it automatically starts VM, just like you boot the real machine from USB or CD-Rom. Then, you can start the installer in the virtual OS and follow the wizard to install the system in the virtual machine.
When everything’s done, the VM will be listed in the main manager window of VMware Workstation, next time you launch it. And, you can go “Virtual Machine” menu to configure the VM preferences and install VMware tools for additional features.

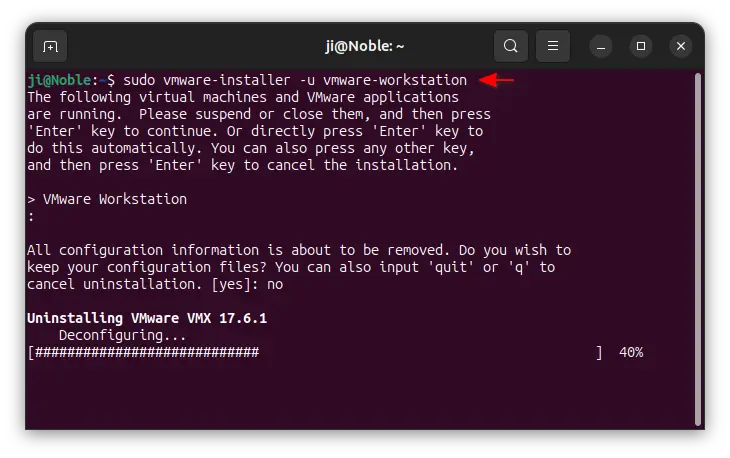
Uninstall VMware Workstation Pro
To uninstall the software, simply open terminal and run command:
sudo vmware-installer -u vmware-workstation


You did not install GCC etc…so this will fail. I tried installing VM Workstation 17 Pro on Ubuntu 24.04 and still does not compile the kernels so your instruction is a joke
I’m on Kubunu 24.04 and was able to install VMware Workstation Pro 17.5.0 by following Step #2.
I found the same with player, the kernels won’t compile so have to stay on 22.04 for now.
It does not work. vmmon and vmnet are not compiled. Has anyone managed to solve it?
Updated with patch to manually build the Kernel modules (See step 2).
Thanks for your help. we have taken a step forward. it still gives me the error: “Cannot open /dev/vmmon: No such file or directory” error when powering on a VM (2146460). I tried to use the official guide: https://kb.vmware.com/s/article/2146460 but the “req” command isn’t there on Ubuntu. Any other ideas? Thanks again.
I had to disable secure boot from bios. now works
Disabling secure boot worked for me (Ubuntu 22.04 kernel 6.8.0), thanks!
thanks for your blog
it works perfectly VMware workstation 17.5.1 on Ubuntu 24.04 LTS
me sale este error
File “/tmp/vmis.zhHxqF/install/vmware-installer/vmis/core/localinstallerops.py”, line 241, in Log
ltype(*args, **kwargs)
Message: ‘stderr: [AppLoader] Use shipped Linux kernel AIO access library.\nAn up-to-date “libaio” or “libaio1” package from your system is preferred.\n[AppLoader] GLib does not have GSettings support.\nUsing kernel build system.\nwarning: the compiler differs from the one used to build the kernel\n The kernel was built by: x86_64-linux-gnu-gcc-13 (Ubuntu 13.2.0-23ubuntu4) 13.2.0\n You are using: gcc (Ubuntu 13.2.0-23ubuntu4) 13.2.0\n/tmp/modconfig-AWsUtV/vmmon-only/common/crosspage.o: warning: objtool: CrossPage_CodePage+0x207: \’naked\’ return found in RETHUNK build\nmake[3]: *** [scripts/Makefile.build:243: /tmp/modconfig-AWsUtV/vmmon-only/common/crosspage.o] Error 255\nmake[3]: *** Se borra el archivo \’/tmp/modconfig-AWsUtV/vmmon-only/common/crosspage.o\’\nmake[3]: *** Se espera a que terminen otras tareas….\n/tmp/modconfig-AWsUtV/vmmon-only/linux/hostif.c:2926:1: warning: no previous prototype for \u2018HostIFCheckTrackedMPN\u2019 [-Wmissing-prototypes]\n 2926 | HostIFCheckTrackedMPN(VMDriver *vm, // IN: The VM instance\n | ^~~~~~~~~~~~~~~~~~~~~\n/tmp/modconfig-AWsUtV/vmmon-only/linux/hostif.c:3046:1: warning: no previous prototype for \u2018HostIFWritePhysicalWork\u2019 [-Wmissing-prototypes]\n 3046 | HostIFWritePhysicalWork(MA ma, // MA to be written to\n | ^~~~~~~~~~~~~~~~~~~~~~~\n/tmp/modconfig-AWsUtV/vmmon-only/linux/hostif.c:3205:1: warning: no previous prototype for \u2018HostIFStartTimer\u2019 [-Wmissing-prototypes]\n 3205 | HostIFStartTimer(Bool rateChanged, //IN: Did rate change?\n | ^~~~~~~~~~~~~~~~\n/tmp/modconfig-AWsUtV/vmmon-only/linux/driver.c:271:1: warning: no previous prototype for \u2018LinuxDriverInit\u2019 [-Wmissing-prototypes]\n 271 | LinuxDriverInit(void)\n | ^~~~~~~~~~~~~~~\n/tmp/modconfig-AWsUtV/vmmon-only/linux/driver.c:339:1: warning: no previous prototype for \u2018LinuxDriverExit\u2019 [-Wmissing-prototypes]\n 339 | LinuxDriverExit(void)\n | ^~~~~~~~~~~~~~~\nmake[2]: *** [/usr/src/linux-headers-6.8.0-31-generic/Makefile:1926: /tmp/modconfig-AWsUtV/vmmon-only] Error 2\nmake[1]: *** [Makefile:240: __sub-make] Error 2\nmake: *** [Makefile:117: vmmon.ko] Error 2\nUsing kernel build system.\nwarning: the compiler differs from the one used to build the kernel\n The kernel was built by: x86_64-linux-gnu-gcc-13 (Ubuntu 13.2.0-23ubuntu4) 13.2.0\n You are using: gcc (Ubuntu 13.2.0-23ubuntu4) 13.2.0\n/tmp/modconfig-AWsUtV/vmnet-only/userif.c:1091:1: warning: no previous prototype for \u2018VNetUserIf_Create\u2019 [-Wmissing-prototypes]\n 1091 | VNetUserIf_Create(VNetPort **ret) // OUT\n | ^~~~~~~~~~~~~~~~~\n/tmp/modconfig-AWsUtV/vmnet-only/netif.c:173:1: warning: no previous prototype for \u2018VNetNetIf_Create\u2019 [-Wmissing-prototypes]\n 173 | VNetNetIf_Create(char *devName, // IN:\n | ^~~~~~~~~~~~~~~~\n/tmp/modconfig-AWsUtV/vmnet-only/bridge.c:258:1: warning: no previous prototype for \u2018VNetBridge_Create\u2019 [-Wmissing-prototypes]\n 258 | VNetBridge_Create(const char *devName, // IN: name of device (e.g., “eth0”)\n | ^~~~~~~~~~~~~~~~~\n/tmp/modconfig-AWsUtV/vmnet-only/bridge.c:1411:1: warning: no previous prototype for \u2018VNetBridgeSendLargePacket\u2019 [-Wmissing-prototypes]\n 1411 | VNetBridgeSendLargePacket(struct sk_buff *skb, // IN: packet to split\n | ^~~~~~~~~~~~~~~~~~~~~~~~~\n/tmp/modconfig-AWsUtV/vmnet-only/userif.o: warning: objtool: VNetCsumAndCopyToUser+0x2d: call to csum_partial_copy_nocheck() with UACCESS enabled\n/tmp/modconfig-AWsUtV/vmnet-only/vnetUserListener.c:87:1: warning: no previous prototype for \u2018VNetUserListener_Create\u2019 [-Wmissing-prototypes]\n 87 | VNetUserListener_Create(uint32 classMask, // IN: the listener\’s class mask\n | ^~~~~~~~~~~~~~~~~~~~~~~\nSkipping BTF generation for /tmp/modconfig-AWsUtV/vmnet-only/vmnet.ko due to unavailability of vmlinux\nUnable to install all modules. See log for details.\n\n’
Installing VMware Player 17.5.0
Configuring…
Thank you.
Dear Thanks for your blog. It’s worked for me.
Thank for all, works for me
Thanks for the post and the link to the github repo maintained by Michal Kubeček. You are both superstars!
Works for me, thanks
Thank you very much!
Remember to do first:
sudo apt-get install gcc
sudo apt-get install make
sudo apt-get update
Your tutorial is cool. After several hours of searching for solution over the internet, yours was the one that solved my problem. No glitch at all, and it was breeze.
First of all, thank you for your blog. Following the instructions, I have successfully installed and run VMware Player 17.5.0 on Ubuntu 24.04 (kernel 6.8.0-38). However, when I attempt to create and start a virtual machine, I still receive the error message “Could not open /dev/vmmon: ?????????. Please make sure that the kernel module vmmon’ is loaded.” After executing the command mentioned in the blog (sudo vmware-modconfig –console –install-all`), the status of Virtual Machine Monitor and Virtual Ethernet remains as failed. Could you please suggest a solution for this issue?
It works perfectly
Thank you very much for this article! Very helpful!
Great Article, thank youuu!
Do You know how to install it when kernel 6.12?(Needed because Mobo x870e ;-/) Needed because Mobo x870e ;-/