Archives For September 30, 2013

Nvidia Driver 319.60

The Latest Long Lived Nvidia Driver 319.60 has been released with bug fixes and GeForce GTX 760 Ti OEM supported. Here’s how to install it in Ubuntu 13.10 Saucy, Ubuntu 13.04 Raring, Ubuntu 12.04 Precise, and Linux Mint.

What’s new in Nvidia 319.60:

  • Added support for the GPU GeForce GTX 760 Ti OEM
  • Fixed a bug that could cause OpenGL applications to crash during the initialization of new threads.
  • Fixed a bug that caused the GPU and Memory clock frequencies for some PowerMizer performance levels on Kepler boards to be reported incorrectly in the nvidia-settings control panel.
  • Fixed a bug that caused the X server to fail to start on certain laptops when the boot display was on an external DisplayPort monitor, for example if the laptop was booted while the lid was closed.

Download & Install Nvidia 319.60:

NOTE: If you’ve already installed an old version of NVIDIA proprietary driver on your machine, remove it before getting started (see step 5).

1. Download the driver:

Nvidia driver 319.60 for Linux 32-bit

Nvidia driver 319.60 for Linux 64-bit

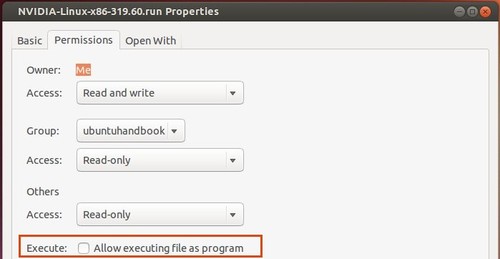
2. Once downloaded, open your file browser and navigate to the downloads page. Right-click on the package and go to its Properties window. Under Permissions tab, check the box where is says “allow executing file as program”

give permission nvidia 319.60

3. Press Ctrl+Alt+F1 to switch to TTY1 command console. Log in with your username and password. When you’re in, you need to run command to stop the graphic session (For Linux Mint or Gnome, change lighdm to mdm or gdm):

sudo stop lightdm

4. Start the installer and follow the on screen prompts:

sudo sh ~/Downloads/NVIDIA-Linux-*-319.60.run

When done, restart your computer by command sudo reboot.

5. (Optional) If for some reason the new drivers do not work properly, re-do step 3. and then uninstall the driver via:

sudo ~/Downloads/NVIDIA-Linux-*-319.60.run --uninstall

Enjoy!

linux kernel logo

The Linux Kernel 3.10.14 LTS series has been released. All users of Kernel 3.10 series are urged to upgrade as soon as possible. This quick tutorial shows how to do it in Ubuntu 13.10, Ubuntu 13.04, Ubuntu 12.04 and Linux Mint.

The Kernel 3.10.14 includes a serious of bug fixes as well as updated drivers. See the official announcement.

Upgrade to Kernel 3.10.14:

Press Ctrl+Alt+T on your keyboard to open terminal. When it opens, run commands below to download the DEBs:

For 32-bit system:

wget http://kernel.ubuntu.com/~kernel-ppa/mainline/v3.10.14-saucy/linux-headers-3.10.14-031014-generic_3.10.14-031014.201310011335_i386.deb

wget http://kernel.ubuntu.com/~kernel-ppa/mainline/v3.10.14-saucy/linux-headers-3.10.14-031014_3.10.14-031014.201310011335_all.deb

wget http://kernel.ubuntu.com/~kernel-ppa/mainline/v3.10.14-saucy/linux-image-3.10.14-031014-generic_3.10.14-031014.201310011335_i386.deb

For 64-bit system:

wget http://kernel.ubuntu.com/~kernel-ppa/mainline/v3.10.14-saucy/linux-headers-3.10.14-031014-generic_3.10.14-031014.201310011335_amd64.deb

wget http://kernel.ubuntu.com/~kernel-ppa/mainline/v3.10.14-saucy/linux-headers-3.10.14-031014_3.10.14-031014.201310011335_all.deb

wget http://kernel.ubuntu.com/~kernel-ppa/mainline/v3.10.14-saucy/linux-image-3.10.14-031014-generic_3.10.14-031014.201310011335_amd64.deb

Then install them via:

sudo dpkg -i linux-headers-3.10.14*.deb linux-image-3.10.14*.deb

Finally, restart your computer and done!

linux kernel logo

The latest Linux Kernel has reached 3.11.3. All users of 3.11 series are urged to upgrade as soon as possible. Here’s how to upgrade to new kernel release in Ubuntu 13.10, Ubuntu 13.04, Ubuntu 12.04 and Linux Mint.

Linux Kernel 3.11.3 includes a lot of bug fixes as well as updated drivers. See the official announcement.

Upgrade to Kernel 3.11.3

To upgrade to this kernel, press Ctrl+Alt+T on your keyboard to open terminal. When it opens, run commands below to download the DEBs:

For 32-bit system:

wget http://kernel.ubuntu.com/~kernel-ppa/mainline/v3.11.3-saucy/linux-headers-3.11.3-031103-generic_3.11.3-031103.201310011421_i386.deb

wget http://kernel.ubuntu.com/~kernel-ppa/mainline/v3.11.3-saucy/linux-headers-3.11.3-031103_3.11.3-031103.201310011421_all.deb

wget http://kernel.ubuntu.com/~kernel-ppa/mainline/v3.11.3-saucy/linux-image-3.11.3-031103-generic_3.11.3-031103.201310011421_i386.deb

For 64-bit system:

wget http://kernel.ubuntu.com/~kernel-ppa/mainline/v3.11.3-saucy/linux-headers-3.11.3-031103-generic_3.11.3-031103.201310011421_amd64.deb

wget http://kernel.ubuntu.com/~kernel-ppa/mainline/v3.11.3-saucy/linux-headers-3.11.3-031103_3.11.3-031103.201310011421_all.deb

wget http://kernel.ubuntu.com/~kernel-ppa/mainline/v3.11.3-saucy/linux-image-3.11.3-031103-generic_3.11.3-031103.201310011421_amd64.deb

Once downloaded, run below command to install them:

sudo dpkg -i linux-headers-3.11.3*.deb linux-image-3.11.3*.deb

Restart your computer and done!

disable guest ubuntu 13.10

This quick tip is going to show beginners how to disable the Guest session from Ubuntu 13.10 Saucy LightDM Login Screen.

Guest Session comes default in Ubuntu Unity, which anyone can log into from the login screen without password. You can easily remove it by the steps below:

1.) Press Ctrl+Alt+T on your keyboard to open terminal. When it opens, copy and paste below code and hit Enter.

sudo gedit /etc/lightdm/lightdm.conf.d/50-unity-greeter.conf

2.) It opens the config file. All you need to do is add below line into the file and click save.

allow-guest=false

remove guest ubuntu 13.10

The changes will take effect when you restart your computer. Enjoy!

intel graphics

This tutorial is going to show you how to enable hardware acceleration on Intel graphics cards using VDPAU driver.

VDPAU is an open-source library and API allows to video programs to offload portions of the video decoding process and video post-processing to the GPU video-hardware. If VDPAU available, CPU usage can be significantly lower.

Applications that uses VDPAU:

  • Avidemux as of version 2.6
  • Boxee
  • GStreamer
  • MPlayer
  • MythTV
  • XBMC Media Center
  • XBMC Live
  • Xine
  • MLT
  • Adobe Flash 10.2 Stage Video and later versions (32-bit only presently)
  • VLC media player 2.1

VDPAU is not available on Intel graphics cards. Fortunately, there’s an open-source project called libvdpau-va-gl, which is a VDPAU driver that uses OpenGL under the hood to accelerate drawing and scaling, and VA-API (if available) to accelerate video decoding. You can use it on some Intel chips.

Install libvdpau-va-gl via PPA on Ubuntu

Press Ctrl+Alt+T on your keyboard to open terminal. When it opens, run below commands one by one (Supports Ubuntu 13.10, 13.04, 12.10, 12.04).

sudo add-apt-repository ppa:nilarimogard/webupd8
sudo apt-get update
sudo apt-get install libvdpau-va-gl1

To install the VAAPI drivers for Intel HD Graphics:

sudo apt-get install i965-va-driver

To launch an application with the driver, for example, launch firefox:

VDPAU_DRIVER=va_gl firefox

To force Adobe Flash to use the hardware acceleration:

sudo mkdir -p /etc/adobe
echo "EnableLinuxHWVideoDecode=1" | sudo tee /etc/adobe/mms.cfg
echo "OverrideGPUValidation=1" | sudo tee -a /etc/adobe/mms.cfg

To enable the driver for system-wide (not recommended):

sudo sed -i "s/^# \[/\[/g" /etc/X11/Xsession.d/20vdpau-va-gl
sudo sed -i "s/^# export/ export/g" /etc/X11/Xsession.d/20vdpau-va-gl

via: libvdpau-va-gl on Github | webupd8