


![]()
For LVM, encrypted, or limited-storage systems, you need to regularly remove old kernels to prevent your computer (/boot partition) from running out of storage space.
Removing old kernels is easy. You can do it manually, or set unattended-upgrades to do it automatically. For details, open terminal from App Launcher or via Ctrl+Alt+T shortcut keys, and follow the steps below:
Remove Automatically Installed Kernels:
1. To remove the kernels that were automatically installed via regular system updates, open terminal and run:
sudo apt autoremove --purge
It will ask you to type in user password and then remove old kernels as well as other automatically installed packages that are no longer needed.

2. To enable automatic removing of old kernels:
sudo dpkg-reconfigure unattended-upgrades
sudo apt install gksu):
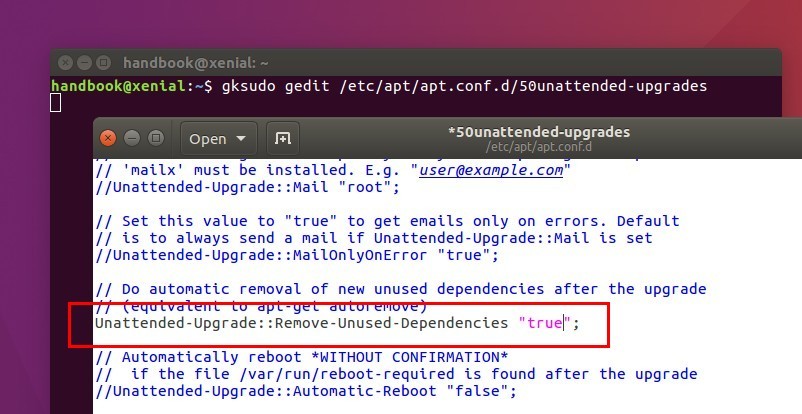
gksudo gedit /etc/apt/apt.conf.d/50unattended-upgrades
When the file opens, uncomment the following line and change the value to true:
//Unattended-Upgrade::Remove-Unused-Dependencies "false";
So it looks like:
Remove Manually Installed Kernels:
If you install latest kernels from Kernel PPA, or build your own kernels with patches, a “purge-old-kernels” script is the best and the easiest way to remove old kernels.
1. The script is maintained in byobu package, so first install it via:
sudo apt install byobu
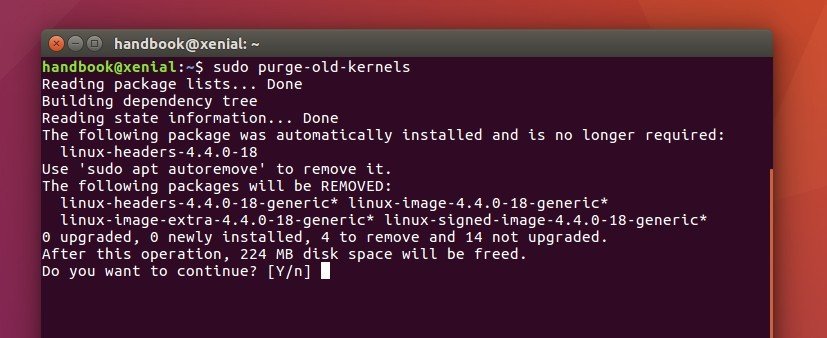
2. Then run the script regularly to remove old kernels:
sudo purge-old-kernels
Remove Old Kernels via DPKG
If your /boot partition has already full while doing an upgrade or package install, and apt (the script above uses apt) can’t remove packages due to broken dependency, here you can manually find out the old kernel packages and remove them via DPKG:
1. Run command to check out current kernel and DON’T REMOVE it:
uname -r
2. List all kernels excluding the current booted:
dpkg -l | tail -n +6 | grep -E 'linux-image-[0-9]+' | grep -Fv $(uname -r)
Example output:
rc  linux-image-4.4.0-15-generic               4.4.0-15.31                                         amd64        Linux kernel image for version 4.4.0 on 64 bit x86 SMP
ii  linux-image-4.4.0-18-generic               4.4.0-18.34                                         amd64        Linux kernel image for version 4.4.0 on 64 bit x86 SMP
rc  linux-image-4.6.0-040600rc3-generic        4.6.0-040600rc3.201604120934                        amd64        Linux kernel image for version 4.6.0 on 64 bit x86 SMP
There will be three status in the listed kernel images:
- rc: means it has already been removed.
- ii: means installed, eligible for removal.
- iU: DON’T REMOVE. It means not installed, but queued for install in apt.
3. Remove old kernel images in status ii, it’s “linux-image-4.4.0-18-generic” in the example above:
sudo dpkg --purge linux-image-4.4.0-18-generic
If the command fails, remove the dependency packages that the output tells you via sudo dpkg --purge PACKAGE.
And also try to remove the respective header and common header packages (Don’t worry if the command fails):
sudo dpkg --purge linux-image-4.4.0-18-header linux-image-4.4.0-18
Finally you may fix the apt broken dependency via command:
sudo apt -f install


Thank you Ji m for your help,I am an old user of ubuntu in a sense of consumer cause I do not have any knowledge of programing or any kind of a sort.
Have a nice day
Just used this page for a corrupted update Ji, thanks man!!
good work!
the header package name is a bit different for me though, and can be listed with:
dpkg -l | tail -n +6 | grep -E 'linux-headers-[0-9]+' | grep -Fv $(uname -r)those can be removed e.g with:
sudo dpkg --purge linux-headers-4.6.6-040606-genericsudo dpkg --purge linux-headers-4.6.6-040606
sudo apt autoremove –purge
was not a valid command in Ubunutu 15.10
sudo apt-get autoremove –purge
did work, and next I could upgrade to Ubuntu 16.04
I suppose you got the information to your article from this Ubuntu Community Wiki article I wrote mainly.
I have written a powerful script that makes purging even easier, and it handles even some trickier conditions. You can fund it here.
The purge-old-kernels (basically just a list of old kernels with apt-get purge) is a handy script. Strange it is a part of byobu terminal program!
Also, a word of caution on the last command – which removes all kernels except current booted one. This is not a good idea. You could’ve booted an earlier kernel to check something and if you build automation around this, you will blow away a newer kernel.
You can just get it back but still…
Going by timestamps is not idea (as with purge-old-kernels) but unless you muck around /boot you should be fine.
I had problem with installing a package using “apt-get” that required some dependencies however it throw errors regarding not enough space on /boot. I followed DPKG methods to free up some spaces on /boot and problem gone.
Thanks a lot
Best regards