Archives For September 30, 2016

angrysearch

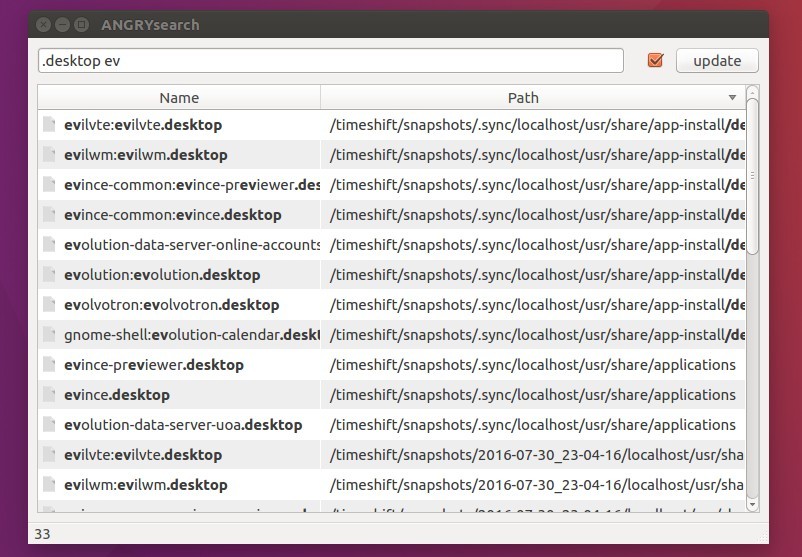
Looking for a Linux version of Everything Search Engine? ANGRYsearch helps you find files and folders rapidly in Linux with a simple graphical interface.

Linux file search, instant results as you type
Attempt at making Linux version of Everything Search Engine because no one else bothered.
Everyone seems to be damn content with searches that are slow, populating results as they go; or are cli based, making it difficult to comfortably make use of the results; or are heavily integrated with a file manager, often limiting search to just home; or are trying to be everything with full-text file’s content search.

angrysearch Linux file search

ANGRYsearch is written in Python3 and PyQt5. It’s database can be set to two different modes in ~/.config/angrysearch/angrysearch.conf file with angrysearch_lite being set to true or false:

  • lite mode (Default) shows only name and path
  • full mode shows also size and date of the last modification, the drawback is that crawling through drives takes roughly twice as long since every file and directory gets additional stats calls

There are also 3 search mode available:

  • Fast mode (Default) extremely fast, but no substrings, meaning it would not find “Pirates” or “Whiplash“, but it would “Pirates” or “The-Fifth”
  • slow mode – enabled when the checkbox is unchecked, slightly slower but can find substrings
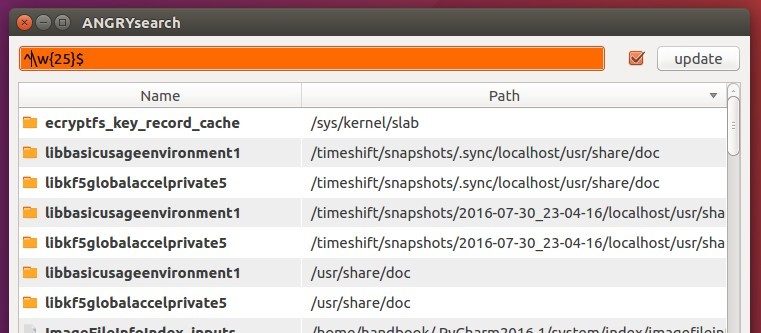
  • regex mode – activated by the F8 key, indicated by orange color background
    slowest search, used for very precise searches using regular expressions, set to case insensitive

AngrySearch Regex mode

How to install ANGRYsearch in Ubuntu:

Install ANGRYsearch is quite easy since the source tarball includes a installer.sh script:

1. Download the source from the link below:

Download ANGRYsearch

2. Extract and open the result folder in terminal:

for ubuntu 14.04 you need to install nautilus-open-terminal and restart nautilus

open-angrysearch-interminal

3. When the terminal windows opens, run command to make execute and run the installer:

chmod +x install.sh && sudo ./install.sh

Type in your password when it asks and hit Enter.

Once installed, launch ANGRYsearch from Unity Dash or App Launcher, when it opens, click update to index your Linux files/folders, and mounted Windows partitions.

Uninstall ANGRYsearch:

Although the source does not offer an uninstall script, you can run the utility via command:

sudo rm -r /usr/share/angrysearch /usr/bin/angrysearch /usr/share/applications/angrysearch.desktop

How to Upgrade to Ubuntu 16.10 from Ubuntu 16.04

Last updated: October 7, 2016

upgrade Ubuntu 16.10

Ubuntu 16.10 Yakkety Yak now is at Final freeze stage, you can now upgrade from Ubuntu 16.04 to Ubuntu 16.10 dev. Then running system update via Software Updater will bring you to the final release of Ubuntu 16.10 on October 13th.

Before upgrading to Ubuntu 16.10, you have to know that:

1. While Ubuntu 16.04 LTS has 5 years support, Ubuntu 16.10 is a short release with 9 months support.

2. It’s hard to roll back your system to previous 16.04 state after upgrading process without a system reinstall.

Preparation

1. First always backup important data, bookmarks, etc.

2. Launch System Settings -> Software & Updates and do:

  • disable or remove all third-party repositories on Other Software tab.
  • under Updates tab, choose “For any new version” after Notify me for a new Ubuntu version
  • select Open Source graphic driver in Additional Drivers and REBOOT after applied changes.

notify-new-release

Upgrade Ubuntu Desktop to Ubuntu 16.10:

1. Open terminal (Ctrl+Alt+T) and run command to update whole system:

sudo apt update && sudo apt full-upgrade

2. Launch update-manager with -d option to check Ubuntu 16.10 dev release:

sudo update-manager -d

upgrade-1610

When it prompts that Ubuntu 16.10 is available, click the Upgrade button. Follow the wizard and enjoy!

Upgrade Ubuntu Server to 16.10:

For Ubuntu server, after making a backup do following steps:

1. Install the update-manager-core package if it is not already installed via command:

sudo apt install update-manager-core

2. Configure update-manager via command:

sudo nano /etc/update-manager/release-upgrades

Change the line “Prompt=LTS” to “Prompt=normal” (without quotes) and save the file.

3. Finally start upgrading via the command below and follow on screen prompts:

sudo do-release-upgrade -d

netbeans-icon245

The Oracle Corporation has announced the release of NetBeans IDE 8.2 today. Here’s how to install it in Ubuntu 16.04.

NetBeans 8.2 features:

  • ECMAScript 6 support
  • experimental ECMAScript 7 support
  • better Node.js support
  • improved Oracle JET support
  • PHP 7 support
  • Docker support
  • a new SQL queries profiling mode
  • some C/C++ enhancements

Install NetBeans 8.2 in Ubuntu:

1. First install Oracle Java via PPA, or install OpenJDK using Ubuntu Software.

2. Download the NetBeans bundles from the link below:

NetBeans Download Page

3. Open terminal from Unity Dash, App Launcher, or via Ctrl+Alt+T shortcut key. When it opens run commands:

  • navigate to Downloads folder:
    cd ~/Downloads
  • make the downloaded script executable:
    chmod +x netbeans-8.2-javase-linux.sh
  • finally run the script:
    ./netbeans-8.2-javase-linux.sh

In the commands, change “netbeans-8.2-javase-linux.sh” with the package name you downloaded.

netbeans-script

The last command launches the installer wizard, just follow it and enjoy!

To make the things easier, there’s a installer script (no ready for NetBeans 8.2 yet, check the PPA page) that automatically downloads and installs the latest version of Netbeans IDE including the Java SE, Java EE, C/C++, HTML5 & PHP plugins (‘All’ version on oracle’s download page).

To install the script, run commands below one by one:

sudo add-apt-repository ppa:vajdics/netbeans-installer

sudo apt update

sudo apt install netbeans-installer

Blender 2.78

The Blender Foundation has recently announced the release of Blender 2.78. Here’s how to install or upgrade it via PPA in Ubuntu 16.04, Ubuntu 14.04, and Linux Mint 18, 17.

What’s new in Blender 2.78:

  • spherical stereo rendering support for VR
  • a grease pencil for full 2D drawing and animations
  • viewport rendering improvements
  • freehand curves drawing over surfaces
  • bendy bones support
  • alembic support
  • The Cycles Render Engine has NVIDIA Pascal support
  • new physics capabilities, and various new add-ons.

Blender 2.78 splash

Install/upgrade to Blender 2.78 via PPA:

Thomas Schiex is maintaining a PPA with most recent Blender release for Ubuntu 16.10, Ubuntu 16.04, Ubuntu 14.04, and Linux Mint 17, 18.

So you can easily install Blender 2.78 or upgrade from a previous release by following the steps below:

The PPA is abandoned, see this tutorial instead.

1. Open terminal from Unity Dash, App Launcher, or via Ctrl+Alt+T keys. When it opens, run command:

sudo add-apt-repository ppa:thomas-schiex/blender

blender-ppa

2. To upgrade from a previous release, simply launch Software Updater and install the updates after checking for updates:

upgrade-blender278

Or install Blender for the first time or upgrade Blender via command:

sudo apt update && sudo apt install blender

3. (Optional) To restore to the stock version of Blender in Ubuntu’s main repository, purge the ppa via command:

sudo apt install ppa-purge && sudo ppa-purge ppa:thomas-schiex/blender