


![]()
This is a step by step guide shows how to enable fingerprint reader support for Lenovo ThinkPad T480/T480s, X1 Carbon 6th gen, X1 Yoga 3rd gen, X280, etc with 06cb:009a device in Ubuntu 22.04, Ubuntu 24.04, Ubuntu 25.10, and Ubuntu 26.04.
Ubuntu has fingerprint reader support out-of-the-box using libfprint, and provides option to enable fingerprint login in Users settings page. However, the library has a list of unsupported devices, including 06cb:009a that’s built-in in my used ThinkPad T480s laptop.
Thankfully, there’s a free open-source alternative python-validity that works in my case. Here’s how to install and set it up in Ubuntu 22.04 and higher, while Ubuntu 20.04 is also supported.
NOTE: This tutorial may also work in many other fingerprint readers, however, the project so far does NOT provide a page to list all supported devices.
Step 1: Tell Which Fingerprint Reader device your laptop have
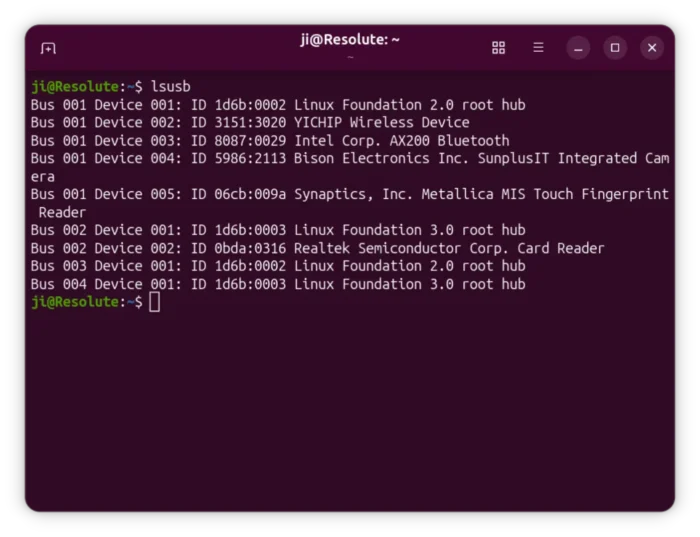
First of all, you may press Ctrl+Alt+T on keyboard to open up a terminal window.
Then run command to find out the device name of your fingerprint reader:
lsusb
In my case, it’s 06cb:009a. Not only for this device, the steps below should also work for 138a:0090, 138a:0097, 138a:009d.
Step 2: Install python3-validity driver
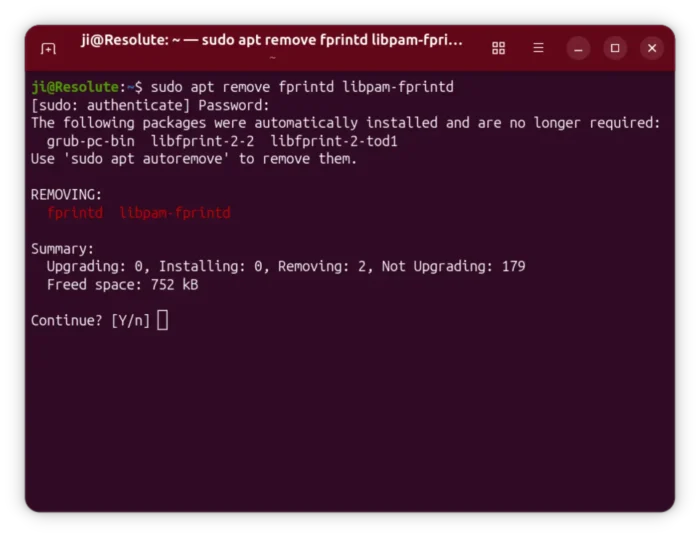
1. In a terminal window, first run command to uninstall the pre-installed libfprint driver:
sudo apt remove fprintd libpam-fprintd
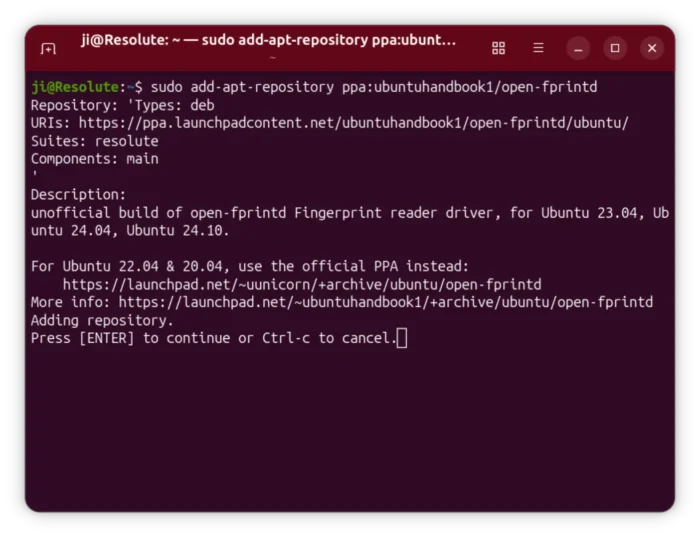
2. Then, add the software developer’s PPA that contains the new driver packages:
sudo add-apt-repository ppa:uunicorn/open-fprintd
NOTE: The PPA so far supports Ubuntu 18.04, Ubuntu 20.04, Ubuntu 22.04, and Ubuntu 24.04.
For Ubuntu 24.04, 25.10, and 26.04, I’ve built the package into this unofficial PPA (works in my case but without well testing), run this command instead to add the PPA:
sudo add-apt-repository ppa:ubuntuhandbook1/open-fprintd
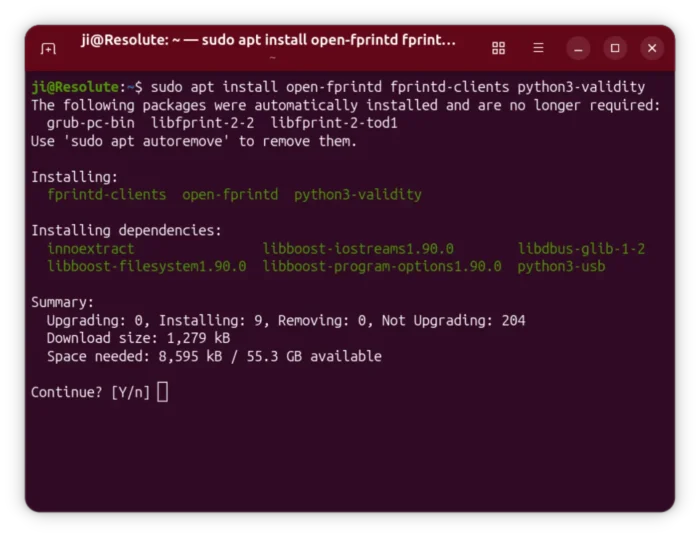
3. Finally, install the driver packages by running command:
sudo apt install open-fprintd fprintd-clients python3-validity
Linux Mint user needs to run sudo apt update first to refresh package cache after adding PPA.
Step 3: Enable python3-validity service
After installing the driver package, it should automatically start the service.
To verify, simply run command in terminal:
systemctl status python3-validity.service
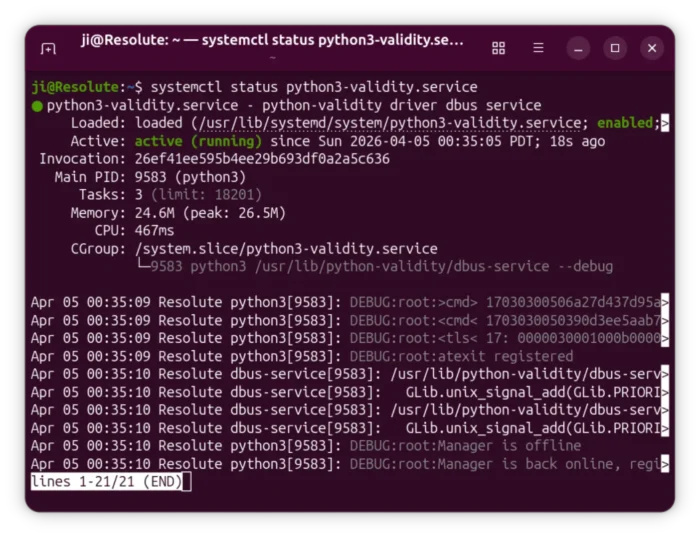
If it’s not in active running status, try running commands below to enable & start the service:
systemctl enable python3-validity.service
systemctl start python3-validity.service
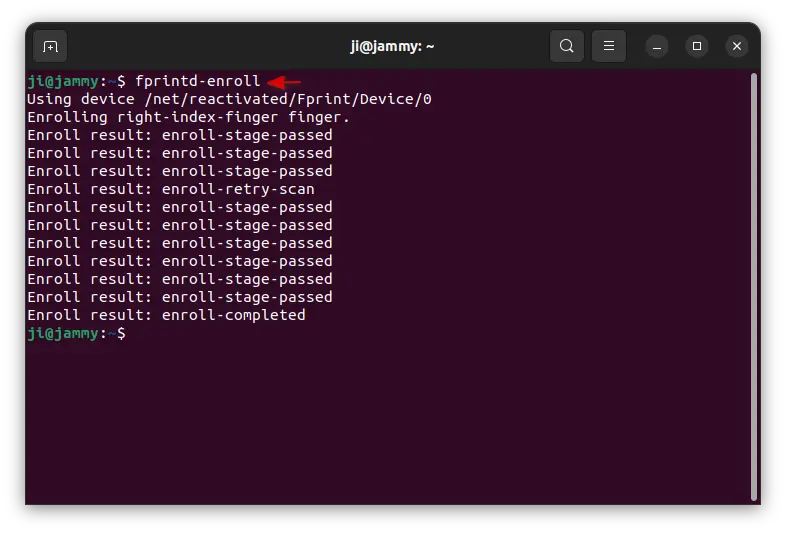
Step 4: Enroll your fingerprint
NOTE: If you have already enrolled your fingerprints from other or old Distributions, for example I added fingerprints on 24.04 then re-installed 26.04, then you may skip this step!
For GNOME, open Settings and go to System -> Users -> Fingerprint Login to see if you already have fingerprints enrolled.
To enroll your fingerprint, run the command below in terminal:
fprintd-enroll
It outputs “Enrolling right-index-finger finger“, and the LED light is turning on.
Now, touch the fingerprint sensor repeatedly. As you press your finger on the fingerprint sensor and lift it, it outputs a line says either Enroll result: enroll-stage-passed or Enroll result: enroll-retry-scan. Do it repeatedly, until it outputs “enroll-completed”.
Tips: Don’t know why, but it outputted ‘result:enroll-failed’ in my case in Ubuntu 24.04 & 25.10! Though, the fingerprint that I successfully enrolled in 22.04 is also working good in 24.04 | 25.10 installed in same laptop. You may factory-reset the fingerprint chip to clear your fingerprint if need.
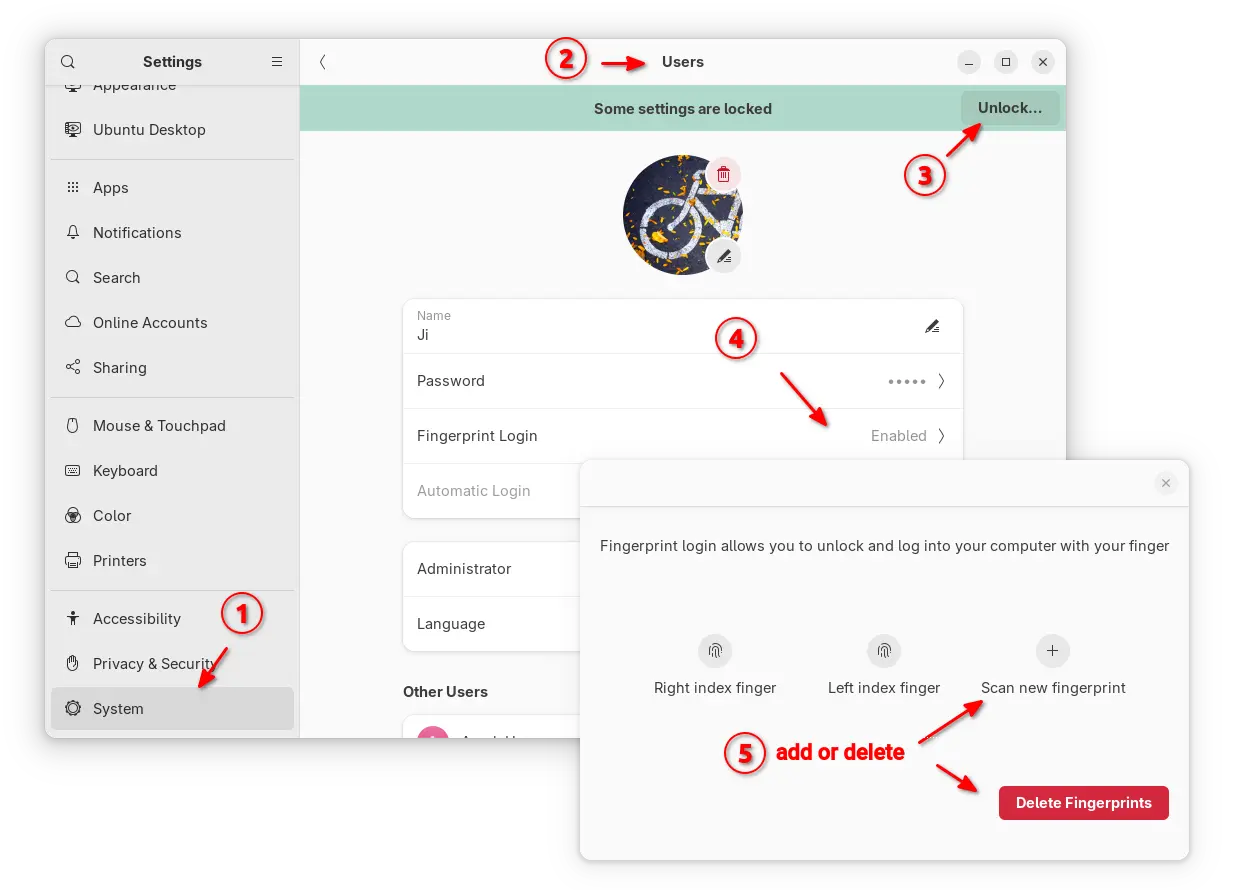
UPDATE: The default GNOME desktop now supports managing your fingerprints. Open Settings then navigate to System -> User, unlock then click “Fingerprint Login” to add or delete fingerprints.
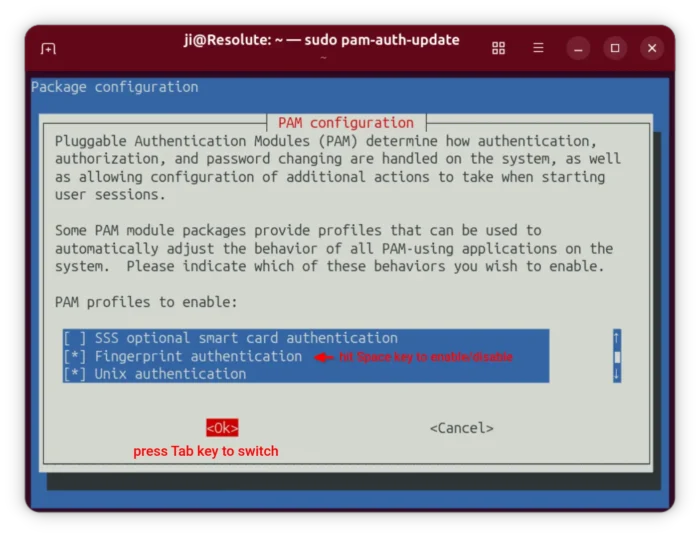
Step 5: Enable Fingerprint Authentication
If everything’s goes well, you can now run the single command below to manage PAM module:
sudo pam-auth-update
In next screen, use up/down arrow keys to choose “Fingerprint authentication”, then press space-bar to enable/disable it. Finally, press Tab to highlight OK and hit Enter.
After that, either lock screen then try using your fingerprint to un-lock. Or, run something or some commands that need user authentication, it will prompt you to “Place your finger on the fingerprint reader“.

Step 6: Make it work after resuming from sleep
The driver includes 2 systemd services to make it work after waking up from sleep. To enable them, run command:
sudo systemctl enable open-fprintd-resume open-fprintd-suspend
They did not work in my case previously. Thanks to @YovanggaAnandhika from this bug report, I added a patch to apply the workaround to the open-fprintd package in PPA, so the fingerprint authentication works now in my case (except wake-up unclock) after waking up from sleep.
If you installed the package from the developer’s PPA, then try manually adding the scripts by following the steps in that bug report (via the last link).
Uninstall
So, if the driver does not work for your fingerprint reader, do following steps one by one to undo the changes.
- First, open terminal (Ctrl+Alt+T) and run command to re-configure PAM:
sudo pam-auth-update
In the screen, disable
fingerprint authenticationthen, hit Tab and enter. - Next, run command to uninstall the python3-validity driver:
sudo apt remove --autoremove open-fprintd fprintd-clients python3-validity
Also, remove the Ubuntu PPA by running command:
sudo add-apt-repository --remove ppa:uunicorn/open-fprintd
If you want, you may install back the original fprintd driver via command:
sudo apt install fprintd
That’s all. Enjoy!


Thank you, Ji. My 1st comment here.
Your website is helpful and always with clear instructions. One of the best out there.
I just to report that I’ve tried the instructions on my ThinkPad X1 Carbon 6th running Ubuntu Cinnamon 23.10.
All worked as expected but then as you mentioned the driver is broken after resuming from sleep. The “sudo systemctl enable open-fprintd-resume open-fprintd-suspend” doesn’t seem to help for me.
Also, when unresponsive, I have trouble manually entering the password.
Thank you!
Worked for my T480.
:^)
hey i get the fail to start error, as follows
× python3-validity.service – python-validity driver dbus service
Loaded: loaded (/lib/systemd/system/python3-validity.service; enabled; ven>
Active: failed (Result: exit-code) since Thu 2024-05-09 09:06:51 +03; 15s >
Process: 6913 ExecStart=/usr/lib/python-validity/dbus-service –debug (code>
Main PID: 6913 (code=exited, status=1/FAILURE)
CPU: 134ms
How do I choose a fingerprint reader for my Ubuntu 24.04 Desktop?
Choosing one randomly that will create a nightmare scenario isnt something I want to do..
I am a complete novice at Ubuntu and unlikely to learn/remember command line instructions.. I am a ‘monkey see, monkey do Ubuntu lover’
The project seems not supporting this so far. You may request this feature by reporting to https://github.com/uunicorn/python-validity
Aaaah without your help I would have not done it, thank you
Thank you, Ji m. Worked for my T480s
Thank you so much
It worked for you?
I am getting a 404 when I attempt to retieve the open-frpintd/ubuntu package:
Err:10 https://ppa.launchpadcontent.net/uunicorn/open-fprintd/ubuntu noble Release
404 Not Found [IP: 2620:2d:4000:1::81 443]
It said enroll failed for me also but after forcing all the steps I can now log in using my fingerprintd as well as confirm sudo in the terminal Much appreciated!
t480s / linux mint 22
Thank you very very much!!!!
I try to do that really many different sites, but none of them works.
No it works perfectly!!!!
Thank you!
Worked for my x280….!!! :)
Thanks man – works well on my Lenovo Yoga x380
Hello. Thanks for article. i have lenovo thinkpad e580.
lsusb
Bus 001 Device 001: ID 1d6b:0002 Linux Foundation 2.0 root hub
Bus 001 Device 002: ID 09da:c10a A4Tech Co., Ltd. USB Mouse
Bus 001 Device 004: ID 5986:2113 Bison Electronics Inc. SunplusIT Integrated Camera
Bus 001 Device 005: ID 06cb:00a2 Synaptics, Inc. Metallica MOH Touch Fingerprint Reader
Bus 001 Device 006: ID 8087:0032 Intel Corp. AX210 Bluetooth
Bus 002 Device 001: ID 1d6b:0003 Linux Foundation 3.0 root hub
But not working.
systemctl status python3-validity.service
× python3-validity.service – python-validity driver dbus service
Loaded: loaded (/usr/lib/systemd/system/python3-validity.service; enabled; preset: enabled)
Active: failed (Result: exit-code) since Sun 2024-11-10 10:40:43 +03; 7s ago
Duration: 4.085s
Process: 5816 ExecStart=/usr/lib/python-validity/dbus-service –debug (code=exited, status=1/FAILURE)
Main PID: 5816 (code=exited, status=1/FAILURE)
CPU: 3.424s
File “/usr/lib/python3/dist-packages/validitysensor/init.py”, line 47, in open
usb.open()
File “/usr/lib/python3/dist-packages/validitysensor/usb.py”, line 50, in open
self.open_dev(dev)
File “/usr/lib/python3/dist-packages/validitysensor/usb.py”, line 62, in open_dev
raise Exception(‘No matching devices found’)
Exception: No matching devices found
python3-validity.service: Main process exited, code=exited, status=1/FAILURE
python3-validity.service: Failed with result ‘exit-code’.
python3-validity.service: Consumed 3.424s CPU time, 157.7M memory peak, 0B memory swap peak.
$ systemctl enable python3-validity.service
$ systemctl start python3-validity.service
$ fprintd-enroll
list_devices failed:
Please help.
Sadly, your fingerprint reader (06cb:00a2) is not supported, due to technical reasons.
Thank you. I hope someone solves this problem.
Hi,
Works fine in my T480 thanks!
Do you have any issued with it not working after awhile? Mine was fine yesterday, then it started saying error detected when I login and the finger print login option is no longer available in the users tab.
Ubuntu 24.04
Any idea how to make it request fingerprint when opening the laptop each time? Mine only requests for initial startup into Ubuntu.
Absolute legend!! Thank you 🙏 T-470 finder print ID functional! :)
Great!!!!
Thanks A lot
I got it to install but it fails to read my fingerprint most of the times so I will have to uninstall it, I am using linux mint 22
Worked extremely well for my t470, thanks a lot.
Thank you so much. it works like a charm.
Good, it is working on Ubuntu 24.04 and ThinkPad A285.
$ sudo systemctl status python3-validity.service
● python3-validity.service – python-validity driver dbus service
Loaded: loaded (/usr/lib/systemd/system/python3-validity.service; enabled; preset: enabled)
Active: active (running) since Tue 2025-01-28 00:47:09 EET; 3min 30s ago
Main PID: 5397 (python3)
Tasks: 3 (limit: 9272)
Memory: 18.8M (peak: 19.1M)
CPU: 211ms
CGroup: /system.slice/python3-validity.service
└─5397 python3 /usr/lib/python-validity/dbus-service –debug
Jan 28 00:47:10 lenovo-laptop python3[5397]: DEBUG:root:<tlstls> 17: 6901000000
Jan 28 00:47:30 lenovo-laptop python3[5397]: DEBUG:root:>cmd> 1703030040f898d6731bef1925a1c14286dd0e66eb5a900eda50aec26ac5b7190a45a19904510a87b4301dfb9f190689396d76317324d748a9c64521538>
Jan 28 00:47:30 lenovo-laptop python3[5397]: DEBUG:root:<cmd
Jan 28 00:47:30 lenovo-laptop python3[5397]: DEBUG:root:<tls< 17: 0104
Jan 28 00:47:30 lenovo-laptop ERROR:root:Failed[5397]: 0401
Traceback (most recent call last):
File "/usr/lib/python-validity/dbus-service", line 157, in run
sensor.enroll(usr, index, update_cb)
File "/usr/lib/python3/dist-packages/validitysensor/sensor.py", line 828, in enroll
self.create_enrollment()
File "/usr/lib/python3/dist-packages/validitysensor/sensor.py", line 749, in create_enrollment
assert_status(tls.app(pack('<BL', 0x69, 1)))
File "/usr/lib/python3/dist-packages/validitysensor/util.py", line 12, in assert_status
raise Exception('Failed: %04x' % s)
Exception: Failed: 0401
Jan 28 00:47:30 lenovo-laptop python3[5397]: DEBUG:root:EnrollStatus
$ fprintd-enroll
Using device /net/reactivated/Fprint/Device/1
Enrolling right-index-finger finger.
Enroll result: enroll-failed
Can you help please?
From my attempt, it appears that this does not yet work in Ubuntu 24.04 on the T480s when coming out of suspend, even after you input the suggested terminal prompt that is supposed to correct for this. I will wait a little while before trying it again, unless someone else has had the same experience and has figured out a way to get it going.
Hello,
This looks nice. But when I try to install on my 24.10, I get :
$ sudo apt install open-fprintd fprintd-clients python3-validity │
Error: Unable to locate package open-fprintd │
Error: Unable to locate package fprintd-clients │
Error: Unable to locate package python3-validity
Any idea why ?
Thanks a lot in advance, cheers from France!
my device is 06cb:00be
and unfortunately I see here:
https://gitlab.freedesktop.org/libfprint/wiki/-/wikis/Unsupported%20Devices
that it’s not supported, but there is a functioning workaround at: https://github.com/Popax21/synaTudor
that I have no ides how to install…
Thanks, with your instructions I was also able to set up my fingerprint on a Lenovo Yoga 370!!!
Working fine on A285 but when i reboot all is messed up and the only way to fix it is to uinstall all and factory reset the chip in bios . then i can install it again but then it works only till reboot. i have same chip as u.
thanks, works fine on my T480~
Nice in terminal but dont work in the login of elementary OS :V
works on t480 with ubuntu 25.04
Thank you.
X270 worked appropriately.
It has 138a Validity Sensors, Inc. fingerprint reader.
Ubuntu 24.04.2 LTS
My fingerprint scanner is supported by normal fprintd, but always gives a failed verify. It is not supported by open-fprintd?
Is there a list of supported HW for open-fprintd?
So far, it supports 138a:0090, 138a:0097, 138a:009d, and 06cb:009a
mine its not working wy is it ?
Thank you, installed on T480s
It works for login after boot, and in terminal … but if I close the laptop lid (suspend) and resume – it does NOT work for GUI or terminal, but both use extra long time to verify password.
sudo systemctl enable open-fprintd-resume open-fprintd-suspend – did not help.
Hi thanks for this hack. Can you add this to Flatpak? It would be a very good utility for non-Linux-savvy people.
This worked initially on my Lenovo X1 Carbon 5th gen. Subsequently I had long delays (up to 40 seconds) in logging in and in using sudo. Turned out libpam-fprintd was still in the authentication chain and removing it fixed the issue. I think
sudo apt-remove fprintd
might better be
sudo apt-remove fprintd libpam-fprintd
I don’t know if libpam-fprintd something shared with open-fprintd and as it’s cost me some time already I’ll leave it for now, but I’ll check back later. Would like to have this working!
Updated. Thank you for the tips!
Thanks!
Thanks a great lot, this is good and working well on Lenovo Thinkpad X Carbon Gen 5,/ Ubuntu 24.04!
cheers from France
Hi Ji,
It is working with Linux Mint 22.2 (~ Ubuntu 24.04 noble) in a T470. Thanks for it! I have not tested the suspend/resume thing yet – got too many things open right now and that process is going to be either long, or painful, or both. :-)
Cheers
AZ
Hi, works this fprint also my machine:
[code]
System:
Kernel: 6.17.0-14-generic arch: x86_64 bits: 64 compiler: gcc v: 13.3.0 clocksource: tsc
Desktop: Cinnamon v: 6.6.7 tk: GTK v: 3.24.41 wm: Muffin v: 6.6.3 vt: 7 dm: LightDM v: 1.30.0
Distro: Linux Mint 22.3 Zena base: Ubuntu 24.04 noble
Machine:
Type: Desktop Mobo: ZOTAC model: ZBOX-MI/CI625/645/665NANO v: XX serial:
part-nu: NA uuid: UEFI: American Megatrends LLC. v: B448P009
date: 11/04/2021
CPU:
Info: quad core model: 11th Gen Intel Core i7-1165G7 bits: 64 type: MT MCP smt: enabled
arch: Tiger Lake rev: 1 cache: L1: 320 KiB L2: 5 MiB L3: 12 MiB
Speed (MHz): avg: 2912 high: 4107 min/max: 400/4700 cores: 1: 4000 2: 4100 3: 2113 4: 4083
5: 400 6: 4107 7: 400 8: 4100 bogomips: 44851
Flags: avx avx2 ht lm nx pae sse sse2 sse3 sse4_1 sse4_2 ssse3 vmx
Graphics:
Device-1: Intel TigerLake-LP GT2 [Iris Xe Graphics] vendor: ZOTAC driver: i915 v: kernel
arch: Gen-12.1 ports: active: HDMI-A-1 empty: DP-1, DP-2, DP-3, DP-4, HDMI-A-2, HDMI-A-3,
HDMI-A-4, HDMI-A-5 bus-ID: 00:02.0 chip-ID: 8086:9a49 class-ID: 0300
Device-2: Logitech Logitech Webcam C925e driver: snd-usb-audio,uvcvideo type: USB rev: 2.0
speed: 480 Mb/s lanes: 1 bus-ID: 3-2:3 chip-ID: 046d:085b class-ID: 0102 serial:
Display: x11 server: X.Org v: 21.1.11 with: Xwayland v: 23.2.6 driver: X: loaded: modesetting
unloaded: fbdev,vesa dri: iris gpu: i915 display-ID: :0 screens: 1
Screen-1: 0 s-res: 1920×1080 s-dpi: 96 s-size: 508x285mm (20.00×11.22″) s-diag: 582mm (22.93″)
Monitor-1: HDMI-A-1 mapped: HDMI-1 model: Samsung C27F390 serial: res: 1920×1080
hz: 60 dpi: 82 size: 598x336mm (23.54×13.23″) diag: 686mm (27″) modes: max: 1920×1080
min: 720×400
API: EGL v: 1.5 hw: drv: intel iris platforms: device: 0 drv: iris device: 1 drv: swrast gbm:
drv: iris surfaceless: drv: iris x11: drv: iris inactive: wayland
API: OpenGL v: 4.6 compat-v: 4.5 vendor: intel mesa v: 25.2.8-0ubuntu0.24.04.1 glx-v: 1.4
direct-render: yes renderer: Mesa Intel Iris Xe Graphics (TGL GT2) device-ID: 8086:9a49
API: Vulkan v: 1.3.275 layers: 3 surfaces: xcb,xlib device: 0 type: integrated-gpu driver: N/A
device-ID: 8086:9a49 device: 1 type: cpu driver: N/A device-ID: 10005:0000
Audio:
Device-1: Intel Tiger Lake-LP Smart Sound Audio vendor: ZOTAC driver: snd_hda_intel v: kernel
bus-ID: 00:1f.3 chip-ID: 8086:a0c8 class-ID: 0403
Device-2: Logitech Logitech Webcam C925e driver: snd-usb-audio,uvcvideo type: USB rev: 2.0
speed: 480 Mb/s lanes: 1 bus-ID: 3-2:3 chip-ID: 046d:085b class-ID: 0102 serial:
Device-3: ESS USB DAC driver: hid-generic,snd-usb-audio,usbhid type: USB rev: 1.0
speed: 12 Mb/s lanes: 1 bus-ID: 3-7.2:9 chip-ID: 0495:3011 class-ID: 0300
API: ALSA v: k6.17.0-14-generic status: kernel-api
Server-1: PipeWire v: 1.0.5 status: active with: 1: pipewire-pulse status: active
2: wireplumber status: active 3: pipewire-alsa type: plugin
Network:
Device-1: Intel Wi-Fi 6 AX201 driver: iwlwifi v: kernel bus-ID: 00:14.3 chip-ID: 8086:a0f0
class-ID: 0280
IF: wlo1 state: down mac:
Device-2: Realtek RTL8111/8168/8211/8411 PCI Express Gigabit Ethernet driver: r8169 v: kernel
pcie: speed: 2.5 GT/s lanes: 1 port: 4000 bus-ID: 2c:00.0 chip-ID: 10ec:8168 class-ID: 0200
IF: enp44s0 state: down mac:
Device-3: Realtek RTL8111/8168/8211/8411 PCI Express Gigabit Ethernet driver: r8169 v: kernel
pcie: speed: 2.5 GT/s lanes: 1 port: 3000 bus-ID: 2d:00.0 chip-ID: 10ec:8168 class-ID: 0200
IF: enp45s0 state: up speed: 1000 Mbps duplex: full mac:
Bluetooth:
Device-1: Intel Bluetooth 9460/9560 Jefferson Peak (JfP) driver: btusb v: 0.8 type: USB rev: 2.0
speed: 12 Mb/s lanes: 1 bus-ID: 3-10:7 chip-ID: 8087:0aaa class-ID: e001
Report: hciconfig ID: hci0 rfk-id: 0 state: up address: bt-v: 5.1 lmp-v: 10
sub-v: 20f9 hci-v: 10 rev: 20f9 class-ID: 7c0104
Drives:
Local Storage: total: 1.82 TiB used: 559.61 GiB (30.0%)
ID-1: /dev/sda vendor: Samsung model: SSD 870 EVO 1TB size: 931.51 GiB speed: 6.0 Gb/s
tech: SSD serial: fw-rev: 3B6Q scheme: GPT
ID-2: /dev/sdb vendor: Crucial model: CT1000X10PROSSD9 size: 931.51 GiB type: USB rev: 2.1
spd: 480 Mb/s lanes: 1 tech: SSD serial: N/A fw-rev: 1000 scheme: GPT
Partition:
ID-1: / size: 915.36 GiB used: 559.61 GiB (61.1%) fs: ext4 dev: /dev/sdb2
ID-2: /boot/efi size: 475 MiB used: 6.1 MiB (1.3%) fs: vfat dev: /dev/sdb1
Swap:
Alert: No swap data was found.
USB:
Hub-1: 1-0:1 info: hi-speed hub with single TT ports: 1 rev: 2.0 speed: 480 Mb/s lanes: 1
chip-ID: 1d6b:0002 class-ID: 0900
Hub-2: 2-0:1 info: super-speed hub ports: 4 rev: 3.1 speed: 10 Gb/s lanes: 1 chip-ID: 1d6b:0003
class-ID: 0900
Hub-3: 3-0:1 info: hi-speed hub with single TT ports: 12 rev: 2.0 speed: 480 Mb/s lanes: 1
chip-ID: 1d6b:0002 class-ID: 0900
Device-1: 3-1:2 info: Micron CT1000X10PROSSD9 type: mass storage driver: usb-storage
interfaces: 1 rev: 2.1 speed: 480 Mb/s lanes: 1 power: 500mA chip-ID: 0634:5604 class-ID: 0806
serial:
Device-2: 3-2:3 info: Logitech Logitech Webcam C925e type: video,audio
driver: snd-usb-audio,uvcvideo interfaces: 4 rev: 2.0 speed: 480 Mb/s lanes: 1 power: 500mA
chip-ID: 046d:085b class-ID: 0102 serial:
Hub-4: 3-6:4 info: Genesys Logic Hub ports: 4 rev: 2.0 speed: 480 Mb/s lanes: 1 power: 100mA
chip-ID: 05e3:0608 class-ID: 0900
Hub-5: 3-6.2:6 info: HP General Purpose USB Hub ports: 2 rev: 1.1 speed: 12 Mb/s lanes: 1
power: 100mA chip-ID: 03f0:4e4a class-ID: 0900
Device-1: 3-6.2.1:10 info: HP HP USB Fingerprint Mouse type: mouse driver: hid-generic,usbhid
interfaces: 1 rev: 2.0 speed: 12 Mb/s lanes: 1 power: 100mA chip-ID: 03f0:4b4a class-ID: 0301
serial:
Device-2: 3-6.2.2:11 info: Synaptics type: driver: N/A interfaces: 1 rev: 2.0
speed: 12 Mb/s lanes: 1 power: 100mA chip-ID: 06cb:00c3 class-ID: ff00 serial:
Device-3: 3-6.3:8 info: CHERRY KC 6000 Slim Keyboard type: keyboard,HID
driver: hid-generic,usbhid interfaces: 2 rev: 2.0 speed: 1.5 Mb/s lanes: 1 power: 100mA
chip-ID: 046a:0113 class-ID: 0300
Hub-6: 3-7:5 info: Genesys Logic Hub ports: 4 rev: 2.0 speed: 480 Mb/s lanes: 1 power: 100mA
chip-ID: 05e3:0610 class-ID: 0900
Device-1: 3-7.2:9 info: ESS USB DAC type: audio,HID driver: hid-generic,snd-usb-audio,usbhid
interfaces: 4 rev: 1.0 speed: 12 Mb/s lanes: 1 chip-ID: 0495:3011 class-ID: 0300
Device-2: 3-10:7 info: Intel Bluetooth 9460/9560 Jefferson Peak (JfP) type: bluetooth
driver: btusb interfaces: 2 rev: 2.0 speed: 12 Mb/s lanes: 1 power: 100mA chip-ID: 8087:0aaa
class-ID: e001
Hub-7: 4-0:1 info: super-speed hub ports: 4 rev: 3.1 speed: 10 Gb/s lanes: 1 chip-ID: 1d6b:0003
class-ID: 0900
Sensors:
System Temperatures: cpu: 70.0 C mobo: N/A
Fan Speeds (rpm): N/A
Repos:
Packages: 2420 pm: dpkg pkgs: 2399 pm: flatpak pkgs: 21
No active apt repos in: /etc/apt/sources.list
Active apt repos in: /etc/apt/sources.list.d/official-dbgsym-repositories.list
1: deb http: //ddebs.ubuntu.com noble main restricted universe multiverse
2: deb http: //ddebs.ubuntu.com noble-updates main restricted universe multiverse
Active apt repos in: /etc/apt/sources.list.d/official-package-repositories.list
1: deb https: //mirror.netzwerge.de/linuxmint/packages zena main upstream import backport
2: deb http: //ftp5.gwdg.de/pub/linux/debian/ubuntu noble main restricted universe multiverse
3: deb http: //ftp5.gwdg.de/pub/linux/debian/ubuntu noble-updates main restricted universe multiverse
4: deb http: //ftp5.gwdg.de/pub/linux/debian/ubuntu noble-backports main restricted universe multiverse
5: deb http: //security.ubuntu.com/ubuntu/ noble-security main restricted universe multiverse
Active apt repos in: /etc/apt/sources.list.d/official-source-repositories.list
1: deb-src https: //mirror.netzwerge.de/linuxmint/packages zena main upstream import backport
2: deb-src http: //ftp5.gwdg.de/pub/linux/debian/ubuntu noble main restricted universe multiverse
3: deb-src http: //ftp5.gwdg.de/pub/linux/debian/ubuntu noble-updates main restricted universe multiverse
4: deb-src http: //ftp5.gwdg.de/pub/linux/debian/ubuntu noble-backports main restricted universe multiverse
5: deb-src http: //security.ubuntu.com/ubuntu/ noble-security main restricted universe multiverse
Active apt repos in: /etc/apt/sources.list.d/slgobinath-gcalendar-noble.list
1: deb [signed-by=/etc/apt/keyrings/slgobinath-gcalendar-noble.gpg] https: //ppa.launchpadcontent.net/slgobinath/gcalendar/ubuntu noble main
Active apt repos in: /etc/apt/sources.list.d/vivaldi.list
1: deb [arch=amd64] https: //repo.vivaldi.com/stable/deb/ stable main
Info:
Memory: total: 32 GiB note: est. available: 31.09 GiB used: 2.92 GiB (9.4%)
Processes: 303 Power: uptime: 15m states: freeze,mem,disk suspend: s2idle wakeups: 0
hibernate: platform Init: systemd v: 255 target: graphical (5) default: graphical
Compilers: gcc: 13.3.0 Client: Unknown python3.12 client inxi: 3.3.34
[/code]