


![]()
This is a step by step beginners guide shows how to install and setup OneDrive client in Ubuntu 22.04, Ubuntu 24.04, or Ubuntu 26.04 to sync files between local machine and Microsoft cloud.
OneDrive is a file hosting service by Microsoft. It so far does not have an official app for Linux, but there’s a popular free open-source client works in most Linux. And, here’s the basic how to guide for installing and using it in Ubuntu Linux.
Method 1: Ubuntu 24.04 & 26.04 with default GNOME Desktop only
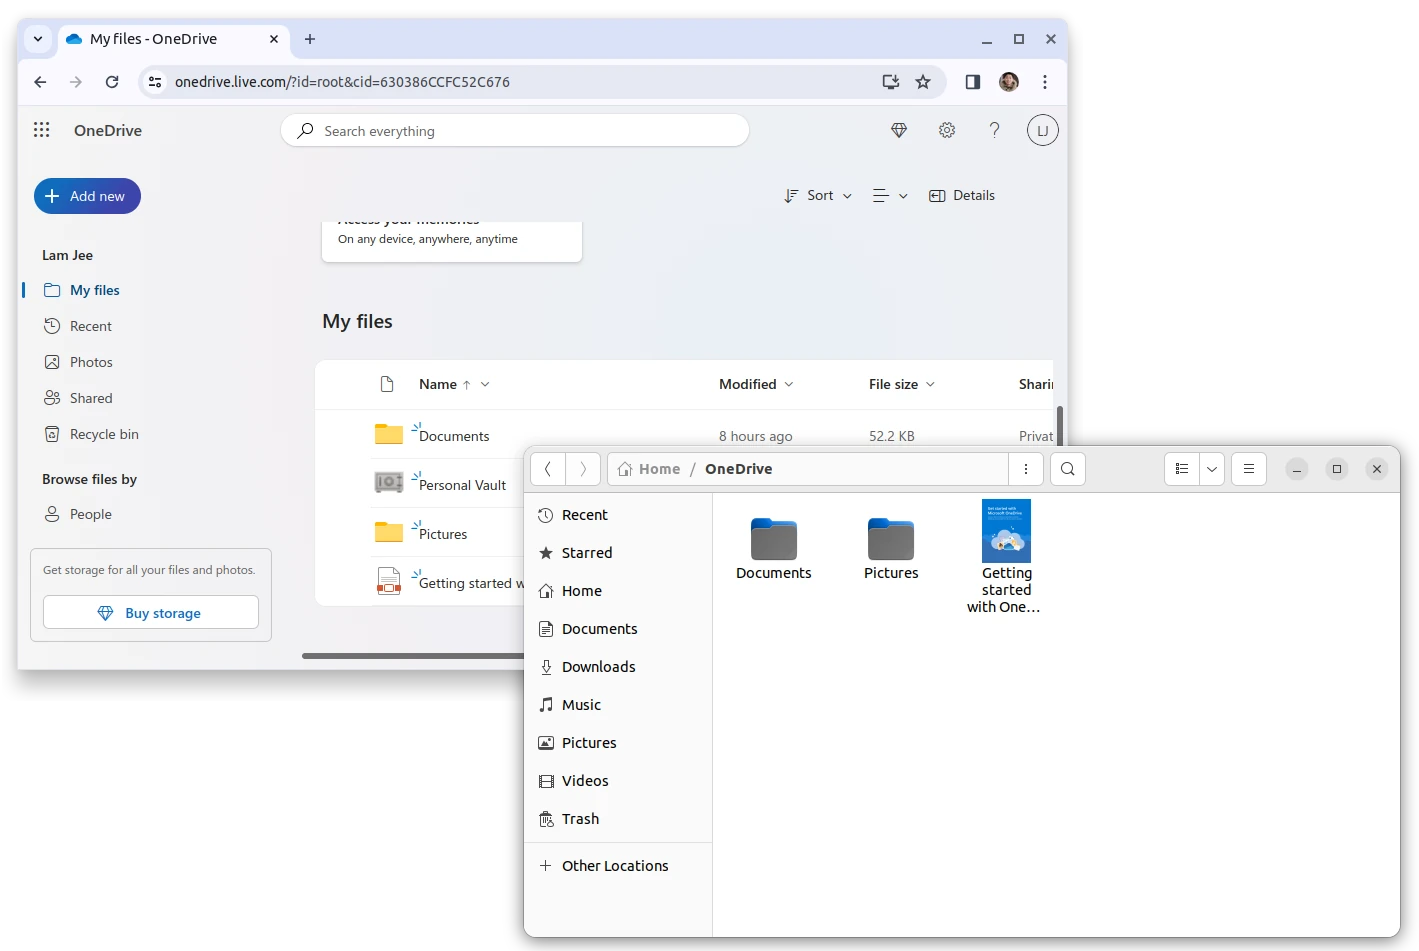
GNOME since 46 introduced onedrive support in its Online Accounts integration. Meaning, Ubuntu 24.04, Fedora 40 Workstation, and other other Linux with the latest GNOME can follow the steps below to get OneDrive integration in file manager.
1. First, press Super (Window Logo) + S to open top-right system tray menu (aka Quick Settings), then click open “Settings” utility.
2. When it opens, navigate to Online Accounts in the left, then click MicroSoft 365 in right. In will open up a web page, and ask to login and grant permissions to access your onedrive files.

3. After successfully login your account, you’ll see it listed in the settings page. By clicking on it will pop-up the dialog, with option to toggle on/off onedrive access, and button to remove the Microsoft 365 account at anytime as you want.

And, you can re-open “Files”, aka Nautilus file manager, and click you account name in left panel to access OneDrive files.

Method 2: for Ubuntu with any desktop environments:
For non-GNOME users, there’s a free open-source OneDrive client that works in most Linux desktop environment.
Step 1: Install OneDrive Client:
Option 1: Install it from system repository
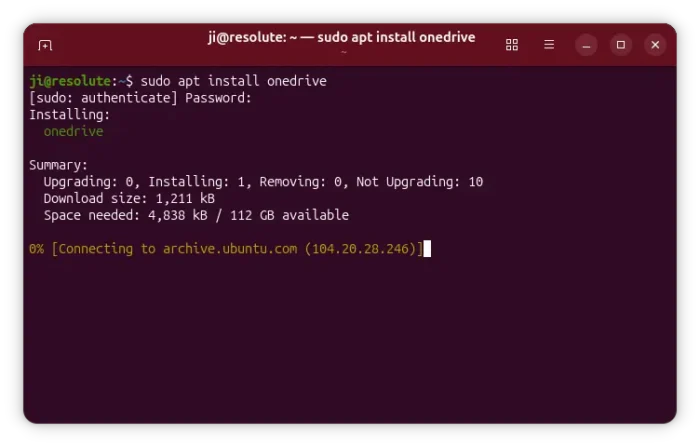
The client package is available in most Linux repositories, including Ubuntu.
For Ubuntu users, simply press Ctrl+Alt+T on keyboard to open terminal. and run command to install it:
sudo apt install onedrive
Option 2: Install from third-party repository
OneDrive package in repository is old. If you would like to get the latest version, then here’s a third-party repository available.
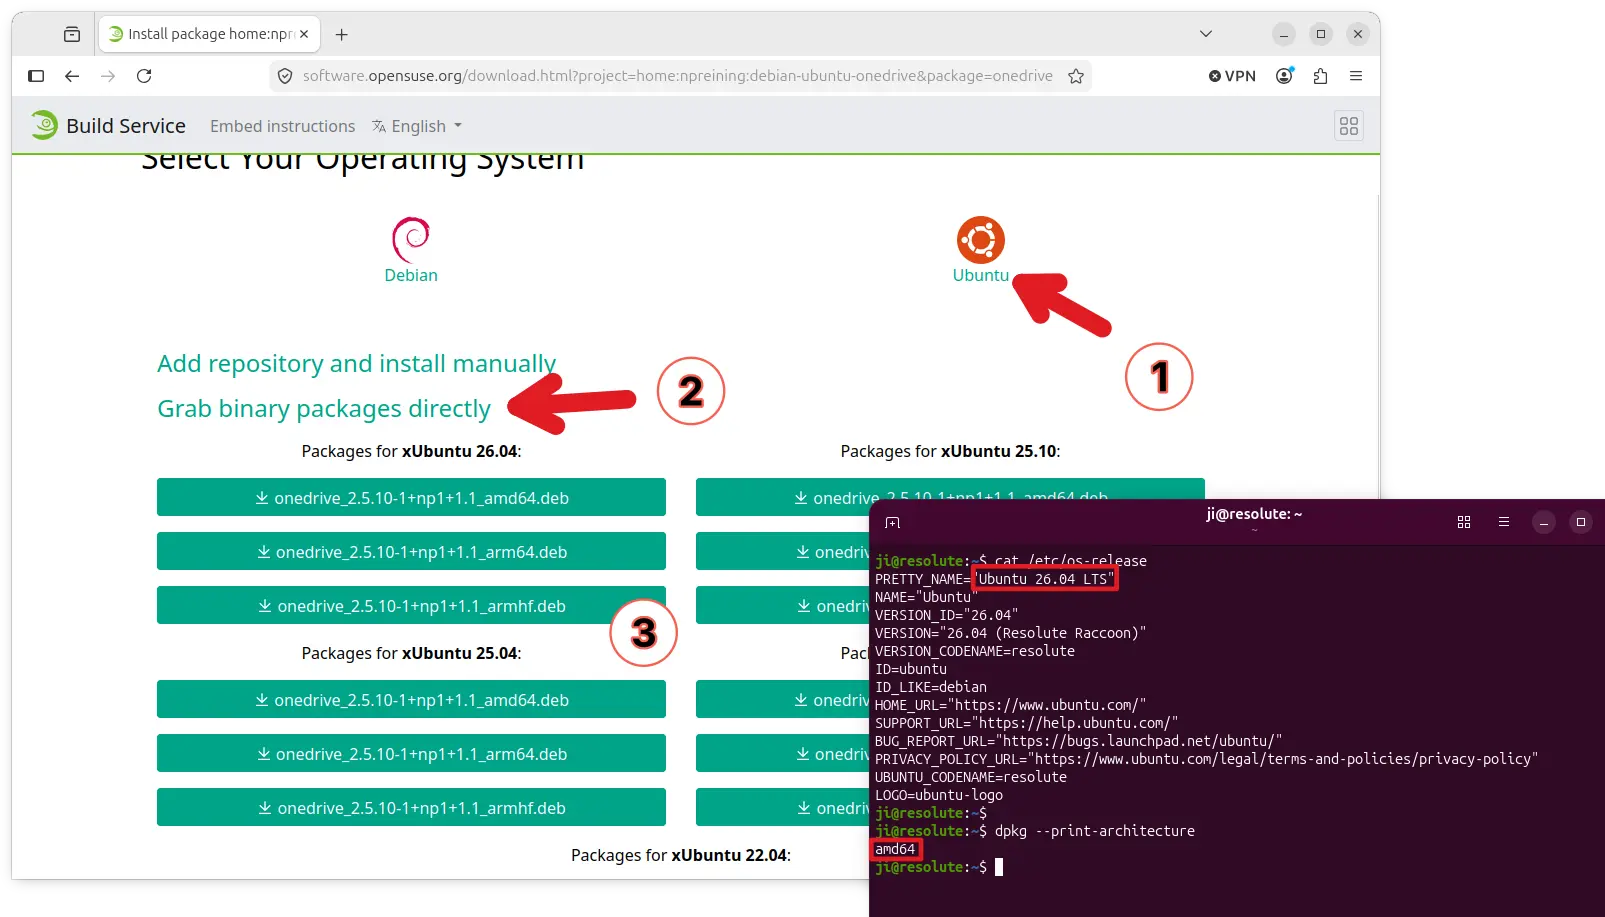
1. First, click the link below to go to the OBS repository:
2. In that web page, click on Ubuntu logo, select “Grab binary package directly“, then click download the .deb package for your system. So far, it offers onedrive package for Ubuntu from 20.04 to 25.04.
In case you don’t know which Ubuntu version is currently running, open terminal (Ctrl+Alt+T) and run cat /etc/os-release, and run dpkg --print-architecture commands to tell OS type (amd64, arm64 or armhf).
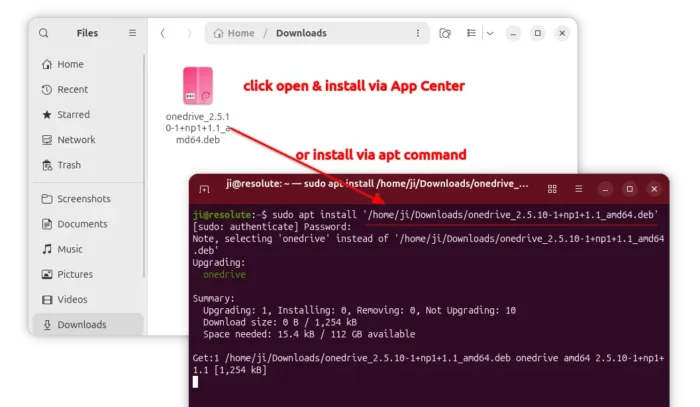
3. Finally, double-click the downloaded .deb package and install via App Center, or press Ctrl+Alt+T on keyboard to open terminal, and run the command below to install it:
sudo apt install ~/Downloads/onedrive*.deb
Step 2: Authorize with your OneDrive Account
UPDATE: For those who hate Linux commands, there’s now a graphical tool to do the following steps! SKIP Step 2 – 5, and scroll down to see the GUI method.
Before being able to upload or download files, you have to first authorize the app with your OneDrive account.
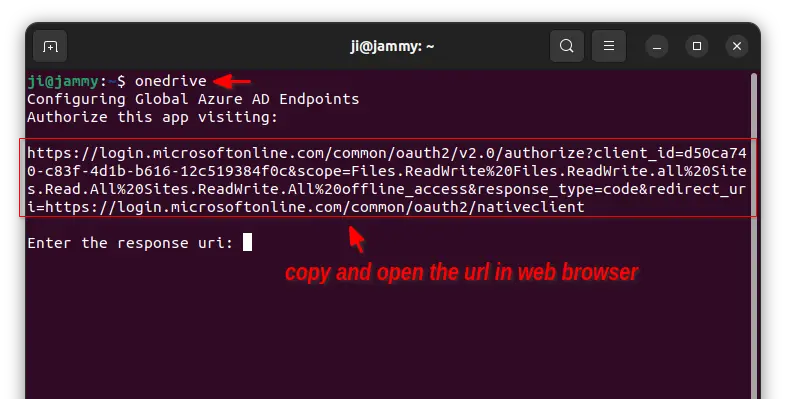
1. To do so, simply open terminal (Ctrl+Alt+T) and run command:
onedrive
Then, copy the output link url and open in web browser.
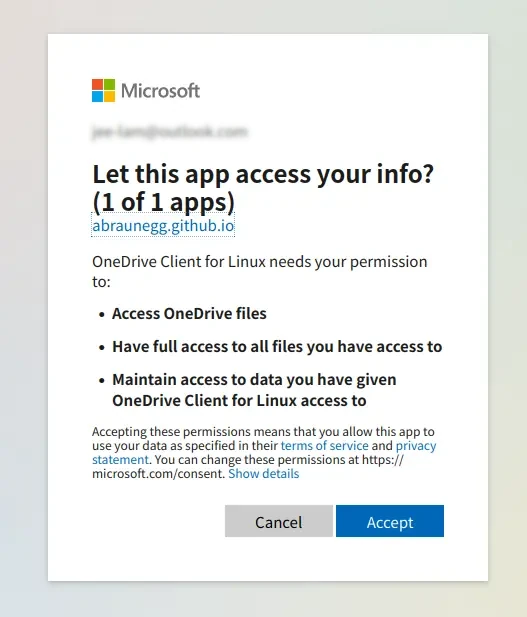
2. In the web page, click “Accept” button to grant permissions to access your OneDrive account.
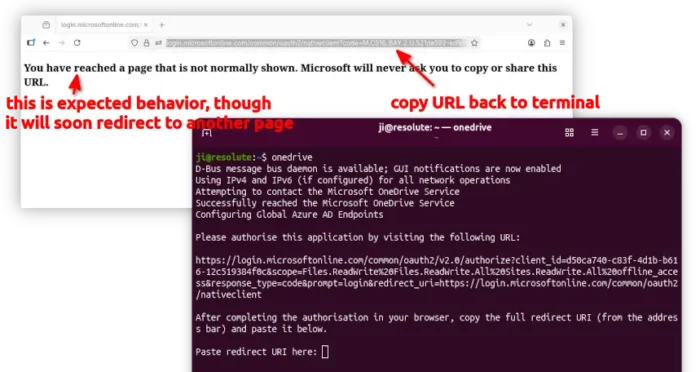
3. After that, the web page will be redirect to a blank page with following message. Just copy the url of that page, and paste back into the terminal window and hit Enter.
This page is not normally shown and could be a sign of a phishing attempt. The URL contains your password. Close this page immediately and do not copy or share the URL with anyone.
NOTE: it will redirect to another page soon. So do the copy & paste things quickly.
If done successfully, the terminal will output somethings says ‘Application has been successfully authorized‘.
Step 3: Sync files between local folder and OneDrive cloud.
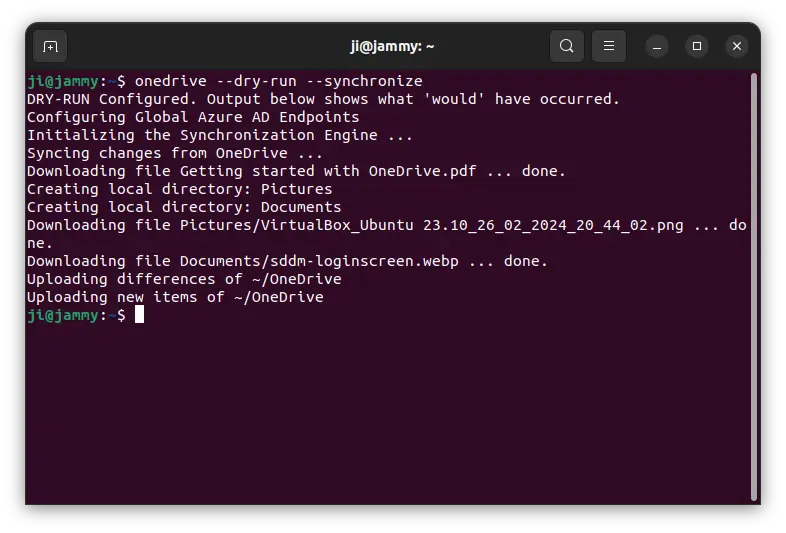
After authorized the app, you can now try running the client in terminal (Ctrl+Alt+T) by running command:
onedrive --dry-run --sync
This command will run the client to test the configuration. No files will be downloaded, uploaded or removed! A OneDrive folder will be created (if not exist) in your user home directory for syncing files.
To start syncing files, run command:
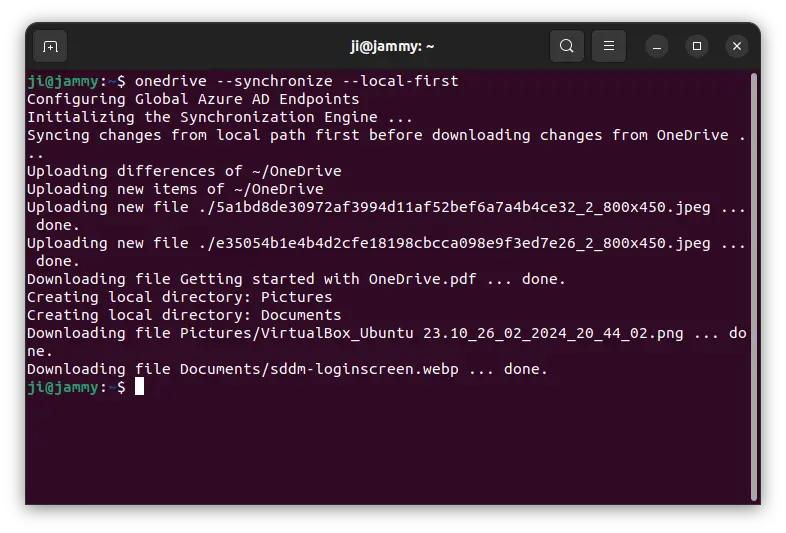
onedrive --sync
Or use onedrive --sync --local-first to upload local files (from user’s OneDrive folder) first then download from cloud.
For choice, you may sync only single folder only, for example “Pictures” sub-folder under OneDrive directory, by running command:
onedrive --sync --single-directory 'Pictures'
Or, do uploading local files only via command:
onedrive --sync --upload-only
There’s also --download-only command option to only download differences from cloud to local, and --no-remote-delete to NOT remove files that previously synced but later manually deleted.
Step 4: Sync files automatically
If everything goes OK, you may also start OneDrive as systemd service, so it does the file sync between cloud and local folder automatically.
To do so, simply run command in terminal (Ctrl+Alt+T) to enable the service:
systemctl enable --user onedrive
Then, start it by running command:
systemctl start --user onedrive
Finally, check the service status by running command systemctl status --user onedrive.
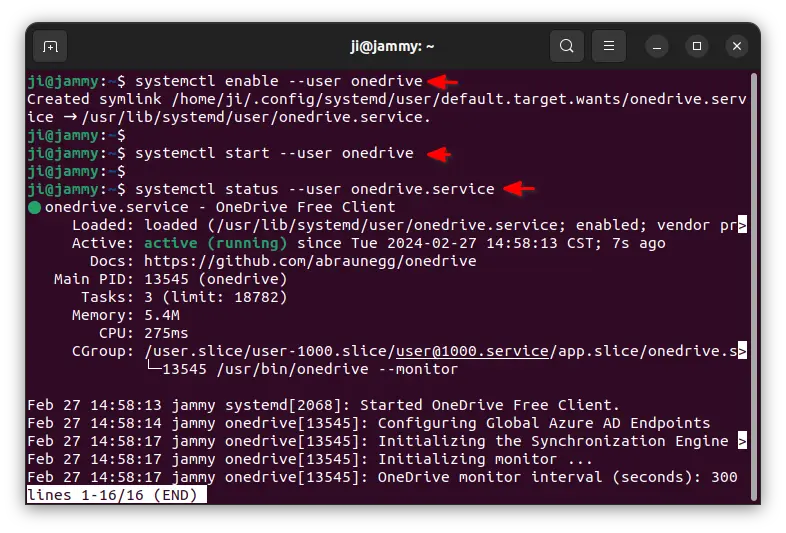
Once the service is in active running status, try making difference in either local or cloud OneDrive folder, then check in another side to see if it works.
Step 5: Config OneDrive client
If the default sync options do not meet your need, then, run command to copy example config file to local folder:
sudo cp /usr/share/doc/onedrive/config ~/.config/onedrive/
Then, change the ownership from root to your user:
sudo chown $USER:$USER ~/.config/onedrive/config
Finally, either open file manager (press Ctrl+H to view hidden files/folders), navigate, and click edit the file. Or, run command:
gnome-text-editor ~/.config/onedrive/config
For Ubuntu 22.04 and earlier, replace gnome-text-editor with gedit. For non-GNOME Desktop, replace it with your text editor, or use nano command line editor works in most desktops.
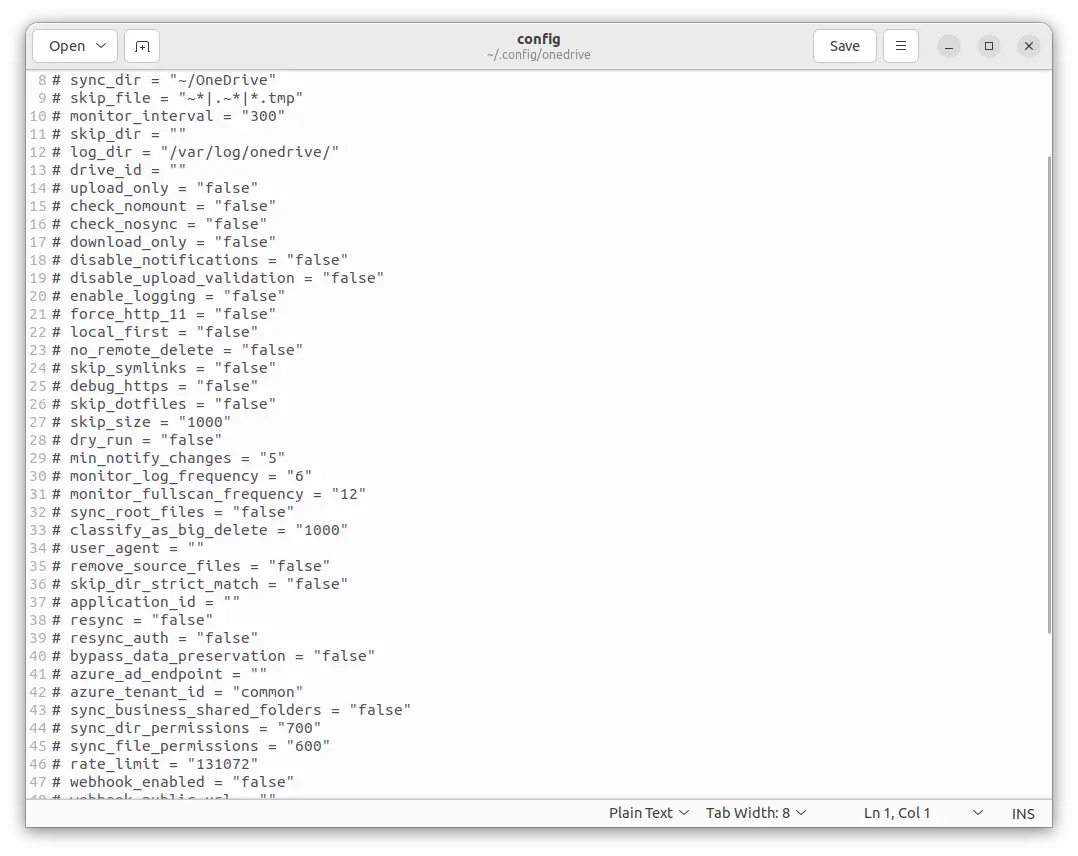
When file opens, un-comment (remove # at the beginning) to enable any option and change its value as you want, such as sync folder, exclude files/folders, upload only or download only, and more, and finally save the file.
Finally, run command systemctl restart --user onedrive to restart service to apply the changes. For more about how to use OneDrive client, see the official docs.
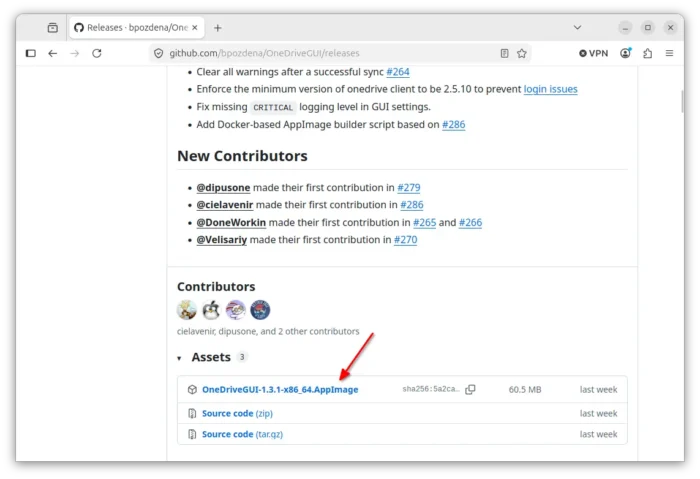
Use GUI tool to configure the OneDrive client
To make things easy, you may select download the GUI tool after installed the OneDrive client:
It’s an AppImage that works in most Linux, though Ubuntu user needs to first enable AppImage support by installing libfuse2 package via the command below:
sudo apt install libfuse2
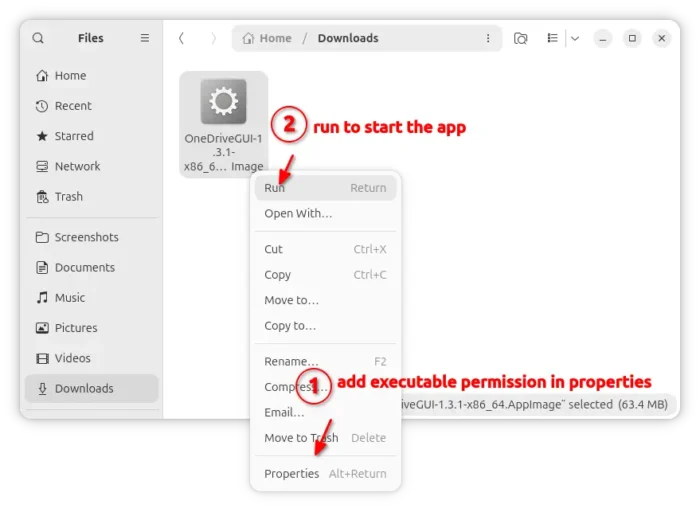
After downloaded the AppImage, add executable permission from its Properties dialog, and click Run to start it.
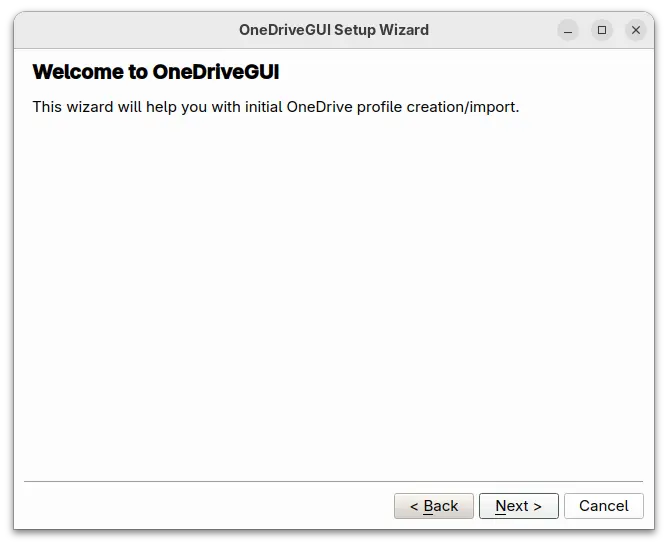
Then, follow the pop-up wizard to add your OneDrive profile.
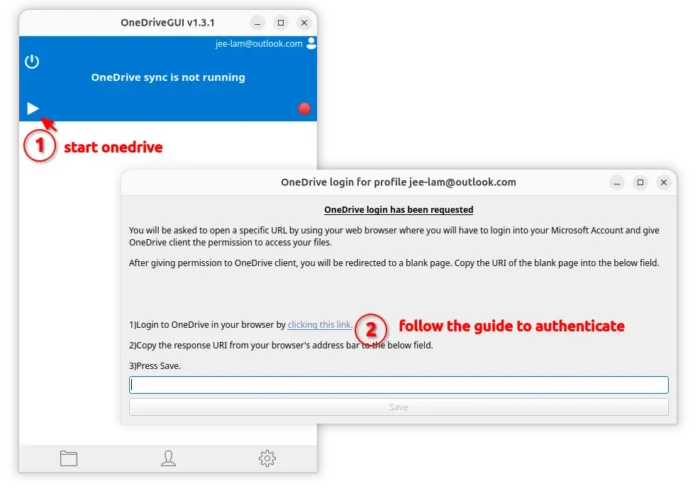
Finally, click “Start Sync” icon to start, and follow the pop-up dialog to login your account.
Uninstall OneDrive:
If you don’t to use the client anymore, open terminal (Ctrl+Alt+T) and run command to stop and disable the service:
systemctl disable --now --user onedrive
Then, remove the client package by running command:
sudo apt remove --autoremove onedrive
For choice, you may clear the leftovers by deleting them via commands:
sudo rm /etc/logrotate.d/onedrive
rm -R ~/.config/onedrive


Thanks, Ji!
Your tutorials are simply the best.
thanks for sharing. Lovely Job.
Best wishes
Thanks for your tutorials ! It helps a lot
Hi Ji, thank you for your tutorial, but I have one problem. After installing one drive client in Ubuntu 23.10, copy the link to authorize the app in microsoft, I sign into my account and nothing happens. The page goes blank and stays there. Any idea?
Just copy back the URL (the URL changed) of the blank page into terminal.
Hi Ji m,
the tutorial was really helpful, thanks!
But I have a problem, the sharepoint taht I share with my colleagues do not sync, I went into the options and tried:
sync_business_shared_folders = “true”
but it didn’t do anything. Do you know how I can proceed?
Same problem here. Any solution?
Thanks for this tuto. Very helpfull !
The next step is to have the Ubuntu 24.04 Onedrive automatically mounted at startup.
How to do this ? What is the CLI to use ?
Hi Thierry, I followed the tutorial and it is mounted at startup :) Doesn’t work for you?
Are there any known issues using authenticator code?
Thank you very much for this explanation, it was really helpfull.
Thanks so much Ji for the nice tutorial. Very helpful!
I get the error while i try to copy back the URL and run it in terminal window.
Below is the transcript of the error received.
*****************************************************
Authorize this app visiting:
https://login.microsoftonline.com/common/oauth2/v2.0/authorize?client_id=22c49a0d-d21c-4792-aed1-8f163c982546&scope=Files.ReadWrite%20Files.ReadWrite.all%20Sites.ReadWrite.All%20offline_access&response_type=code&redirect_uri=https://login.microsoftonline.com/common/oauth2/nativeclient
Enter the response uri: https://login.microsoftonline.com/common/oauth2/nativeclient?code=M.C507_BAY.2.U.1ea7a6ad-49a2-c35f-180b-4a61f716413d
onedrive.OneDriveException@src/onedrive.d(874): HTTP request returned status code 400 (Bad Request)
{
“correlation_id”: “fa3e5e70-8931-494a-9564-651827c53549”,
“error”: “invalid_grant”,
“error_codes”: [
70000
],
“error_description”: “AADSTS70000: The provided value for the ‘code’ parameter is not valid. Trace ID: b58b74c5-520c-4a60-a835-6bccf3343b00 Correlation ID: fa3e5e70-8931-494a-9564-651827c53549 Timestamp: 2024-08-21 06:01:57Z”,
“error_uri”: “https:\/\/login.microsoftonline.com\/error?code=70000”,
“timestamp”: “2024-08-21 06:01:57Z”,
“trace_id”: “b58b74c5-520c-4a60-a835-6bccf3343b00”
}
—————-
??:? [0x55c101f629d9]
??:? [0x55c101f61cb5]
??:? [0x55c101f62b65]
??:? [0x55c101f60f58]
??:? [0x55c101f608c5]
??:? [0x55c101f6e7a8]
??:? void rt.dmain2._d_run_main2(char[][], ulong, extern (C) int function(char[][])*).runAll() [0x7faad3b059db]
??:? _d_run_main2 [0x7faad3b057ee]
??:? _d_run_main [0x7faad3b0565d]
??:? __libc_start_main [0x7faad36ee082]
??:? [0x55c101f395ed]
Could you please advice where i went wrong
Did you change permissions?
sudo chown $USER:$USER ~/.config/onedrive/config
Straightforward and clear Article.
Thanks
Hi,
I just wanted to take a moment to sincerely thank you for the solution you provided. Your advice was exactly what I needed, and it worked perfectly. I’m really grateful for the time and effort you took to help me out.
Thanks again, and I truly appreciate your support!
Best regards,
amazing job
En caso de que tengan que cambiar su contraseña, para autorizar nuevamente, el comando es:
onedrive –reauth
Saludos!
Thanks for the tips.
Hi There, how do you upgrade the Onedrive client on 22.04?
Here’s a guide about adding the OBS repository to update onedrive package, though you need to replace 24.04 with 22.04 in the commands there.
https://ubuntuhandbook.org/index.php/2025/04/install-apps-opensuse-obs/
Hello Ji, after I go the the URI i get from the terminal, and login with my work account, it simply asks for the “approval required” and asks for the justifucation why I need access to it. and once I submit the request, I am unaware who has the rights to approve the request.
Could you guide me with that. I am stuck at this page and can’t go to the blank page to get the response URI.
Finding no help on the Internet.
Sorry but I’m not sure what you mean. If you messed up the authentication, try deleting the configuration by running the command below, and re-do step 2.
Its easy to overlook appreciating when instructions work right on the first try, and clear enough to be able to then learn more on the topic forward from. So TYVM, your tutorial now has me with OneDrive working correctly as needed on my Ubuntu laptop, one essential step toward being able to use it as my daily go to computer instead of running Windows 11.
This worked amazing!
Only issue I am having now is, I edited the config file to set sync_dir = “~/OneDrive/CAD” Saved the file, ran systemctl restart –user onedrive, but it still downloads the ENTIRE OneDrive to my HDD. grrr
Hi there, I am new to Linux/Ubuntu and found this page while searching for a solution to my problem. I have quite a large OneDrive data set built up over many years. Yesterday, I followed instructions to synch all these files and it took a long time to do but seemed to work okay. I set up ongoing synch service and did a test to see if I could access and update a file on there from Ubuntu and then save. All went well and changes were visible on Windows. I tried the reverse test and again all went as expected. My problem is this. I notice that some files have not copied across. Full transparency, there were some ERROR messages that popped up which honestly I did not understand and they flashed by on terminal. My question – is there a utility or command that I can run ,firstly at a single folder level before trying on the full folder set, to go through and check if all files are present and if not copy missing files across? TIA for any help.
This page has KISS instructions for installing and running the onedrive service (from abraunegg). https://onedrive.jadeinternet.net
Hello,
With 24.04.3 I click on online account and I have a popup : id and …
I put my mail and nothing happened.
Hello, when I execute the commands “systemctl enable –user onedrive”, “systemctl start –user onedrive” and “systemctl status –user onedrive” I get this error:
omar17@server-ec:/$ systemctl enable –user onedrive
Failed to connect to bus: Media not found
omar17@server-ec:/$ systemctl start –user onedrive
Failed to connect to bus: Media not found
omar17@server-ec:/$ systemctl status –user onedrive
Failed to connect to bus: Media not found
Very useful post.
Thank you.