


![]()
This is a beginner’s guide shows you how to enable, disable, and configure firewall in Ubuntu using UFW.
Firewall is a network security system that monitors incoming and outgoing network traffic, and decides whether to allow or block specific traffic based on pre-defined security rules.
Linux Kernel has the Netfilter subsystem, which is implemented as a packet filter and firewall. Iptables (and nftables, the successor of iptables) is the user-level command line tool to configure the firewall by adding/removing netfilter rules.
Iptables (and nftables) is much more flexible but really hard for beginners. UFW (Uncomplicated Firewall), the user-friendly front-end for iptables, is which I’m going to talk about below.

Image by Pete Linforth from Pixabay
Enable Firewall in Ubuntu
UFW is usually pre-installed in both Ubuntu Desktop and Server, though NOT enabled by default.
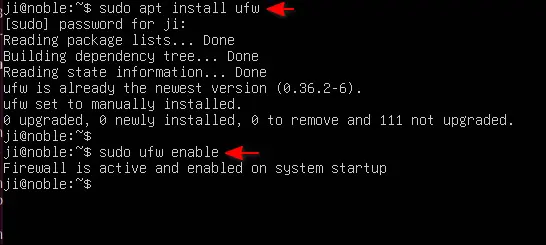
Just in case, you may open terminal (Ctrl+Alt+T) and run command to install it:
sudo apt install ufw
As mentioned, the firewall is usually not enabled by default. To check its status, use command:
sudo ufw status
It will show you either “Status: in active” or “Status: active” along with user added rules.
NOTE: It supports adding rules before ufw enabled. For remote server, run sudo ufw allow ssh to whitelist ssh first, or you’ll lost SSH connection. If non-default SSH port is in use, for example port 1234, then use sudo ufw allow 1234/tcp command instead.
To enable the firewall, just run command:
sudo ufw enable
It should output “Firewall is active and enabled on system startup” if command’s done successfully.
Configure Firewall using UFW
1. Check status & added rules
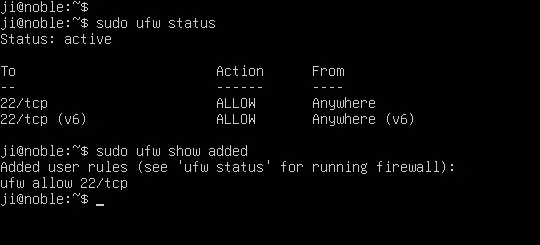
As mentioned above, you may check the firewall status by running the command below:
sudo ufw status
It will show you if the firewall is activated or not. If yes, it also shows all the user added rules.
However, to check user added rules even when firewall is in-activated, this command may be helpful:
sudo ufw show added
2. Configure UFW default policy
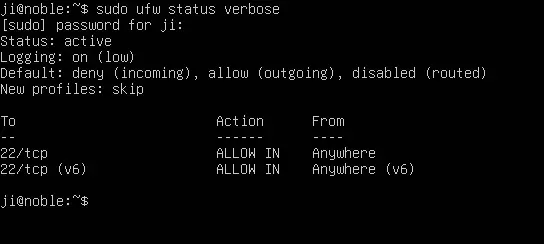
The default firewall policy allows any outgoing traffic, meaning from the Ubuntu PC/Server you can access any website, use apt, wget, etc commands to install/download something in your system.
However, incoming by default is disabled. You need to add your own rules to allow outside systems to connect to your machine. All routing and forwarding are also disabled, which is good default if you are not using your machine as a router.
To check default policy, use command:
sudo ufw status verbose
If you want to change the default policy, for example deny outgoing, use command:
sudo ufw default deny outgoing
After that, if you want to access outside systems, then you can either re-allow all outgoing traffic via:
sudo ufw default allow outgoing
Or, manually add outgoing rules for certain ports. For example, add firewall rules below to allow using apt command to install something:
sudo ufw allow out 53/udp
sudo ufw allow out 80/tcp
When done, you may delete the rules, so all outgoing denied again:
sudo ufw delete allow out 53/udp
sudo ufw delete allow out 80/tcp
3. Add UFW Rules
As commands above mentioned, you may use ufw allow command to allow incoming (and/or outgoing) traffic to specific port, and use ufw deny command to deny traffics.
For example, allow incoming to port 80 (both tcp & udp) from any where, use command:
sudo ufw allow 80
Or, allow incoming to port 53 only for udp, use command:
sudo ufw allow 53/udp
To be more specific, you can tell from where the traffic is allowed to certain port on current machine. For example, the command below set the firewall to allow remote IP ranging from 192.168.0.0 to 192.168.0.255 to tcp port 22 in this host.
sudo ufw allow from 192.168.0.0/24 to any port 22 proto tcp
The “any” in last command means any network interfaces in local host. To specify certain IP in this host, 192.168.0.100 for example, then the last command can be:
sudo ufw allow from 192.168.0.0/24 to 192.168.0.100 port 22 proto tcp
As mentioned above, you can also use service name in UFW command to allow (or deny) certain traffics. For example:
sudo ufw allow smtp
This command will allow the SMTP port 25, even when the service is not installed. However, it only and will always sets the service’s default port (e.g, 22 for ssh) even when a custom one is in use.
4. Remove UFW filewall rules
To delete ufw rules, just add delete operation between ufw and allow (or deny) in the last commands you run.
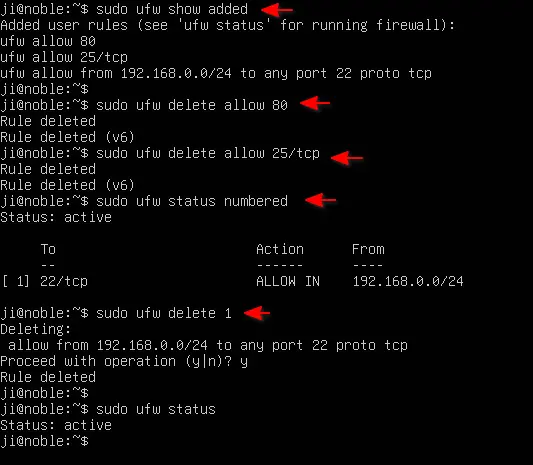
- First, list added rules via command:
sudo ufw show added
- Then, delete a rule. For example, undo
allow 53/udp:sudo ufw delete allow 53/udp
If ufw is in activated status, you may list all added rules with line numbers, then delete via desired number:
- First, show ufw status as well as added rules with numbers:
sudo ufw status numbered
- Then, delete the first rule via:
sudo ufw delete 1
NOTE: After deleted a rule, the numbers of the following rules change automatically. If you need to delete multiple rules, either run ufw status numbered and delete commands multiple times, or use the command below instead:
for rules in 5 3 2; do sudo ufw delete $rules; done
Replace the numbers 5 3 2 with the desired ones you want to delete, and they must be list in reverse order so to delete from the highest number downwards.
If you don’t want to answer “Proceed with operation (y|n)” for each delete action, then use the command below instead:
for rules in 8 7 5 3 2; do yes|sudo ufw delete $rules --force; done
5. Disable IPv6
The ufw firewall rules by default apply to both IPv6 and IPv4.
If you want to exclude IPv6 for all firewall rules, then edit the /etc/default/ufw file via command:
sudo nano /etc/default/ufw
Then, then change IPV6=yes to IPV6=no. Finally, press Ctrl+S then Ctrl+X to exit. Also, run sudo ufw reload to apply changes.
Or, specify the IPv4 address in your rules. For example:
ufw allow to 0.0.0.0/0 port 80 proto tcp
This rule will allow traffic from anywhere to port 80/tcp on this host through all the ipv4 interfaces.
Disable Firewall
To disable firewall, simply run:
sudo ufw disable
It will show “Firewall stopped and disabled on system startup“. However, all user added rules are still left there though NOT function.
For choice, you may reset ufw via command:
sudo ufw reset
Which will disable firewall (if enabled), then reset all rules to the installed defaults.


Awesome write up, you hit every point without the fluff.
Thank you, New Linux user here’
Linux is blocking my downloads now. What is the code to allow downloads? What is the code to allow incoming? You only show outgoing code.
Something hacked my system and it is blocking downloads now. Says “I do not have permission” but I am admin.
Got a message from terminal while attempting download from server:
“somebody or something is erasing the data, will retry”…took three times for it to download…from Terminal…I did not have a browser open.
Ubuntu has a serious security problem.