


![]()
This is a step by step beginner’s guide shows how to control the fan speed in Lenovo ThinkPad laptop running Ubuntu 24.04.
The fan speed control solution differs depends on computer manufacturers. For my ThinkPad T480s, fan is usually not spinning when doing the basic web browsing and other light works.
But if you want, it’s easy to set a fixed fan speed, or adjust the speed automatically according to the core temperature.
Step 1: Enable the Kernel Option for Fan Control
Linux Kernel includes a thinkpad_acpi module for supporting ThinkPad laptops. It supports fan control operations, but disabled by default due to safety reasons.
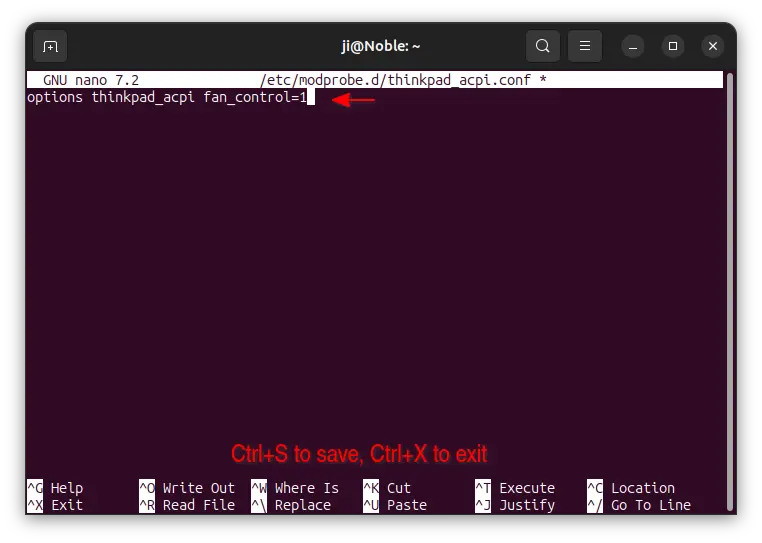
1. To enable this fan control feature, open terminal (Ctrl+Alt+T) and run command to create a config file under /etc/modprobe.d/ directory:
sudo nano /etc/modprobe.d/thinkpad_acpi.conf
The command uses nano command line text editor that works in most Linux Desktops. You may replace it with gnome-text-editor for Ubuntu 24.04 or other Linux with recent GNOME Desktop, mousepad for XFCE, or pluma for MATE.
2. When file opens, simply add the line below:
options thinkpad_acpi fan_control=1
Then save it. For nano text editor, press Ctrl+S to save and Ctrl+X to exit.
3. To apply the change, just run command below to remove the kernel module, then re-load it:
sudo modprobe -r thinkpad_acpi && sudo modprobe thinkpad_acpi
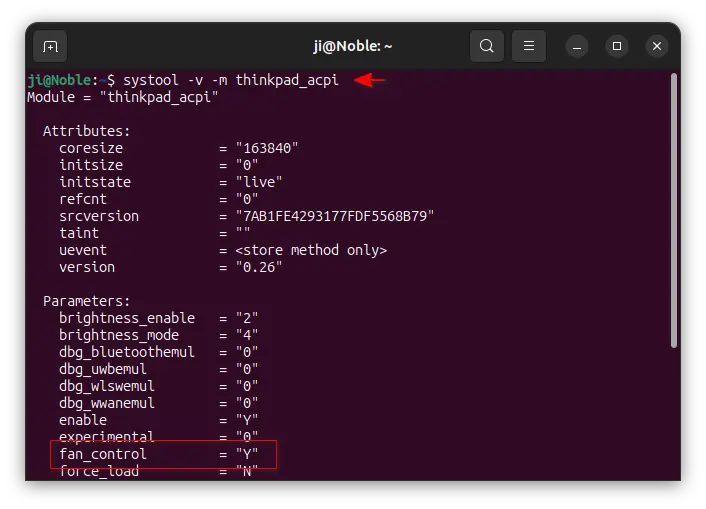
4. To verify, use command:
systool -v -m thinkpad_acpi
Run sudo apt install sysfsutils to install the tool if command not found. In the terminal output, the “fan_control” parameter equals to “Y” means the feature is enabled.
Step 2: Set Fan Speed Manually
After enabled the Kernel module option, you can manually set fan speed by writing custom level value into /proc/acpi/ibm/fan file. This can be done by either running single command in terminal or using a graphical tool.
Option 1: Single Command to Set Fan Speed
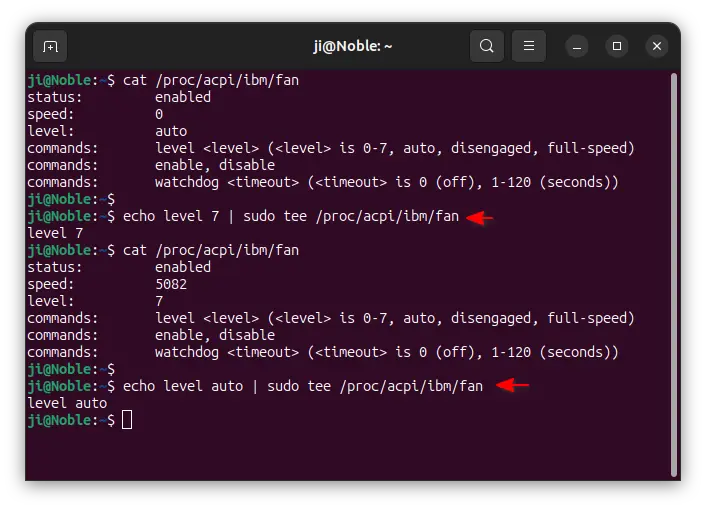
To set fan speed from in a terminal window, use command:
echo level 0 | sudo tee /proc/acpi/ibm/fan
The command will set fan speed to level 0 (fan off). For choice, you may replace it with level 1, level 2, …, level 7.
For example, set medium fan speed with level 4:
echo level 4 | sudo tee /proc/acpi/ibm/fan
Or, set the maximum regulated speed with level 7:
echo level 7 | sudo tee /proc/acpi/ibm/fan
The default is level auto, which can be set via command:
echo level auto | sudo tee /proc/acpi/ibm/fan
While there’s also level disengaged for the maximum unregulated speed, that’s even much faster than the maximum regulated speed.
After changing the fan speed, either run command to monitor your fan speed or just move your ear closer to the air outlet and listen to the fan noise.
cat /proc/acpi/ibm/fan
Option 2: Use Graphical Tool to set Fan Speed
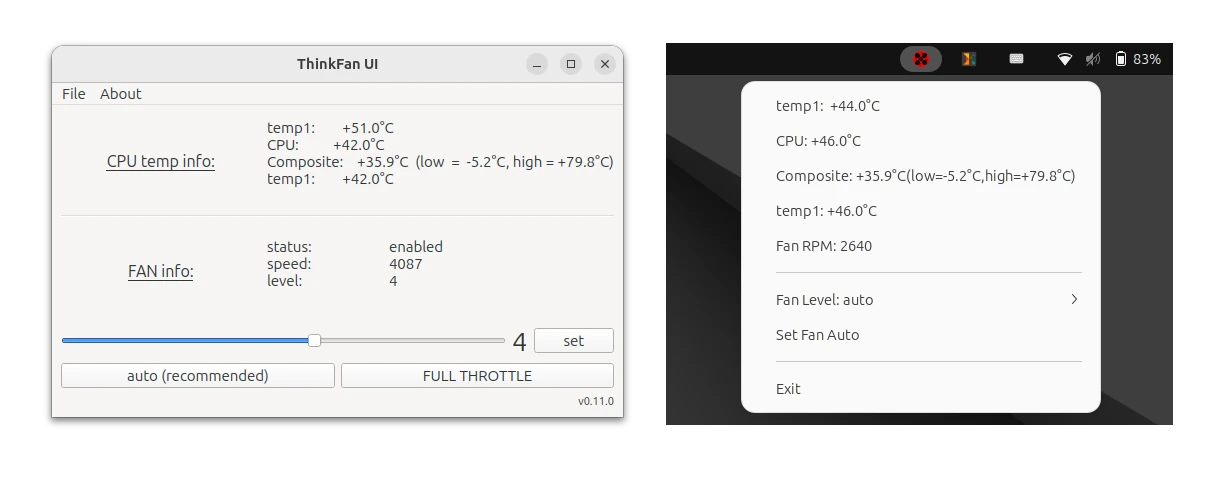
If you would like to use a graphical tool to control your fan speed, then here’s an open-source tool thinkfan-ui available for choice.
For Arch and Manjaro Linux, it’s available as thinkfan-ui package in the AUR repository.
While, Debian and Ubuntu based system can download the .deb package from its project page:
Then double-click the .deb package in file manager to install via either App Center or Software Install.
Once installed, launch it and use either the pop-up dialog or top-right system indicator to monitor and control fan speed:
Step 3: Auto Fan Speed According to CPU/GPU Temperature
If the default auto fan control does NOT meet your need, then you may use thinkfan to auto-adjust fan speed according to the CPU/GPU temperature.
Thinkfan automatically writes speed level into the /proc/acpi/ibm/fan file, according to the core device temperature reported by lm-sensors. By editing the config file, user can control how fast the fan is spinning according to given temperature range.
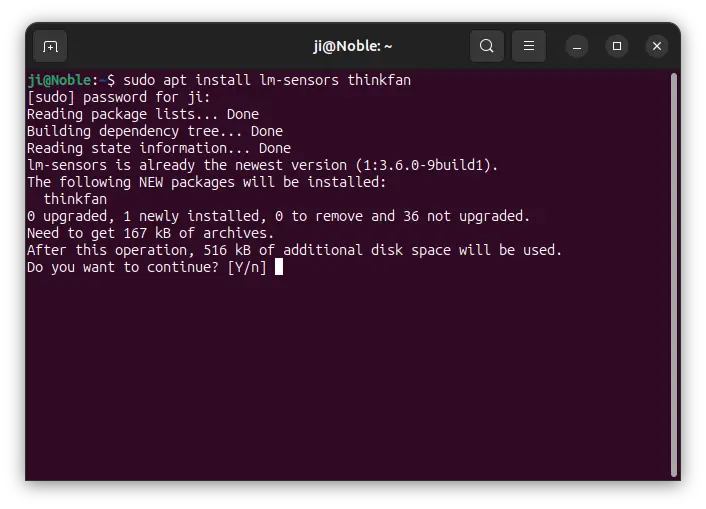
1. First, open terminal (Ctrl+Alt+T) and run command to install thinkfan, as well as lm-sensors:
sudo apt install thinkfan lm-sensors
2. Then, run the command below to detect your laptop monitoring chips or sensors:
sudo sensors-detect
In terminal output, you may hit Enter to choose default answers for all questions.
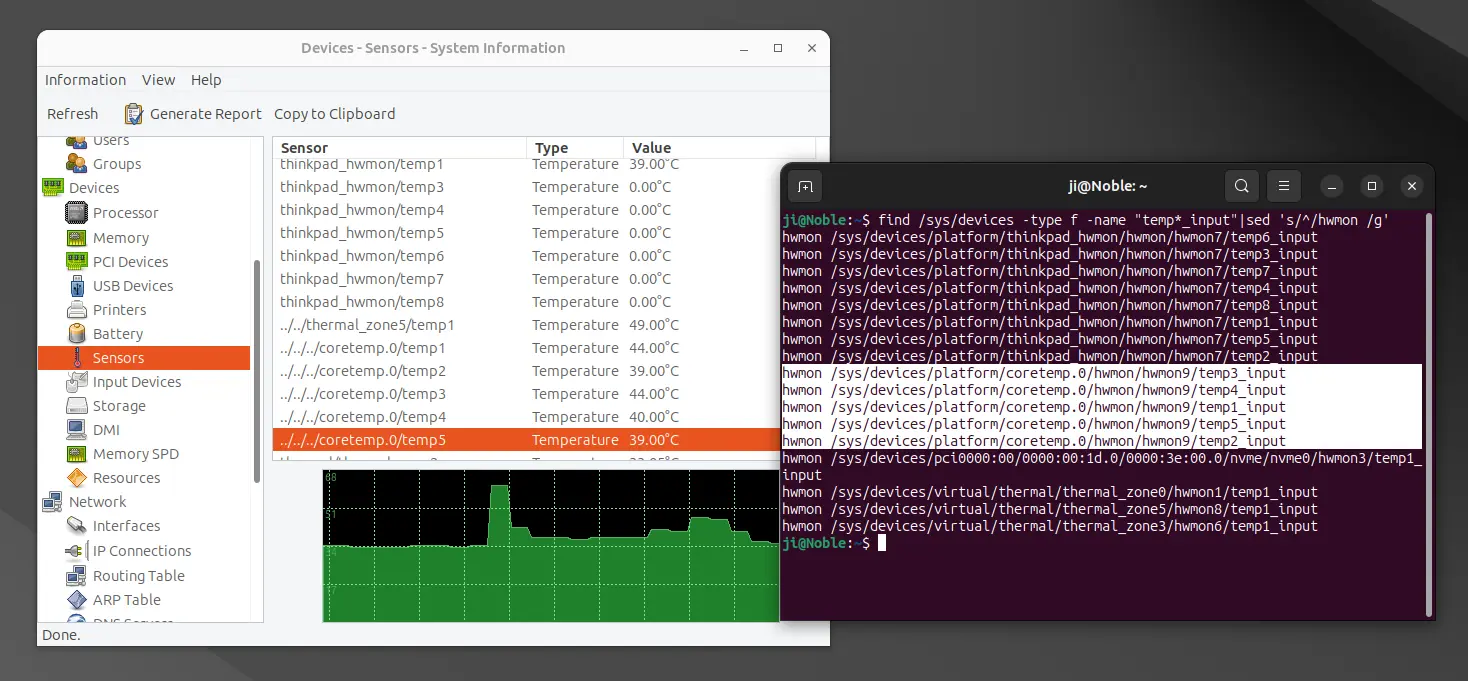
3. Before configuring thinkfan, you need to find out where to read the core temperatures from.
To do so, use command:
find /sys/devices -type f -name "temp*_input"|sed 's/^/hwmon /g'
In the terminal output, you may copy all the outputs, or choose some of them accordingly, then use for next step.
In my case, according to the hardinfo (System Profiler and Benchmark) tool, only the 5 highlight lines (see screenshot below in terminal) are the ones that monitoring my CPU cores temperatures. Since my laptop does not have dedicated GPU, I’m going to use them in next steps.
4. Edit /etc/thinkfan.conf file, by running command:
sudo gnome-text-editor /etc/thinkfan.conf
Replace gnome-text-editor according to your desktop environment, or use nano that works in most desktops.
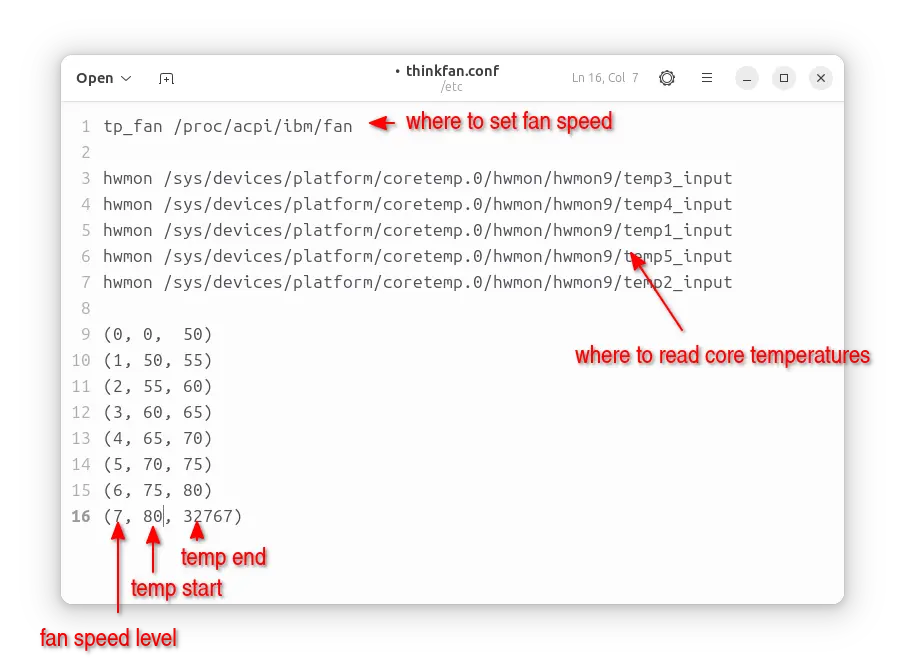
When file opens, add following lines:
- First, add the line below to tell which file to control fan speed:
tp_fan /proc/acpi/ibm/fan
- Then, add lines below to tell where to read the core temperatures:
hwmon /sys/devices/platform/coretemp.0/hwmon/hwmon9/temp3_input
hwmon /sys/devices/platform/coretemp.0/hwmon/hwmon9/temp4_input
hwmon /sys/devices/platform/coretemp.0/hwmon/hwmon9/temp1_input
hwmon /sys/devices/platform/coretemp.0/hwmon/hwmon9/temp5_input
hwmon /sys/devices/platform/coretemp.0/hwmon/hwmon9/temp2_input
You need to replace them according to last step!!!
- Finally, configure temperature ranges and which speed level the fan should run in the ranges.
(0, 0,  50)
(2, 50, 60)
(4, 60, 70)
(7, 70, 32767)
In the case, fan off when CPU temperature in range of 0 to 50, low speed for 50 ~ 60, medium speed for 60 ~ 70, and maximum speed when temperature higher than 70. You can add/skip speed levels (0 ~ 7) and change the temperatures as you prefer.
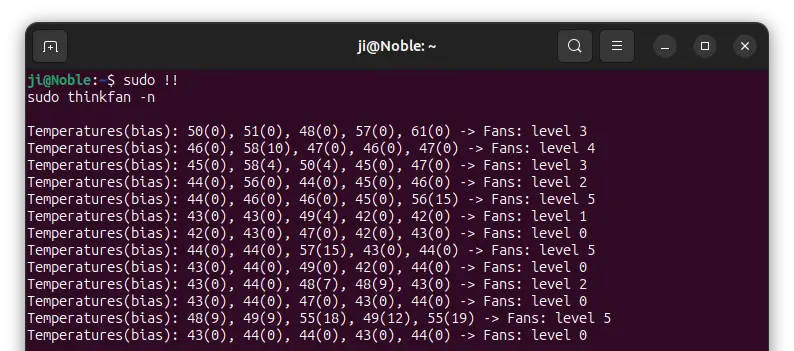
5. After saving the file in last step, run the command below to test if it’s working properly.
sudo thinkfan -n
6. If everything goes well, you may start thinkfan as systemd service to control your fan speed automatically.
sudo systemctl enable thinkfan thinkfan-sleep thinkfan-wakeup
sudo systemctl start thinkfan thinkfan-sleep thinkfan-wakeup
Undo:
If you want to restore the fan control of your ThinkPad to its previous state, first open terminal (Ctrl+Alt+T) and run command to remove the Kernel module config file:
sudo rm /etc/modprobe.d/thinkpad_acpi.conf
Then, re-load to disable the fan control option:
sudo modprobe -r thinkpad_acpi && sudo modprobe thinkpad_acpi
Next, remove thinkfan and thinkfan-ui if installed, via command:
sudo apt remove thinkfan thinkfan-ui


I have a Thinkpad T14s Gen 3 with AMD Ryzen 7 Chip.
Can you please write a Tutorial how to optimize the Batterie Management for Thinkpads with AMD Ryzen?
Thank you!
Sorry but I don’t have any AMD device to try out.
Hi Ji, thanks again for your detailed article!
I have two questions:
– Do you know if for example I fix the fan on minimum RPM (Level 1) but the CPU temp goes very high, then will the system automatically increase the fan speed to prevent overheating or it will continue on Level 1?
– Do you know how to make the fan speed/level persistent after the OS suspend? I found that even I fix the fan to Level 1, after OS resume from suspend it went back to Auto.
Thanks.
Question 1: it will continue on Level 1.
Question 2: You can create a custom service to do the job. And, here a guide talking about it.
Thanks for the article. Your tutorial is very clear and easy for me to follow. The only issue I had was not being able to auto-start after a reboot. I did some more digging and found something that works for me. I followed all of your instructions but ran this last command to get it to auto-start after a reboot.
sudo systemctl enable thinkfan.service && sudo systemctl start thinkfan
If you want to check on the status, run:
sudo systemctl status thinkfan.service
I have a ThinkBOOK but usually the stuff for ThinkPads works pretty well. However, after finishing step 1 I can’t find /proc/acpi/ibm/fan – Do you have an idea why?