


![]()
This is a step by step beginner’s guide shows how to configure Nginx to block certain IPs or IP range from accessing your website, and block all others while only you (and specified IPs) can access the wordpress login pages.
This site was under attack a few days ago. Someone made tens of thousands of constant requests that slowed down the server response. And, here’s what I did to manually block attacker’s IPs and restrict access to the login page.
NOTE: For large amount of DDoS attack, it’s recommended to use 3rd party tools/services, e.g., fail2ban or CloudFlare, to mitigate by automatically banning the IPs.
Step 1: Find out Attacker’s IPs
1. First, connect to your Linux server and run command to edit Nginx configuration file:
sudo nano /etc/nginx/nginx.conf
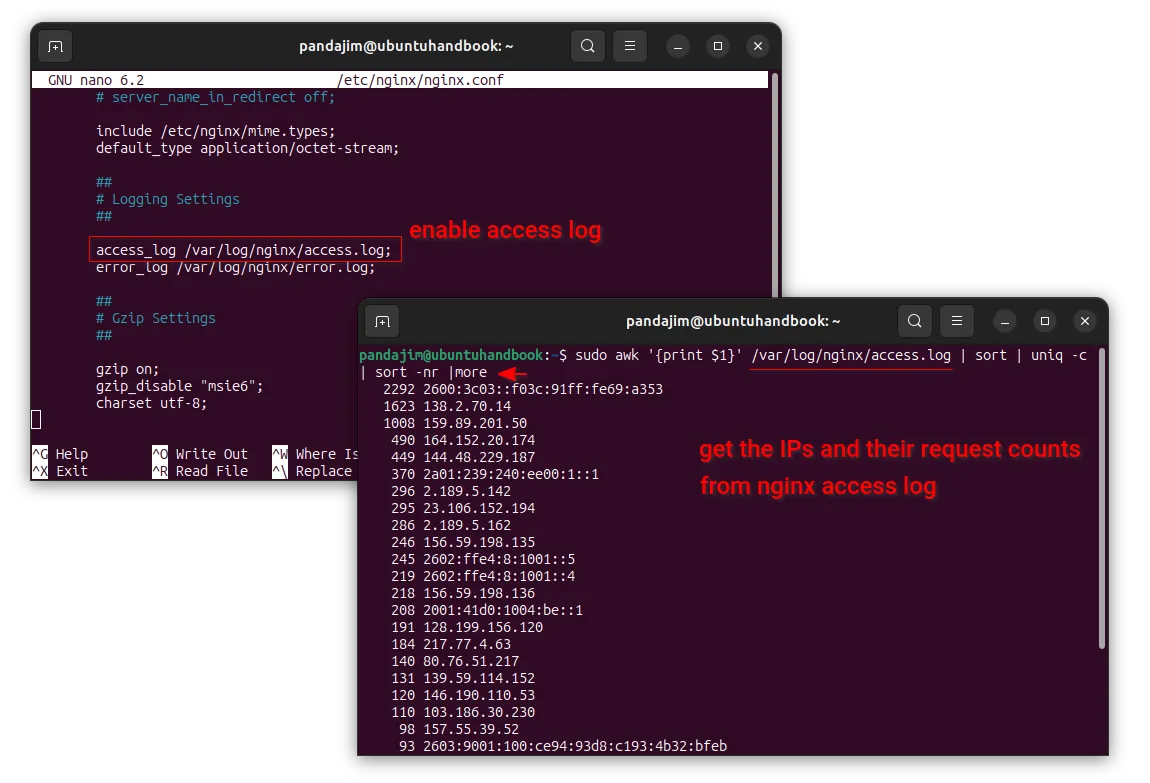
Then, make sure it includes the access_log /var/log/nginx/access.log; line for the access log.
2. If access log was not enabled, then you need to manually add that line and save file (press Ctrl+S then Ctrl+X).
And, apply change by doing configuration check and restarting the service:
sudo nginx -t
sudo systemctl restart nginx.service
3. Without browsing the log file and counting the IP accesses manually, you may run the single command below in server:
sudo awk '{print $1}' /var/log/nginx/access.log | sort | uniq -c | sort -nr |more
This command will look for the log file (/var/log/nginx/access.log) and print the top IPs and count how many requests they sent.
NOTE: If you use CloudFlare CDN for your website, then Nginx by default does NOT show the real IPs from visitors.
In the case, you need to create a configuration file for Nginx by running the command below in server:
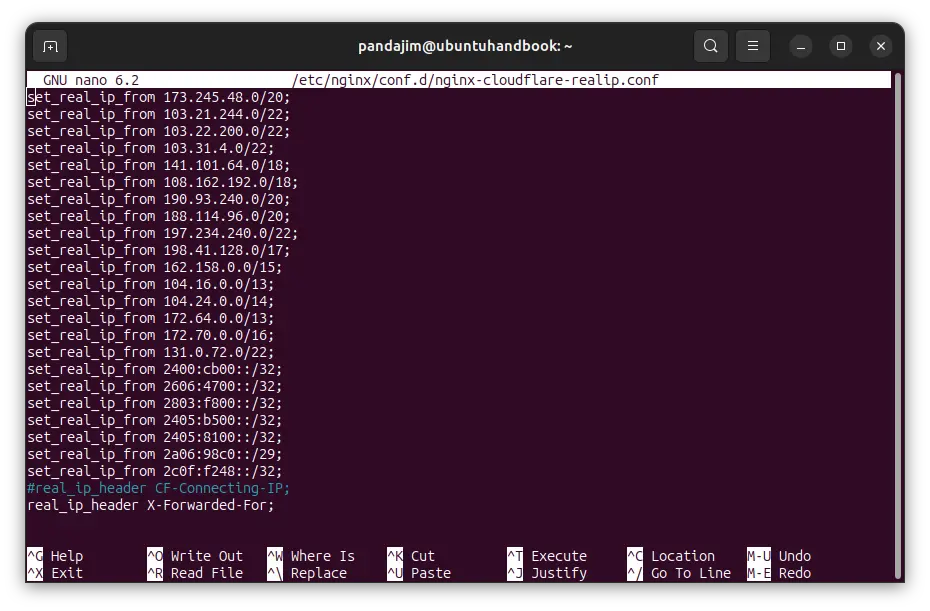
sudo nano /etc/nginx/conf.d/nginx-cloudflare-realip.conf
Then, add following lines to tell to show the real IPs for visits from CloudFlare:
set_real_ip_from 173.245.48.0/20;
set_real_ip_from 103.21.244.0/22;
set_real_ip_from 103.22.200.0/22;
set_real_ip_from 103.31.4.0/22;
set_real_ip_from 141.101.64.0/18;
set_real_ip_from 108.162.192.0/18;
set_real_ip_from 190.93.240.0/20;
set_real_ip_from 188.114.96.0/20;
set_real_ip_from 197.234.240.0/22;
set_real_ip_from 198.41.128.0/17;
set_real_ip_from 162.158.0.0/15;
set_real_ip_from 104.16.0.0/13;
set_real_ip_from 104.24.0.0/14;
set_real_ip_from 172.64.0.0/13;
set_real_ip_from 172.70.0.0/16;
set_real_ip_from 131.0.72.0/22;
set_real_ip_from 2400:cb00::/32;
set_real_ip_from 2606:4700::/32;
set_real_ip_from 2803:f800::/32;
set_real_ip_from 2405:b500::/32;
set_real_ip_from 2405:8100::/32;
set_real_ip_from 2a06:98c0::/29;
set_real_ip_from 2c0f:f248::/32;
#real_ip_header CF-Connecting-IP;
real_ip_header X-Forwarded-For;
Then, press Ctrl+S to save file and Ctrl+X to exit. Finally, run the 2 commands mentioned above to check configuration and restart service.
NOTE 1: Cloudflare may add/remove IPs in future! See this page for the latest.
NOTE 2: This configuration needs ngx_http_realip_module model, which is enabled by default in Ubuntu & Debian.
Step 2: Block IPs or IP range in Nginx
Once you found out the attacker’s IP addresses, run command below to create a configuration file:
sudo nano /etc/nginx/conf.d/block.conf
Then, add similar lines below to tell to block certain IPs and IP range (replace IP addresses below with the ones you got in last step) for all the NGINX web servers in this host:
deny 206.189.129.37;
deny 143.110.180.216;
deny 167.172.87.180;
deny 167.99.77.92;
deny 152.42.178.38;
deny 2600:3c03::f03c:91ff:fe69:a353;
deny 139.59.108.0/24;
deny 128.199.0.0/16;
Here deny 139.59.108.0/24; means to block IP range from ‘139.59.108.0’ to ‘139.59.108.255’. And, 128.199.0.0/16; means IP range from ‘128.199.0.0’ to ‘128.199.255.255’. You may replace them accordingly for your desired IP range.

For choice, you may use the rules below instead to allow only IP 1.2.3.4 and 2.3.4.5 (replace accordingly) but block all others.
allow 1.2.3.4;
allow 2.3.4.5;
deny all;
When done editing the file, press Ctrl+S to save and Ctrl+X to exit. Finally, check configuration and restart service to apply changes:
sudo nginx -t
sudo systemctl restart nginx.service
Step 3: Restrict Access to WordPress Login Page (wp-admin, wp-login.php)
For wordpress website, it’s a good choice to block all others from visiting the wp-admin/wp-login.php page, leaving only you and users from specified IP addresses being able to access.
1. First, connect to the Linux server and run command to edit the Nginx configuration file for your website:
sudo nano /etc/nginx/sites-available/wordpress
In command you need to replace file-name wordpress with yours. Use ls /etc/nginx/sites-available to list all files in that directory.
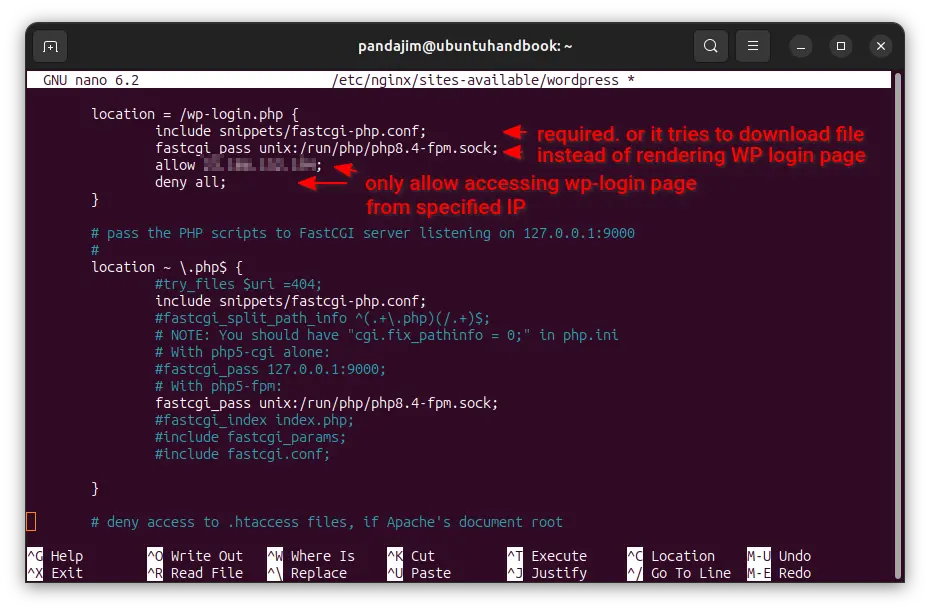
2. When files opens, scroll down and add “location = /wp-login.php{}” block with similar rules below:
location = /wp-login.php {
    allow 1.2.3.4;
    allow 2.3.4.5;
    deny all;
}
Here replace 1.2.3.4 and 2.3.4.5 with the IPs you want to allow them to access the login page. And, you may add more or remove allow lines to add/remove IPs.
NOTE: Both “location = /wp-login.php {}” and “location ~ /.php$ {}” (meaning any end with ‘.php’) blocks match the wordpress login page URL (wp-login.php), but the former one has higher priority.
Meaning when visiting wp-login.php page, rules under location ~ /.php$ will be ignored! In the case, it may try downloading file instead of rendering the web page.
To workaround it, you also need to add the rules under “location ~ /.php$ {}” , so it will look like:
location = /wp-login.php {
    include snippets/fastcgi-php.conf;
    fastcgi_pass unix:/run/php/php8.4-fpm.sock;
    allow 1.2.3.4;
    allow 2.3.4.5;
    deny all;
}
NOTE: you need to replace include snippets/fastcgi-php.conf; and fastcgi_pass unix:/run/php/php8.4-fpm.sock; according to the rules under “location ~\.php$ {}” block.
When done. Save file (press Ctrl+S, then Ctrl+X), check configuration and restart service to apply changes.
sudo nginx -t
sudo systemctl restart nginx.service
Tips: After made changes to location blocks, you may need to clear browser cache then verify if it works.
More about Nginx location blocks
Nginx configuration has different types of location blocks. They include:
location /abc– prefix match, example.com/abc, example.com/abcde, example.com/abc/123, example.com/abc?123.location = /abc, exact match, example.com/abc, example.com/abc?123, but NOT for example.com/abcde, example.com/abc/.location ~ ^/abc$, regex matches example.com/abc, example.com/abc?123, but NOT for example.com/abcde, example.com/abc/.location ~* ^/abc$, similar tolocation ~ ^/abc$but case-insensitive. It also matches example.com/ABC.location ^~ /abc, similar tolocation /abc, but higher priority and no regex.
The priority from high to low: location = > location ^~ > location ~ = location ~* > location /.


