This is a step by step guide shows how to set the priority of certain packages, launchpad PPAs, and/or other apt repositories in Ubuntu, Debian, Linux Mint, and their based systems.
Besides using the default system repositories, we can also install additional packages from third-party or software’s own repositories.
For example, user may update LibreOffice office suite via the Ubuntu PPA, install Spotify, Google Chrome, Edge from their own repositories, or install tons of media apps from deb multimedia repository in Debian.
Due to mixed software sources, you have multiple versions of same app package, but you may want to install and keep an older or certain version. Or you added a third-party repository, but only want to install single or few packages from it, while keep all others being blocked.
In the cases, you need to set the priority for certain packages or repositories, and here’s how!
NOTE: This tutorial does NOT work for Flatpak and Snap packages, as they run in sandbox environment.
Step 1: Find out the key attribute for the target repository
Before getting started, you need to first find out the key attribute to identify the target package repository.
1. First, press Ctrl+Alt+T on keyboard to open up a terminal window. Then, run command to refresh the package cache:
sudo apt update
2. Next, list all local repositories as well as their properties by running the command below:
apt policy
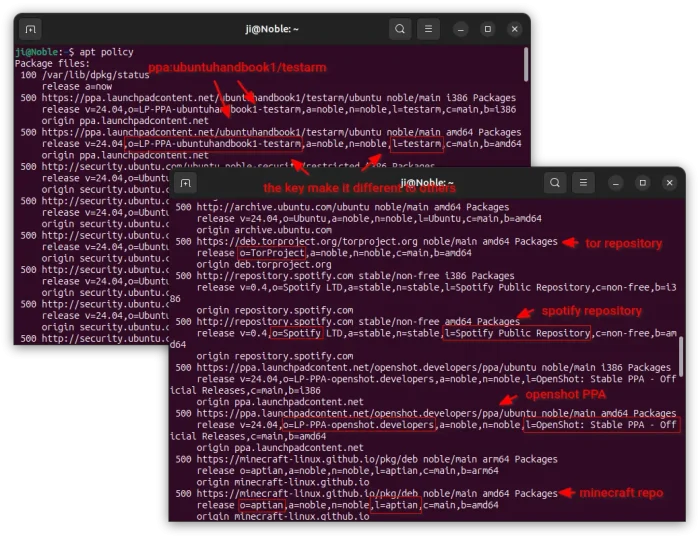
In the output, find out the target PPA or package repository, and the unique attributes (usually ‘o=xxx’) to make it different to others.
In my case (see the screenshot below), I can use:
- The ‘release’ attribute:
o=LP-PPA-ubuntuhandbook1-testarmorl=testarmto identify my testarm PPA. - The ‘release’ attribute:
o=Spotifyor ‘origin’ attributerepository.spotify.comto identify the Spotify repository - The ‘release’ attribute:
o=aptianorl=aptian, or ‘origin’ attributeminecraft-linux.github.ioto identify the minecraft github repository. - Or even
o=Ubuntufor all Ubuntu official repositories,c=multiversefor the multiverse,c=restrictedfor the restricted repositories.
Step 2: Create/Edit Apt Preferences Config file
The apt package manager reads the package priority rules from files under /etc/apt/preferences.d directory.
1. Simply open terminal (Ctrl+Alt+T) and run command to create a file (with whatever name) under that directory:
sudo nano /etc/apt/preferences.d/mozillateamppa
Here I use nano command line text editor that works in most Linux desktops and servers. You may replace it accordingly, such as gnome-text-editor for GNOME, pluma for MATE, or mousepad for XFCE.
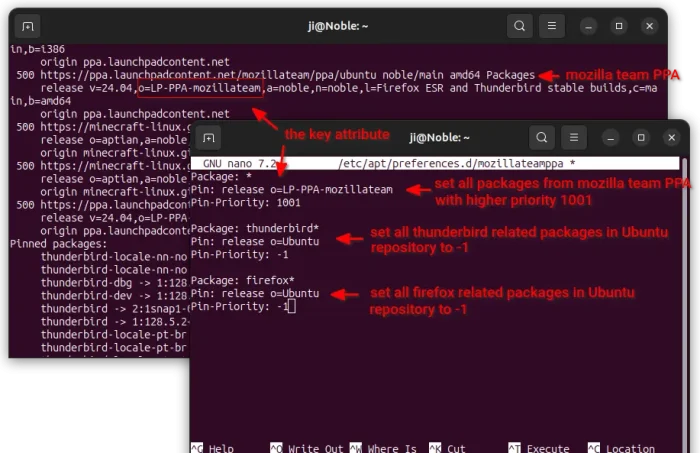
2. When file opens, add rules accordingly.
For example, set higher priority (1001) for all packages from Mozilla Team PPA:
Package: *
Pin: release o=LP-PPA-mozillateam
Pin-Priority: 1001
As you see, each rule has 3 lines. They include:
- Package: – specify which package or packages to set priority. Use value * (for any package), exact package name, or regex patterns.
- Pin: – specify which repository the packages are from. Use
release o=xxx,release l=xxx, ororigin xxx.xxx.xxxaccording to step 1. - Pin-Priority: – set the priority number for the specified packages.
As the screenshot above shows, you may add as many rules as possible, according what you need.
For example, the rules below tell to set higher priority for firefox packages from MozillaTeam PPA, while set all others to -1.
Package: firefox*
Pin: release o=LP-PPA-mozillateam
Pin-Priority: 1001

Package: *
Pin: release o=LP-PPA-mozillateam
Pin-Priority: -1
Rather than setting priority for packages from certain repository, you may also set package in certain version. For example, set perl at version 5.38.2-3.2build2 with 1001 priority.
Package: perl
Pin: version 5.38.2-3.2build2
Pin-Priority: 1001
Apt by default will install the package with highest priority, unless you specify version number in the apt command, e.g., sudo apt install firefox=133.0.3-0build3…
The default package priority in Debian and Ubuntu is 500. And, if you set a package priority to number:
- 1000 or higher, then apt command will install that version and even downgrade an already installed package.
- from 501 to 999 (higher than default 500), then apt will install that version, even it’s older than other versions. But it won’t downgrade if higher version already installed.
- from 1 to 499, only install if there’s no other version available in local repositories.
- -1 or lower, prevent the version from being installed, unless you specify version number in apt command, or use
-t "o=unique-release-attribute"(won’t work if another package version available with higher priority) to tell to install from certain repository.
For more details, run man apt_preferences command in terminal to tell.
Step 3: Apply changes and Verify
After editing the config file, press Ctrl+S to save and Ctrl+X to exit.
Finally, apply change by running command:
sudo apt update
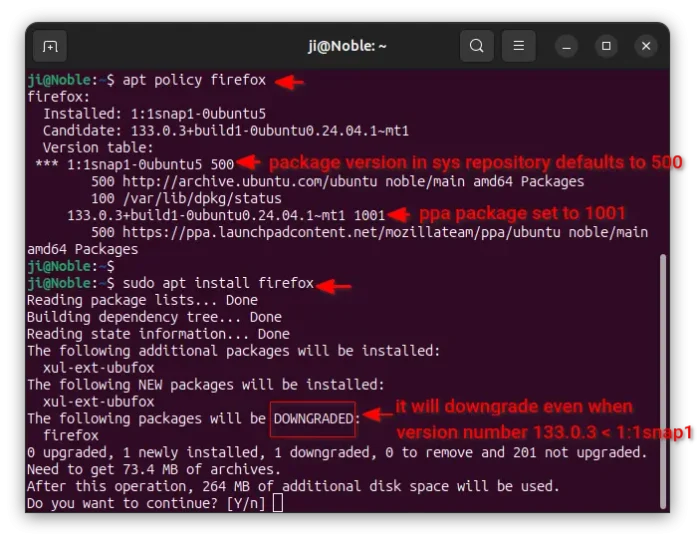
And, verify by apt policy command + target package name. For example, run command to check the firefox package:
apt policy firefox
In the output, it will show available versions of the package, as well as their priority.


Thanks for the fine article … I appreciate your time and efforts … to bring new understanding to the complex world of computing …
Excellent ! Thx