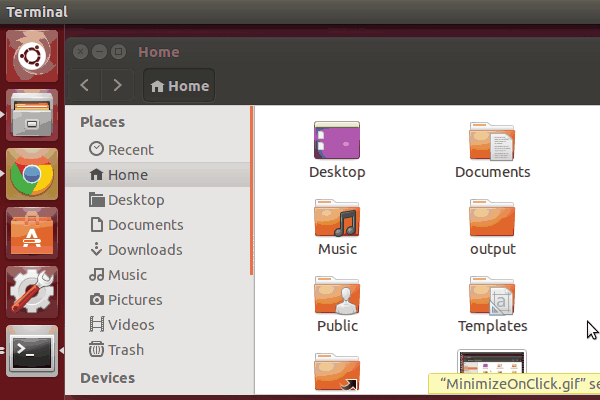
Minimize an application window by single clicking on its icon on system taskbar or dock app launcher is a common used functionality.
This ‘minimize on click’ behavior for Unity’s Left Launcher is not ready in Ubuntu out-of-the-box. So this simple tutorial is going to tell you how to enable this handy feature in Ubuntu 15.10 Wily Werewolf.
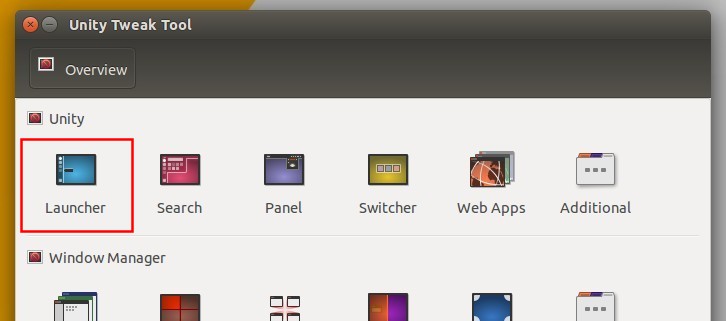
1. Install Unity Tweak Tool.
Search for and install unity tweak tool via Ubuntu Software Center:
2. Launch Unity Tweak Tool once installed. Then click the first icon that says ‘Launcher’ to go to its configuration page.
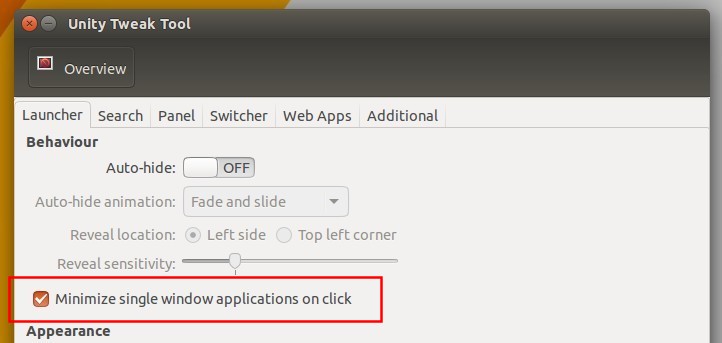
3. Check the box says ‘Minimize single window applications on click’ and done.
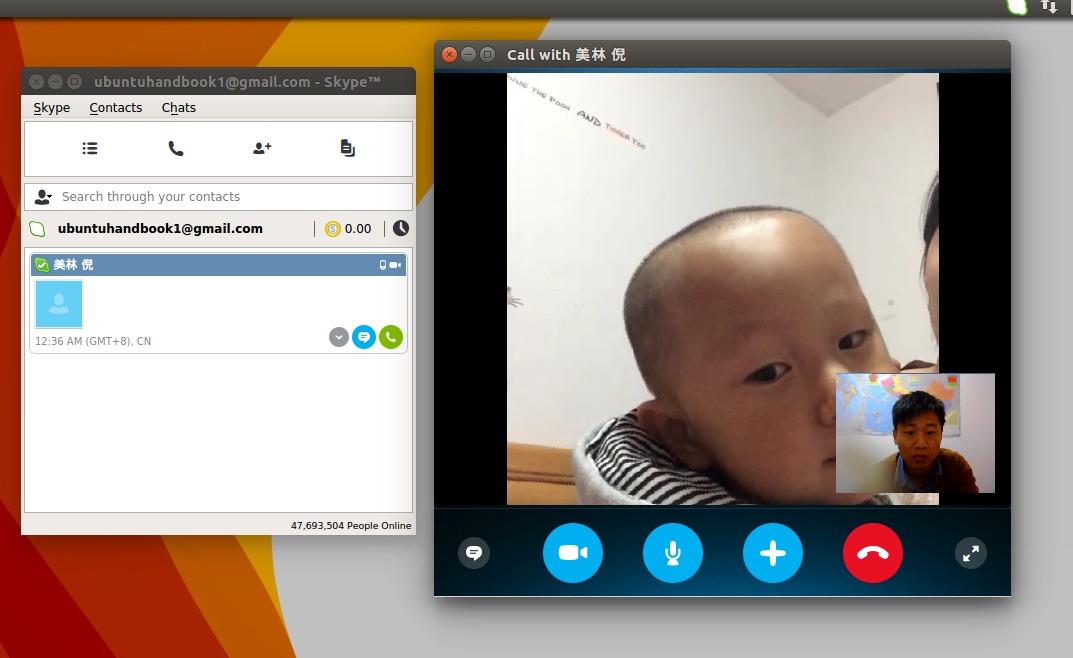
Quick tutorial that shows beginner how to install the Skype 4.3 client for Linux in Ubuntu 15.10 Wily Werewolf.
This just is a rewritten of one my old tutorial when the 4.3 release was released to make the installation more clear and easy to understand!
Skype Audio/Video Call
1. Enable Canonical Partners repository.
The partner repositories offer access to proprietary and closed-source software and are not enabled by default, e.g., adobe-flashplugin, google-cloud-sdk, and skype.
To add the repository, launch Software & Updates and then go to Other Software tab. Check first two boxes as shown below:
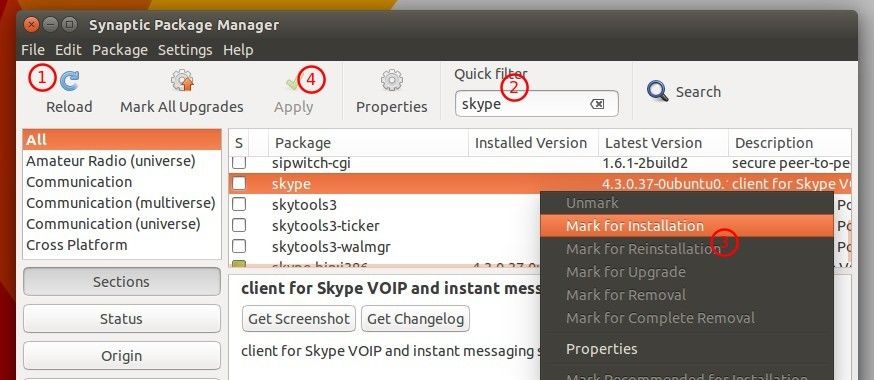
2. Refresh package cache and install Skype
For graphical way, install Synaptic Package Manager in Software Center. Then launch the software to refresh your system repositories, search for and install skype.
For those who prefer Linux commands, launch terminal from the Unity Dash, App Launcher, or via Ctrl+Alt+T shortcut key. When it opens, run below commands one by one:
sudo apt-get update

sudo apt-get install skype
Finally, launch the client from the Dash/Launcher and Enjoy!
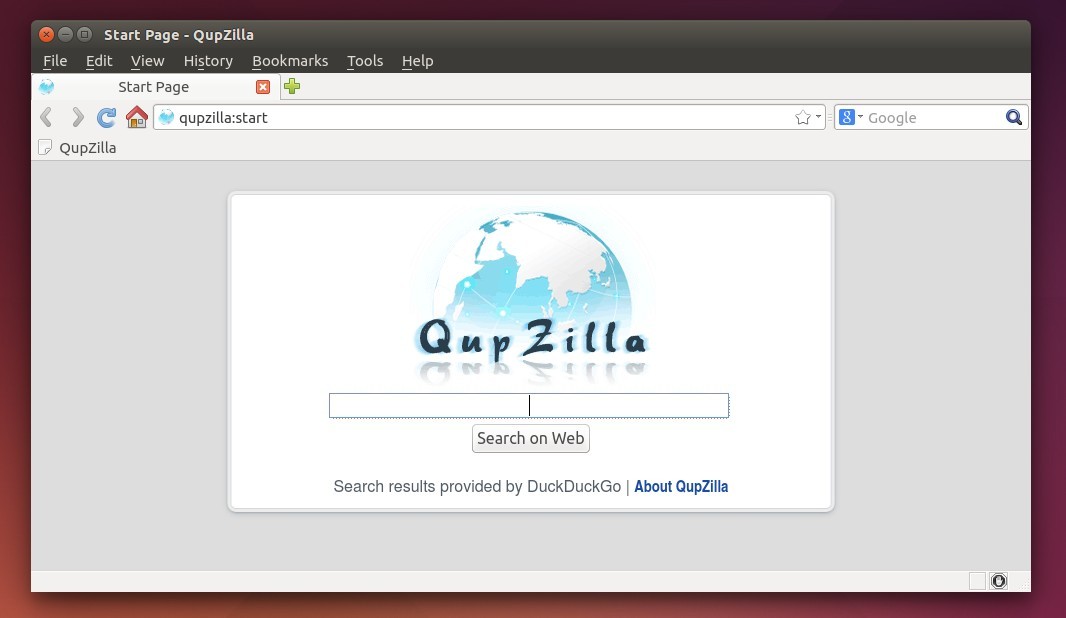
QupZilla web browser 1.8.8 was released a few hours ago. Official builds are now using Qt 5, which bring HTML5 Audio/Video support and a lot of fixes for bugs and crashes for Windows Vista+.
QupZilla 1.8.8 is still using QtWebKit. It’s a bug-fix release that feathers:
added interface for extensions to show action in Tools menu
add option to use TabManager as main tabbar replacement
fix build with Qt 5.5.1
fix crash when unloading plugin with visible sidebar
fix possible crash when accessing last active window
fix sometimes incorrectly loading background non-restored tab
fix showing speed dials in bookmarks icon
fix showing messages in statusbar in RTL mode
fix crash when application style is externally changed
fix labels color in access keys navigation with dark style
fix position of autoscroll indicator with site notification visible
Windows: fix setting as default browser
Windows: better toolbar background for Windows 10
How to Install QupZilla 1.8.8 in Ubuntu:
Ubuntu packages are now also using Qt 5, and they are available in its official PPA for Ubuntu 15.10, Ubuntu 14.04, and Ubuntu 15.04.
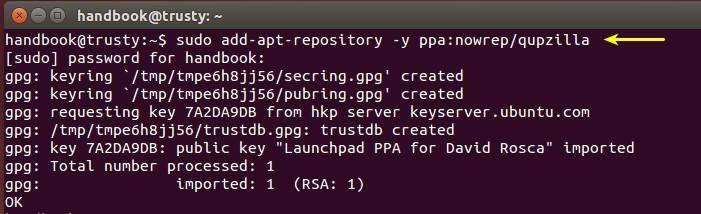
1. Add QupZilla PPA.
Open terminal from the Unity Dash, App Launcher, or via Ctrl+Alt+T shortcut key. When it opens, run below command in terminal:
sudo add-apt-repository -y ppa:nowrep/qupzilla
2. If have a previous release installed, run Software Updater (or Update Manager) and upgrade the browser by installing the updates in the list.
Or, run below commands one by one in terminal to refresh system repository cache and install/upgrade the browser:
sudo apt-get update

sudo apt-get install qupzilla
For those who don’t want to add PPA, select download the .deb package directly from THIS PAGE.
Linux Mint’s Desktop Environment Cinnamon 2.8 now is available for upgrade. Here’s how to install it in Ubuntu 15.04 via PPA.
Cinnamon 2.8 will be officially released and announced at the end of October. Currently known changes in the 2.8 release:
Better sound applet:
The track info and media controls are now part of a new overlay which sits on top of the cover art. For supported players, a flat position bar is displayed underneath.
Input controls, applications and output devices moved to the right-click context menu. Output devices now show their origins when multiple sound devices are detected (credits go to Cobinja for that).
Battery vendor/model info – display the presence of manufacturer data in the power settings and applet.
a couple of fixes to box pointers
The workspace switcher applet now shows a visual representation of your workspaces, with little cubes for the windows inside of them
Install Cinnamon 2.8 in Ubuntu:
There’s a PPA repository that contains Cinnamon 2.8 for Ubuntu 15.04. Ubuntu 15.10 should be support soon once it’s officially released. Check out the PPA page.
1. Add PPA.
Open terminal from the Dash, App Launcher, or via Ctrl+Alt+T shortcut key. When it open, run command:
sudo add-apt-repository -y ppa:moorkai/cinnamon
2. Update and install the DE via below commands one by one:
sudo apt-get update

sudo apt-get install cinnamon
Once installed, log out and select log back with Cinnamon session.
Kodi 15.2, the final maintenance release for Kodi 15 ‘Isengard’, has been announced today. This release brings a lot of bug-fixes on top of the 15.0 and 15.1 release.
Fix refresh-rate switching on Android. This should improve on most devices like Nexus Player and NVIDIA SHIELD TV and others which use the Android API
Fix file time used in scanning library which may speed up scanning times on 32bit platforms
Fix video rewind on Windows. May still leave artifacts for some seconds.
Fix continues check on system partitions on Android
Fix MicroDVD subtitles
Fix subtitles positioning below video
Fix memory leak on opening Bluray menu for stream selection
Fix default sorting for songs over UPnP
Updated taglib that fixes a crash when playing flac files
Fix volume adjustment for XBOX controllers
Fixes side flyout appearing when using touch
Fixes freeze on win32 on away mode
Fix crash on osx 10.7 when trying to resolve hdd names
Fix Amlogic zoom problems on Android
Set default screen region for dvb subs (wrong placed subtitles)
Fix missing lyrics from tag when playing from musicdb url
Properly set the time format when setting/changing regions
Fix playback problems on AMLogic after ffwd or skip
Fix fallback for nb_no language
Fix empty LatestAlbum.Artist
Fix watched flag in Confluence media info 3 view
Install or Upgrade to Kodi 15.2 in Ubuntu:
The new release has been made into Kodi Stable PPA, available for Ubuntu 14.04, Ubuntu 15.04, and derivatives, such as Linux Mint 17.x and Elementary OS Freya.
1. Add Kodi PPA
Open terminal from the Unity Dash, App Launcher, or via Ctrl+Alt+T shortcut key. When it opens, run below command to add PPA:
sudo add-apt-repository ppa:team-xbmc/ppa
2. Refresh system package cache and install the media center.
You can do it either via Synaptic Package Manager, or by running below commands one by one:
sudo apt-get update

sudo apt-get install kodi
Once installed, log out and select log back with Kodi session. Or launch the media center from the Dash (may need restart).
The Final release of Ubuntu 15.10 Wily Werewolf will be out in a few days on October 22. Below is how to upgrade your existing Ubuntu 15.04 to Ubuntu 15.10.
Preparation
1. Backup Data. You should back up your important documents, files, bookmarks, etc.
2. Disable PPAs. Some PPAs may cause the upgrade fail, so do disable all third-party PPAs in Software & Updates -> Other Software tab.
3. Uninstall video driver. If you’ve manually installed proprietary drivers directly from the manufacturer’s website, then before upgrading I recommend you removing these drivers first and reverting to the open-source drivers.
Upgrade Ubuntu Desktop:
1. Open terminal from the Unity Dash, App Launcher, or via Ctrl+Alt+T shortcut key. When it opens, run command to update your system:
sudo apt-get update; sudo apt-get dist-upgrade
2. After that, launch Software Updater via below command:
sudo update-manager -d
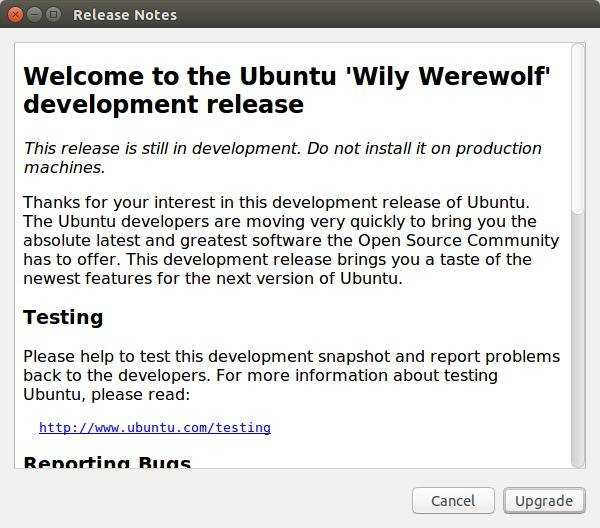
Below window should pop-up and prompt that Ubuntu 15.10 is available for upgrade:
Click the Upgrade button and confirm again in next window. Software Updater will fetch and install the files and prompt you to remove unnecessary applications.
Restart your computer once the upgrade process finished.
Upgrade Ubuntu Server:
1. Backup your configuration files if you’re running any services on Ubuntu server.
2. install the update-manager-core via command:
sudo apt-get install update-manager-core
3. Edit the config file via below command to make sure there a line says “Prompt=normal” (without quotes):
sudo nano /etc/update-manager/release-upgrades
After editing, press Ctrl+X -> type y -> finally hit Enter to apply changes.
QupZilla, an open-source Qt web browser, has reached the 1.8.7 release with enhancements and various bug-fixes.
QupZilla 1.8.7 is still using QtWebKit. New version QupZilla 2.0 will be using QtWebEngine, and it’s now under development. Changes in the 1.8.7 release:
save pinned tabs per-window when set to restore session
Shift+Left click on links now opens link in new window
show web inspector action now toggles inspector
add button to create new userscript in GreaseMonkey
add “Anti-Adblock Killer” AdBlock subscription
add Ctrl+G and Ctrl+Shift+G shortcuts in search toolbar
fix enabling select all and find actions in menu
fix searching for strings with special whitespaces from locationbar
fix build with KF5 KWallet, Qt 5.5 and gcc 4.9.
fix crash when blocking popup window with AdBlock
fix icon animation when blocking popup window with AdBlock
fix incorrectly accepting some cookies
fix creating new config directory
fix saving settings without changing pages in SpeedDial
fix center dials option in SpeedDial
fix not escaping characters for (file, ftp) dir listings
fix not showing restore page when opening new url from cli
fix adding search engine from form on page with Qt 5
fix saving homepage/new tab urls from preferences
Linux: use run-time detection of X11 platform
How to Install / Upgrade QupZilla in Ubuntu:
For all current Ubuntu releases, there’s an official PPA repository for QupZilla browser. Follow below steps to add the PPA and install/upgrade the latest browser:
NOTE: The new release is not ready for upgrade at the moment. CHECK OUT THE PPA PAGE.
1. Add QupZilla PPA.
Open terminal from the Unity Dash, App Launcher, or via Ctrl+Alt+T shortcut key. When it opens, run below command in terminal:
sudo add-apt-repository -y ppa:nowrep/qupzilla
2. If have a previous release installed, run Software Updater (or Update Manager) to upgrade the browser once a new release is out and made into PPA.
Or, run below commands one by one in terminal to refresh system repository cache and install/upgrade the browser:
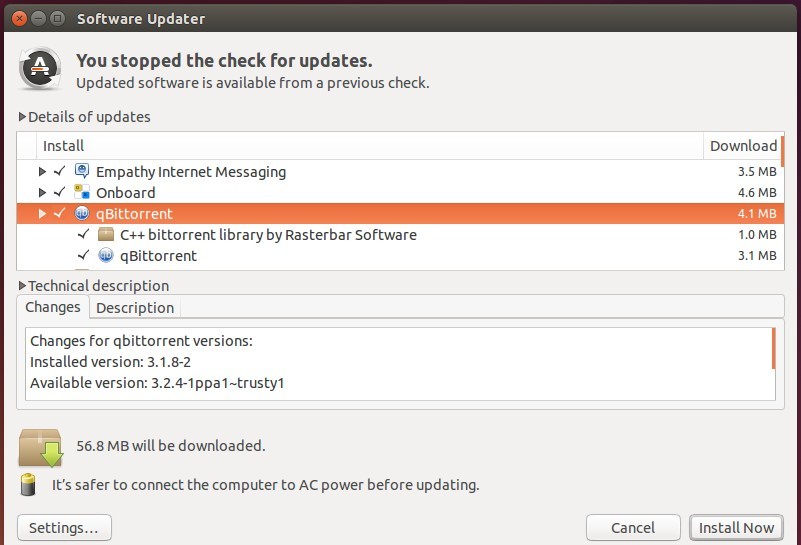
A new release of qBittorrent, a free BitTorrent client in Qt, was released yesterday with a new feature, various bug-fixes and other improvements.
qBittorrent 3.2.4 is the last release in the 3.2.x series. It adds a feature that auto-select the file of single file torrents when opening destination folder, and finally fixes an obscure “hit-and-run” bug with trackers.
Fix broken .desktop file icon for some locales
Fix Qt5 nox build on non-windows
Allow adding torrent link from Torcache
Fix crash with invalid favicon.
Move option “Ignore transfer limits on local network” to Speed page
Move option “Confirm torrent deletion” to Behavior page
Fix potential crash when memory allocation failed.
The new release has been made into its official PPA repository, available for Ubuntu 15.10, Ubuntu 15.04, Ubuntu 14.04, and derivatives, e.g., Linux Mint 17.x and Elementary OS Freya.
1. Add PPA.
Open terminal from the Dash, App Launcher, or via Ctrl+Alt+T shortcut key. When it opens, run command:
2. For those who have a previous version installed, launch Software Updater (or Updater Manager for Mint, need refresh). You’ll see qBittorrent in the update list
Or run below commands one by one in terminal to update repository cache and install/upgrade the software:
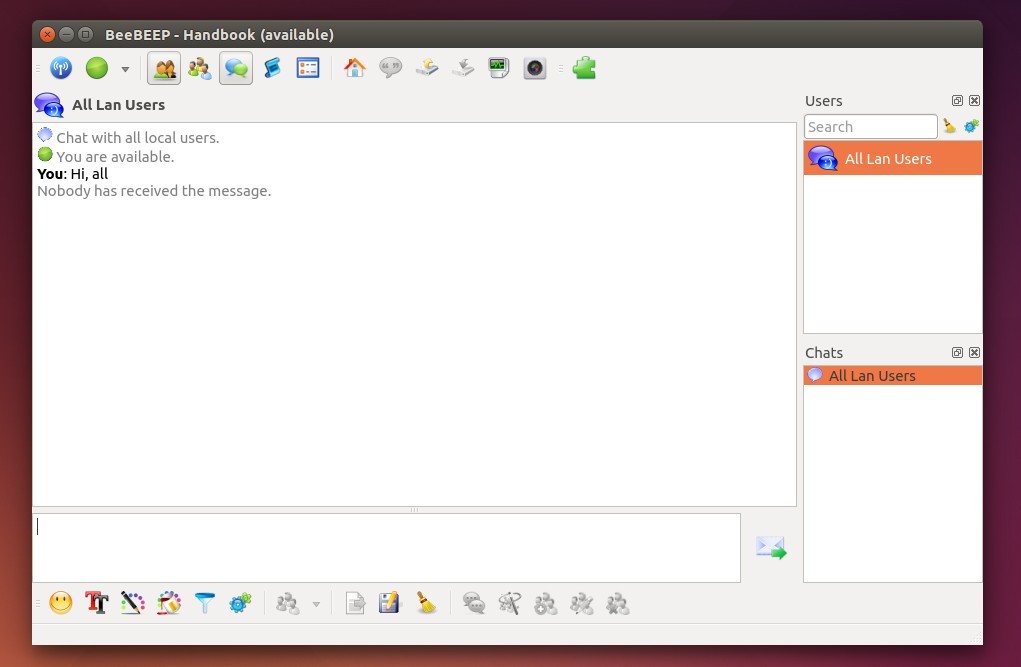
Quick tip shows how to install BeeBEEP, a secure lan messenger, in Ubuntu 14.04, Ubuntu 15.04, Ubuntu 15.10, and derivatives, e.g., Linux Mint 17.x, and Elementary OS Freya.
BeeBEEP is an open source, peer to peer, and secure (encryption based on Rijndael Algorithm, AES) lan messenger. You can talk and share files with all the people inside your local area network such of an office, home or internet cafe without a server.
BeeBEEP features:
Free and Multipe OS support: Windows, MacOSX, Linux, OS/2 and eComStation.
Easy to use: (no server required)
encryption based on Rijndael Algorithm (AES).
chat with all people connected, group or single user.
files and folders drag and drop support.
Offline messages and message history
BeeBEEP in Ubuntu 14.04
How to Install BeeBEEP in Ubuntu:
UPDATE: BeeBEEP now can be easily installed via snap, in Ubuntu 16.04 and higher simply search for and install beebeep in Ubuntu Software.
1. Install Required Qt5 libraries:
Open terminal from the Dash, App Launcher, or via Ctrl+Alt+T shortcut key. When it opens, run command to install required packages:
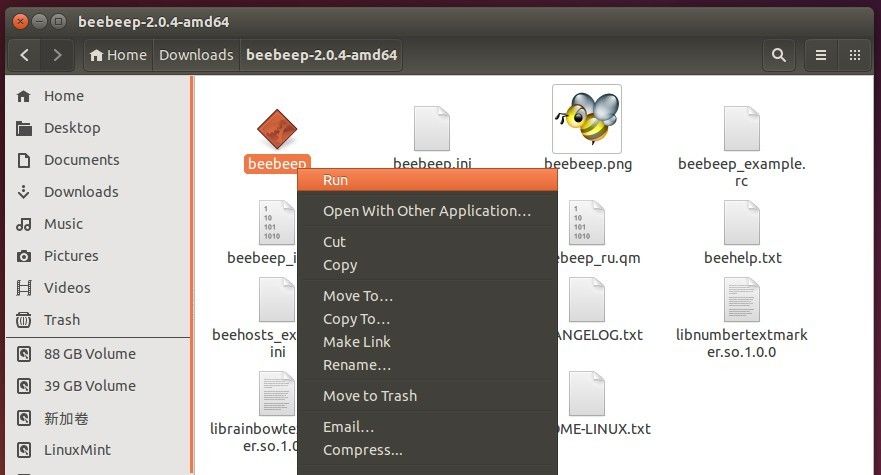
3. Extract the downloaded package and run BeeBEEP executable from the result folder.
Don’t see the “Run” option? Go to File Browser menu Edit -> Preferences -> Behavior tab, check the box where it says ‘Run executable text files when they are opened’. Apply changes by nautilus -q command or just log out and back in.
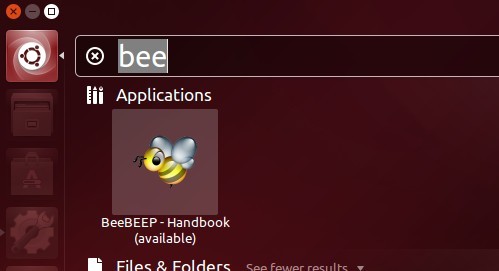
4. Create shortcut icon.
After running the messenger for the first time, it automatically creates a launcher for current user so that you can next time launch the software from the Dash or Application Launcher.
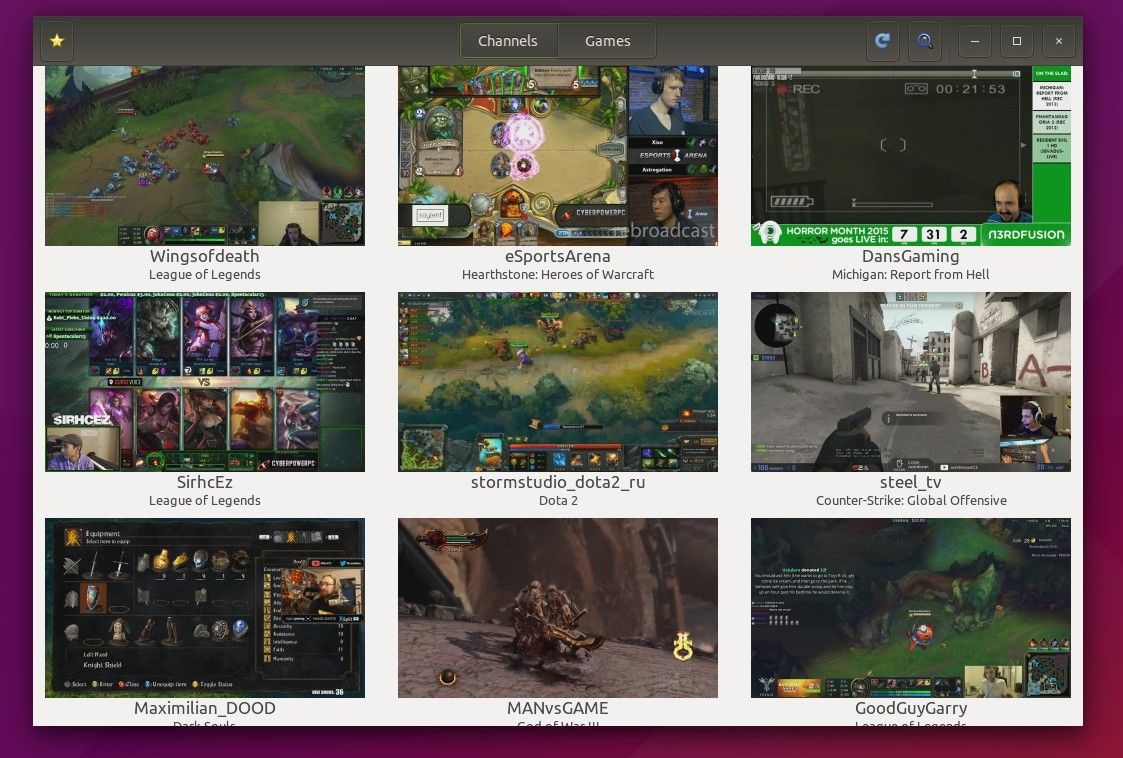
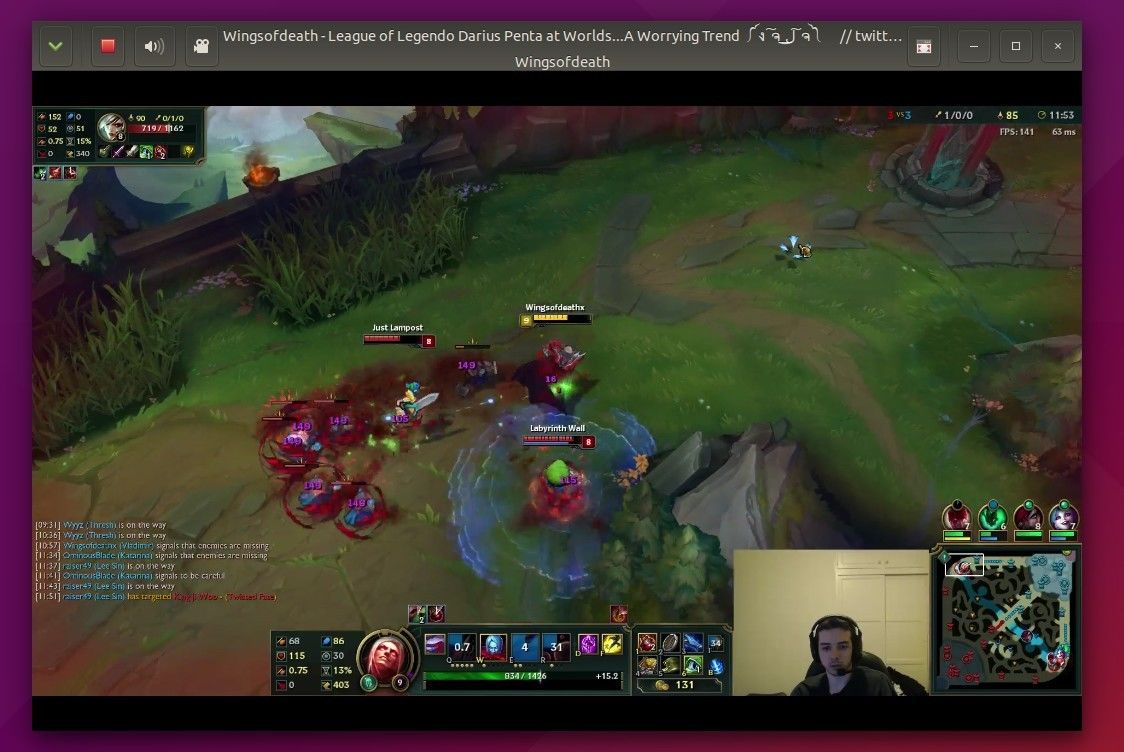
Gnome Twitch is an open-source and unofficial Twitch app for watching Twitch on your GNU/Linux desktop. Allow user to enjoy favorite streams without the hassle of flash or the web.
Gnome Twitch is new project created a few weeks ago. It’s based on GTK 3 and uses gstreamer 1.0 to handle audio and video playback.
Screenshots:
Gnome Twitch can be installed in Elementary OS Freya, but streams does not play in my case!
Install Gnome Twitch in Ubuntu:
Gnome Twitch is available in GetDeb repository for Ubuntu users. The current build is for Ubuntu 15.04, it also works on Ubuntu 15.10 (tested on beta 2).
1. Select download the .deb package from the link below
Download Gnome Twitch (amd64.deb for 64-bit, or i386.deb for 32-bit OS)
2. Click the package to open with Software Center and finally install the software.
3. If the audio/video playback does not work, install below packages one by one in Software Center:
gstreamer1.0-plugins-base
gstreamer1.0-plugins-good
gstreamer1.0-plugins-bad
gstreamer1.0-plugins-ugly
gstreamer1.0-libav
Or just run below command in terminal to install them via apt-get: