This simple tutorial shows how to install the latest Oracle Java (JDK 21, 25 LTS or JDK 26) in Ubuntu Linux via the official binary package.
There used to be unofficial Ubuntu PPA to automate the process of installing Java JDK and setup the environment, however, discontinued. So, here’s the tutorial to manually install the Java package and set as default.
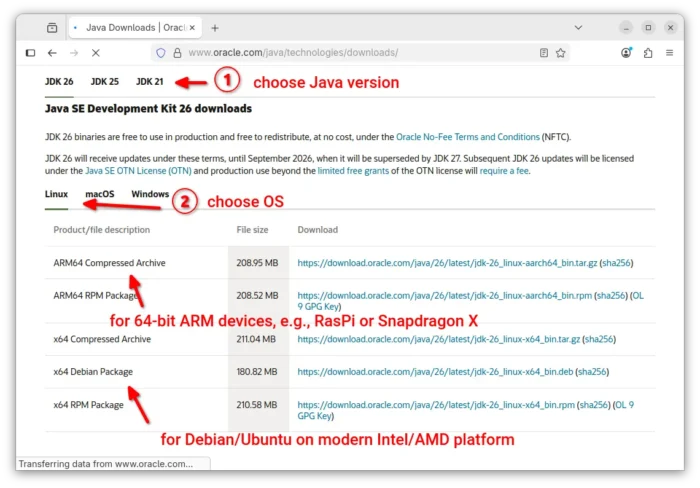
Step 1: Download the pre-build binary package
Oracle provides the pre-build binary packages for Linux, Windows, macOS, available to download via the link below:
First, select JDK version, then choose download:
- either “x64 Debian Package” for
amd64 devices, e.g., modern Intel/AMD CPUs.
- or “ARM64 Compressed Archive” for
arm64 (aarch64) devices, e.g., Raspberry Pi, Snapdragon X, and Apple Silicon.
If you don’t even know your CPU architecture type, open terminal (Ctrl+Alt+T) and run uname -m or dpkg --print-architecture command to tell.
Step 2: Install the JDK package
After downloaded the pre-build package, install it via either option below depends on CPU architecture type.
For x86_64 (amd64) AMD/Intel
For modern AMD/Intel platform, press Ctrl+Alt+T to open terminal, and run command to install the downloaded .deb package:
sudo apt install ~/Downloads/jdk-21_linux-x64_bin.deb
Here replace 21 in command if you downloaded JDK 25 or 26. Or, just drag and drop the .deb package from your downloads folder into terminal to auto-insert path to that file.
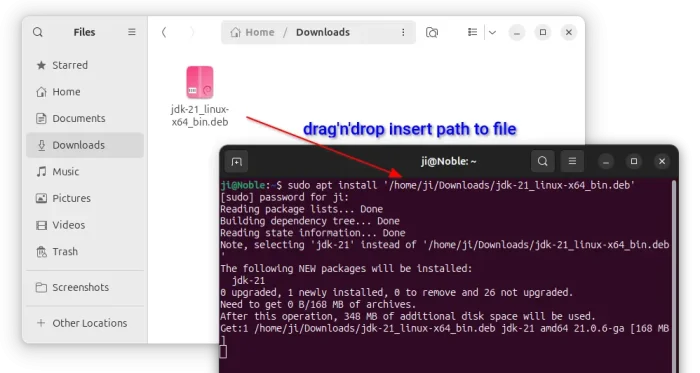
The .deb package include a post-install script that automatically set the JDK installation with a higher priority. So, it should be default if you have multiple java.
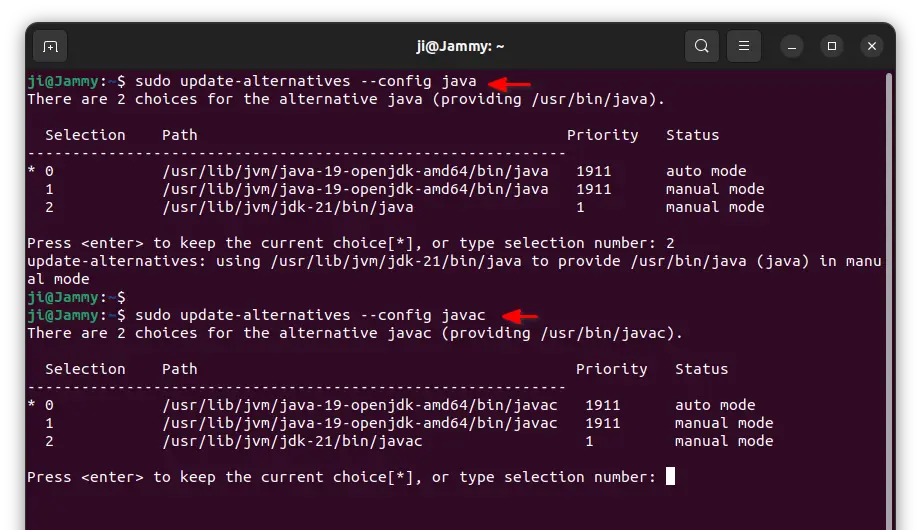
Just in case, you may run the command below to manually set default Java:
sudo update-alternatives --config java
In the output, input the number for your desired Java version and hit Enter.

Similarly, you may run the command below to configure default Javac, Jshell, Jar, etc.
sudo update-alternatives --config javac
For Intel/AMD platform, you’re done!
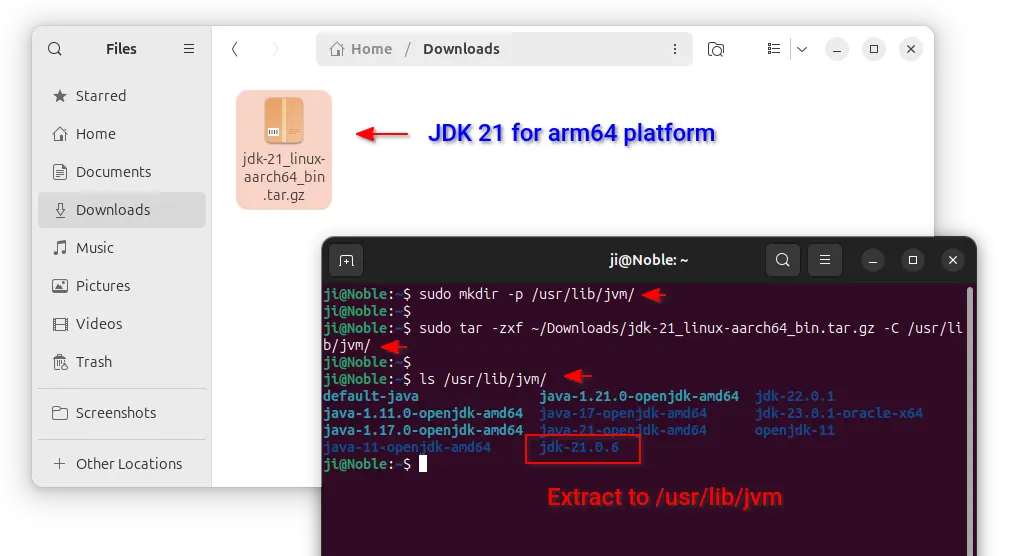
Install the Compressed Archive for ARM devices
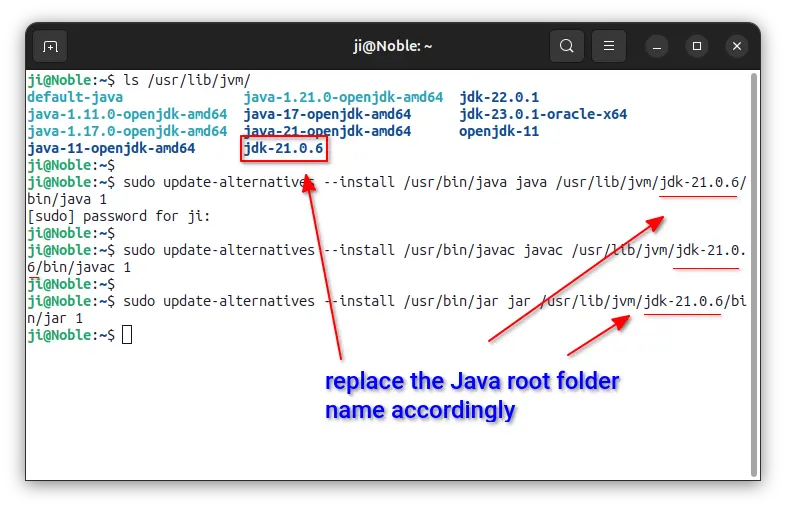
For the ARM computers (e.g., Raspberry Pi, Snapdragon X, Apple M1/2, etc processors), first open terminal (Ctrl+Alt+T) and run command to make sure the /usr/lib/jvm directory is exist:
sudo mkdir -p /usr/lib/jvm
Then, extract the downloaded archive to that directory by running command:
sudo tar -zxf ~/Downloads/jdk-21_linux-aarch64_bin.tar.gz -C /usr/lib/jvm/
Also, replace 21 in command with 25 or 26 if you selected JDK 25/26. After that, you may run the command below to list that directory content which should include the new generated jdk-21 (or jdk-21.x.x) sub-folder.

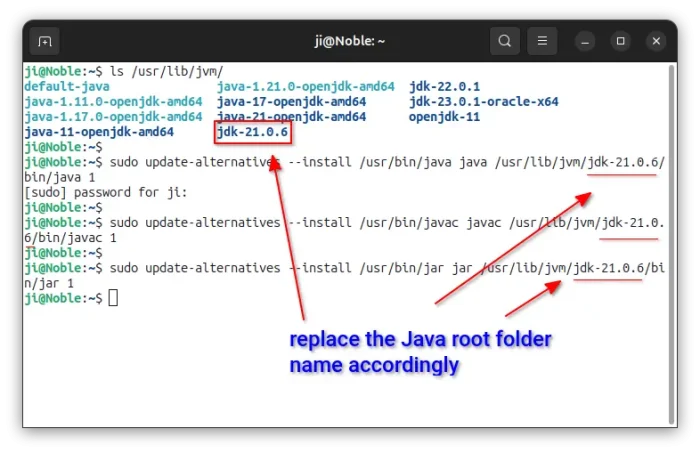
3. Set JDK 21/25/26 as default (for ARM only):
NOTE 1: For Intel/AMD, you’re DONE after installed the .deb package which set default Java automatically. This is only required for ARM platform.
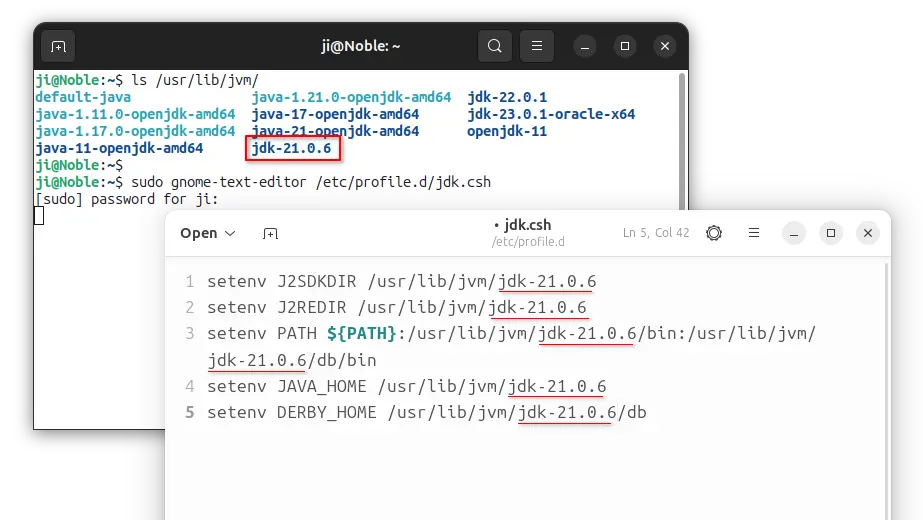
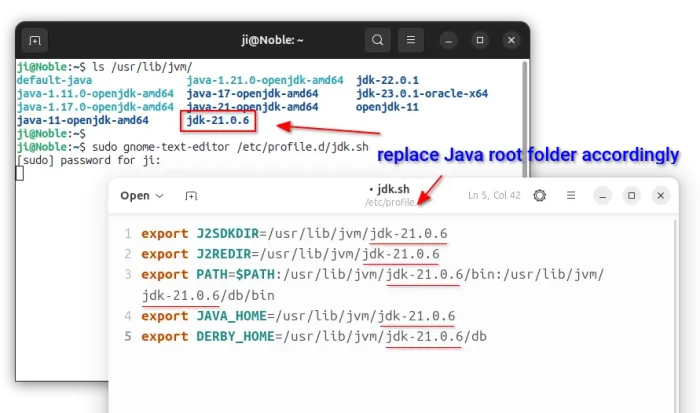
NOTE 2: The JDK root folder-name may vary depends on which package you installed. It may be ‘jdk-21’, ‘jdk-21.0.1’, ‘jdk-25’, ‘jdk-25.0.1’, ‘jdk-26’, ‘jdk-26.0.1’ and so on. Run ls /usr/lib/jvm to tell and replace jdk-21 in commands below accordingly.
a.) Create symbolic links for the executable files:
sudo update-alternatives --install /usr/bin/java java /usr/lib/jvm/jdk-21/bin/java 1
sudo update-alternatives --install /usr/bin/javac javac /usr/lib/jvm/jdk-21/bin/javac 1
sudo update-alternatives --install /usr/bin/jar jar /usr/lib/jvm/jdk-21/bin/jar 1
As mentioned, you need to replace “jdk-21” in command with e.g., jdk-21.0.1, jdk-21.0.6, jdk-25, jdk-25.0.1, etc. accordingly!!!
Similarly, add links for other executable files (e.g., jarsigner, jlink, javadoc) as you need.
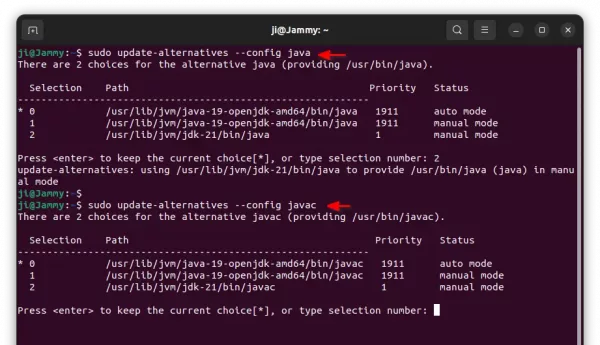
b.) Next, run the commands below one by one, and type number to select Java JDK 21 as default.
sudo update-alternatives --config java
sudo update-alternatives --config javac
sudo update-alternatives --config jar
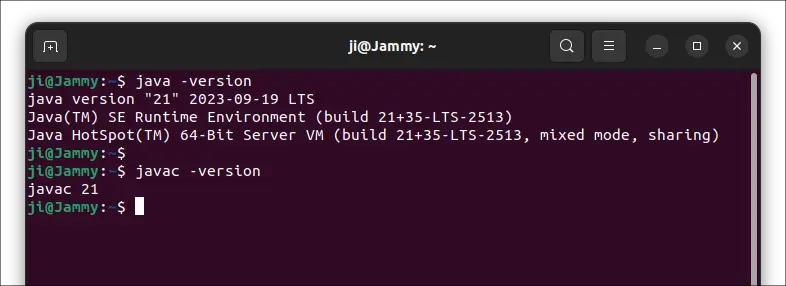
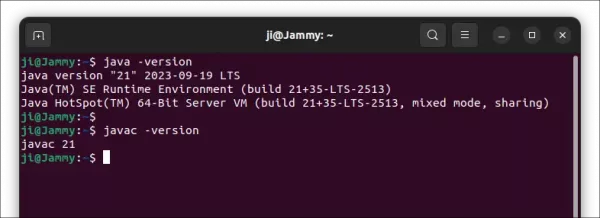
When done, verify by running command in terminal:
java -version
javac -version
4. Set JAVA_HOME (for ARM only):
As well, you only need to do this for ARM package. If installed the .deb version, just verify JAVA HOME via the bottom command.
Also, replace ‘jdk-21’ below according to ls /usr/lib/jvm command output (e.g., jdk-21.0.6, jdk-25, jdk-25.0.x).
Option 1.) Set JAVA_HOME for current terminal console, that will work until you close it:
export JAVA_HOME=/usr/lib/jvm/jdk-21
setenv JAVA_HOME=/usr/lib/jvm/jdk-21
Option 2.) To make it permanent, create and edit config file via command:
sudo gnome-text-editor /etc/profile.d/jdk.sh
Depends on your desktop environment, you may replace gedit with mousepad for XFCE, xed for Linux Mint, pluma for MATE, kate for KDE Plasma, gedit for Ubuntu 22.04 or older.
then add following lines:
export J2SDKDIR=/usr/lib/jvm/jdk-21
export J2REDIR=/usr/lib/jvm/jdk-21
export PATH=$PATH:/usr/lib/jvm/jdk-21/bin:/usr/lib/jvm/jdk-21/db/bin
export JAVA_HOME=/usr/lib/jvm/jdk-21
export DERBY_HOME=/usr/lib/jvm/jdk-21/db
And create anther one for C shell:
sudo gedit /etc/profile.d/jdk.csh
add following lines and save it:
setenv J2SDKDIR /usr/lib/jvm/jdk-21
setenv J2REDIR /usr/lib/jvm/jdk-21
setenv PATH ${PATH}:/usr/lib/jvm/jdk-21/bin:/usr/lib/jvm/jdk-21/db/bin
setenv JAVA_HOME /usr/lib/jvm/jdk-21
setenv DERBY_HOME /usr/lib/jvm/jdk-21/db

Finally, change the permissions via command, and it should take place next time you log in.
sudo chmod +x /etc/profile.d/jdk.csh /etc/profile.d/jdk.sh
To verify JAVA HOME, run the command below in terminal at next login:
java -XshowSettings:properties -version
Uninstall Java JDK 21/25/26
To uninstall the Java package, open terminal (Ctrl+Alt+T) and run command:
sudo apt remove --autoremove jdk-21 jdk-25 jdk-26
In the commands below, replace jdk-21, with jdk-21.0.5, jdk-25, jdk-25.0.1, jdk-26, jdk-26.0.1, etc, depends on which version you installed.
For the ARM version, simply remove all the installed files, by running the commands below one by one:
- Remove the alternative links:
sudo update-alternatives --remove java /usr/lib/jvm/jdk-21/bin/java
sudo update-alternatives --remove javac /usr/lib/jvm/jdk-21/bin/javac
sudo update-alternatives --remove jar /usr/lib/jvm/jdk-21/bin/jar
- Remove JDK installation files:
sudo rm -R /usr/lib/jvm/jdk-21
- And remove JAVA HOME config files:
sudo rm /etc/profile.d/jdk.sh
sudo rm /etc/profile.d/jdk.csh