Archives For November 30, 1999

This quick tutorial shows how to install ‘Audio Recorder’, a simple lightweight audio recording utility, in all current Ubuntu releases.

Though there are a few audio recording apps available in Ubuntu Software, Audio Recorder is a good choice that features:

  • small and lightweight.
  • Record audio from system’s soundcard, microphones, Rhythmbox player, webcams & more.
  • Built-in timer
  • Output format support: OGG, M4A, FLAC, MP3, WAV, SPX.

Although Audio Recorder is available in Ubuntu Software via Snap package (runs in sandbox), it’s large in file size and not working very well.

To install the native Ubuntu .deb package, do following steps one by one:

1.) Open terminal from application menu, then run command to add the official PPA:

sudo add-apt-repository ppa:audio-recorder/ppa

Type user password (no asterisk feedback) when it prompts, and hit Enter to continue.

2.) After adding the PPA, run command to install the recorder:

sudo apt install audio-recorder

For Linux Mint, you may run sudo apt update before this command.

Uninstall Audio Recorder:

To remove the PPA, open Software & Updates utility and navigate to ‘Other Software’ tab. Then choose the repository line and remove it.

To remove the audio recorder, simply run command in terminal:

sudo apt remove audio-recorder

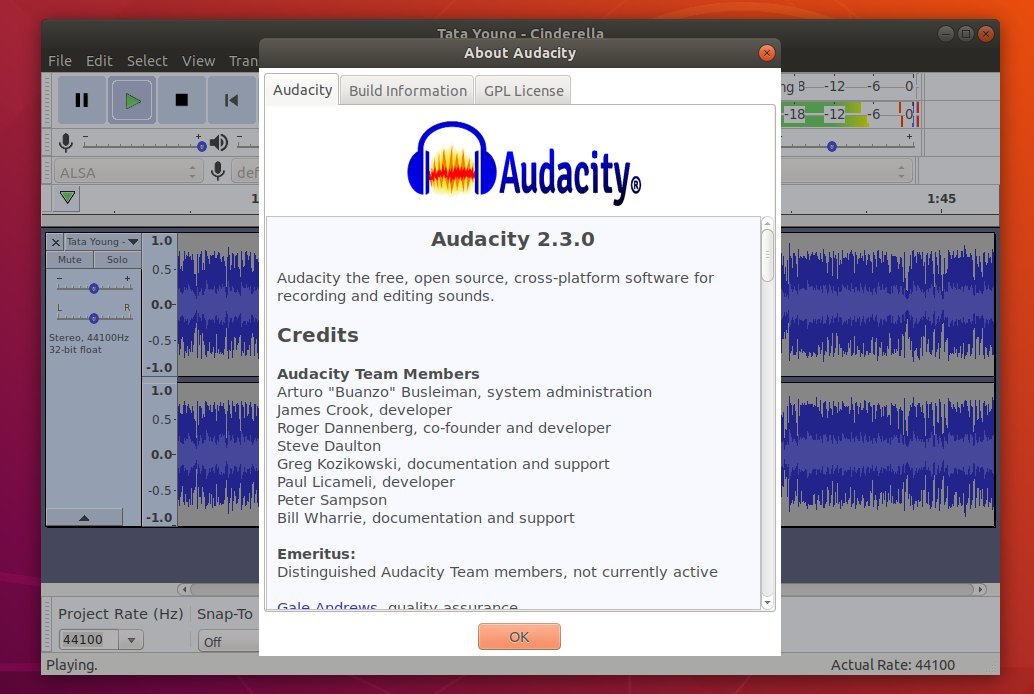
Audacity audio editor and recorder 2.3.0 was released one day ago. Here’s how to install it in Ubuntu 18.10, Ubuntu 18.04, Ubuntu 16.04, Linux Mint 18 and 19.

New features in Audacity 2.3.0 according to the release note:

  • New feature – “Punch and Roll Recording”
  • Pinned-play-head can now be repositioned by dragging
  • Play-at-speed now can be adjusted whilst playing.
  • Toolbars controlling volume and speed can now be resized for greater precision
  • Macros (formerly ‘Chains’) substantially extended
    • New Macro palette
    • Macros can be bound to keyboard keys
  • New commands: New ‘Tools’ menu, and new ‘Scriptables’ commands
  • Nyquist gains AUD-DO command
  • Nyquist effects are now translatable and translated
  • More dialogs have help buttons now
  • Increased legibility of trackname display
  • Half-wave option for collapsed tracks
  • Sliding Stretch
  • Dialog (option) for entering labels
  • And numerous bug-fixes.

Audacity 2.3.0

How to Install Audacity 2.3.0 in Ubuntu:

Audacity 2.3.0 for Linux is considered ‘experimental’ and may crash. I’ve revert the PPA package to Audacity 2.2.2.

For Ubuntu 16.04 and higher, the new release package can be easily installed from this third-party PPA.

1. Open terminal via Ctrl+Alt+T or by searching for ‘terminal’ from app launcher. When it opens, run command:

sudo add-apt-repository ppa:ubuntuhandbook1/audacity

Type your password (no asterisks feedback while typing) when it prompts and hit Enter to add the PPA.

2. If you have a previous version installed, you can upgrade Audacity via Software Updater after adding the PPA.

upgrade audacity

or run following commands one by one to check updates and install (or upgrade) audacity 2.3.0:

sudo apt-get update

sudo apt-get install audacity

Uninstall:

To remove the PPA repository, launch Software & Updates utility and navigate to ‘Other Software’ tab.

To remove Audacity audio software, either use system package manager or run command in terminal:

sudo apt-get remove --autoremove audacity audacity-data

Audacity 2.2.2 Released! (How to Install / Upgrade)

Last updated: February 22, 2018

Audacity audio editor 2.2.2 was released two days ago with some improvements and several bug-fixes. Here’s how to install it in Ubuntu 16.04, Ubuntu 17.10, and Ubuntu 18.04.

Audacity 2.2.2 release highlights:

  • Easier zooming in and out with mousewheel, new Zoom Toggle command, and context menu for vertical rulers.
  • Easy access to change keyboard bindings of menu commands by holding Shift key
  • Detection of dropout errors while recording with overburdened CPU
  • Improved contrasts in Light and Dark themes
  • Half-wave display option
  • Several bugs/annoyances in 2.2.1 are now fixed
  • See Release Notes for details.

How to Install Audacity 2.2.2 in Ubuntu:

The Audacity team does not offer pre-compiled Linux binaries. Other than building from source, a third-party PPA is available with Audacity 2.2.2 packages for Ubuntu 16.04, Ubuntu 17.10, and Ubuntu 18.04.

1. Open terminal via Ctrl+Alt+T or by searching for ‘terminal’ from app launcher. When it opens, run command:

sudo add-apt-repository ppa:ubuntuhandbook1/audacity

Input your password (no visual feedback while typing) when it prompts and hit Enter to add the PPA.

audacity ppa

2. If you have a previous version installed, you can upgrade Audacity via Software Updater after adding the PPA.

upgrade audacity

or run following commands one by one to check updates and install (or upgrade) audacity 2.2:

sudo apt-get update

sudo apt-get install audacity

Uninstall:

To remove the PPA repository, launch Software & Updates utility and navigate to ‘Other Software’ tab.

To remove Audacity audio software, either use system package manager or run command in terminal:

sudo apt-get remove --autoremove audacity audacity-data

Install Audio Recorder in Ubuntu 16.04, 15.10

Last updated: February 15, 2016

Audio Recorder for Gnome and Unity

Looking for a sound recording software for Ubuntu Unity and/or Gnome Desktop? Well, Audio Recorder is a great free application allows you to record audio from your sound card, microphones, browsers, webcams, music players, Skype calls, and everything plays out of your loudspeakers.

This program supports several output formats such as OGG, M4A, FLAC, MP3, MP2, WAV, SPX. More features:

  • a system tray indicator (enable it in settings page)
  • automatic control via MPRIS2-compatible media players
  • an advanced timer that can:
    • start recording on voice or sound
    • start, stop or pause recording on give time, or after a time period
    • stop or pause recording on “silence”
    • stop when the file size exceeds a limit.

Audio Recorder

Audio Recorder Settings

How to Install Audio Recorder in Ubuntu:

The software is available in PPA repository for Ubuntu 15.10 and Ubuntu 16.04.

1. Add PPA

Launch terminal from App Launcher, or via Ctrl+Alt+T shortcut key. When it opens, paste below command and hit run:

sudo add-apt-repository ppa:audio-recorder/ppa

Type in your password (no visual feedback when typing) when it asks and hit Enter to continue.

audio recorder team ppa

2. Update and install the software via Synaptic Package Manager or following commands:

sudo apt-get update

sudo apt-get install audio-recorder

For those who don’t want to add PPA, select download the .deb package for 32bit (i386) or 64bit (amd64) Ubuntu 16.04 xenial, 15.10 wily from THIS PAGE, and click install via Software Center.

3. (Optional) To remove this recoder, use Synaptic Package Manager or run command:

sudo apt-get remove audio-recorder

For Ubuntu 14.04, and Linux Mint 17.x, an old version is available HERE.

How to Install Ardour 4 in Ubuntu 14.04

Last updated: May 16, 2015

ardour-icon

Ardour, free digital audio workstation application, has reached the 4.0 release for almost one month. The new release brings many technical improvements, as well as new features and over a thousand bug fixes.

Ardour is a hard disk recorder and digital audio workstation application intended to be suitable for professional use. The 4.0 release has vastly reduced the memory consumption, brings better OS X support, updated user interface, JACK is no longer required, though it’s still usable with Ardour. For more changes, see the official news page.

retina_no_plugs2

How to Install Ardour 4 in Ubuntu 14.04:

There’s finally a PPA repository that contains the Ardour 4 packages for Ubuntu 14.04 LTS. To add the PPA, and install/upgrade the software, run below commands one by one in a terminal (Ctrl+Alt+T):

sudo add-apt-repository ppa:dobey/audiotools

sudo apt-get update

sudo apt-get install ardour

Or you can directly download the .deb installer from the PPA page.

For help, please go to Ardour forums.

Audio Recorder Ubuntu

Audio-recorder is a handy tool allows to record your favorite music and audio to file. It supports for recording devices, such as microphone, webcam, audio card, music/movie players, Skype calls, browsers, etc.

With the Gstreamer plugins, the recorder supports output formats: OGG, Flac, MP3, AAC, and WAV.

Audio Recorder in Ubuntu

Audio-recorder provides an advanced timer that can:

  • Start, stop or pause recording at a given clock time.
  • Start, stop or pause after a time period.
  • Stop when the recorded file size exceeds a limit.
  • Start recording on voice or sound (user can set the audio threshold).
  • Stop or pause recording on “silence” (user can set the audio threshold and delay).

The recording can be automatically controlled by MPRIS2-compatible media players. It can also record all your Skype calls without any user interaction.

Install Audio Recorder in Ubuntu:

This amazing software has been made into PPA, available for Ubuntu 14.10, Ubuntu 14.04. Old versions available from Ubuntu 10.10 to Ubuntu 13.10.

Press Ctrl+Alt+T on keyboard to open terminal. When it opens, run commands below one by one to add the PPA, update package lists, and install the recorder:

sudo add-apt-repository ppa:osmoma/audio-recorder

sudo apt-get update

sudo apt-get install audio-recorder

If you don’t want to add the PPA, you can grab the .deb package from Launchpad Page and click open it with Ubuntu Software Center and finally install the program.

For more output audio formats support, install gstreamer plugins (ubuntu 14.04 & higher):

sudo apt-get install gstreamer1.0-plugins-base gstreamer1.0-plugins-good gstreamer1.0-plugins-ugly gstreamer1.0-plugins-bad gstreamer0.10-fluendo-mp3

This quick tutorial is going to show you how to install Audio Recorder in Ubuntu 13.10 Saucy Salamander & Linux Mint 16 Petra via Getdeb repository.

As you may know, audio-recorder allows you to record your favourite music and audio to a file. It can record audio from your system’s soundcard, microphones, browsers, webcams & more. Put simply; if it plays out of your loudspeakers you can record it.

It has an advanced timer that can:

  • Start, stop or pause recording at a given clock time.
  • Start, stop or pause after a time period.
  • Stop when the recorded file size exceeds a limit.
  • Start recording on voice or sound (user can set the audio threshold).
  • Stop or pause recording on “silence” (user can set the audio threshold and delay).

The recording can be atomatically controlled by MPRIS2-compatible media players. It can also record all your Skype calls without any user interaction; It supports several audio (output) formats such as OGG audio, Flac, MP3 and WAV. It even allows you to select the recording device (microphone, webcam, audio card, etc.) which you practically CANNOT DO with GNOME’s official recorder. It’s so pathetic!

Install Audio Recorder:

Press Ctrl+Alt+T on your keyboard to open terminal. When it opens, run 2 commands to install getdeb repository:

wget http://archive.getdeb.net/install_deb/getdeb-repository_0.1-1~getdeb1_all.deb

sudo dpkg -i getdeb-repository_0.1-1~getdeb1_all.deb

Then you can use Synaptic Package Manager to install the audio-recorder. Or run commands below instead:

sudo apt-get update; sudo apt-get install -y audio-recorder

audio recorder in ubuntu 13.10