This is a step by step beginner’s tutorial shows how to set the default OS or kernel entry in Grub boot-menu in Ubuntu, Linux Mint, Debian or other Linux.
Most Linux today uses Grub2 to provide a menu on start-up, allowing to choose which operating system, which kernel, or recovery mode to boot.
It by default boots the first entry, while user can configure to automatically another menu entries without user interaction. And, here’s how to do the trick in 2 ways: from command line or use a graphical tool.
NOTE: You need to boot the first entry, then follow this tutorial is that OS. Or, set current OS’s boot menu as default in BIOS.
Option 1: Use command tool or edit Grub configuration file
The grub configuration tool has an option to set the default boot entry, and, there’s a command line tool grub-set-default allowing to change the default at any time as easy as a single command.
1. Count your boot menu entries.
Without remembering the full tiles of all the boot entries, you may count them and use the number instead to set which to boot as default.
To preview the menu, press Ctrl+Alt+T to open terminal window, then run commands below to install grub-emu tool and use it the simulate the boot menu:
- First, run command to install grub-emu:
sudo apt install grub-emu
- Then, run grub-emu to start a window with system boot menu:
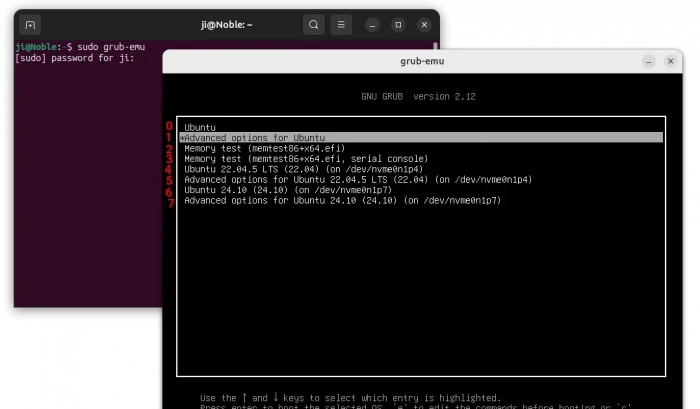
sudo grub-emu
NOTE: The simulated menu MAY not interactable. If you want to preview the sub-menu options, then try restart your computer and browse “Advanced options for …”.
As you see in the screenshot above, count starts from number 0. The first entry is 0, the second is 1, and the third entry is 2 …
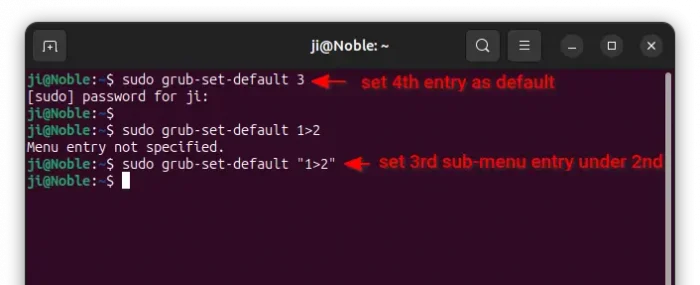
If you want to set a sub-menu entries to boot another kernel as default, for example the second main menu option (Advanced options for Ubuntu in my case, count number 1) and third sub-menu entries (e.g., Ubuntu with Linux Kernel 6.x.x…, count number 2), then the target number is 1>2.
2. Edit configuration file for default OS/Kernel
Next, open terminal (Ctrl+Alt+T) and run command to edit the grub configuration file:
sudo nano /etc/default/grub
Here I use the universal nano command line text editor that works in most Linux. You may replace it with gnome-text-editor for Ubuntu with default GNOME Desktop, or other text editor according to your DE.
And, when file opens, set GRUB_DEFAULT=”0″ by replacing number 0 (meaning the first) with the corresponding number you got in last step.
Tips: you may set GRUB_DEFAULT=saved plus new line GRUB_SAVEDEFAULT=true, so it remember the last boot entry and set it as default in next boot.
Finally, press Ctrl+S to save file and Ctrl+X to exit. And, run the command below to update changes.
sudo update-grub
NOTE: for Fedora you may run grub2-mkconfig -o /boot/grub2/grub.cfg instead to update grub configuration changes.
3. Set default boot entry via grub-set-default command
Without editing the file again and again, you may use the built-in grub-set-default command to do the job at any time.
First, you need set GRUB_DEFAULT=saved and GRUB_SAVEDEFAULT=true (skip if this line does not exist) in Grub configuration file and update grub.
Then, run the command line tool at any time to set default boot OS. For example, set 4th menu entry as default:
sudo grub-set-default 3
Replace number 3 in command according to which menu entry you want to set as default.
Tips 1: Without reboot, you may run sudo grub-emu afterward to simulate boot menu and see which entry is selected by default.
Tips 2: By replacing grub-set-default command with grub-reboot, it can immediately reboot your computer with the specified entry selected by default, though for next boot only.
Option 2: Use graphical tool
For those who don’t like Linux commands, there’s a popular free open tool Grub Customizer that provides graphical options to do the job.
Many Linux (e.g., Arch, Debian, Fedora, and RHEL 9) include Grub Customizer in their system repositories. However, Ubuntu since 22.04 dropped it from system repository due to poor scripting issue (though fixed now).
To install Grub Customizer in Ubuntu, open terminal (Ctrl+Alt+T) and run the commands below one by one to get it from developer’s PPA.
sudo add-apt-repository ppa:danielrichter2007/grub-customizer
sudo apt-get update
sudo apt-get install grub-customizer
Then, launch the tool and navigate to “General Settings” tab. Next, either choose a pre-defined entry or previously booted entry as default. Finally, click on “Save” button to apply changes.


