


![]()
This tutorial shows how to change the MAC Address, aka hardware address, for your network interface in Ubuntu 24.04. Though the title said for Ubuntu 24.04, it should work in all current Ubuntu releases, including Ubuntu 20.04 and Ubuntu 22.04.
MAC address, stands for Media Access Control address, is a unique identifier primarily assigned by device manufacturers. Therefore, it’s often referred to hardware address or physical address. However, many network interfaces support changing their MAC addresses. And, here’s how to do the trick in Ubuntu.
Step 1: Get Your Network Interface Name
First of all, you need to get the name (and maybe the original MAC address) of your network interface.
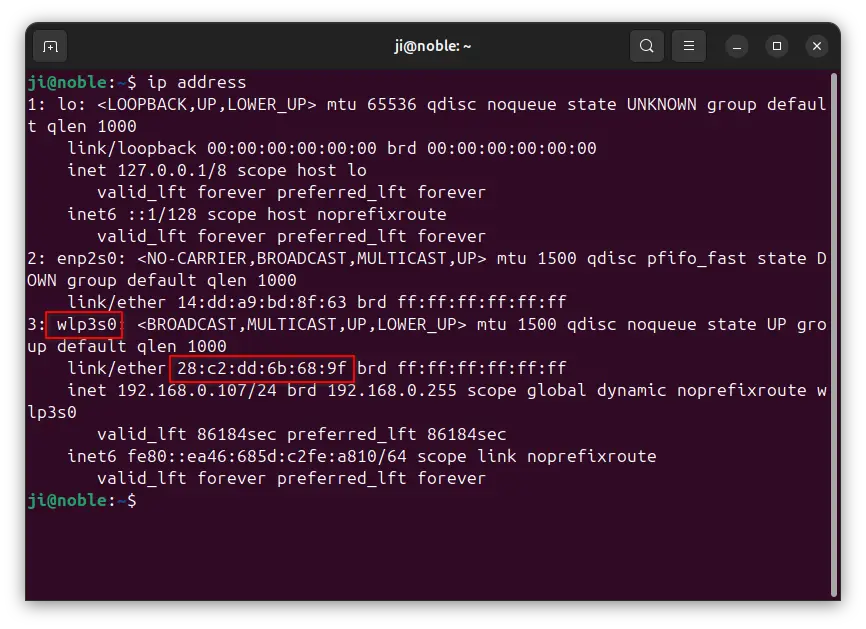
To do so, press Ctrl+Alt+T on keyboard to open up a terminal terminal. Then, run command:
ip address
In my case, I have a wired enp2s0 network which is not connected, and wireless network wlp3s0 with IP 192.168.0.107 and original MAC address 28:c2:dd:6b:68:9f. And, I’m going to change the MAC address of the wireless network interface.
It’s BETTER to write down the current MAC Address, in case later you want to revert it back to original.
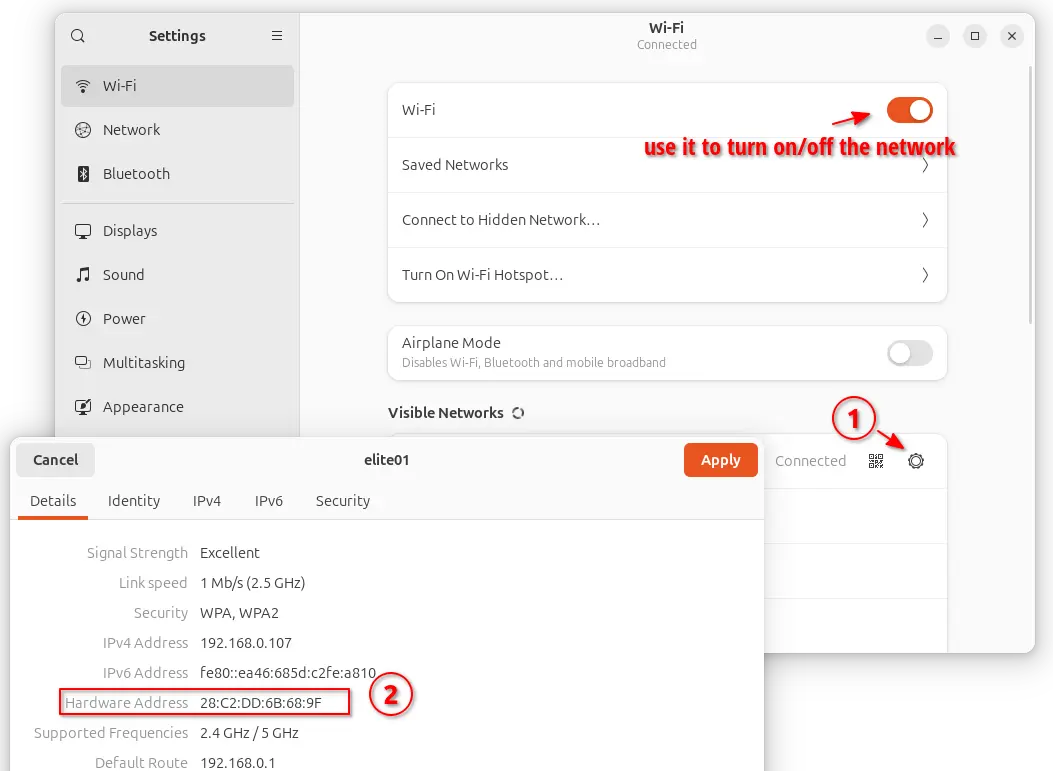
For the default GNOME Desktop, you may also open “Settings“, then either go to Wi-Fi or Network tab (depends on which network you want to change). And, finally click on the setting gear icon for the original MAC address. You can of course, use this settings page to turn down/on network device (need in following steps).
Step 2: Change MAC Address
Once you got the name of your network interface, then you can use either method below to change its MAC address. In all the commands below, you need to change “wlp3s0” to yours network name!!
Method 1: Use ip command
The built-in ip command can do the job to change network interface hardware name.
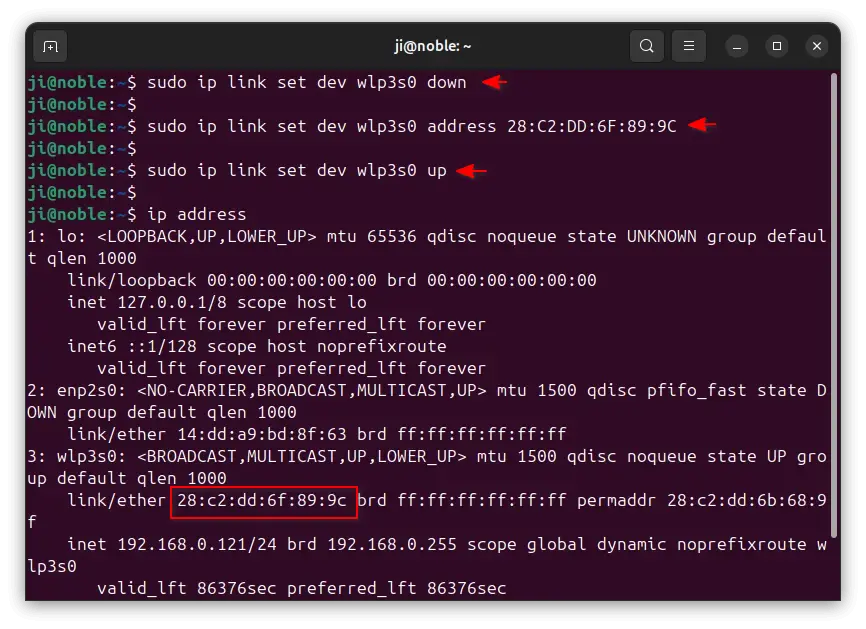
First of all, you need to bring down the network interface by running command (replace wlp3s0 to yours):
sudo ip link set dev wlp3s0 down
Then, set another MAC address via:
sudo ip link set dev wlp3s0 address xx:xx:xx:xx:xx:xx
Finally, bring up the network interface:
sudo ip link set dev wlp3s0 up
And, re-run ip address to verify.
NOTE: use hexadecimal value (number and letter range from ‘a’ to ‘f’) for a MAC address value. And, it’s BETTER to keep the first 3 bytes same to original, because they are usually the prefix of real vendor, and some networks may refuse to assign IP to client whose MAC does not match up with any of known vendors.
Method 2: Use macchanger
For choice, you can use macchanger (aka GNU MAC Changer), a command line tool that can do the job easily!
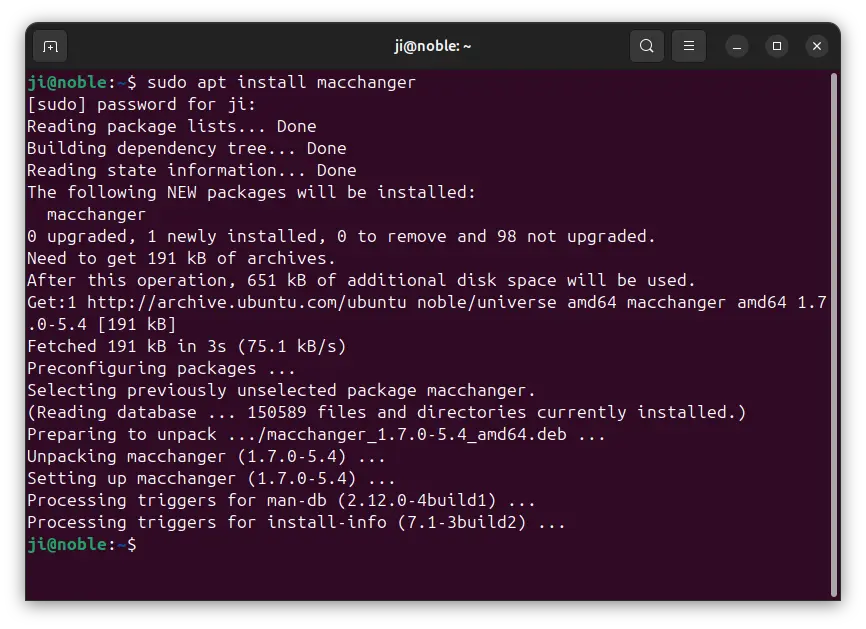
1. First, launch terminal (Ctrl+Alt+T) and run command to install the tool:
sudo apt install macchanger
While the installing process, it asks you to whether select “Change MAC Automatically”. If you answered “Yes”, then you’re done. It changes the MAC every boot, or every time you turn off and turn back on the network interface.
2. If you don’t want to automatically change MAC, then use the commands below to change it manually:
NOTE: You need to turn down the network interface before running the commands below, either use command in Method 1, or use “Network/Wi-Fi Settings” page.
To change the MAC address of wlp3s0 (replace to yours) to a random value, use command:
sudo macchanger -r wlp3s0
To revert the Mac address to original, use command:
sudo macchanger -p wlp3s0
If you want to keep the MAC prefix, use this command instead to set a random value:
sudo macchanger -e wlp3s0
NOTE: the last command will keep the first 3 bytes according to current MAC address, so you MAY first revert Mac address to original before running it.
And, to set a certain MAC Address value, use command:
sudo macchanger --mac=xx:xx:xx:xx:xx:xx wlp3s0
(Optional) If you don’t use the tool anymore, then use the command below to uninstall it:
sudo apt remove --autoremove macchanger
