


![]()
This tutorial shows how to access and import your photos and videos from iPhone / iPad to Ubuntu 24.04 or Ubuntu 22.04 computer.
Ubuntu seems now have out-of-the-box support for accessing iOS photos. User can easily browse, copy, and move photo images and videos in connected iOS device using either the built-in file manager or a photo manager app (e.g., gThumb). And, here’s how to do the trick in Ubuntu step by step.
This tutorial is tested and works in my iPhone with iOS 16.1.1, and iPad with 14.4.2, along with Ubuntu 22.04, Ubuntu 24.04 with default GNOME Desktop. Thanks to @Trozpent, there’s a few tips in the comment below that may also help!
Option 1: Access iOS photos using file manager
First of all, connect your iPhone or iPad into the Ubuntu computer. Tap “Trust this Computer” in iOS device and input your password to authenticate.
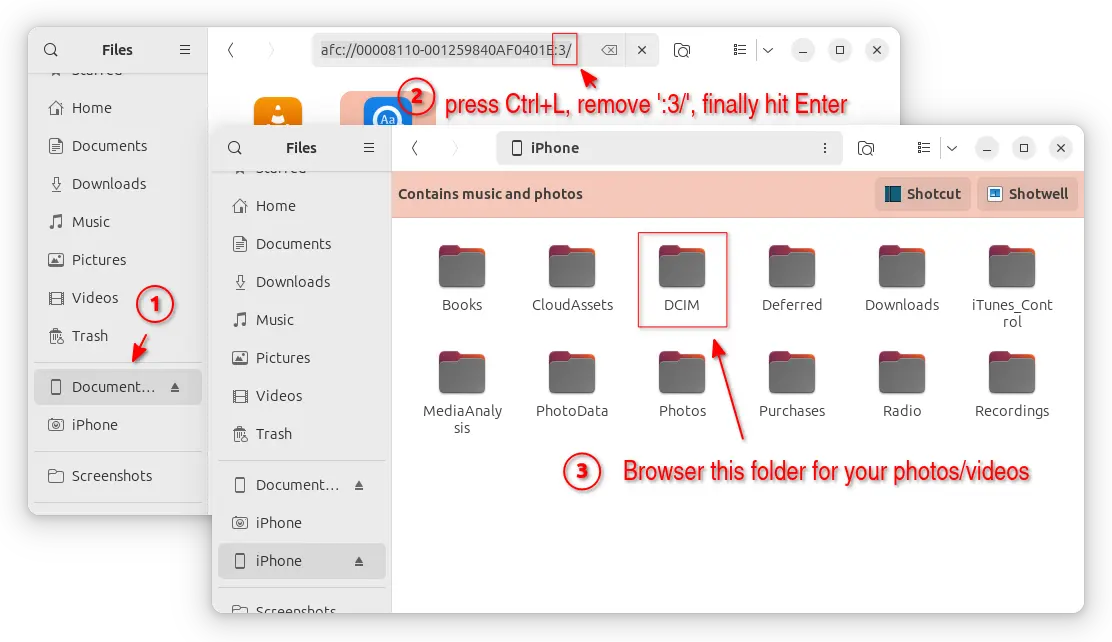
In Ubuntu computer, open “Files” (aka Nautilus file manager), you’ll then see a new “Document…” option in the left panel. In my case, there’s also a “iPhone” option, and by clicking on it allows to browse folders in the device.
Thanks to @Trozpent, if you only see the “Document…” option in file manager’s left side menu. Then, click on it and press Ctrl+L to enter the location bar. Next, just delete the last 3 characters “:3/” in the end, and hit Enter will open your iOS folders.
There, click open DCIM folder, then you can browse, copy and paste all your photos and videos in the iOS device from the sub-folders.
Option 2: Use gThumb to import photos on plug-in:
If you want to import all or selected photos from iOS to your computer, then use a photo manager app can be a better choice. And, here I would recommend gThumb.
1. Install and setup gThumb
gThumb is a free open-source image viewer and organizer for GNOME desktop. It has a built-in importer tool for transferring photos from cameras, which works great in my case for my iPhone.
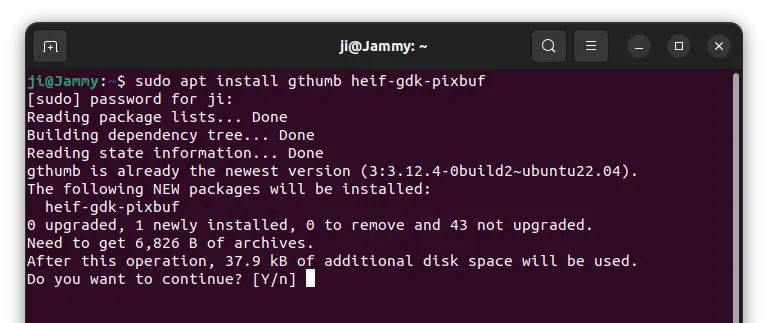
1.) First, press Ctrl+Alt+T to open up a terminal window. When it opens, run the command below to install gThumb and the gdk-pixbuf plugin for heif image support:
sudo apt install gthumb heif-gdk-pixbuf
For those hate Linux commands, the image viewer can be also installed via Ubuntu Software or App Center.
2.) Next, you need to set gThumb as the default app for handling photos from removable media.
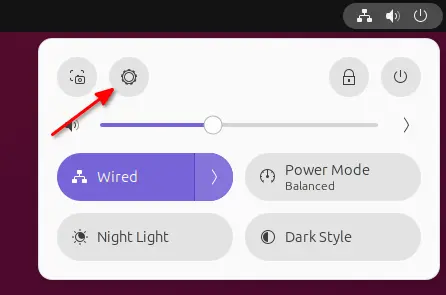
To do so, first open “Settings” from the top-right corner system tray menu.
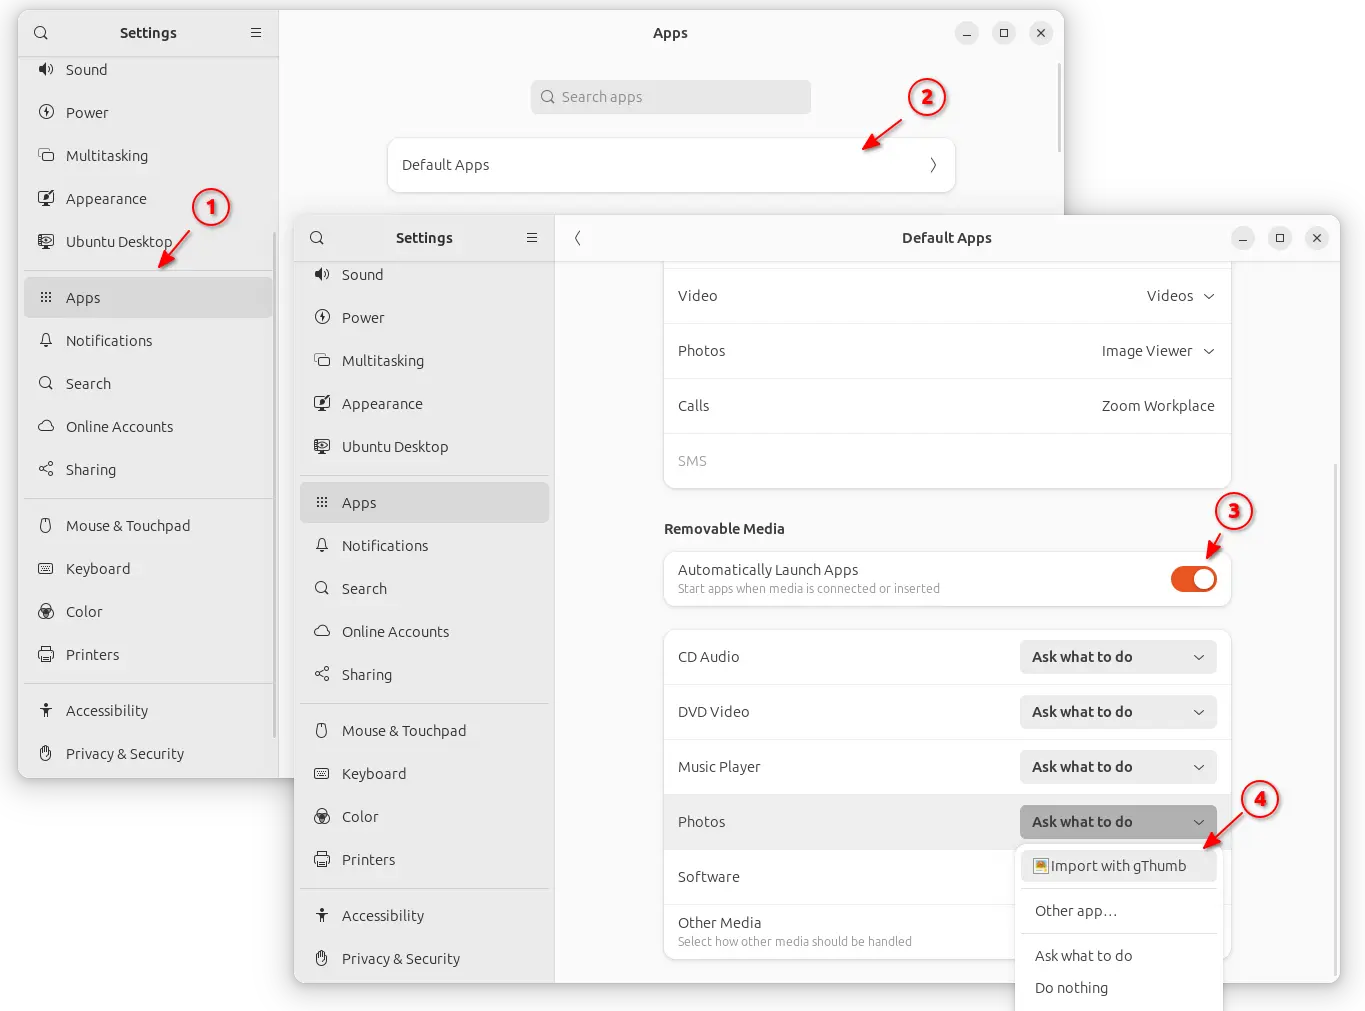
When the Settings utility opens, navigate to “Apps” from left pane. Then, go to “Default Apps“, enable “Automatically Launch apps” toggle option under Removable Media session.
Finally, select “Import with gThumb” for photos in the drop-down box. For Ubuntu 22.04, go to “Removable Media” instead in left and select gThumb in right for Photos.
2. Connect iPhone via USB and start importing photos
Now, plug your iPhone into Ubuntu PC/laptop via USB port. Then, select “Trust this computer” in your iPhone and type password to confirm.
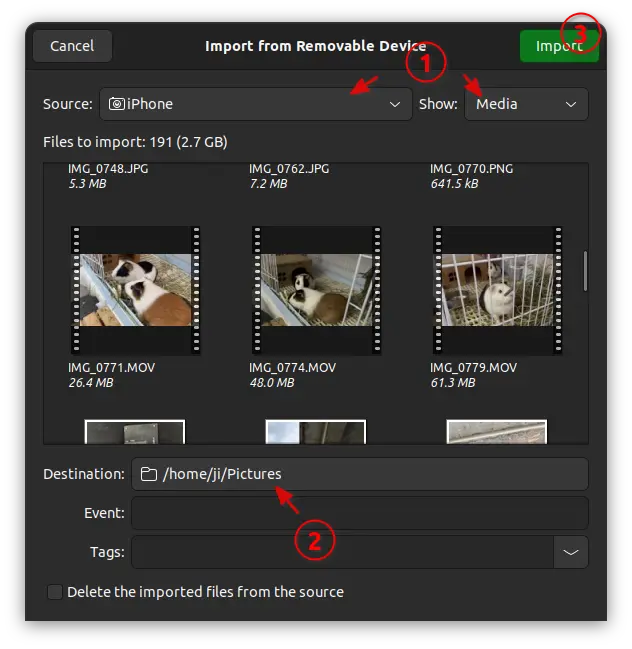
An import dialog should pop-up automatically in your Ubuntu desktop:
- There set ‘Source’ to your iOS device.
- Use the selection box after ‘Show:’ to filter what you want to import.
- It should now load all the files with preview under “Files to import” section.
- After ‘Destination’, click and choose where you want to import the files.
- Finally, click green Import button to start the process.
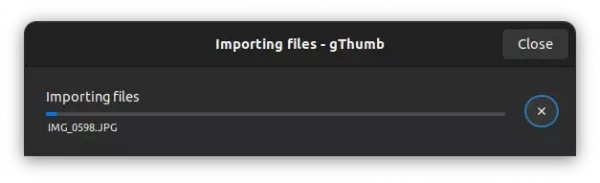
If the dialog didn’t open, try manually launching gThumb, open ‘☰’ menu, and finally navigate to ‘Import from -> Removable device’.
All photo files are saved to user’s “Pictures” folder by default, though you may change the location in the previous dialog.
That’s all. Enjoy!


not working, not able to find out photos in gThumb app
Its not working in combination with Xubuntu 22,04 and Iphone13
My Iphone can not be seen, although it is recgnized as camara
Just great mate, thanks a million!!!!
gThumb doesn’t seem to show photos anymore
As in, it does not show a “Photos” folder in Ubuntu 22.04 file explorer when plugged in — it just shows a “Documents on Nicholas Roth’s iPhone” folder that has app data but no photos.
Worked for me. But slow to respond.
Could it be the 13,000 pics on my phone?
worked once. Was able to copy over SOME of my photos, but now only the phone documents show up. HOW TO FIX THIS? I need to get my photos off my phone.
Did you fix this? I have the same problem..
For those saying that it isn’t work, there are a few possible factors involved here:
1. Perhaps you have “optimized storage” in your icloud settings on the phone which means it’s storing the vast majority of your images in the cloud. Photos app is only showing you thumbnails (from it’s own database file) and downloads the original when you view them. Change this optimize settings to download all your original size photos onto your phone so you have the physical files on the device.
2. You might need to make sure you have heif support – `sudo apt install heif-gdk-pixbuf`
3. In nautilus, go to your iPhone device documents (phone icon, not the camera icon). You will probably see a few icons representing your apps installed. press `ctrl+L` in nautilus and it gives you access to the address bar where you can now remove the “:3/” or what ever number you see there at the end of the address bar. Press enter and you’ll now see your device folders including DCIM. Here are your photos.
You might need to wait a while for your iphone to download all your images. Or you might have space issues. I leave this problem up to your creative solutions.
Still not working after doing #2
#3 is the way
@Trozpent HAPPY NEW YEAR 2024! Thanks for your tips no. 3. It works on iphone XS Max to Ubuntu 22.04.
Thank you, thank you, thank you.
I do not know why but it was not showing the non ‘:3’ in the left side list in Nautilus and had to be done manually as you described.
A good hour or two of troubleshooting before I found your comment about removing :3.
Trozpent reply helped me find a solution. My wifes iphone 11 ended with E:3/
i removed the :3/ and i was able to see the dcim folder finally. Thanks
on mint 20.3
removing the :3 also worked for me.
not working
Lets look for another way
@Trozpent, thank you soooo much!!!
Thank you so much! Removing the :3 also worked for me.
GREAT!!! THANK YOU!
Removing the :3 also worked for me :)
thank you for file manager explanation
Is there a way to make the Ctl-L the default way of displaying the text of the files bar?
If you meant the Files’ (Nautilus) location bar, then yes.
Either use command:
Or, install & launch “Dconf Editor”, navigate to org.gnome.nautilus.preferences, and turn on ‘always-use-location-entry’. After that, re-open file manager to see change.
Thank you so much Ji. You are a life saver.
After struggling to find a way for months trying to copy iphone pictures into my external hard drive, I was on the verge of going crazy. Even when connecting iphone to macbook, there was no easy way to copy pictures from iphone to macbook reliably. Even their own Photos app or screencapture apps crash during the copying part if there are thousands of files. There are third party shady softwares to sync photos between iphone and macbook. The idea that the photos which I clicked with my own $1000 hardware camera on a phone cannot be easily transferred without jumping through hoops and without paying additional monthly fees to put my data on the network is laughably demonic and insulting as a consumer. I have regretted purchasing the iphone and will move back to android in a few months. I compromised on a lot of freedom by walking into Apple’s walled garden but I wrongly assumed that an excellent camera will make up for it. And frankly, the camera is one of the best and arguably the best but what kills the dream is the inability to easily backup my pictures on a local drive. One more infuriating issue is that all pictures including the ones clicked by the camera and random whatsapp or downloaded pictures all appear in the same place without any separation or annotation. Manually moved 20,000 pictures to a separate Camera directory because apple fails to solve pain points which don’t swell their wallet. It’s infuriating how badly Apple treats their customers by charging a premium but not caring about the UX and useful functionality.
I never expected Ubuntu Linux to come to the rescue due to Apple’s allergy to open protocols and be able to read the entire DCIM directory in nautilus. I have finally been able to copy my pictures to hard drive by following this article and will use a bit of bash to separate out the pictures clicked by iphone camera from all the combined set by filtering based on the apple camera picture’s extension of HEIC.
Thank to you all…
Trozpent, your tips working
Thanks, gthumb fixed my problem when Thunar file manager couldn’t access the pictures even after DCIM showed up from iphone.