


![]()
This simple tutorial shows how to enable and setup Secure Shell (SSH) service in Ubuntu 24.04, so you can login remotely and transfer files securely in command console.
Debian and Ubuntu use OpenSSH (OpenBSD Secure Shell) to provide secure shell channel for making changes, transferring data, and performing other operations on server from a client remotely.
The SSH service is NOT enabled by default. And, here I’m going to how to enable and configure it in Ubuntu 24.04
Step 1: Install OpenSSH Server
First connect to your Ubuntu server, or press Ctrl+Alt+T to open up a terminal window on Ubuntu Desktop.
When terminal opens, run command to refresh system package cache:
sudo apt update
Then, install the SSH server via command:
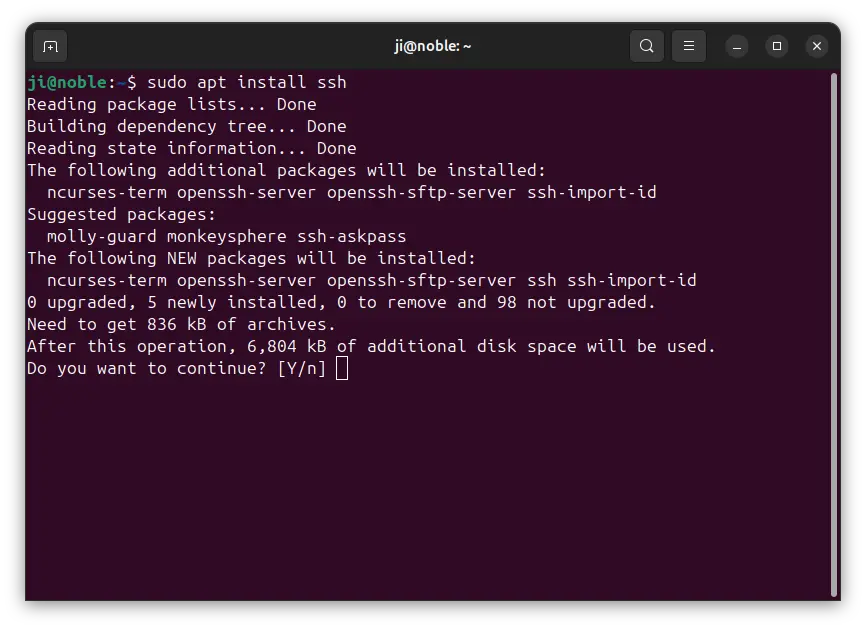
sudo apt install ssh
For choice, you may use sudo apt install openssh-server command that will do the same thing.
Step 2: Configure Listening Port, Authentication, etc
Since Ubuntu 22.10, OpenSSH is configured to use systemd socket activation by default. Meaning that the ssh service will be NOT started until an incoming connection is received.
This can save at least 3MiB of memory, which is useful when running multiple Ubuntu instances in VMs or LXD containers.
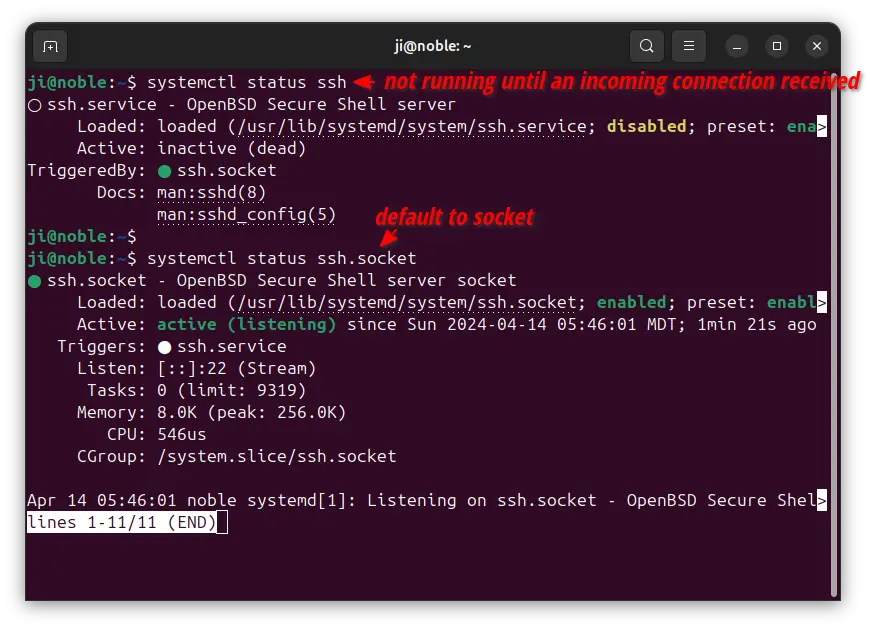
Due to this change, Port and ListenAddress etc changes in /etc/ssh/sshd_config did NOT work. User had to either edit config files under /etc/systemd/system/ssh.socket.d instead, or revert to the previous non-socket-activated behavior.
In Ubuntu 24.04, user again can edit the /etc/ssh/sshd_config file to configure SSH. The only change is re-starting the socket instead of ssh.service for applying changes.
And, to edit the file, run command:
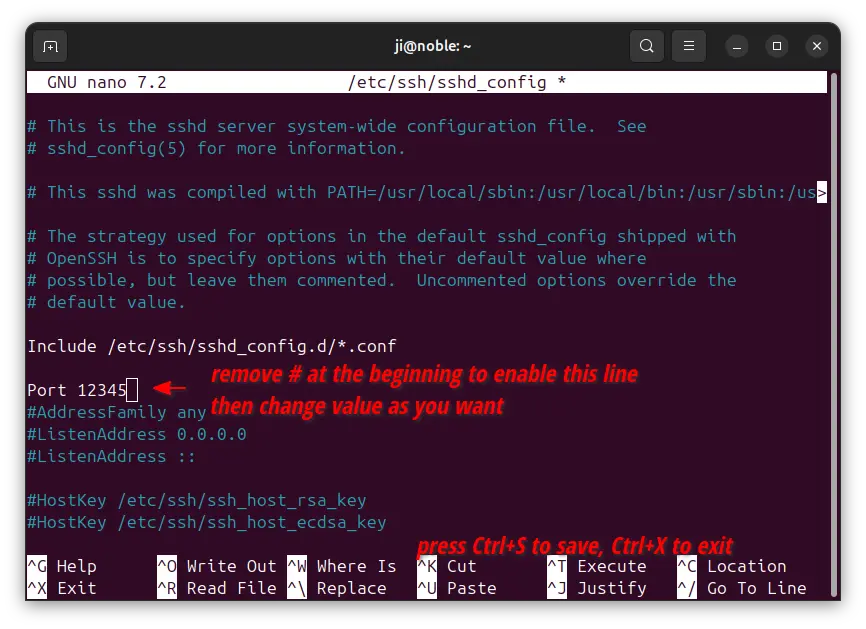
sudo nano /etc/ssh/sshd_config
When the file opens, remove “#” at the beginning for any line you want to enable, then change the value according to your need. For example:
- Set
Port 12345to listen on port 12345 instead of default 22. - Set listening IP address
ListenAddress 172.67.181.180if more than one available. By default, all the server IP addresses are allowed for SSH connection. LoginGraceTime 30– set 30s timeout waiting for a password.PermitRootLogin no– disable root login.MaxAuthTries 3– max authentication failures.PasswordAuthentication no– disable password login. In the case, you need to enable a key-based authentication.
For more, see the official SSH documentation.
Step 3: Apply SSH Server Config Changes
After making changes, press Ctrl+S to save and Ctrl+X to exit for nano command line text editor.
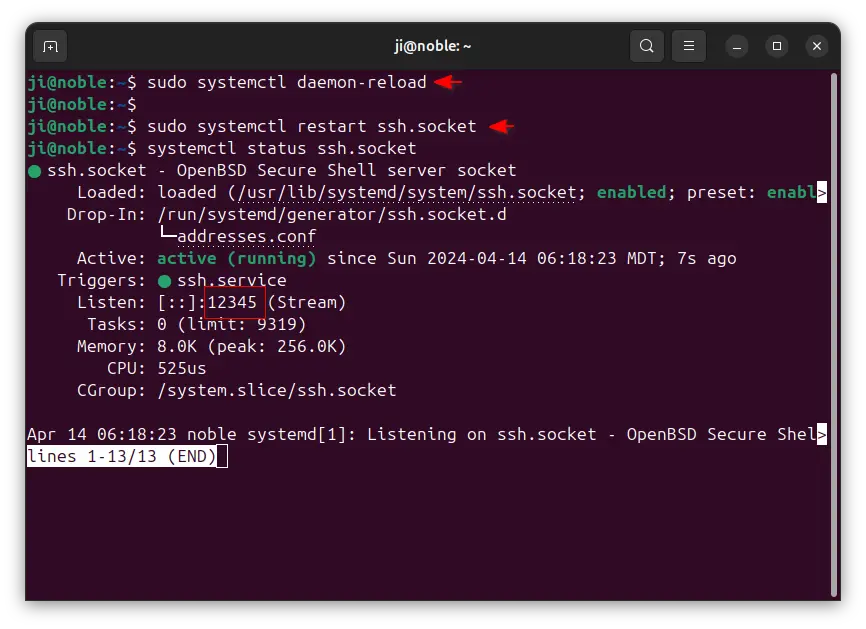
Then, as mentioned, restart the socket instead to apply changes:
sudo systemctl daemon-reload
sudo systemctl restart ssh.socket
In my case, I change the port number to 12345, which can be verified by running systemctl status ssh.socket command.
Step 4: Open the listening port in firewall
If you changed the SSH port and enabled firewall (firewall is NOT enabled by default in Ubuntu Desktop), then run command to allow the new port:
sudo ufw allow 12345
Change number 12345 to yours. Then, verify by running command:
sudo ufw status verbose
Step 5: Use SSH to Login Remotely or Transfer Data
Finally, you can run the ssh command to connect to a remove server. For example:
ssh [email protected] -p 22345
In the command:
jiis the username in remote server here I’m trying to log in with. Replace to yours.192.168.0.107is the remote server’s IP address. Replace it to yours.-p 22345specifies the port. Change the number, or skip it if the default port 22 in use.

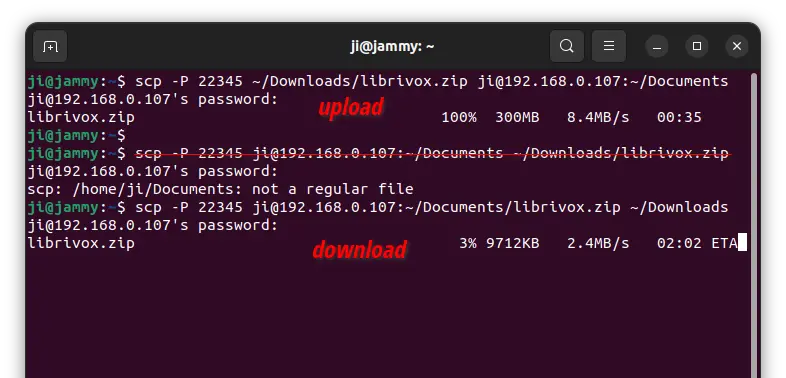
To upload file from local to remote SSH server, use command for example:
scp -P 22345 ~/Downloads/librivox.zip [email protected]:~/Documents
In the case, it will upload the librivox.zip file from my local Downloads folder to remote server’s Documents folder for ji.
To download file from remote, run command for example:
scp -P 22345 [email protected]:~/Documents/librivox.zip ~/Downloads
It will download the librivox.zip file from remote ji’s Documents folder, to my local Downloads folder.
For more about using SSH command, see the official documentation.


Thanks for this!
I was trying to configure ssh the old way and could not figure out why changes didn’t stick. You have restart the socket.