


![]()
This is a step by step tutorial shows how to encrypt Ubuntu, while preserving its data, after you installed it on your computer.
While installing Ubuntu 24.04, if you didn’t choose to use the entire disk, then there’s no graphical option to enable encryption. You can however manually encrypt the full Ubuntu system afterward.
So, on every boot of the Ubuntu system, it asks to input password to unlock boot entry (if /boot partition is also encrypted), then asks again to unlock disk partition before user being able to login.
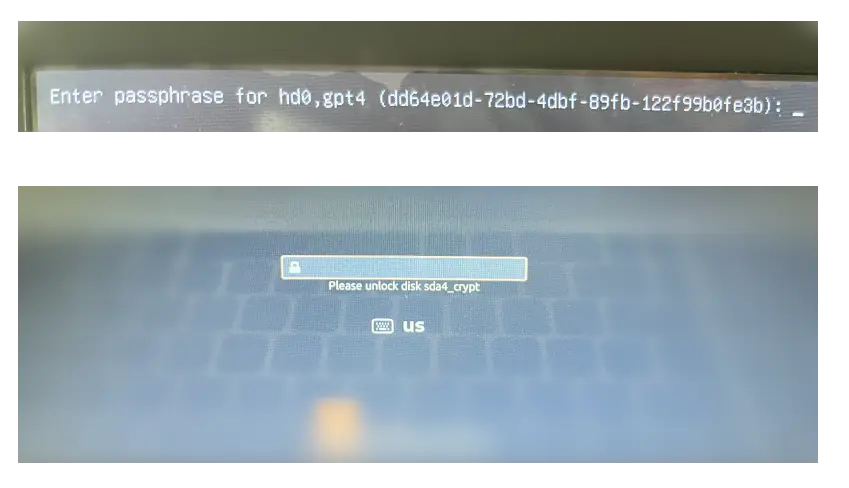
it asks password twice to unlock boot entry & then root partition
This tutorial is tested in Ubuntu 24.04 LTS with default Grub boot-loader. The system setup include:
- Secure boot: disabled. Not sure if it required.
/boot/efion separated/dev/sda3partition.- all other system files (including /boot, /home, swap area) on single Ext4 /dev/sda4 partition.
It should also work if you have separated /boot, /home, and swap. But for non-Ext4 file system, the shrink process may differ.
NOTE: The encryption process in this tutorial MAY BREAK YOUR SYSTEM!!! Don’t do it on production machine, unless you know how to restore.
Step 1: Preparation
Before getting started, it’s always recommend to backup, backup, and backup! Back your important data, because any mis-configuration and hardware interrupt can break your system!
1. First, boot and log into Ubuntu 24.04. Then, press Ctrl+Alt+T to open up a terminal window. When it opens, run command:
df -h
The command will help to find out the root partition mount on /, where the bootloader installed to, and separated partitions for /boot and /home if any.
In my case (see the screenshot below), I have only /dev/sda4 for root, and /dev/sda3 for /boot/efi boot-loader. For NVMe SSD, the device names will be like /dev/nvmeXnYpX (e.g., /dev/nvme0n1p3).
You need to write them done or remember them (including separated /home /boot if exist) for later use.
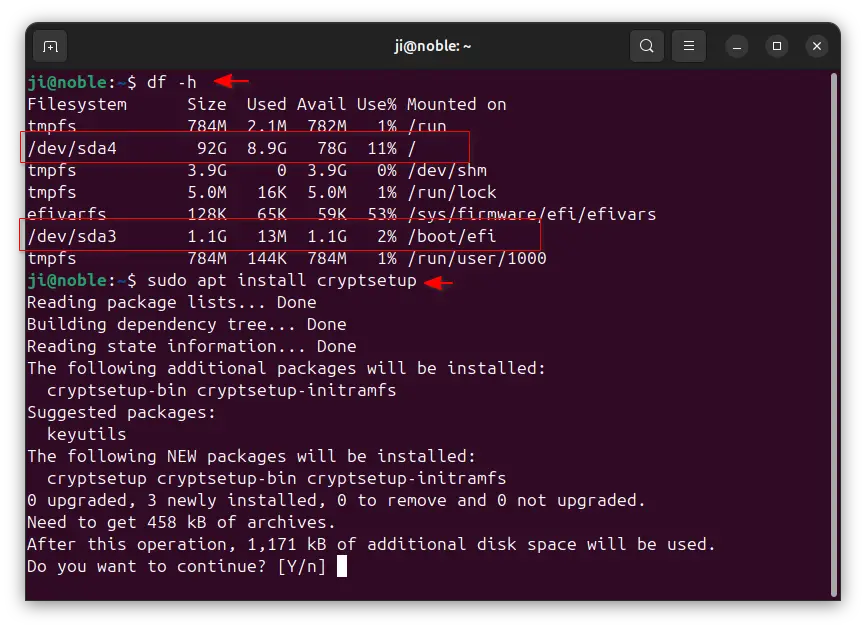
2. Then, install the required cryptsetup package by running command:
sudo apt install cryptsetup
Also, check if SELinux is enabled by running the command below in terminal:
sudo apt install policycoreutils && sestatus
Step 2: Boot another Linux OS (or LiveUSB) in the computer
To encrypt Ubuntu, you need to un-mount the file-system first. Meaning, you need to boot the computer with another Linux OS for doing the encryption process.
If you have a dual-boot Linux system installed on the computer, just reboot into it. If NOT, create a boot-able USB installer for e.g., Ubuntu, Mint, Debian, then boot the live system from USB.
Step 3: Encrypt your Ubuntu System
Once you boot into the live system, close the installer wizard to get into live desktop.
Then, identify the Ubuntu 24.04 root partition, /boot/efi (and separated /home /boot if exist), either by launching GNOME Disks (available in Linux, Ubuntu, and other Linux with GNOME) or by mounting and checking in the file manager.
In my case, they are “/dev/sda4” (root) and “/dev/sda3” (/boot/efi). Replace them to yours in all the commands below!
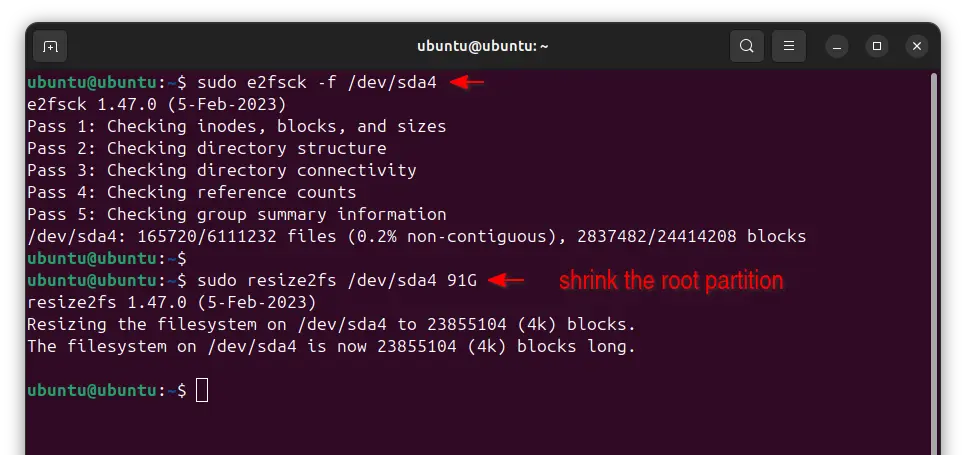
1. Shrink to make some room for LUKS header
If mounted manually, unmount all the disk partitions. Then, open terminal (Ctrl+Alt+T) and run command:
sudo e2fsck -f /dev/sda4
This command forces to check the Ubuntu file system, which is required before being able to shrink it. Replace /dev/sda4 to yours Ubuntu root.
Next, shrink the Ubuntu file-system to be a bit smaller, so there’s required space for LUKS header:
sudo resize2fs /dev/sda4 91G
Replace /dev/sda4 and 91G (a bit smaller than 92G in my case) according to what you got in “Step 1: Preparation”.
2. Encrypt the Ubuntu partition
Once you have enough free space (32M at least) for the LUKS header, run the command below to encrypt the Ubuntu root file system:
sudo cryptsetup reencrypt --encrypt --type luks2 --hash sha256 --pbkdf pbkdf2 --reduce-device-size 32M /dev/sda4
Also, replace /dev/sda4 to yours Ubuntu root partition, and here are the description for command options:
--type luks2– optional for Ubuntu 24.04 since it’s default. For old Ubuntu and other Linux with GRUB older than version 2.06luks2is NOT support. GRUB 2.06 has initial support but with limitations. So for old Grub, use--type luks1instead.--hash sha256– tell which hash function to use, also optional sincesha256is default value.--pbkdf pbkdf2– required, because Grub boot-loader so far does NOT support the defaultArgon2idmode, but onlypbkdf2.
After running the command, type YES in terminal output to confirm the operation. Then, type a password and confirm again (no visual feedback, just type in mind), the password will be used to un-lock your Ubuntu system while booting.
NOTE: This command can take quite a few minutes! For laptop, plug-in the power supply and disable suspend in case of interruption!
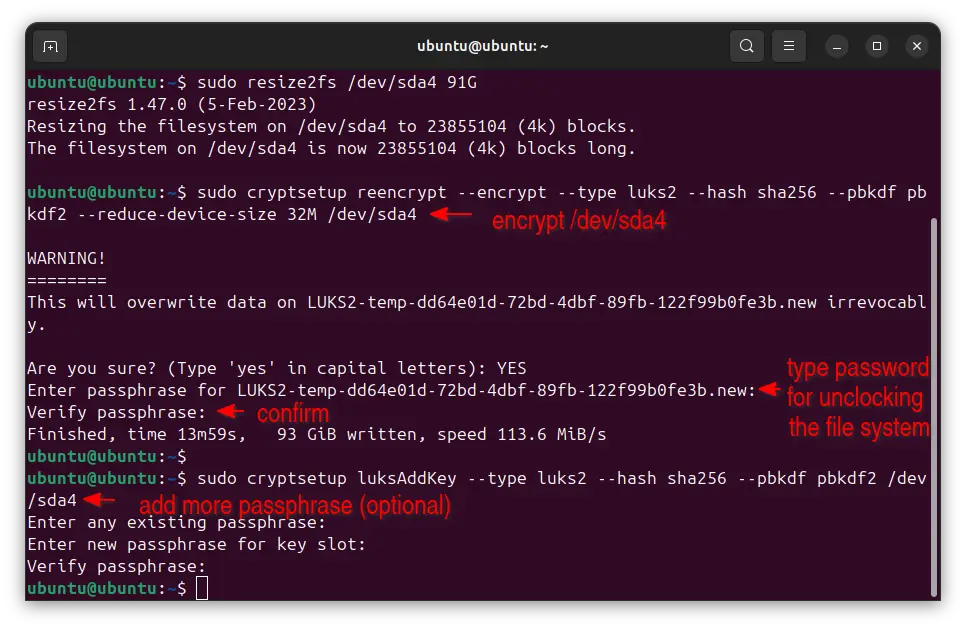
For choice, you may add another password for backup or other use via command:
sudo cryptsetup luksAddKey --type luks2 --hash sha256 --pbkdf pbkdf2 /dev/sda4
(NOT tested) If you have separated /home file partition and want to encrypt it, re-do the last commands to shrink to make room, and encrypt via cryptsetup reencrypt command.
Step 3. Configure Grub Bootloader & Tell Ubuntu to unlock at boot
After encryption, you need to re-generate the Grub boot menu entry, and tell Ubuntu to unlock the root at every boot.
This step is also done in either the dual-boot Linux OS or live system booted from USB.
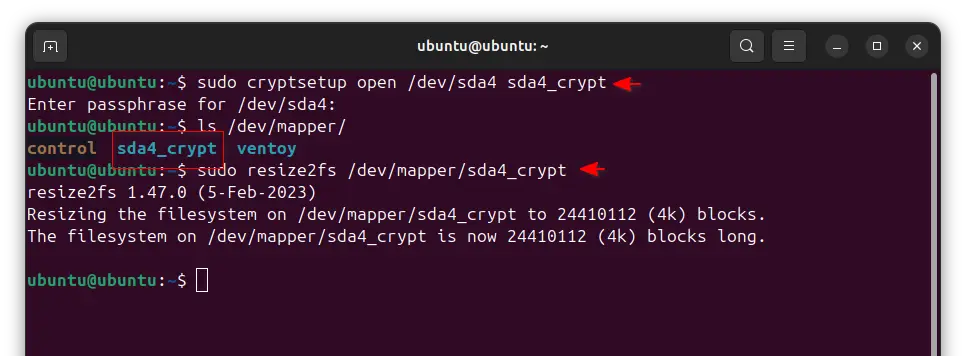
1. Unlock Root file system
First, run the command below to unlock (/dev/sda4 now is encrypted container, rather than root partition):
sudo cryptsetup open /dev/sda4 sda4_crypt
This command will ask you the password (you set in last step) to unlock, then map the root filesystem to /dev/mapper/sda4_crypt. Change sda4_crypt with whatever name as you want, though you need to also replace it in all the commands below.
Then, resize it to be maximized (you shrank it in last step):
sudo resize2fs /dev/mapper/sda4_crypt
In the command, replace sda4_crypt if you used another name in the last command.
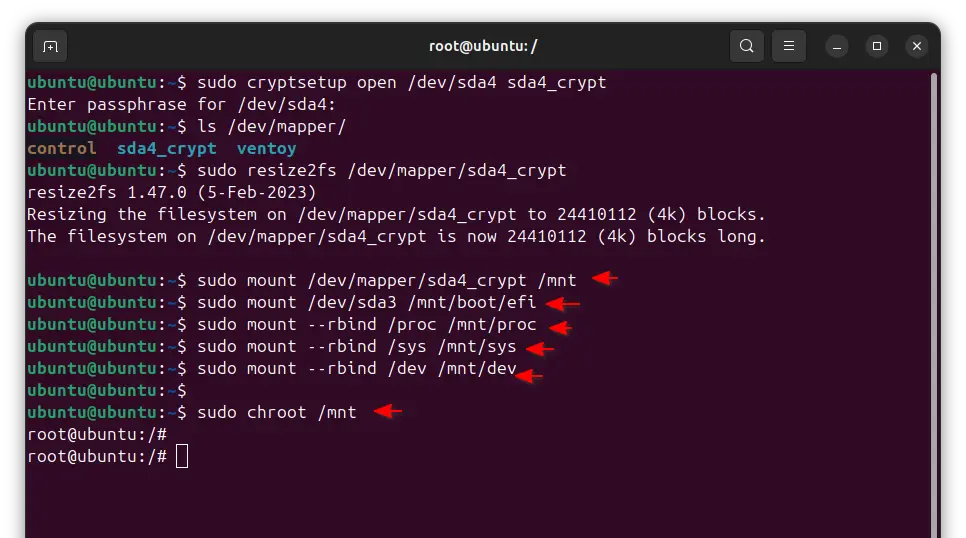
2. Mount & Chroot to the filesystem
Next, mount the root file-system, which is mapped to /dev/mapper/sda4_crypt in my case, by running command:
sudo mount /dev/mapper/sda4_crypt /mnt
If there’s a separated /boot partition (for example, /dev/sdaX), then mount it via:
sudo mount /dev/sdaX /mnt/boot
And, mount the /boot/efi (/dev/sda3 in my case) to the corresponding directory:
sudo mount /dev/sda3 /mnt/boot/efi
Also, bind-mount pseudo filesystems:
sudo mount --rbind /proc /mnt/proc
sudo mount --rbind /sys /mnt/sys
sudo mount --rbind /dev /mnt/dev
Finally, chroot into the root file-system, so you can operate just like remotely logged in.
sudo chroot /mnt /bin/bash
After this command, you’ll find the terminal prompt changed to be ‘root@ubuntu:/#’.
3. Configure Grub and Crypttab
The root UUID does NOT change after encrypted the root (and/or /home) system partition, but device name changed. The root is NO longer /dev/sda4 in my case, it’s now /dev/mapper/sda4_crypt.
If your have ever edited ‘/etc/fstab’ to use device name (e.g., /dev/sdaX, /dev/nvme0nXpY) instead of UUID for mounting system partitions on boot, then you need to change them accordingly. If NOT, just skip and leave that file unchanged.
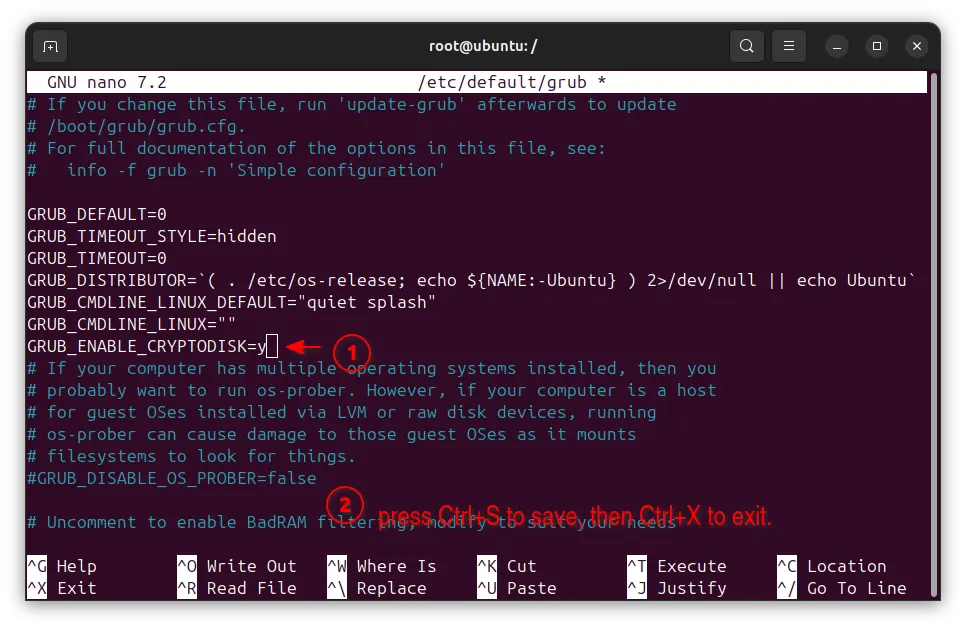
In this chroot environment, run the command below to edit the grub config file:
nano /etc/default/grub
Then, you need to add new line GRUB_ENABLE_CRYPTODISK=y to tell Grub to un-lock /boot at every boot (not required if /boot partition is mounted in separated un-encrypted partition), then press Ctrl+S to save and Ctrl+X to exit.
If your Ubuntu has SELinux enabled (it’s usually disabled by default), then add enforcing=0 kernel parameter as value of GRUB_CMDLINE_DEFAULT to tell it to work in permissive mode, or your Ubuntu may refuse to boot. You can then remove the kernel parameter after first boot of the encrypted Ubuntu system.
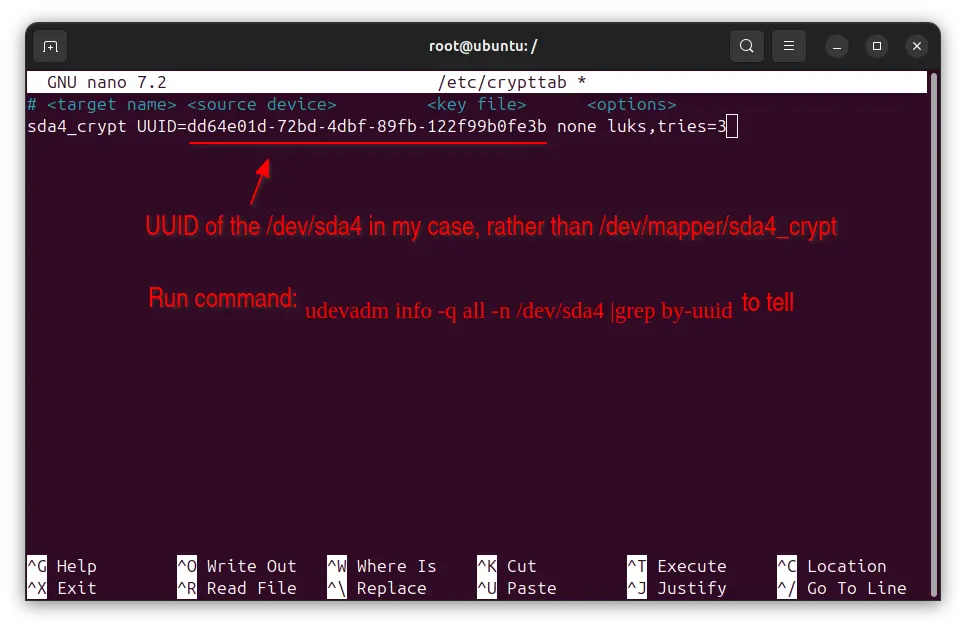
Then, edit the /etc/crypttab via command below:
nano /etc/crypttab
Then, add the line below to tell to unlock the encrypted container (specified by UUD) and map to /dev/mapper/sda4_crypt on every boot.
sda4_crypt UUID=xxxxx-xxx-xxx-xxx-xxxx none luks,tries=3
Here is the UUID of ‘/dev/sda4’. Run udevadm info -q all -n /dev/sda4 |grep by-uuid command in another terminal window (Ctrl+Alt+T) to tell, while blkid will output the incorrect one.
If there’s also separated /home partition encrypted, add new line in the file:
sdaX_crypt UUID=xxxxx-xxx-xxx-xxx-xxxx none luks,tries=3
In this line, replace the UUID according to udevadm info -q all -n /dev/sdaX |grep by-uuid command output in another terminal. Though, you need to replace /dev/sdaX according to where you /home located.
4. Apply Changes
Also, in the chroot environment, re-install grub boot-loader via command:
grub-install --target=x86_64-efi --efi-directory=/boot/efi --boot-directory=/boot/efi/EFI/ubuntu --recheck
Here, the command options tell:
--target=x86_64-efi– install GRUB for amd64 (Intel/AMD) platform. The value can also bearm-efi,arm64-efi, etc, depends on your CPU architecture type.--efi-directory=/boot/efi– specify the EFI partition, it’s mounted to /boot/efi in last step.--boot-directory=/boot/efi/EFI/ubuntu– Ubuntu by default set boot directory to/boot. However, it’s encrypted in my case. So, use this one instead.--rechecktells to delete the existing device map.
Finally, update grub configuration via command:
grub-mkconfig -o /boot/efi/EFI/ubuntu/grub/grub.cfg
NOTE: The update-grub command no long works here, since the command auto-generates /boot/grub/grub.cfg. While --boot-directory= option in last command told to install the config file to /boot/efi/EFI/ubuntu which is un-encrypted.
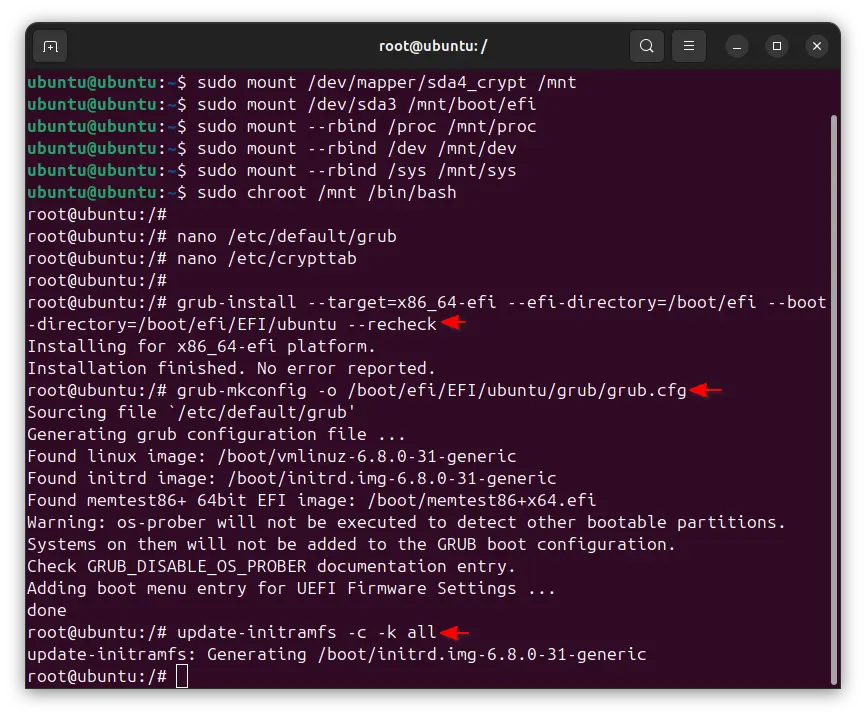
Also, you need to run the command below to regenerate initramfs images.
update-initramfs -c -k all
Unmount and Reboot
When everything’s done well, exit the chroot environment by running command:
exit
Then, umount via following commands. For --rbind mount, you need to re-run mount command with --make-slave option to allow to recursively change the type of all the mounts. Or, it will refuse to umount and say busy.
sudo umount /mnt/boot/efi
sudo mount --make-slave /mnt/proc
sudo umount -R /mnt/proc
sudo mount --make-slave /mnt/sys
sudo umount -R /mnt/sys
sudo mount --make-slave /mnt/dev
sudo umount -R /mnt/dev
And, close (lock) the encrypted partition:
sudo cryptsetup close sda4_crypt
Finally, shutdown the computer by running command:
shutdown -P now
To be simple, you may run the shutdown command directly after exit chroot, as it will automatically umount and close encrypted partition.
Now, restart your computer to see the magic (or break your system😅. It takes me quite a few hours to troubleshoot).


Ji, thank you for the awesome guide. Very helpful and these days almost a requirement for mobile devices.
I have a question.
How SELinux is related to LUKS? Mine shows “disabled” and I’m currently running Ubuntu with LUKS, a separate unencrypted /boot in EFI and Secure Boot enabled (dual-boot with Windows encrypted with BitLocker).
I don’t recall disabling the SELinux when initially set my config. Not sure if there are any implications because SELinux is disabled or if it is normal as replaced by AppArmor.
I’m not familiar with SELinux. But if it’s enabled, it may prevent system from booting due to the change you made in this tutorial. User has to enable
enforcing=0kernel parameters to make it work in permissive mode, then remove it after successfully boot the encrypted Ubuntu system for the first time.Thanks for the clarification.
I wrongly assumed the SElinux supposedly needs to be enabled as found in the Preparation sections and it reads “check if SELinux is enabled”.
Thanks for this great tutorial. So I may have done something wrong in the setup, because I have to enter the LUKS passphrase at two different stages on boot; once at the beginning of the boot sequence, where grub shows a screen “enter passphrase for Luks” [encrypted partition UUID], then another time after the next splash screen to load the Ubuntu kernel, it asks for it again before finally loading the login manager, with the language “Please unlock disk”. I disabled the splash quiet in /etc/default/grub so it shows the boot log.
Is there a way to enter the Luks password only one time, either on the initial boot, or after the grub menu is loaded and booting into Linux that is on the encrypted partition? I only encrypted the Linux part.
It’s correct! It asks for the password twice if your Ubuntu does not have a separate /boot partition.
The Grub boot-loader asks for password, at the first time, to un-lock the /boot partition so it can load the kernel. Then, Ubuntu asks the password again for being able to mount the file system.
There are 2 workarounds if you don’t want to type the password twice:
/boot. This is default behavior the Ubuntu installer does, when choose full disk encryption during installing the system. In the case, you don’t need to add ‘GRUB_ENABLE_CRYPTODISK=y’ in /etc/default/grub.Hi Ji,
The only snag I noticed was that that when editing the /etc/crypttab file you add the following line:
sda4_crypt UUID=xxxxx-xxx-xxx-xxx-xxxx none luks,retries=3
I noticed that in the screenshot the command is shown as ending with ,tries=3
I then subsequently got an error message about the option “retries” not being recognized. So I edited the /etc/crypttab file to end with tries=3 instead of retries=3
After that the procedure does appear to have worked, because my system boots up ok.
Sorry for the mistake. It’s “tries=3”. You may see the documentation for more about crypttab.
https://www.freedesktop.org/software/systemd/man/latest/crypttab.html
After reboot, after apt upgrade update.
I cant boot anymore, seems like its not finding it bc of the crypttab file anymore, i also booted in live usb and repeated the steps, the command to show the uuid isn’t showing anything anymore
V useful – I’ll try this on my newly installed xubuntu laptop
It’s frustrating that the option to encrypt at install is not there anymore – that is an odd decision IMHO
Thank you so much for such a complete and detailed tutorial. I’ve been trying to encrypt my disk for several days without success. I couldn’t get it to boot; it remained stuck in the initramfs phase. It couldn’t find the disk. After searching extensively, I finally managed to understand the reason. Before encrypting the disk, it’s very important to install cryptsetup on the target system. From then on, following the tutorial, everything works perfectly, even on Ubuntu 24.10. I hope this comment can help people with this same problem.
Hi!
Thanks for the great blog post! Quite clear and useful.
a typo:
sudo mount –rbint /dev /mnt/dev
should be:
sudo mount –rbind /dev /mnt/dev
Also the last command does not work for me:
sudo cryptsetup close sda4_crypt
tells me the device is still busy. Seems like it’s not really important, as I can shutdown.
Still fighting with the UUID on my side, but I’m confident I’ll get it to work :-)
Ok , some more:
– the last command, ‘sudo cryptsetup close sda4_crypt’ simply return an error telling me that the device is still in use. Not yet found a way to get rid of it, so I bypassed it and shutdown.
– still, as @Anon, I’m stuck when booting as it can’t find the UUID, so I guess there is some missing step somewhere…
Finally done and working!
(@Anon I guess we have had the same issue).
The key was to have a separate partition for /boot. So I shrinked my crypted partition using gparted (1), then I created a 2GB /boot partition (still using gparted), mounted the encrypted disk to /main in order to be able of doing:
cp -a /main/boot/* /mnt/boot/
Then follow the grub install/mkconfig, and reboot. Now, I was prompted with the password and get to my previous working machine :-)
In any case, @Ji m, great blog post, thanks a ton for it!
(1) https://github.com/mwouts/resize_encrypted_partitions?tab=readme-ov-file#move-and-resize-the-recovery-and-luks-partitions-with-ubuntu-live
Why you need two passwords normally: It asks for two passwords normally because GRUB needs to unlock the drive to read the kernel and initramfs, but the system isn’t fully booted yet and there is no way for GRUB to tell the kernel the password when it passes control. So then the kernel boots into initramfs and needs the password all over again.
But there is a way to have it only ask once. To do this you only need to set up a key-file for initramfs for the second stage boot. Do this:
1) Create a key file with at least 512 truly random bytes: dd if=/dev/random of=/keyfile.bin bs=512 count=1
1a) chown root:root /keyfile.bin && chmod =000 /keyfile.bin
2) Add that keyfile as a second key (slot #1) on your encrypted root: cryptsetup luksAddKey –pbkdf=pbkdf2 –hash=sha256 –pbkdf-force-iterations=1000 /dev/sda1 /keyfile.bin
We force the number of pbkdf iterations to the lowest allowable because at this point pbkdf is not required – the keyfile already has far more entropy than your password, and iterations here only slows down boot
3) Change your /etc/crypttab to reflect there is now a key file:
sdaX_crypt UUID=aaaaaaaa-1111-2222-3333-0123456789ab /keyfile.bin luks,keyscript=/bin/cat,key-slot=1,discard
NOTE: I use “discard” to enable trim, this is because I use this technique on VMs lot and it keeps my virtual disk smaller. You may or may not want to use discard, there are (very) minor security considerations to this, but it’s a good idea if you have an SSD as it keeps it healthier.
4) Tell the system to copy the keyfile to the initramfs each time update-initramfs is run by setting up a hook. Create the file /etc/initramfs-tools/hooks/crypto_keyfile and edit it to read:
cp /keyfile.bin “${DESTDIR}”
4a) chmod +x /etc/initramfs-tools/hooks/crypto_keyfile
5) update-initramfs -u
What we are doing here: In this change we are creating a second “password” that is a random keyfile, then giving that keyfile to the initramfs system to use automatically. This keyfile will live on / on your filesystem, but it has its its permissions set so that no one can read it. This means your hard drive encryption key is as secure as your root account. If root is compromised, it’s game over anyway, so this is not really a security risk. We are then telling the crypttab to use that keyfile to log in rather than ask for a password. We give update-initramfs instructions to copy that keyfile into the initramfs for use at the second stage of booting.
NOTE: In step 3 we’re telling the crypttab to use that key file on the key in slot #1. If you have added extra passwords to your LUKS, then the one we add in step 2 might not be in key slot #1. Use the keyslot number in step 3 of the slot you add in step 2. Use cryptsetup luksDump to see your key slots. The reason we give a specific keyslot in the crypttab is that without it, it will check the keyfile against every slot in order. This is just wasted boot time.
Thanks for this immensely helpful tutorial!
I initially had secure boot enabled, and that prevented grub from being able to decrypt
/boot(the error message waserror: prohibited by secure boot policy</code). Once I disabled secure boot in the BIOS that error was gone.Decrypting
/bootthen worked, but in the initramfs stage the decryption of the root partition failed, and I got dropped into an initramfs shell after the messageGave up waiting for root file system device. I solved this by installing `cryptsetup-initramfs` and rebuilding the initramfs as explained here: https://askubuntu.com/questions/1546439/updating-initramfs-breaks-the-kernel-on-fd-luks-encrypted-ubuntu-24-04.