![]()
This is a simple tutorial shows how to disable password authentication, and use SSH key instead for remote login to remote Ubuntu Server or Desktop.
SSH (Secure Shell) is a popular and secure way to login remote servers and/or transfer data between local and remote machines. When you try to SSH to a remote server, it usually asks for user password for authentication.
However, passwords are not the most secure. They are generally either not complex or long enough to protect from attacks, or hard to remember and type again and again on every connection.
To be more secure and also save your time, the secure key authentication is a good choice. And, here’s how to set it up step by step.
Step 1: Generate Secure Key Pair in Local Computer
A SSH key pair usually includes private and public keys. The local client holds the private key, while the associated public key is uploaded to remote server.
When a SSH connection starts, the server test if the client has the private key. If yes, then allows connecting. If not, fall back to other authentication method if any (e.g, asking for password).
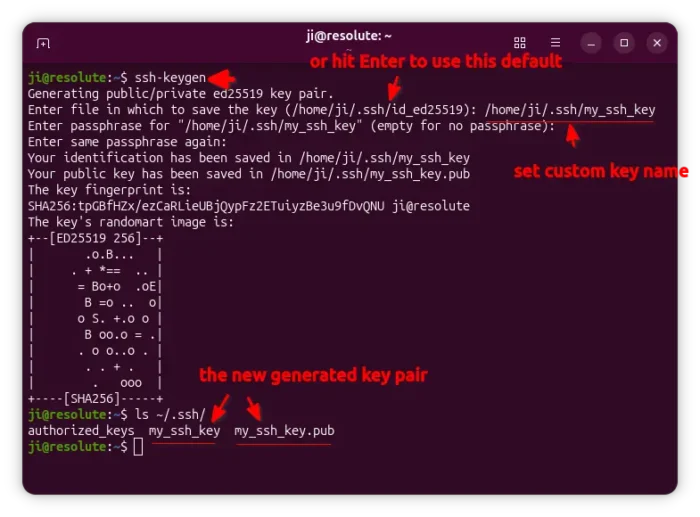
To generate a key pair, open terminal (Ctrl+Alt+T) and run the command below in your local computer:
ssh-keygen
Run sudo apt install openssh-client if you don’t have the SSH client package installed.
The command will by default create a ed25519 key pair. Then, it will ask to either hit Enter to use default key filenames, or manually type /home/USER_NAME/.ssh/key_name_here.
Next you need to type a passphrase (just type in mind, no asterisk feedback in 24.04 and earlier) and confirm to encrypt the key, so even if you lost the key, others can’t use without the passphrase.
Step 2: Upload the Public Key to Remote Server
After step 1, you should have the private and public key files in local .ssh folder.
Run the command to navigate to that folder, and list the folder content. Then, you’ll see the 2 key files.
cd ~/.ssh && ls
NOTE: Before running the command below, make sure the remote server has openssh-server installed, and enabled the ssh.service (or ssh.socket for 24.04+). As well, it needs to allow password authentication for uploading the key.
To upload the public key to SSH server, run similar command below in local computer:
ssh-copy-id -i ~/.ssh/my_ssh_key.pub -p 1098 [email protected]
In the command, you need to replace following options accordingly:
-i ~/.ssh/my_ssh_key.pub– identifies the key file. Replace the key namemy_ssh_keywith yours according to Step 1.-p 1098– tells the listening port of remote SSH server. Default is 22.[email protected]– ‘root’ is the username on remote server I’m trying to login, “111.222.333.444” is remote IP. You need to replace them with yours.
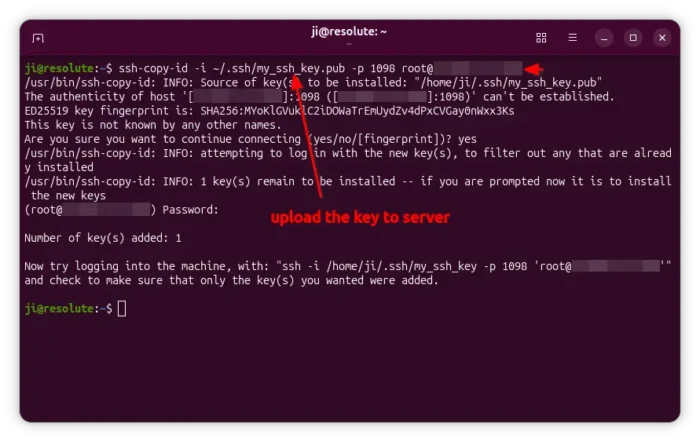
After successfully run the ssh-copy-id command, the remote SSH server should now has the “public key” written as a new line in the default ~/.ssh/authorized_keys file.

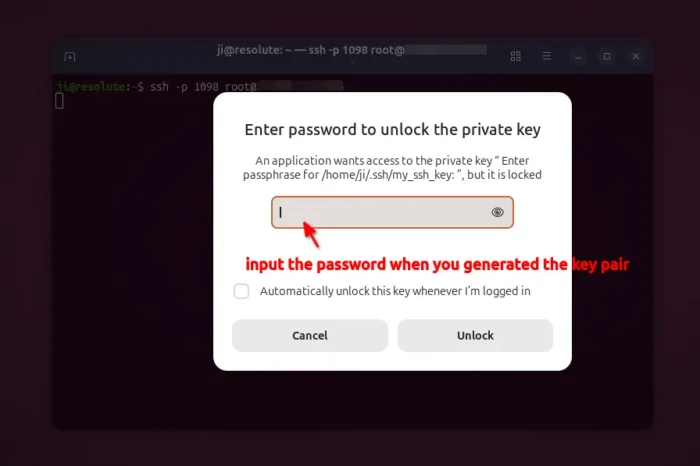
You can then, try ssh -p xxx user@ip-address command in local computer. It should pops-up a dialog asking for password (you set in Step 1) to un-lock the private key.
If you don’t want to input the password again and again, just tick “Automatically unlock this key whenever I’m logged in” in the popup dialog.
In case it does NOT work, make sure your SSH server has “pubkeyauthentication” set to “yes”, and includes “.ssh/authorized_keys” as “authorizedkeysfile“, though they are usually default SSH daemon settings.
To identify, use command:
sudo sshd -T |grep -e "authorizedkeysfile" -e "pubkeyauthentication"

Step 3: Disable Password SSH Login in Server
If everything goes well, you can now disable password authentication to secure the SSH server, though this is OPTIONAL.
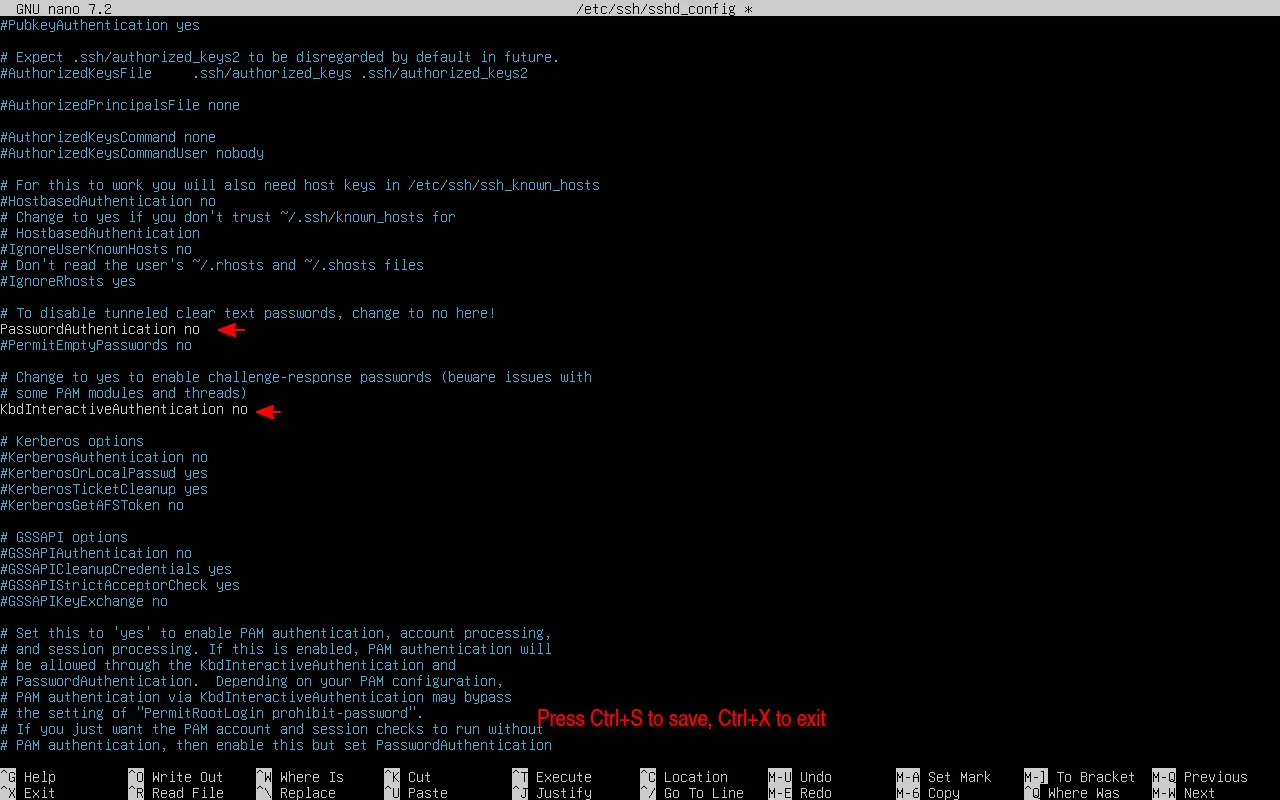
1. First, connect to your remote SSH server. Then, run command to edit the sshd daemon config file:
sudo nano /etc/ssh/sshd_config
When file opens, do:
- Find out “PasswordAuthentication yes” and set it to PasswordAuthentication no. Remove “#” if it has it at the beginning, or it won’t function.
- If KbdInteractiveAuthentication line enabled (without # at the beginning) set it to no. It is used for one time password login, which however also allows static password login unless you disabled from PAM settings.
- If ChallengeResponseAuthentication enabled, also set to no.
Finally, press Ctrl+S to save file, and Ctrl+X to exit.
2. Then, run command to list /etc/ssh/sshd_config.d/ directory content:
ls /etc/ssh/sshd_config.d/
The directory by default is empty! But any .conf file in that directory may override your SSH configurations, since they are load first in /etc/ssh/sshd_config.
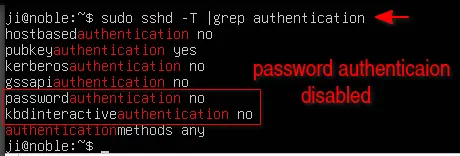
3. To verify your configuration, and check if there’s any errors, use command:
sudo sshd -T | grep authentication
4. To apply changes, run the 2 commands below one by one:
sudo systemctl daemon-reload

sudo systemctl restart ssh
For old Ubuntu 22.04 and earlier, you may run the command below instead to apply changes:
sudo systemctl status ssh.service